69 Nova. 5.3 L33 Turbo build. Billet S474, LOTS of pictures...
 05-07-2014, 01:07 PM
#61
Restricted User
Thread Starter

I'll post a couple pics when I get home to show you. Do you have the clamshell mounts or frame stands?
I know I haven't posted many updates recently, and in about a week I will show pretty good reason for the delay. On the other side, I did sell my old turbo setup so I now have permission to purchase the new one haha.
I know I haven't posted many updates recently, and in about a week I will show pretty good reason for the delay. On the other side, I did sell my old turbo setup so I now have permission to purchase the new one haha.
 05-07-2014, 04:16 PM
#62
Restricted User
Thread Starter
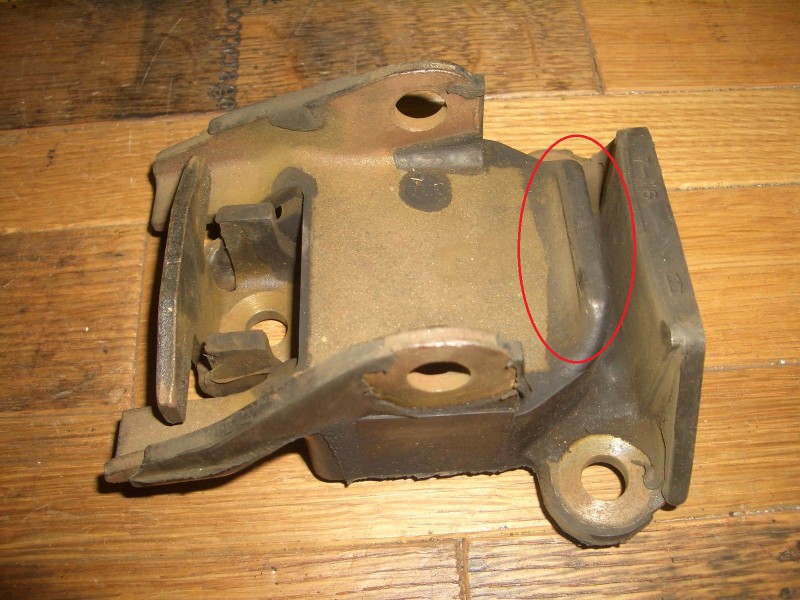
Here is the lip I had to grind to get the mounts to fit, otherwise the lip would sit on the stands and the motor wouldn't sit down into place. Got a die grinder and cut off the lip, and now the motor drops PERFECTLY into place every time. I don't have to do any wiggling to get it to line up.
I did have to flip the mounts upside down, though. The single bolt is now at the top, and the 2 bolts at the bottom. I just had to flip the mount adapters from side to side. The spacing was perfect this way and I didn't have to do anything else at all.
06-01-2014, 07:29 PM
#63
Restricted User
Thread Starter
A small info update.
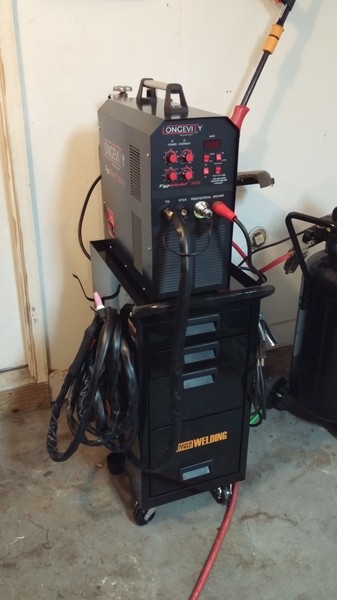
I picked up a Longevity TigWeld 200SX. Paid less than $900 for it shipped to my house. Its a 200 amp AC/DC Tig welder that can run off of either 110v or 220v. Somehow, I welded some 1/8" aluminum on a 110v using a 15 amp breaker and it welded like a BOSS. Everything about this welder is very very nice, and I'm honestly extremely impressed by a sub $1000 tig welder. I had to dish out $200 to rent a 120 cubic foot bottle of argon for 3 years but no biggie, I saved so much on the welder. Now I just need an affordable welding table. Wood benchtops catch fire pretty easy as it turns out.
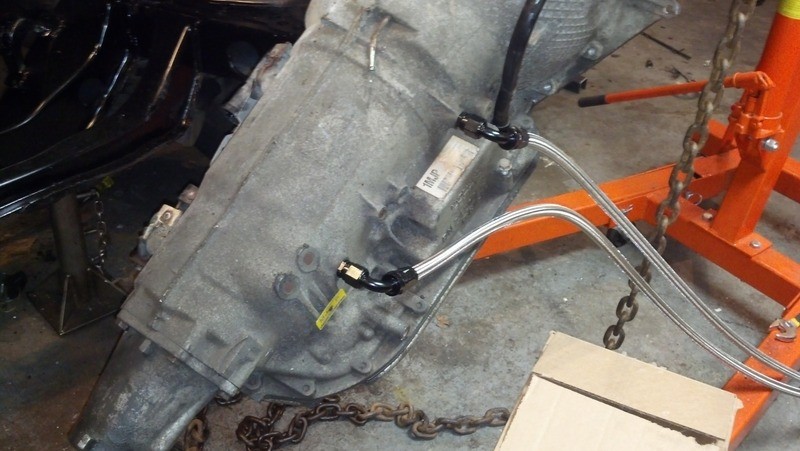
On top of this, my new transmission cooler is here. I've decided to use the Russell's -8 AN CPE fuel line for this cooler and send the rest of the lines and fittings back, so I can pick up some Fragola PTFE lines in its place. I'll be sending everything back to Summit in the next day or two since its within 90 days.
I've also decided to go ahead and do the suspension work on the car now. It'll be getting upper and lower control arms, Viking double adjustables front and rear, sway bar in the front, and possibly even a rack and pinion conversion. I'll leave the stock multi-leafs on for now and throw on my Caltracs. The handling should improve considerably. I have an explorer 8.8 rear end sitting around that I might swap in place of my 10-bolt. This would be a good time to do disks all around as well as adding a brake booster.
Now I just have to sell the old big block, or my SRT-4 to pay for it all.......
I picked up a Longevity TigWeld 200SX. Paid less than $900 for it shipped to my house. Its a 200 amp AC/DC Tig welder that can run off of either 110v or 220v. Somehow, I welded some 1/8" aluminum on a 110v using a 15 amp breaker and it welded like a BOSS. Everything about this welder is very very nice, and I'm honestly extremely impressed by a sub $1000 tig welder. I had to dish out $200 to rent a 120 cubic foot bottle of argon for 3 years but no biggie, I saved so much on the welder. Now I just need an affordable welding table. Wood benchtops catch fire pretty easy as it turns out.
On top of this, my new transmission cooler is here. I've decided to use the Russell's -8 AN CPE fuel line for this cooler and send the rest of the lines and fittings back, so I can pick up some Fragola PTFE lines in its place. I'll be sending everything back to Summit in the next day or two since its within 90 days.
I've also decided to go ahead and do the suspension work on the car now. It'll be getting upper and lower control arms, Viking double adjustables front and rear, sway bar in the front, and possibly even a rack and pinion conversion. I'll leave the stock multi-leafs on for now and throw on my Caltracs. The handling should improve considerably. I have an explorer 8.8 rear end sitting around that I might swap in place of my 10-bolt. This would be a good time to do disks all around as well as adding a brake booster.
Now I just have to sell the old big block, or my SRT-4 to pay for it all.......
06-18-2014, 06:49 AM
#65
Restricted User
Thread Starter
Small update. No major work done to the car but there is a little good news and a change of plans.
I no longer plan on racing the car in X235. It'll be primarily a street car with some weekend thrashes at the track. I don't want hack up the car or give up some of the luxuries like overdrive for the sake of slightly better ETs. The car will get a decent stereo and A/C. I still want the weight to be at a MAXIUMUM of 3500 lbs though, so there might be some lighter panels going on soon (bumpers and trunk lid). I'd still love to run an 8 second pass, but getting down deep into the 8s is no longer a priority.
Some of this came out of the fact that Skinnies old RX7 that once held the stock bottom end record has presented itself on a silver platter. The owner is willing to do an even trade for my 05 SRT-4. Even if the deal doesn't go through, I'll probably still use it as a lesson learned and get a dedicated drag car, fully set up as a roller, for primary track duty.
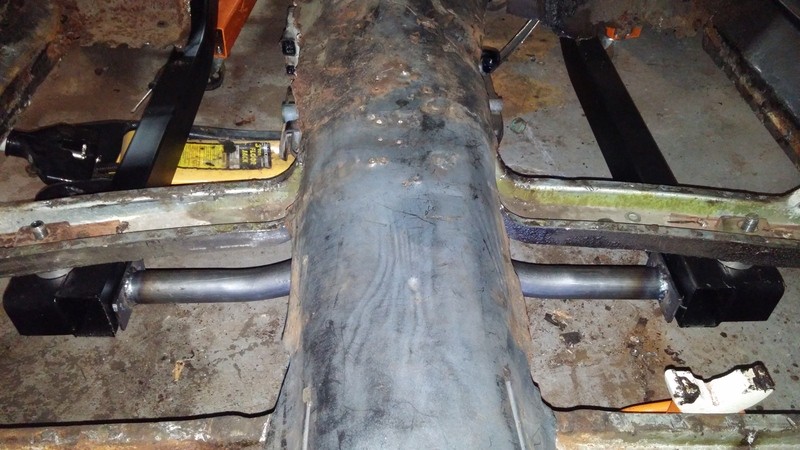
Also, I've made myself the most cost effective crossmember I possibly could for my 4L80e. I'll post up pics and info soon. I tried 2 other crossmembers and neither fit with my setback mounts, so I returned them. I didn't feel like paying $250+ for a crossmember that I was going to have to hack up and weld. This seems to be a MAJOR problem for the Nova/Camaro 4L80e crossmembers. None of them fit unless you want to spend $400 bucks.
Its made out of a single piece of square tubing with NO welding required. I did do a slight bit of welding on it for added strength, since the piece of tubing I used was free and was apparently made out of butter (Tractor Supply actually had them for $14 as well). The good news is that there is zero fab work. No measureing needed. Just a sharpie, a grinder (or any cutoff wheel), and a drill. The only tricky part is the installation, as the crossmember has to go in first and then the transmission on top of it, but it slides right in and I didn't have any issues.
Once I get it all bolted down and the transmission lines ran, I can start putting it all back together. I need to get the core support back on next so I can mount the radiator and fan and finish up the hotside (which I've already started on.... I'm always behind when it comes to updates here).
I picked up a set of control arms and sway bar for the front. I've also got some Viking double adjustable coilovers for the front and rear, and I'm really just waiting to see how the brakes are going to pan out. I'm putting AFX spindles on the front with corvette C6 calipers and rotors (base model, they're cheap), but haven't decided what to do about the rear brakes or the master cylinder/booster just yet. I can get brakes that will fit my 10-bolt, but I've been contemplating swapping it out for an 8.8 with a Truetrac and 33 spline axles. I still have some research to do..
I no longer plan on racing the car in X235. It'll be primarily a street car with some weekend thrashes at the track. I don't want hack up the car or give up some of the luxuries like overdrive for the sake of slightly better ETs. The car will get a decent stereo and A/C. I still want the weight to be at a MAXIUMUM of 3500 lbs though, so there might be some lighter panels going on soon (bumpers and trunk lid). I'd still love to run an 8 second pass, but getting down deep into the 8s is no longer a priority.
Some of this came out of the fact that Skinnies old RX7 that once held the stock bottom end record has presented itself on a silver platter. The owner is willing to do an even trade for my 05 SRT-4. Even if the deal doesn't go through, I'll probably still use it as a lesson learned and get a dedicated drag car, fully set up as a roller, for primary track duty.
Also, I've made myself the most cost effective crossmember I possibly could for my 4L80e. I'll post up pics and info soon. I tried 2 other crossmembers and neither fit with my setback mounts, so I returned them. I didn't feel like paying $250+ for a crossmember that I was going to have to hack up and weld. This seems to be a MAJOR problem for the Nova/Camaro 4L80e crossmembers. None of them fit unless you want to spend $400 bucks.
Its made out of a single piece of square tubing with NO welding required. I did do a slight bit of welding on it for added strength, since the piece of tubing I used was free and was apparently made out of butter (Tractor Supply actually had them for $14 as well). The good news is that there is zero fab work. No measureing needed. Just a sharpie, a grinder (or any cutoff wheel), and a drill. The only tricky part is the installation, as the crossmember has to go in first and then the transmission on top of it, but it slides right in and I didn't have any issues.
Once I get it all bolted down and the transmission lines ran, I can start putting it all back together. I need to get the core support back on next so I can mount the radiator and fan and finish up the hotside (which I've already started on.... I'm always behind when it comes to updates here).
I picked up a set of control arms and sway bar for the front. I've also got some Viking double adjustable coilovers for the front and rear, and I'm really just waiting to see how the brakes are going to pan out. I'm putting AFX spindles on the front with corvette C6 calipers and rotors (base model, they're cheap), but haven't decided what to do about the rear brakes or the master cylinder/booster just yet. I can get brakes that will fit my 10-bolt, but I've been contemplating swapping it out for an 8.8 with a Truetrac and 33 spline axles. I still have some research to do..
10-01-2014, 09:27 PM
#67
Restricted User
Thread Starter
Been a long time since I had an update.
Mainly because things have changed a bit.
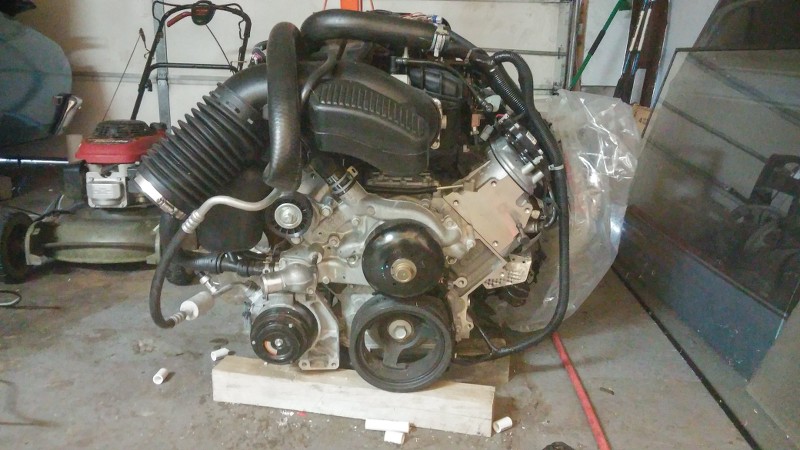
I traded off the big block and everything that I had for it for a brand new complete L92, which I turned around and sold for $4000, to help pay for some new stuff:
The first thing I decided to do was strip most of the car down for rust repair. I pulled the seats/carpet, most of the dash, fenders. etc.
Then after much much debate, I decided to upgrade the stock subframe and front suspension. This took a ton of research. There are lots of options out there, but I eventually settled on a cheaper, more DIY option from Checkered Racing.
Its a complete bolt-in subframe, tubular A-arms with QA1 spherical rod ends, Mustang II rack and pinion, screw in ball joints, QA1 Promastar adjustable coilovers. I opted for stock height spindles with 11" drilled/slotted rotors and custom aluminum calipers. I plan to eventually upgrade to 12" wilwood 2 piece rotors and 4 piston calipers.
I got all of this with weld-on subframe connectors for a little under $2500. The bare frame, with control arms, ball joints, and rack and pinion, weighs 129 lbs. I think with spindles/brakes, coilovers, and trans crossmember it was around 235. Not sure what the stock subframe weigh with everything, yet.

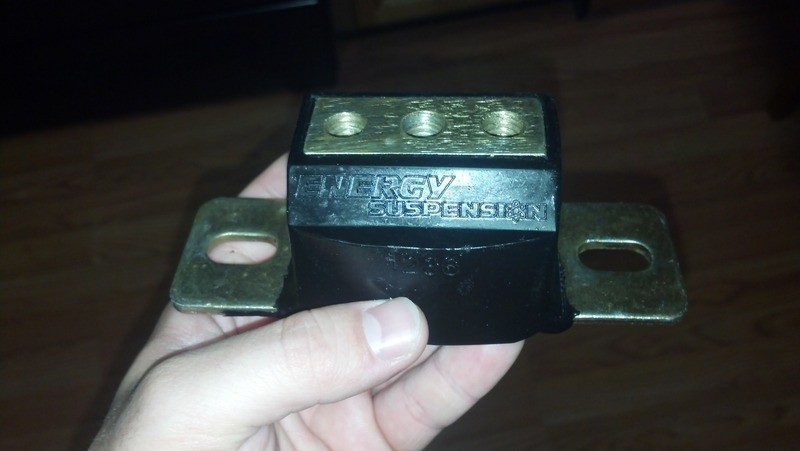
It isn't without flaws. I have to fab my own motor mount stands and steering shaft (although most parts are included), and deal with the issue of the body mounts and the coilovers. I also have to figure out what I want to paint/coat it with. I also asked them "PLEASE DO NOT DRILL OR WELD THE TRANS CROSSMEMBER, I WILL DO IT MYSELF". Of course, they drilled the flange on the crossmember and now I have to figure out what to do with it since the 4-bolt pattern on it doesn't match up with 3-bolt Energy trans mount.
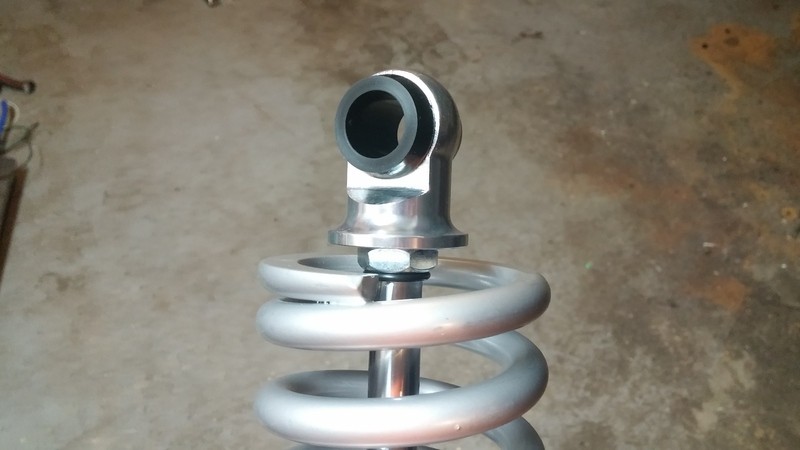
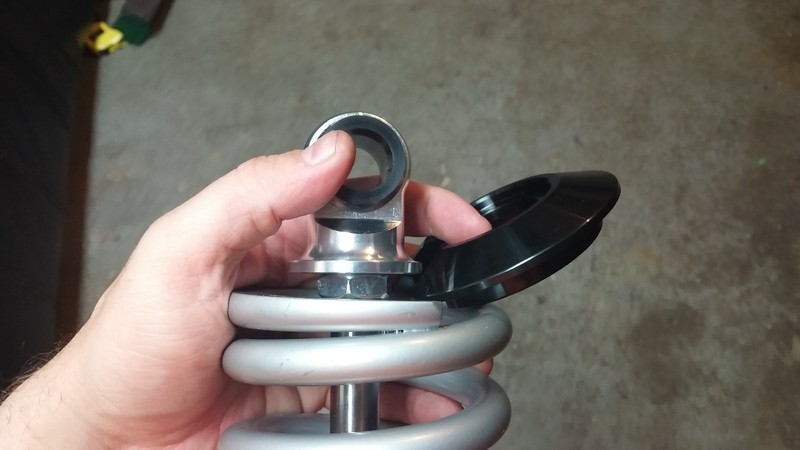
The coilovers were drop shipped, they didn't have them in stock when I ordered the frame. When I get them, I notice that I can't put them together yet because the springs are just a bit too long. This is the recommended spring for these coilovers, but I can't fit the cap on without compressing the springs a bit.
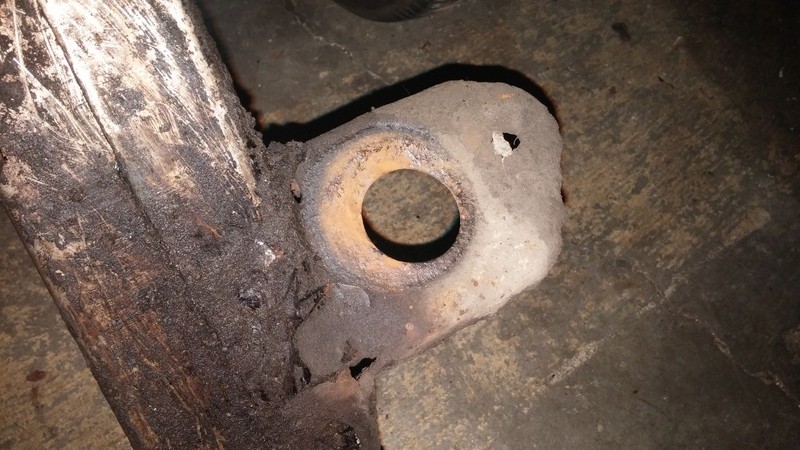
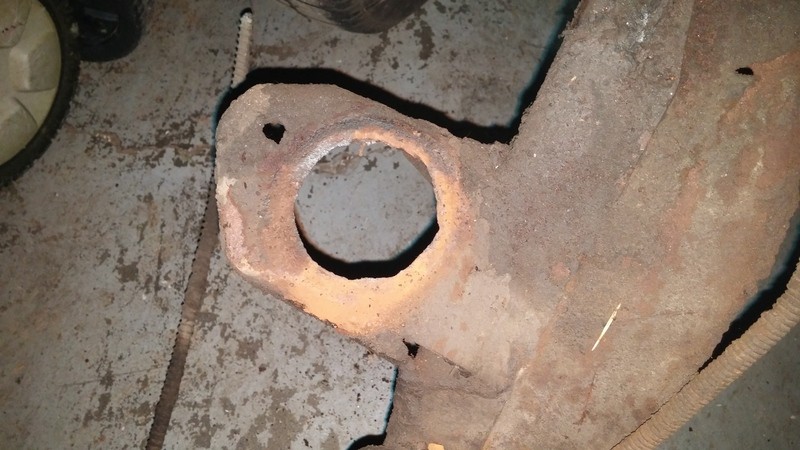
The next issue is the body mounts. The bushings were completely rotted out of my stock subframe. Rotted to the point where on had pulled through the subframe and it wasn't actually bolted to the car there anymore. They were falling apart. Unfortunately Checkered Racing doesn't make this very easy to work around, either. They don't give you new bolts to use, or washers. The subframe isn't setup to use stock style mounts, and the ones they give you are.... crap.
The subframe itself it setup with slotted holes to help with alignment, but they aren't any wider than the actual bolts that hold them on so you can't use a stock style sleeved bushing. There goes my idea for $55 poly Energy Suspension bushings.
Here is the condition of the stock mounting spots on the old frame, and the smaller, slotted versions on the new subframe.
And here are the old bushings vs the ones that Checkered Racing sent.
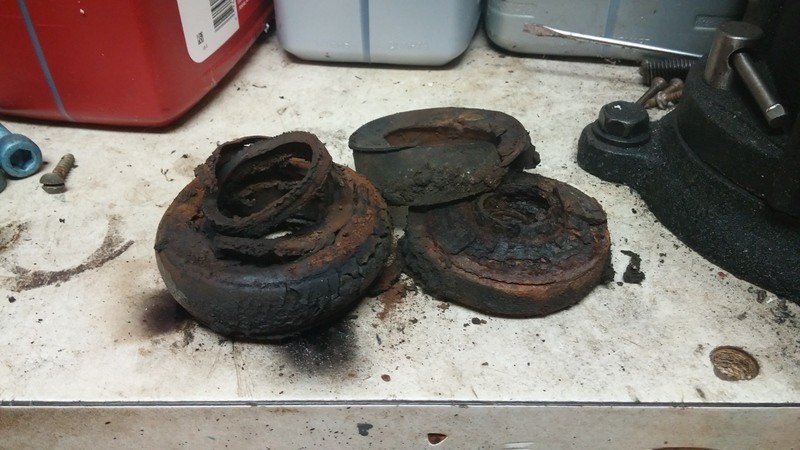

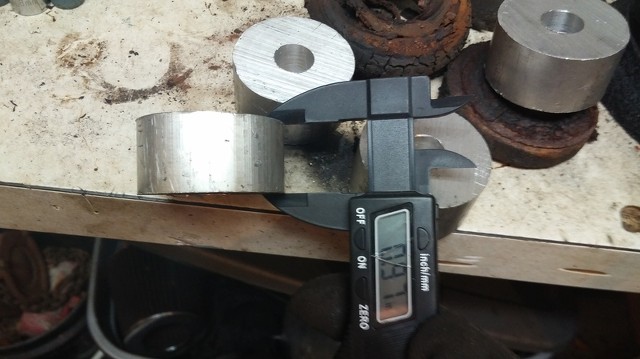
So I didn't want to use solid bushings because this is primarily a street car. The issue gets a little worse when you start to look at the horrible cut quality on these bushings. They need cleaned with a file and/or grinder. They're also cut crooked. This is two sides of a single bushing:

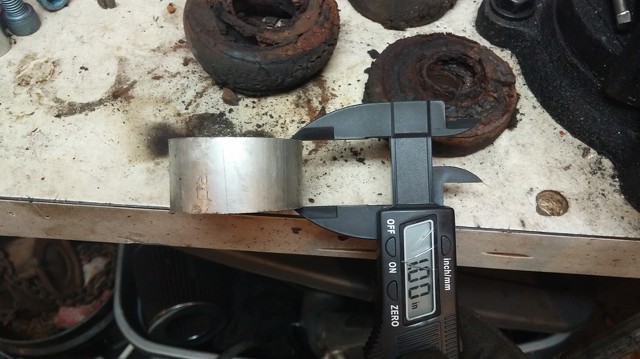
And the measurement of another bushing. The first one is the only one cut completely crooked. The rest are a little straighter. However, they are ALL DIFFERENT SIZES.
I haven't really decided how to tackle this yet. I either drill out the new frame to accept the Energy Suspension bushings, or I figure out a way to use the un-sleeved versions.
Mainly because things have changed a bit.
I traded off the big block and everything that I had for it for a brand new complete L92, which I turned around and sold for $4000, to help pay for some new stuff:
The first thing I decided to do was strip most of the car down for rust repair. I pulled the seats/carpet, most of the dash, fenders. etc.
Then after much much debate, I decided to upgrade the stock subframe and front suspension. This took a ton of research. There are lots of options out there, but I eventually settled on a cheaper, more DIY option from Checkered Racing.
Its a complete bolt-in subframe, tubular A-arms with QA1 spherical rod ends, Mustang II rack and pinion, screw in ball joints, QA1 Promastar adjustable coilovers. I opted for stock height spindles with 11" drilled/slotted rotors and custom aluminum calipers. I plan to eventually upgrade to 12" wilwood 2 piece rotors and 4 piston calipers.
I got all of this with weld-on subframe connectors for a little under $2500. The bare frame, with control arms, ball joints, and rack and pinion, weighs 129 lbs. I think with spindles/brakes, coilovers, and trans crossmember it was around 235. Not sure what the stock subframe weigh with everything, yet.
It isn't without flaws. I have to fab my own motor mount stands and steering shaft (although most parts are included), and deal with the issue of the body mounts and the coilovers. I also have to figure out what I want to paint/coat it with. I also asked them "PLEASE DO NOT DRILL OR WELD THE TRANS CROSSMEMBER, I WILL DO IT MYSELF". Of course, they drilled the flange on the crossmember and now I have to figure out what to do with it since the 4-bolt pattern on it doesn't match up with 3-bolt Energy trans mount.
The coilovers were drop shipped, they didn't have them in stock when I ordered the frame. When I get them, I notice that I can't put them together yet because the springs are just a bit too long. This is the recommended spring for these coilovers, but I can't fit the cap on without compressing the springs a bit.
The next issue is the body mounts. The bushings were completely rotted out of my stock subframe. Rotted to the point where on had pulled through the subframe and it wasn't actually bolted to the car there anymore. They were falling apart. Unfortunately Checkered Racing doesn't make this very easy to work around, either. They don't give you new bolts to use, or washers. The subframe isn't setup to use stock style mounts, and the ones they give you are.... crap.
The subframe itself it setup with slotted holes to help with alignment, but they aren't any wider than the actual bolts that hold them on so you can't use a stock style sleeved bushing. There goes my idea for $55 poly Energy Suspension bushings.
Here is the condition of the stock mounting spots on the old frame, and the smaller, slotted versions on the new subframe.
And here are the old bushings vs the ones that Checkered Racing sent.
So I didn't want to use solid bushings because this is primarily a street car. The issue gets a little worse when you start to look at the horrible cut quality on these bushings. They need cleaned with a file and/or grinder. They're also cut crooked. This is two sides of a single bushing:
And the measurement of another bushing. The first one is the only one cut completely crooked. The rest are a little straighter. However, they are ALL DIFFERENT SIZES.
I haven't really decided how to tackle this yet. I either drill out the new frame to accept the Energy Suspension bushings, or I figure out a way to use the un-sleeved versions.
Last edited by JoeNova; 10-01-2014 at 10:03 PM.
10-01-2014, 09:39 PM
#68
Restricted User
Thread Starter
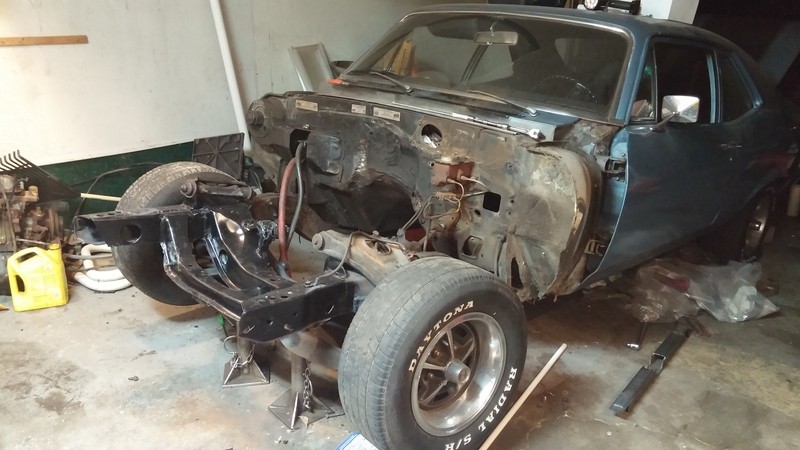
Moving on... I'm cutting out a ton of sheet metal that is rusted out and replacing it with new stuff.
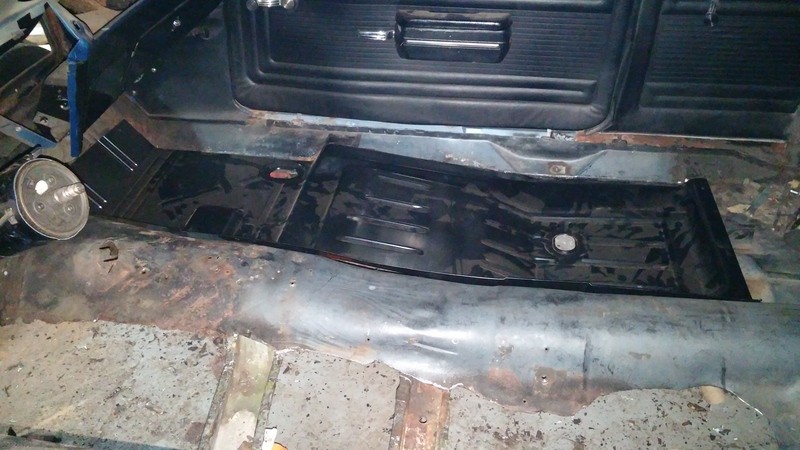
I decided to do the floors, and something about the firewall. Most of the car is rather solid, and I'm not going to fix those problems until I decide to paint the car because it would require stripping the paint and patching several areas.
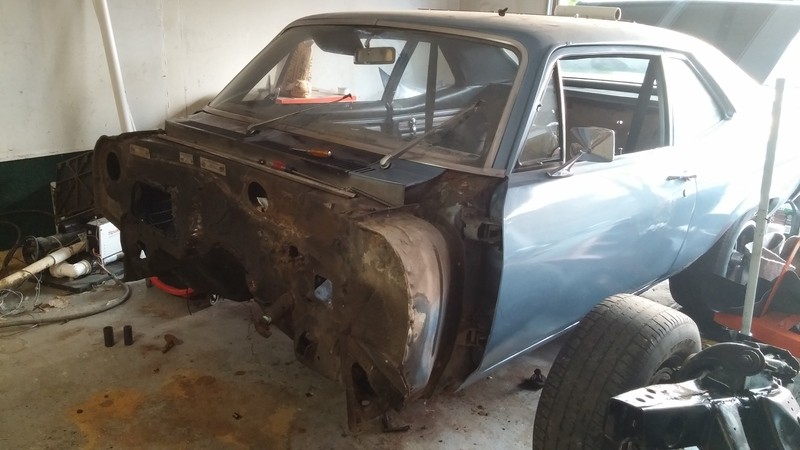
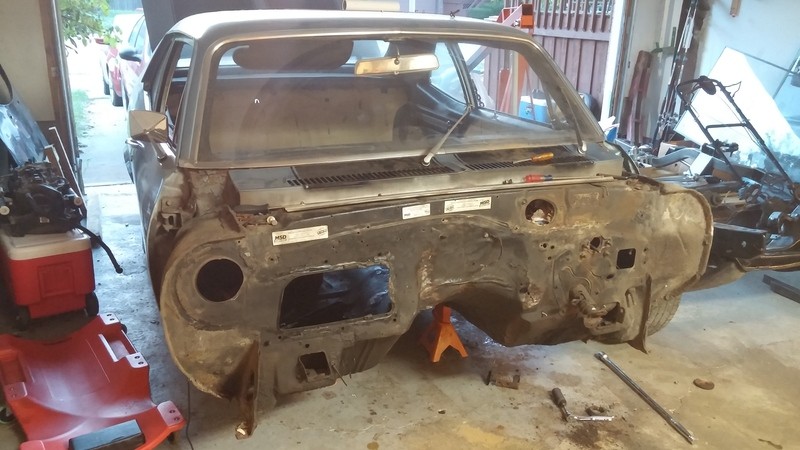
This is how the car is sitting now:
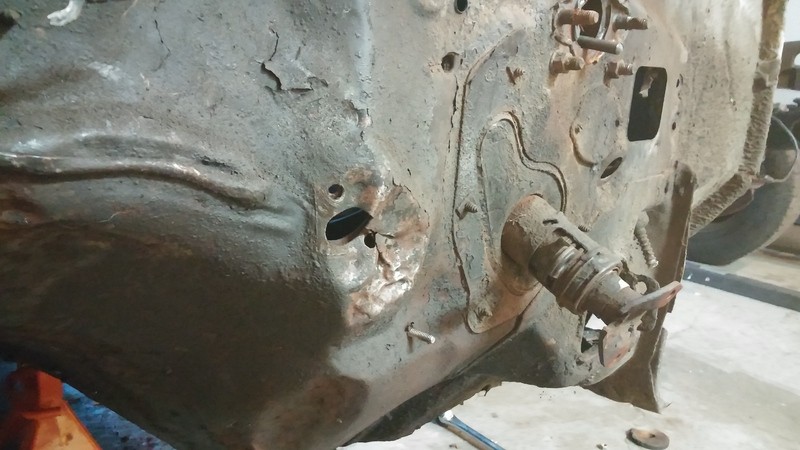
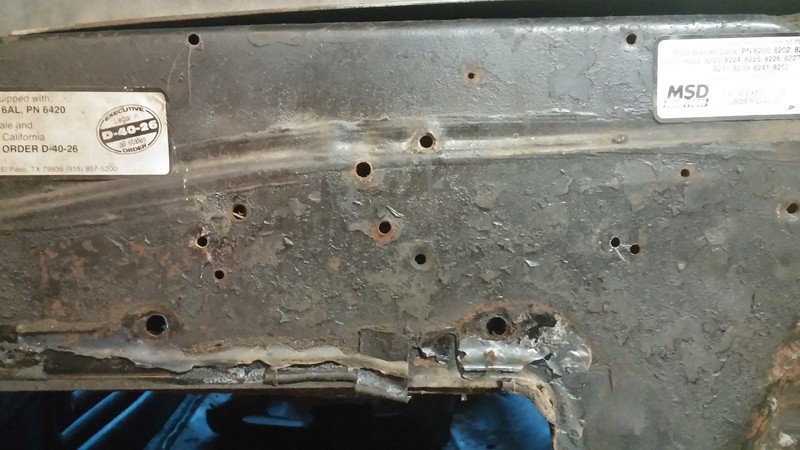
The condition of the firewall his horrible. I think I'm going to cut a lot of it out and weld in flat sheets of steel to smooth it out a bit. I'm also going to be going with a vintage air unit in the future and you can get a smooth firewall kit that doesn't have any firewall attachment points, so you can close off all of the holes in the firewall. Mine has some major spots that need filled/repaired. It looks like it was used for target practice at one point (kidding of course).
Sadly, what I found under the carpet was just as bad. Both of the front seat tubs have been patched/repaired.
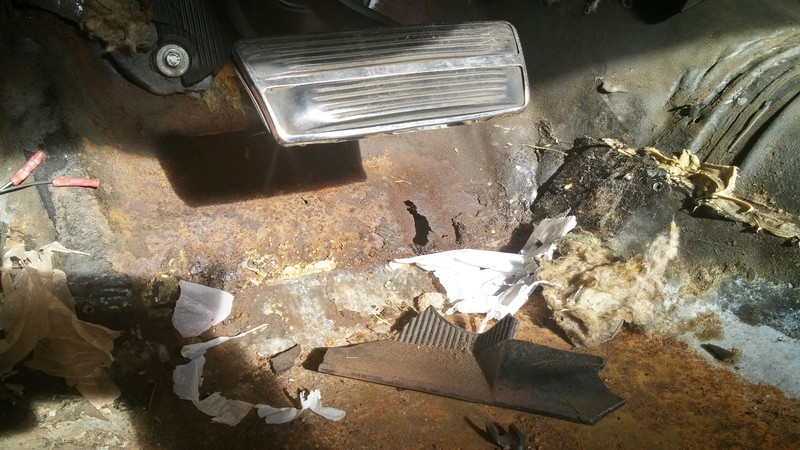

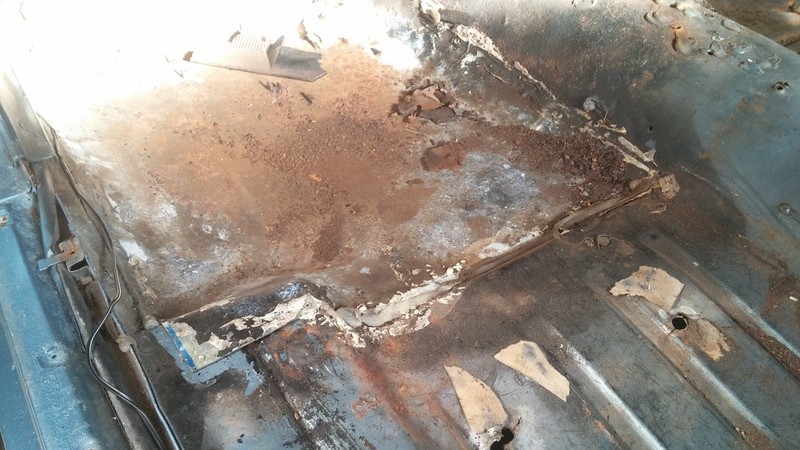
That last one is actually a patch that is sitting on top of and riveted to the rusted out floor underneath. It pops up and down loudly when you put some weight on it.
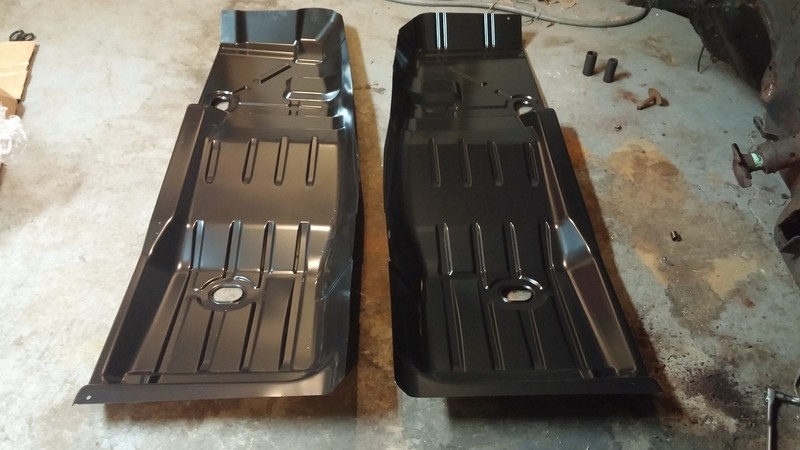
I ordered 2 new floor pans from ebay for a decent price:
http://www.ebay.com/itm/330982494635?_trksid=p2059210.m2749.l2649&ssPageName=STRK%3AMEBIDX%3AIT
I'm going to MIG weld them in, grind them smooth, and strip the rest of the floor. I'll probably coat it with a self-etching primer and a cheap top-coat before covering the entire floor in some sort of sound deadener. (Any budget minded suggestions would be great). As for the firewall, I'll probably order sheets from a local supply store and cut out patches of what I need and go over the rest with filler. The subframe and firewall will likely be coated with something like POR15 or Chassis Saver in matte black.
I'm also considering mini-tubbing it at this point too. I can fit a 275/40/18 under the stock tubs, but I've been eyeing some very nice 295/45/17 Mickey Thompson drag radials for a while.
I decided to do the floors, and something about the firewall. Most of the car is rather solid, and I'm not going to fix those problems until I decide to paint the car because it would require stripping the paint and patching several areas.
This is how the car is sitting now:
The condition of the firewall his horrible. I think I'm going to cut a lot of it out and weld in flat sheets of steel to smooth it out a bit. I'm also going to be going with a vintage air unit in the future and you can get a smooth firewall kit that doesn't have any firewall attachment points, so you can close off all of the holes in the firewall. Mine has some major spots that need filled/repaired. It looks like it was used for target practice at one point (kidding of course).
Sadly, what I found under the carpet was just as bad. Both of the front seat tubs have been patched/repaired.
That last one is actually a patch that is sitting on top of and riveted to the rusted out floor underneath. It pops up and down loudly when you put some weight on it.
I ordered 2 new floor pans from ebay for a decent price:
http://www.ebay.com/itm/330982494635?_trksid=p2059210.m2749.l2649&ssPageName=STRK%3AMEBIDX%3AIT
I'm going to MIG weld them in, grind them smooth, and strip the rest of the floor. I'll probably coat it with a self-etching primer and a cheap top-coat before covering the entire floor in some sort of sound deadener. (Any budget minded suggestions would be great). As for the firewall, I'll probably order sheets from a local supply store and cut out patches of what I need and go over the rest with filler. The subframe and firewall will likely be coated with something like POR15 or Chassis Saver in matte black.
I'm also considering mini-tubbing it at this point too. I can fit a 275/40/18 under the stock tubs, but I've been eyeing some very nice 295/45/17 Mickey Thompson drag radials for a while.
Last edited by JoeNova; 10-01-2014 at 09:47 PM.
10-01-2014, 09:43 PM
#69
Restricted User
Thread Starter
Lastly, the engine/trans are back apart. I got some fittings to install the trans cooler lines, and the engine is back on the stand. I'm going to pull out the pistons, install new rings (properly gapped), and toss some new rod bolts back in it while I have the chance, along with LS9 head gaskets.
I also ordered a complete hotside from KB Racing a few weeks ago, so that should be on the way soon. I had him NOT weld on the wastegate tube/flange so that I can locate it somewhere in the turbo manifold itself for better flow. I hear that the stock wastegate location on those has a hell of a time bleeding off boost since its technically only venting exhaust gases out from the driver's side.
If anyone is in the Cincy area in Ohio, I'd LOVE a helping hand (someone who knows what they're doing). Otherwise I'll be doing 100% of the work myself. I'll make sure beer and food are covered .
.
I also ordered a complete hotside from KB Racing a few weeks ago, so that should be on the way soon. I had him NOT weld on the wastegate tube/flange so that I can locate it somewhere in the turbo manifold itself for better flow. I hear that the stock wastegate location on those has a hell of a time bleeding off boost since its technically only venting exhaust gases out from the driver's side.
If anyone is in the Cincy area in Ohio, I'd LOVE a helping hand (someone who knows what they're doing). Otherwise I'll be doing 100% of the work myself. I'll make sure beer and food are covered
. 
 10-09-2014, 06:46 PM
#71
Restricted User
Thread Starter
I've already cut out the floors and have the new ones sitting in the garage. The only problem is the floor is spot welded to the crossbraces underneath, and its so beat up that I can't tell where the spot welds are to drill them out. I'm having trouble removing the last pieces of the floor because of this.
This is becoming more of a restoration project than a LS swap/turbo build. I might have this moved to the conversions & hybrid section to be honest.
10-11-2014, 06:07 PM
#73
Restricted User
Thread Starter
I may take you up on that, but I was hoping to figure out a way to use poly mounts. I found some mounts that didn't come with alignment sleeves, but it seems like there would be some lateral flex if I used them.
 10-13-2014, 06:09 AM
#75
Restricted User
Thread Starter
Even with Heim joint control arms? I'm trying to keep the ride fairly comfortable. I thought that the solid subframe bushings would be a little harsh on the street.
If I won't notice, I don't see any reason to go with anything other than solids, then. Especially since they won't wear out. I just don't want to use these crappy band-saw cut blocks I got from Checkered.
If I won't notice, I don't see any reason to go with anything other than solids, then. Especially since they won't wear out. I just don't want to use these crappy band-saw cut blocks I got from Checkered.
10-13-2014, 06:36 AM
#76
TECH Resident
iTrader: (2)

Join Date: Jun 2013
Location: Wichita, KS
Posts: 755
Likes: 0
Received 0 Likes
on
0 Posts
I don't have this information, but if someone could provide the dimensions for these mount locations, you could just drill out the mount pads to fit poly bushings. That's the route I'd take.or use your car's bolt spacing.
10-13-2014, 06:42 AM
#77
Restricted User
Thread Starter
To be honest I'll probably use the solid bushings to get the engine and trans fit and the mounts fabbed up. I have to custom fab some mount stands for this subframe and I'm not too terribly worried about drilling holes in it just yet. I'll try solid mounts for now. If the ride is a little too harsh I'll go to Poly. I won't know until I try, right?
01-18-2015, 09:43 PM
#78
Restricted User
Thread Starter
So it has been a while since an update because I've been busy and haven't had a lot of time to work on the car, but I've been hard at work for the last 3 or 4 days so I have something to show for it.
When I last left off, the floors were looking ugly and I had just got my new suspension.
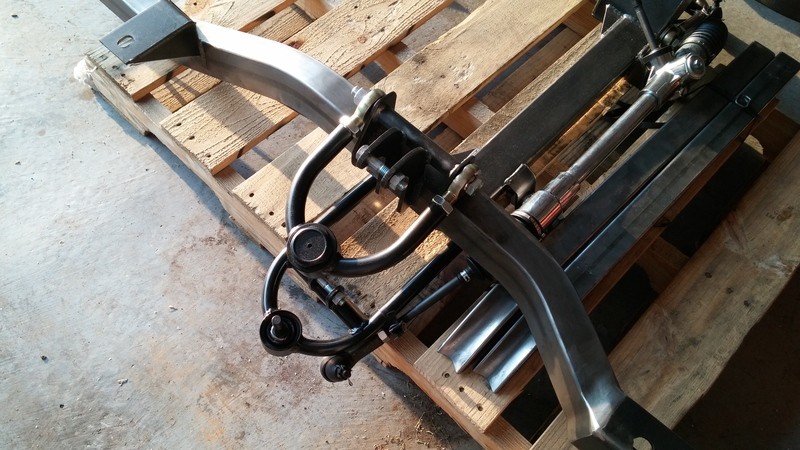
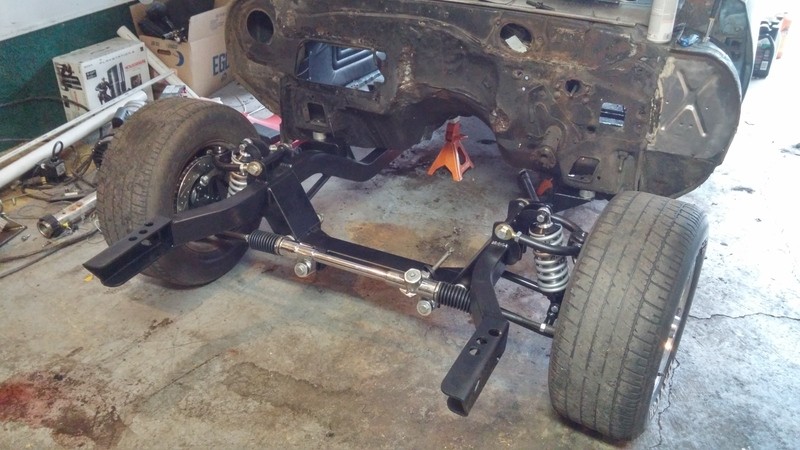
Here, I got it all put together and painted, ready to go.

I went ahead and fit it to the car, but my front tires are too small to fit over the new brakes so I can only get one lug on them. It was enough to roll the frame underneath of the car and get it bolted in.
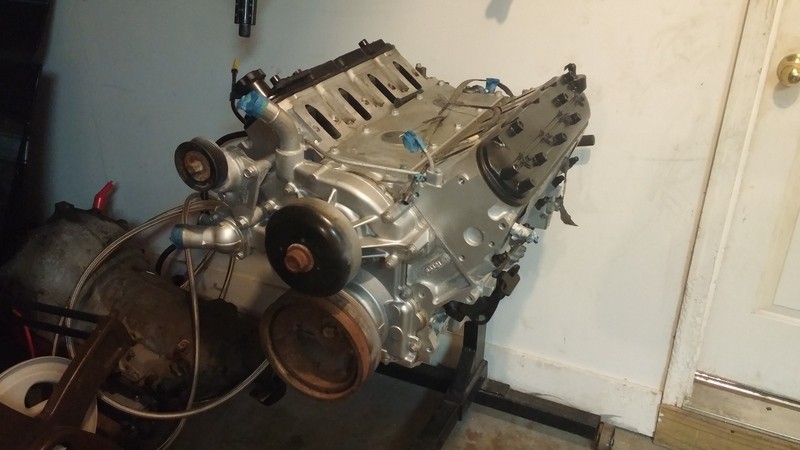
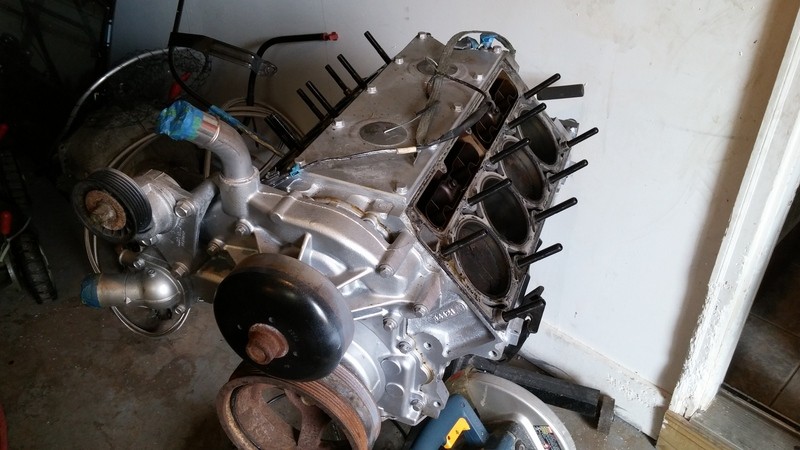
I pulled my 5.3 apart to replace some bad rod bearings, regap the rings, and replace the head gaskets.
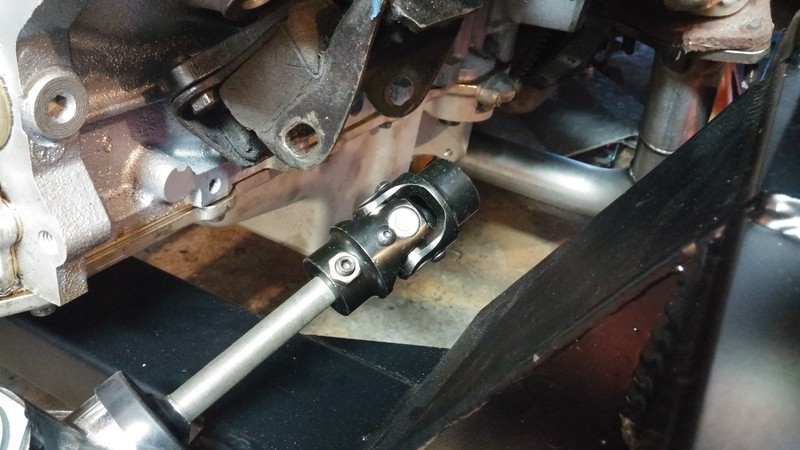
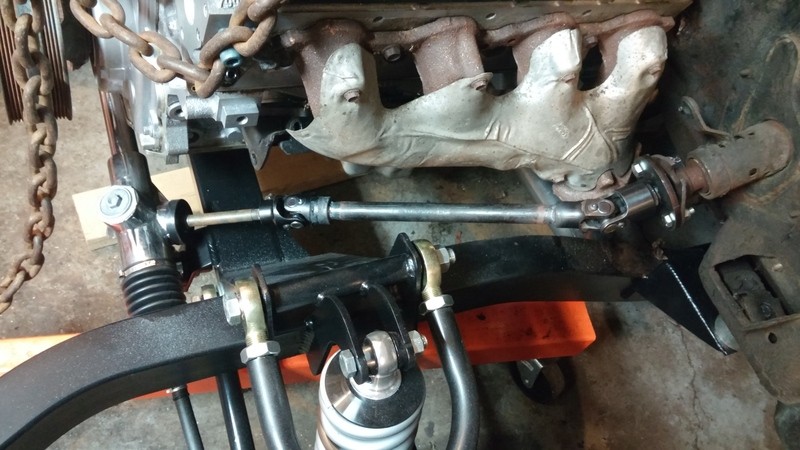
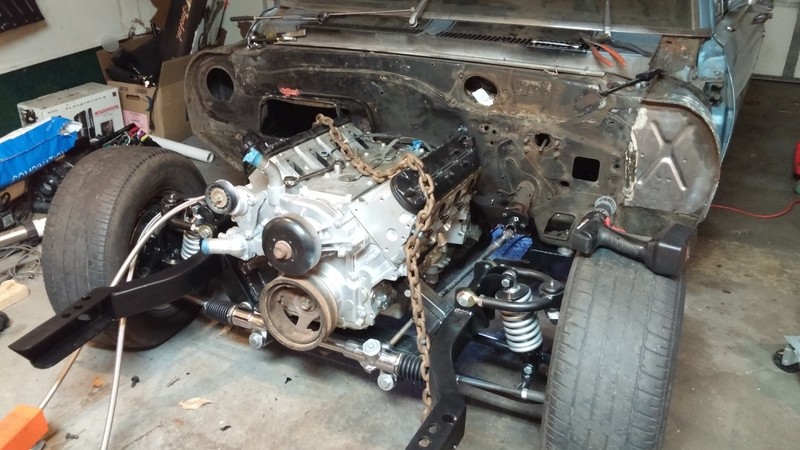
Afterwards, I hung the engine over the subframe and immediately noticed a problem. The steering shaft and U-joints pass a couple of inches in front of the motor mount. I ended up needing to mount the engine an inch higher and more forward than I originally planned.
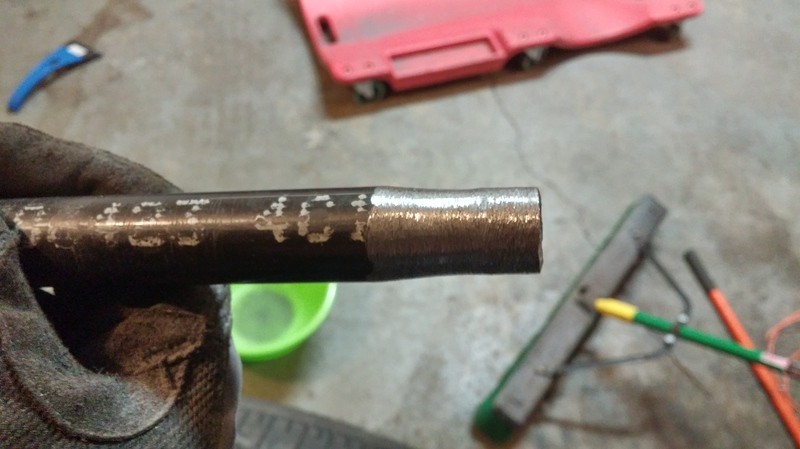
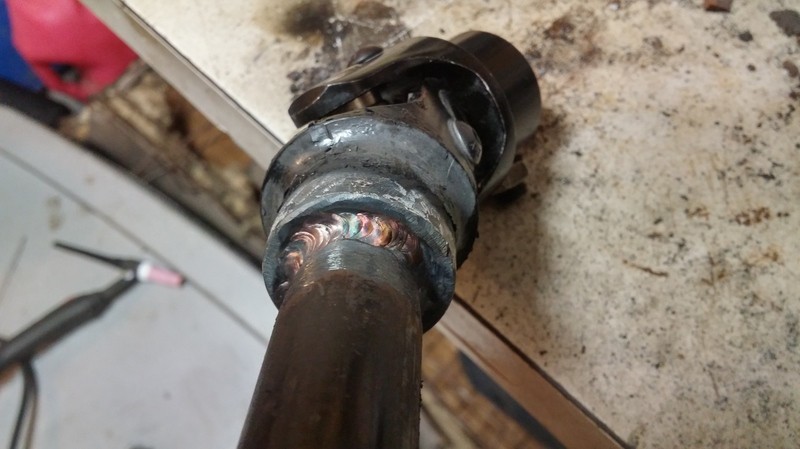
Seeing as how I couldn't find the steering shaft that came with the Checkered Racing front, I had to improvise. I grabbed some .85" rod at work and had to grind it down to .75 to fit inside of the U-joints. Then I welded them up.
For those of you that might want to do a rack conversion in your old Nova or Camaro, you're going to need these 2 pieces:
http://www.ebay.com/itm/310155605233?_trksid=p2059210.m2749.l2649&ssPageName=STRK%3AMEBIDX%3AIThttp://www.ebay.com/itm/331057723375?_trksid=p2059210.m2749.l2649&ssPageName=STRK%3AMEBIDX%3AIT
The U-joint you can get in D shaft or round shaft depending on how you want to set yours up. D-shaft you can basically bolt in, round shaft will usually be welded.
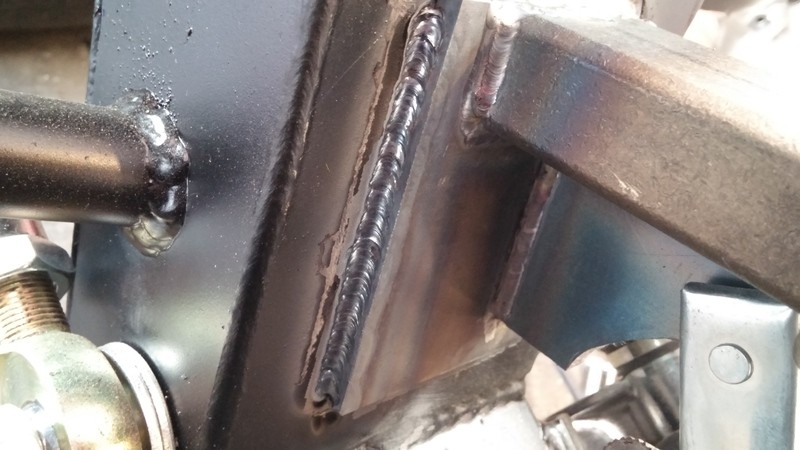
So then I started on my mounts. I have similar mounts for driver's and passenger's side, with the exception of a little clearancing on the driver side mount for the steering shaft. Note: This was my FIRST real experience TIG welding. I've had a TIG in the past that I did some tack welding/spot welding with and maybe some very very minor welding, but this was my first major experience doing fabrication work with a TIG. everything I've done before was either stick/MIG.
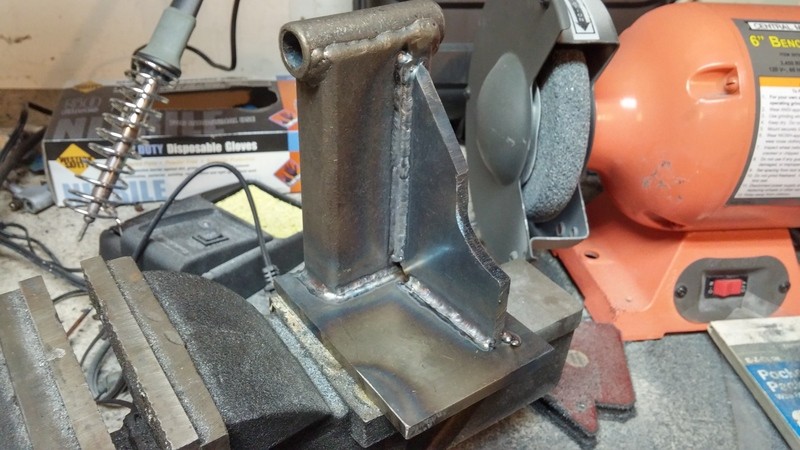
I had to grind the paint off of my new frame and weld these on. Turns out bolting them on like I had originally intended wasn't going to work as planned. So, I tried 'walking' the cup with the TIG without using any filler rod to see how it would turn out. Not bad for about 3 hours worth of TIG experience.
So I ended up welding in the crossmember. Weirdest thing, normally the crossmember has a bow in the middle of it where it curves downward to make room for the tailshaft and mount. Mine curves UP, not exactly sure how that worked out, but the trans output angle is at 3.5 degrees so I guess its right.
And finally, engine and trans mounted in!
When I last left off, the floors were looking ugly and I had just got my new suspension.
Here, I got it all put together and painted, ready to go.
I went ahead and fit it to the car, but my front tires are too small to fit over the new brakes so I can only get one lug on them. It was enough to roll the frame underneath of the car and get it bolted in.
I pulled my 5.3 apart to replace some bad rod bearings, regap the rings, and replace the head gaskets.
Afterwards, I hung the engine over the subframe and immediately noticed a problem. The steering shaft and U-joints pass a couple of inches in front of the motor mount. I ended up needing to mount the engine an inch higher and more forward than I originally planned.
Seeing as how I couldn't find the steering shaft that came with the Checkered Racing front, I had to improvise. I grabbed some .85" rod at work and had to grind it down to .75 to fit inside of the U-joints. Then I welded them up.
For those of you that might want to do a rack conversion in your old Nova or Camaro, you're going to need these 2 pieces:
http://www.ebay.com/itm/310155605233?_trksid=p2059210.m2749.l2649&ssPageName=STRK%3AMEBIDX%3AIThttp://www.ebay.com/itm/331057723375?_trksid=p2059210.m2749.l2649&ssPageName=STRK%3AMEBIDX%3AIT
The U-joint you can get in D shaft or round shaft depending on how you want to set yours up. D-shaft you can basically bolt in, round shaft will usually be welded.
So then I started on my mounts. I have similar mounts for driver's and passenger's side, with the exception of a little clearancing on the driver side mount for the steering shaft. Note: This was my FIRST real experience TIG welding. I've had a TIG in the past that I did some tack welding/spot welding with and maybe some very very minor welding, but this was my first major experience doing fabrication work with a TIG. everything I've done before was either stick/MIG.
I had to grind the paint off of my new frame and weld these on. Turns out bolting them on like I had originally intended wasn't going to work as planned. So, I tried 'walking' the cup with the TIG without using any filler rod to see how it would turn out. Not bad for about 3 hours worth of TIG experience.
So I ended up welding in the crossmember. Weirdest thing, normally the crossmember has a bow in the middle of it where it curves downward to make room for the tailshaft and mount. Mine curves UP, not exactly sure how that worked out, but the trans output angle is at 3.5 degrees so I guess its right.
And finally, engine and trans mounted in!
01-18-2015, 10:02 PM
#79
Restricted User
Thread Starter
Now onto the goodies. I've gathered up quite a few things over the last month or so.
First, the new floor pans. I've already cut out most of the old floor, but actually finding someone to give me a hand welding these things in is either really hard or really expensive. The cheapest quote I've gotten so far was $600 to weld them in.
I've been doing all of my TIG welding with a Longevity 200sx. I must say this is the nicest welder I've owned and I've had Hobart/Miller welders in the past. Its extremely simple, VERY easy to use, with great results. This one is AC and DC capable and runs off of either 110v or 220v. On the 110v outlet with a 15a breaker in my garage, I was able to weld quarter inch thick mild steel for my motor mounts and trans crossmember. It welds extremely smooth and was very very easy to learn with. I picked up a Harbor Freight welding cart for $170 and I have absolutely 0 complaints. I have $1000 in the whole setup minus the bottle.
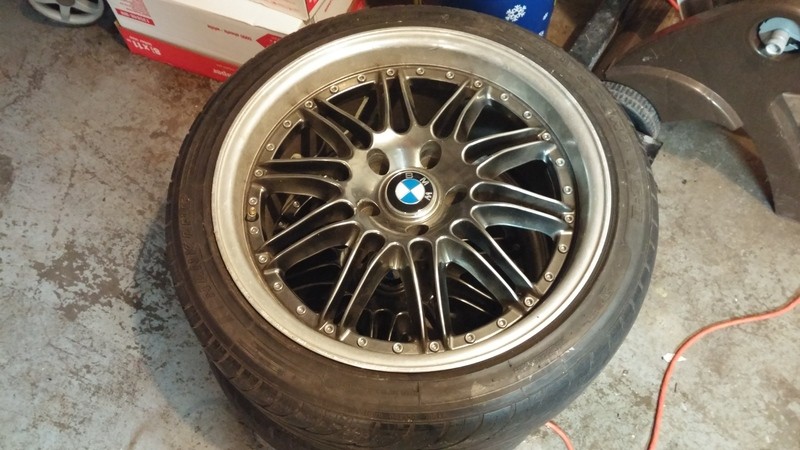
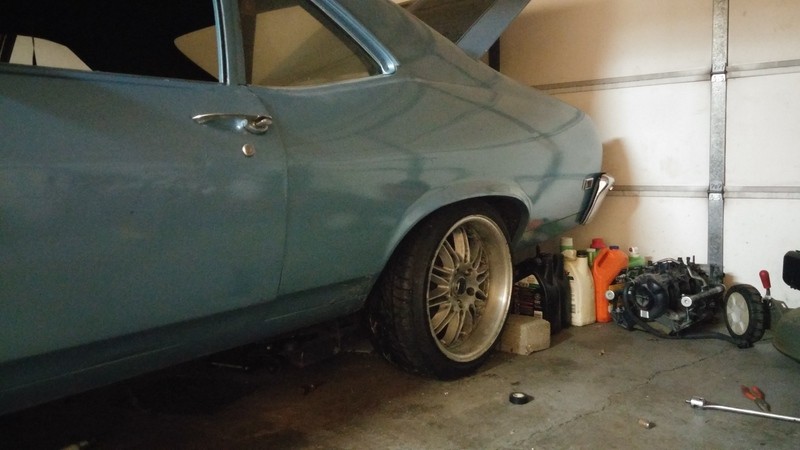
I also picked up a set of wheels on craigslist for CHEAP. 18x8 and 18x9.5. Came off of some guys project BMW (5x120 bolt pattern is basically the same as the 5x4.75 GM uses), and they just happened to be the exact backspacing I needed. He wanted $350 for the set with tires and I talked him down to $300 and he had to throw in a set of lug nuts. Unfortunately the guy had 235/40/18s on all 4, so the backs are stretched out WAY too far and look hideous. He also tried to paint them instead of leaking the stock powder coat on them, and then tried to strip it all, butchering it. Probably why they were so cheap.
Fronts don't look half bad:
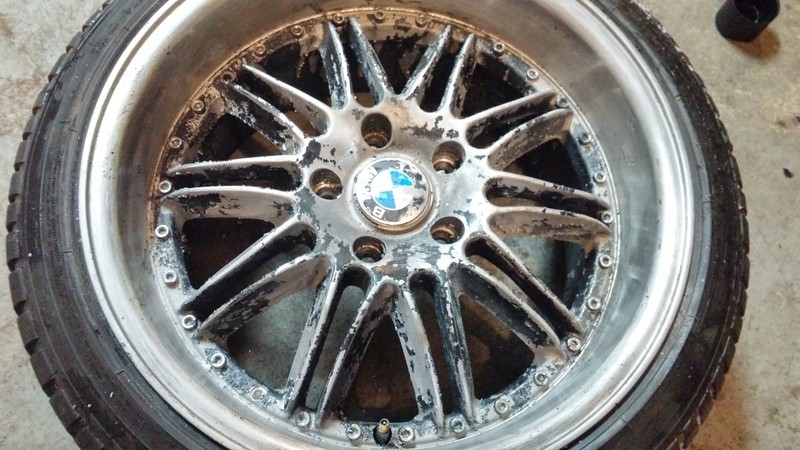
Rears have paint everywhere and need some work:
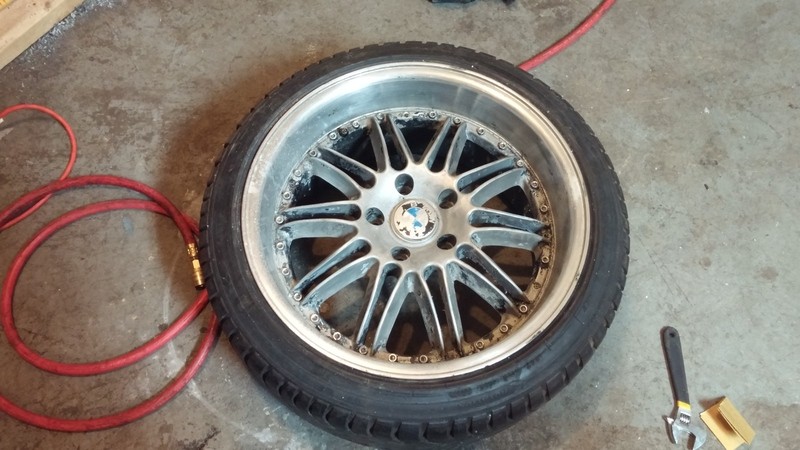
After A little work I got them somewhat clean. I'm going to paint the centers with that peel-off paint from Autozone so I can remove it with ease when the time comes.
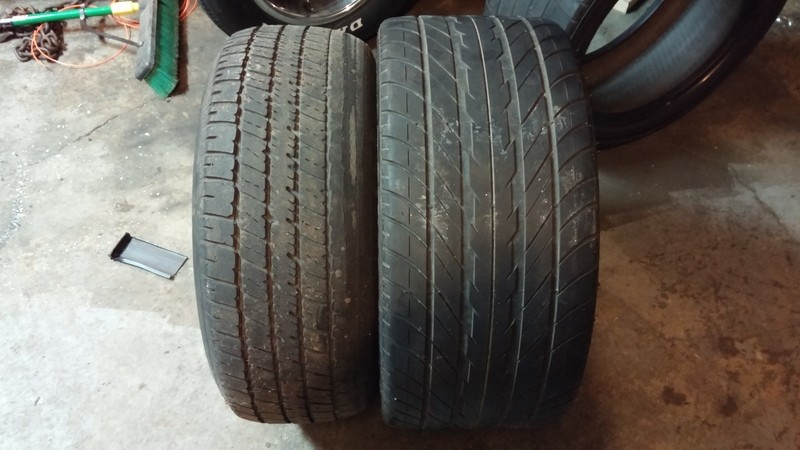
I also picked up a set of 275/40/18 Eagle F1 tires for the rear for $30. Here they are compared to the old rear wheels/tires. I still need to get them mounted on the rear wheels.
I also ditched the On3 76mm a while back and picked up this GT45 to use a mockup and base tune before I dish out money for a billet Borg Warner (I did have one for about a month and sold it locally to a guy that paid me to basically piece together his whole setup).
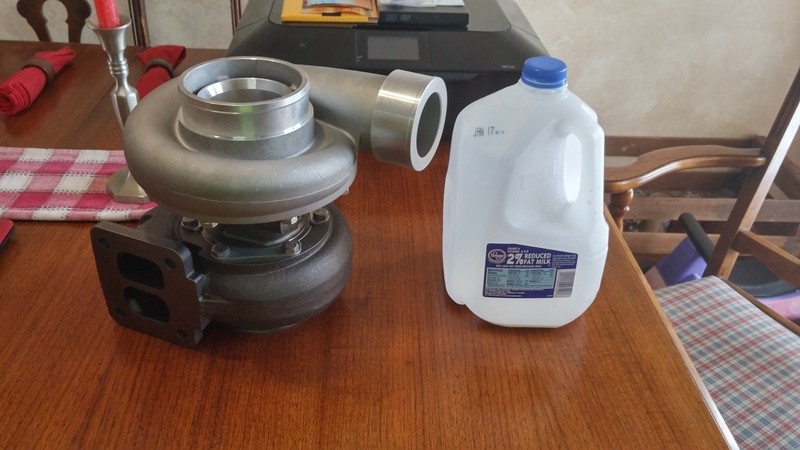
Squeeze performance sold me the oil feed/drain fittings, as well at the GT45 downpipe flange (A MUST IF YOU GET A GT45).
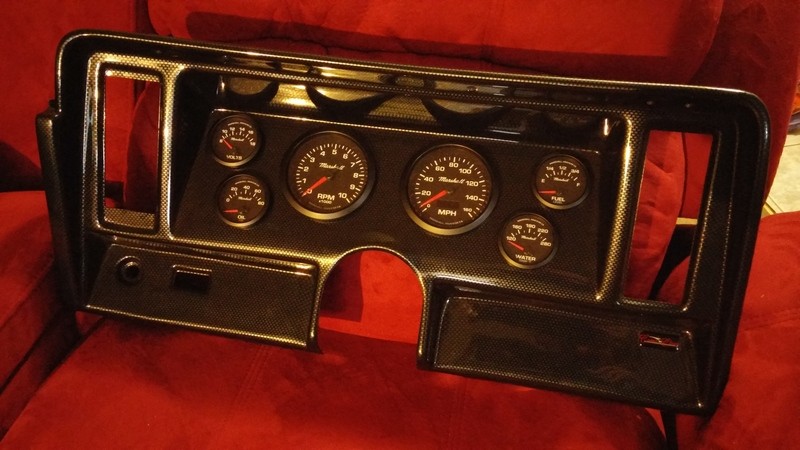
I also picked up a new gauge cluster for half price from someone who bought it and never used it. Looks decent with my gauges in it. Still have to figure out where I want to put the Boost gauge and Wideband.
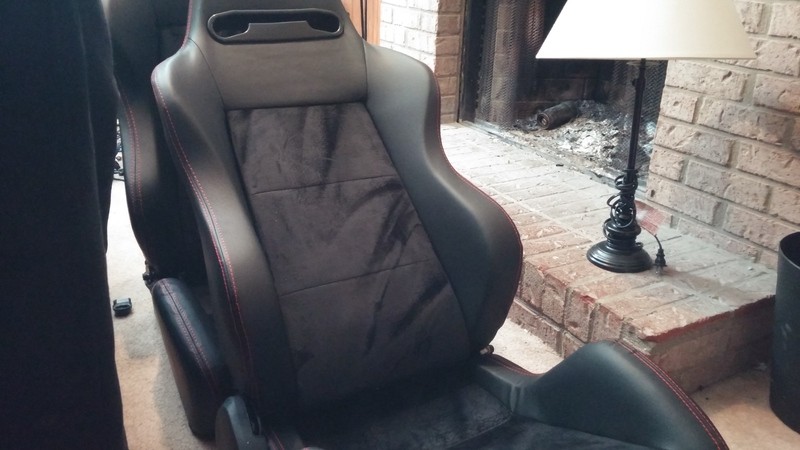
I picked up a set of seats from ebay. Black suede and leather. Red stitching. Sliders, brackets, the whole deal shipped for like $230. These things are actually VERY nice. I'm greatly surprised by the quality. They're the perfect width and extremely comfortable.

I'll let the goodies wrap up there. I get started on my rear suspension in a couple of days and I'll post updates on what else I've bought for the car. Lets just say my basement is completely full of boxes right now.
First, the new floor pans. I've already cut out most of the old floor, but actually finding someone to give me a hand welding these things in is either really hard or really expensive. The cheapest quote I've gotten so far was $600 to weld them in.
I've been doing all of my TIG welding with a Longevity 200sx. I must say this is the nicest welder I've owned and I've had Hobart/Miller welders in the past. Its extremely simple, VERY easy to use, with great results. This one is AC and DC capable and runs off of either 110v or 220v. On the 110v outlet with a 15a breaker in my garage, I was able to weld quarter inch thick mild steel for my motor mounts and trans crossmember. It welds extremely smooth and was very very easy to learn with. I picked up a Harbor Freight welding cart for $170 and I have absolutely 0 complaints. I have $1000 in the whole setup minus the bottle.
I also picked up a set of wheels on craigslist for CHEAP. 18x8 and 18x9.5. Came off of some guys project BMW (5x120 bolt pattern is basically the same as the 5x4.75 GM uses), and they just happened to be the exact backspacing I needed. He wanted $350 for the set with tires and I talked him down to $300 and he had to throw in a set of lug nuts. Unfortunately the guy had 235/40/18s on all 4, so the backs are stretched out WAY too far and look hideous. He also tried to paint them instead of leaking the stock powder coat on them, and then tried to strip it all, butchering it. Probably why they were so cheap.
Fronts don't look half bad:
Rears have paint everywhere and need some work:
After A little work I got them somewhat clean. I'm going to paint the centers with that peel-off paint from Autozone so I can remove it with ease when the time comes.
I also picked up a set of 275/40/18 Eagle F1 tires for the rear for $30. Here they are compared to the old rear wheels/tires. I still need to get them mounted on the rear wheels.
I also ditched the On3 76mm a while back and picked up this GT45 to use a mockup and base tune before I dish out money for a billet Borg Warner (I did have one for about a month and sold it locally to a guy that paid me to basically piece together his whole setup).
Squeeze performance sold me the oil feed/drain fittings, as well at the GT45 downpipe flange (A MUST IF YOU GET A GT45).
I also picked up a new gauge cluster for half price from someone who bought it and never used it. Looks decent with my gauges in it. Still have to figure out where I want to put the Boost gauge and Wideband.
I picked up a set of seats from ebay. Black suede and leather. Red stitching. Sliders, brackets, the whole deal shipped for like $230. These things are actually VERY nice. I'm greatly surprised by the quality. They're the perfect width and extremely comfortable.
I'll let the goodies wrap up there. I get started on my rear suspension in a couple of days and I'll post updates on what else I've bought for the car. Lets just say my basement is completely full of boxes right now.
01-18-2015, 10:16 PM
#80
Restricted User
Thread Starter
And here is what I did today (besides scraping glue off of the exhaust side of the heads before I put my manifolds back on).
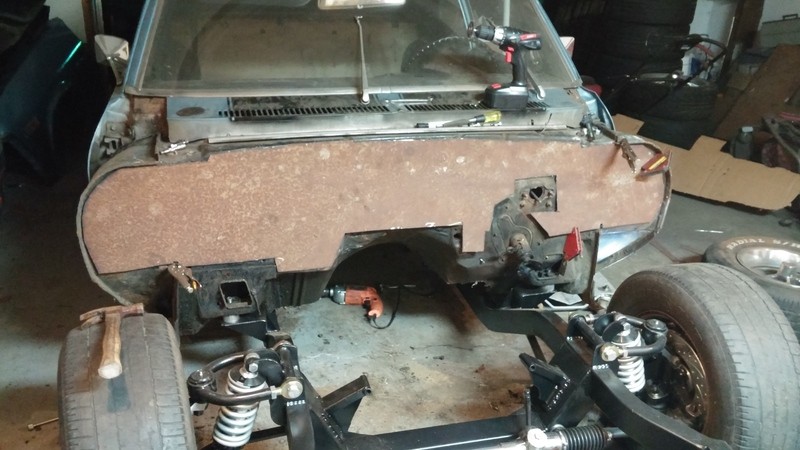
Someone gave me a free sheet of mild steel. Been sitting outside for a while. Lots of rust and bird poop. I bought a DA sander and lots of sanding pads to get it cleaned up for later, but here is my progress.
Made a rough cardboard template first.
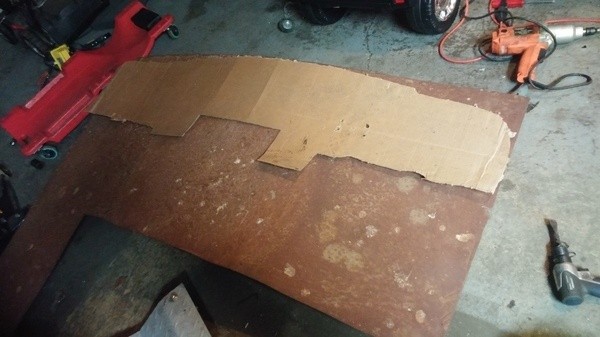
Cut out the bulk of the material and did a test-fit.
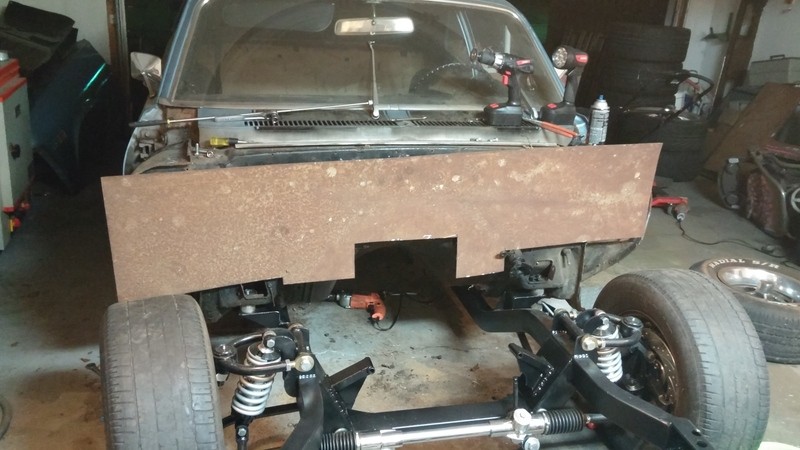
And after an hour of trimming/fitting, I finally have the finished piece. Tomorrow I get to hammer and cut the old firewall until everything lines up and matches up everywhere before I sand down this piece of sheet metal, tack weld it on, and then borrow a MIG and finish welding it before painting semi-gloss black to match the rest of the interior.
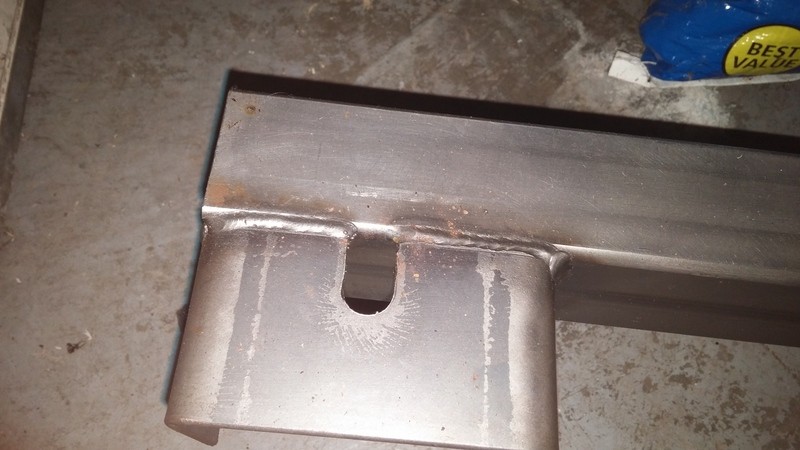
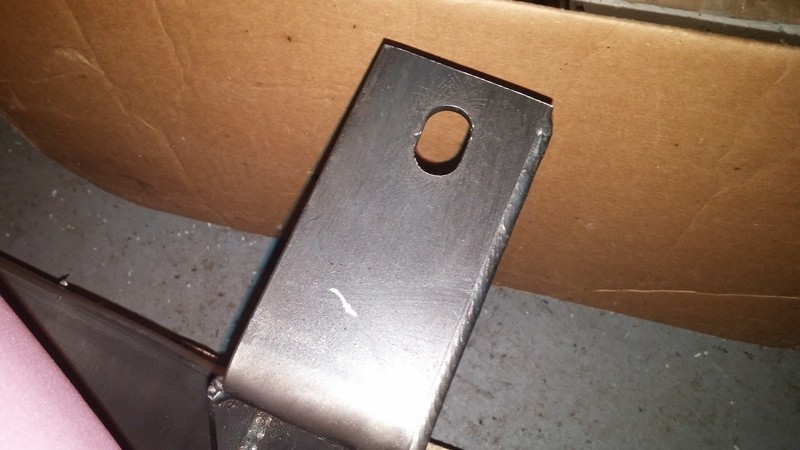
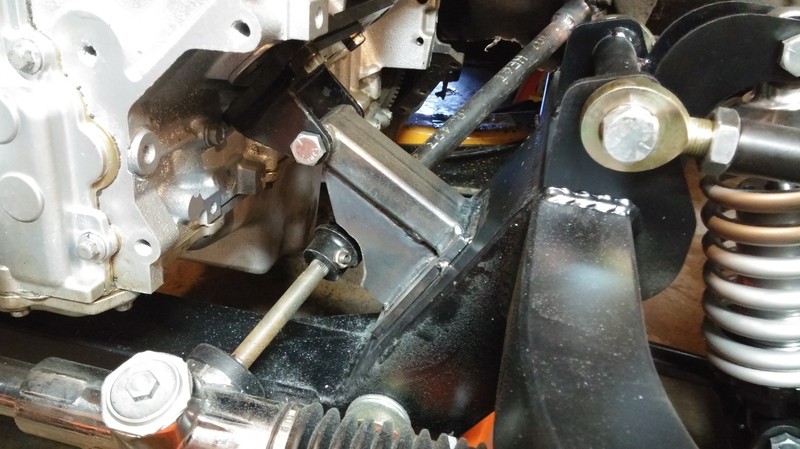
You can see the finished motor mount stands on the frame here as well.
After the firewall, the engine and trans go back in and then I get to finish welding up the cross-over and wrapping it in DEI wrap. There are some modifications that have to be made to the driver's side truck manifold to get it to fit this frame, since its a few inches more narrow than the old stock subframe.
Tomorrow I'll try to get new rear tires mounted on the wheels. The front wheels are an issue. Center bore is 2.5", which would have been fine on the stock brakes. New brakes are 2.75" hub diameter, so I have to find someone to lathe out the wheels to fit over them. Until then, I can't move the car since the old wheels are held on by a single lug and the calipers are locked against them.
Tuesday is probably going to be rear suspension day. I have new QA1 shocks and Caltracs for the mult-leafs. I still haven't decided if I want to relocate the shocks inward. If the new tires fit around the QA1s (they won't fit the old shocks), then I probably won't bother relocating them.
Someone gave me a free sheet of mild steel. Been sitting outside for a while. Lots of rust and bird poop. I bought a DA sander and lots of sanding pads to get it cleaned up for later, but here is my progress.
Made a rough cardboard template first.
Cut out the bulk of the material and did a test-fit.
And after an hour of trimming/fitting, I finally have the finished piece. Tomorrow I get to hammer and cut the old firewall until everything lines up and matches up everywhere before I sand down this piece of sheet metal, tack weld it on, and then borrow a MIG and finish welding it before painting semi-gloss black to match the rest of the interior.
You can see the finished motor mount stands on the frame here as well.
After the firewall, the engine and trans go back in and then I get to finish welding up the cross-over and wrapping it in DEI wrap. There are some modifications that have to be made to the driver's side truck manifold to get it to fit this frame, since its a few inches more narrow than the old stock subframe.
Tomorrow I'll try to get new rear tires mounted on the wheels. The front wheels are an issue. Center bore is 2.5", which would have been fine on the stock brakes. New brakes are 2.75" hub diameter, so I have to find someone to lathe out the wheels to fit over them. Until then, I can't move the car since the old wheels are held on by a single lug and the calipers are locked against them.
Tuesday is probably going to be rear suspension day. I have new QA1 shocks and Caltracs for the mult-leafs. I still haven't decided if I want to relocate the shocks inward. If the new tires fit around the QA1s (they won't fit the old shocks), then I probably won't bother relocating them.