69 Nova. 5.3 L33 Turbo build. Billet S474, LOTS of pictures...

 03-15-2015, 10:36 PM
#142
Restricted User
Thread Starter

Moser is 90 minutes from me....
03-22-2015, 12:33 AM
#143
Restricted User
Thread Starter
These last 2 weeks have been very very busy, so I'm not going to post the full update all at once. I'll have to get back to it in a few days. I'll skip updates about the wiring, the dash, the rear end for now.
After I left off, I finished up the crossover and manifold.
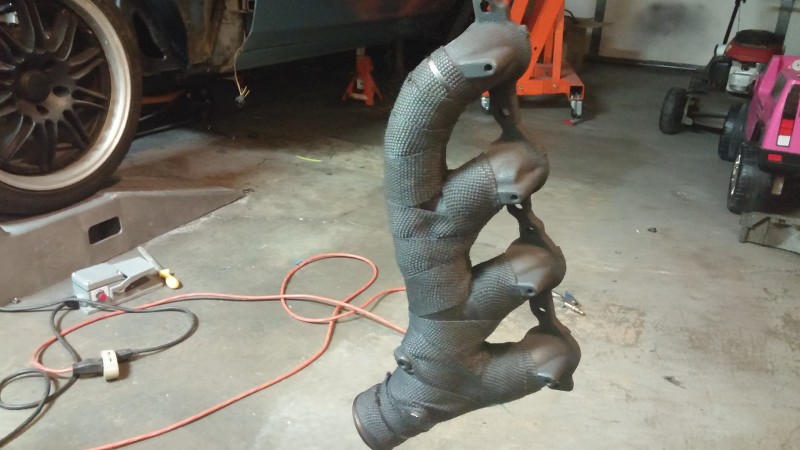
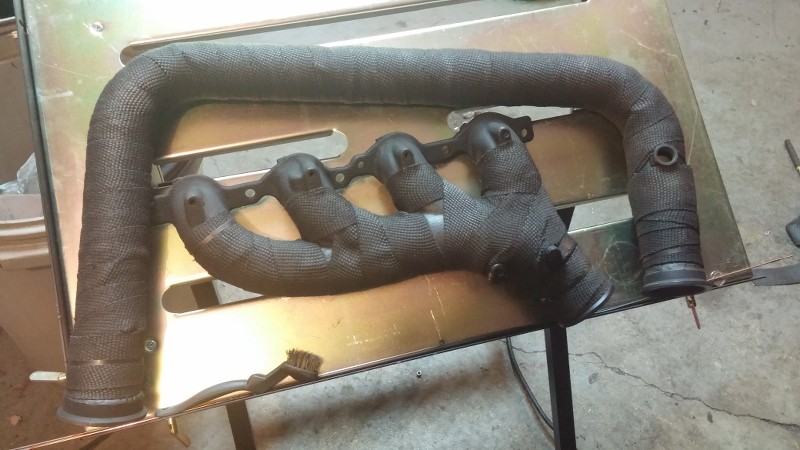
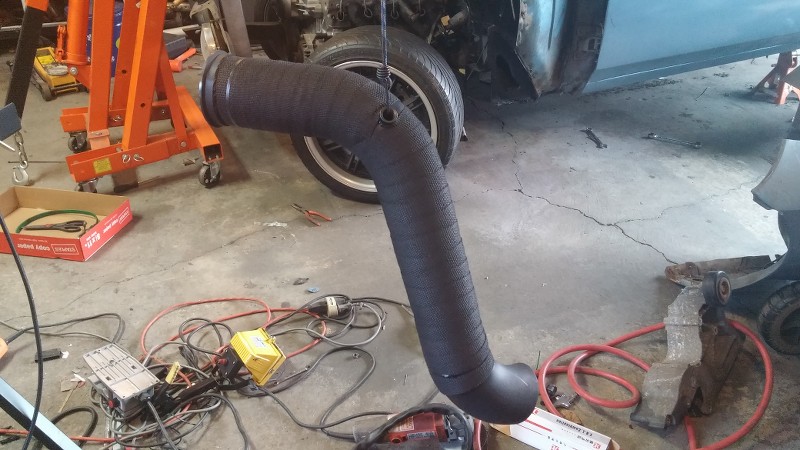
I painted both the crossover and the passenger side manifold with VHT Ceramic header paint, and then wrapped them with header wrap and sprayed them with the silicone coating that comes with it. Wrapping these is a real PITA, and it looks sloppy as hell, but nobody will ever see it.
I also modified the KB Racing manifold for the external gate. Lots of people are having problems controlling boost with the gate located in the crossover, so I moved it directly into the turbo manifold before the turbo flange.
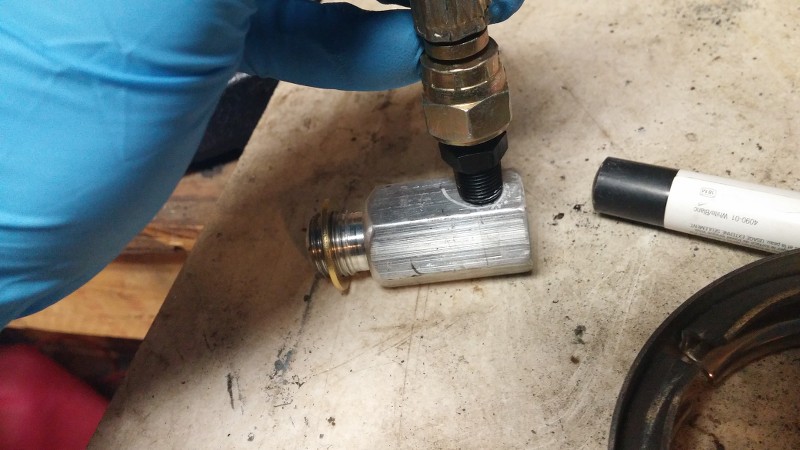
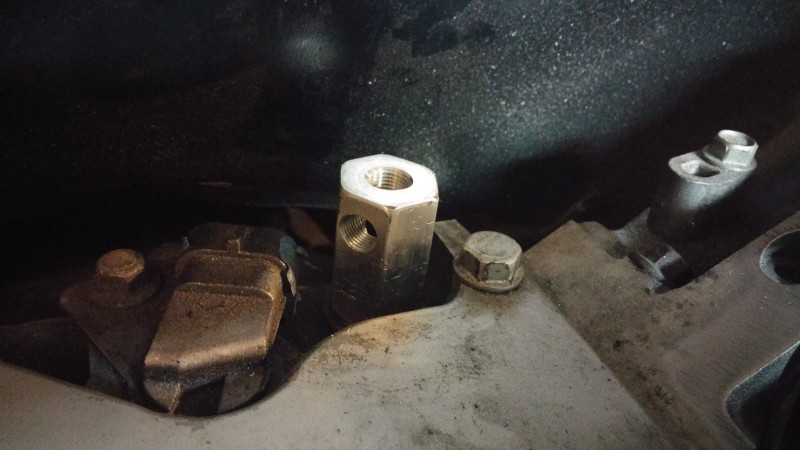
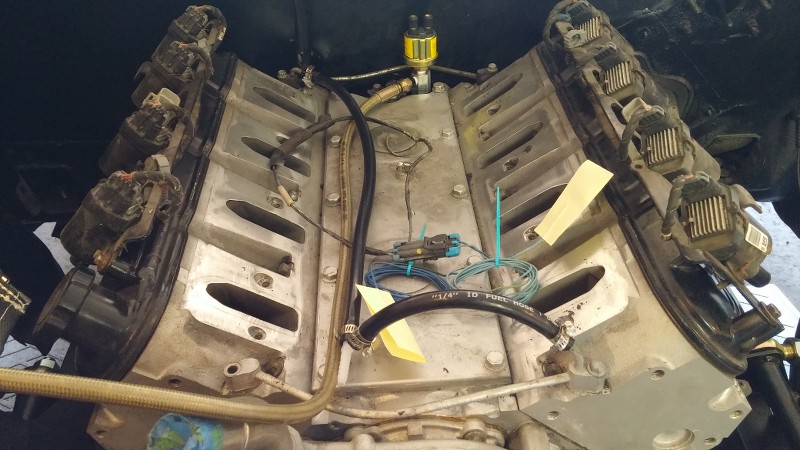
I picked up an oil sender adapter from Ebay for $15. It threads into the factory pressure sensor switch at the back of the valley cover next to the cam sensor, and has a 1/8" NPT port on the top. The stock sensor just runs a dash light, so in swap cars you can disable it in favor of a gauge fitting.
I took it a step further and drilled/tapped it again for a 1/8" NPT fitting, and threaded in a 1/8" to -4 AN adapter and used it for my oil feed.
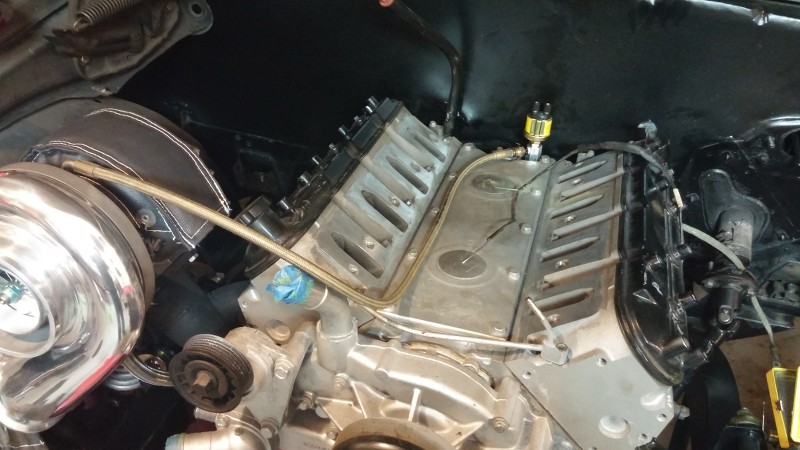
I used another truck coolant crossover in the rear and a plastic T fitting to make a 4-point coolant crossover that will run to my radiator.
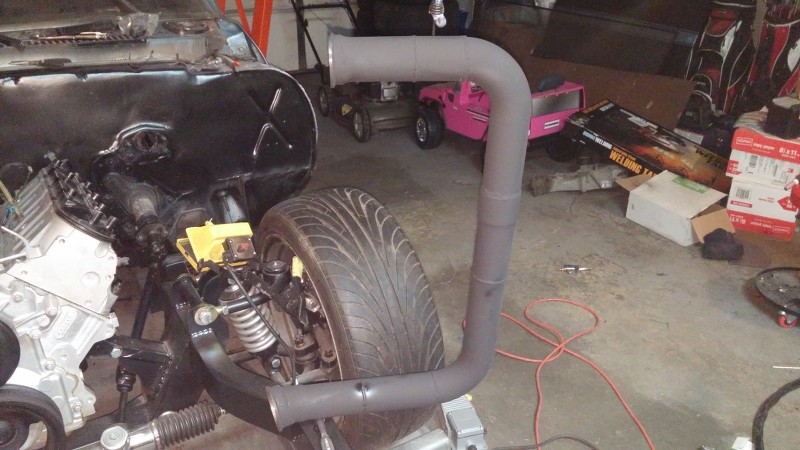
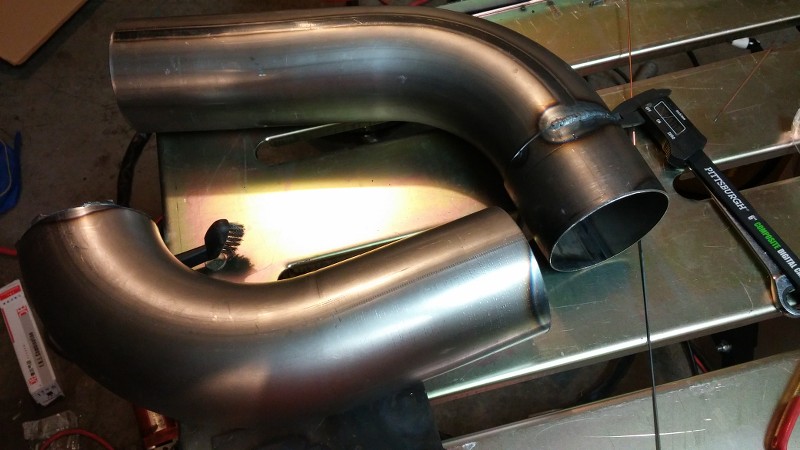
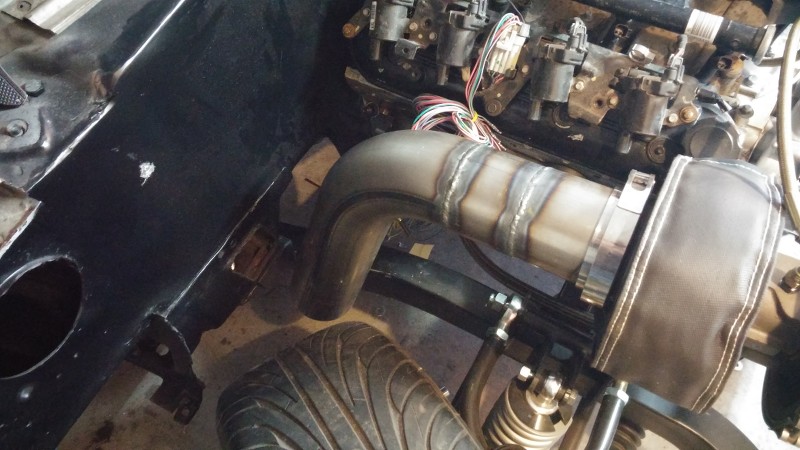
I tacked up the downpipe earlier too. It looks like I can make the entire downpipe out of a single 4" U-bend. Forgive my sloppy welds. I'm still not very good at this, and for some reason seem to be getting worse haha.
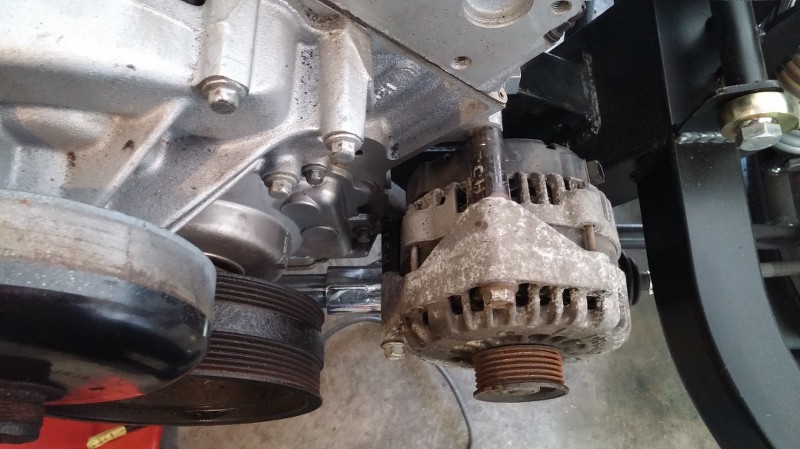
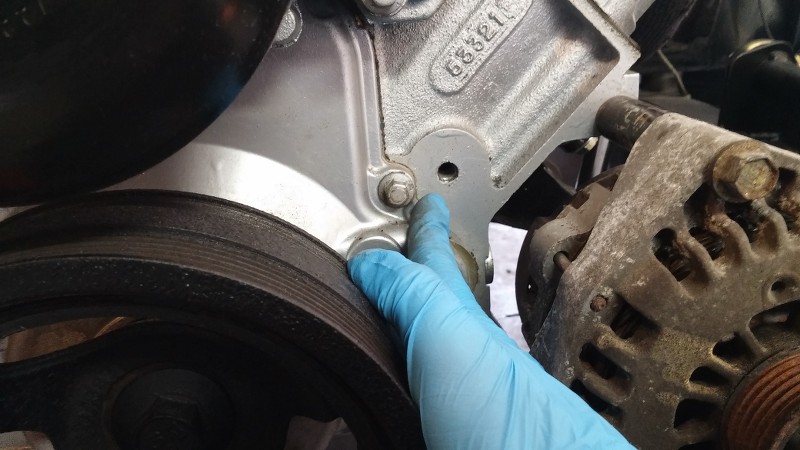
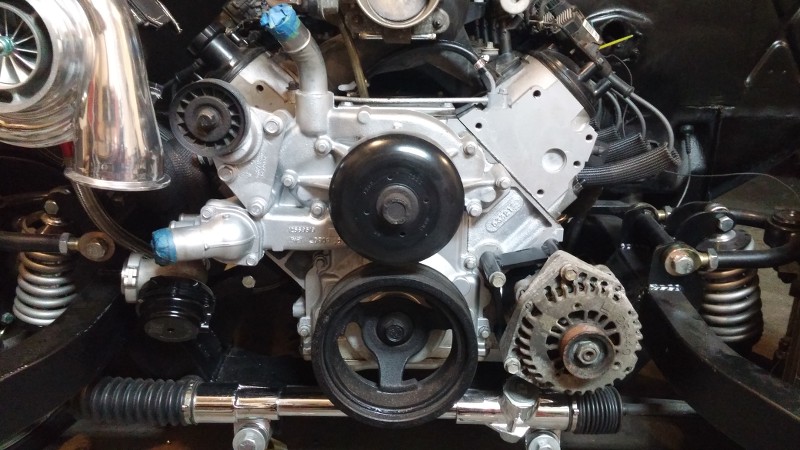
Also, the L33 block apparently has all of the bosses drilled for the car accessories, so I didn't need to drill for an F-body style alternator bracket. Basically, I cut some 2" pieces of pipe and used them to mount the alternator where I want it. I'm going to use the third hole that I indicate in the 2nd picture for a third piece of pipe, and then I'll take some quarter inch plate steel and weld them all together so there is no flexing, and then I'll give it a shot of paint. This means I have one hell of an idler situation to figure out....
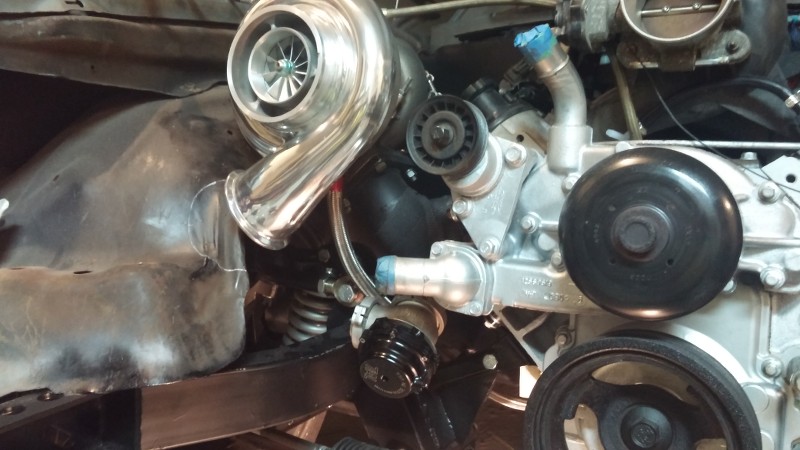
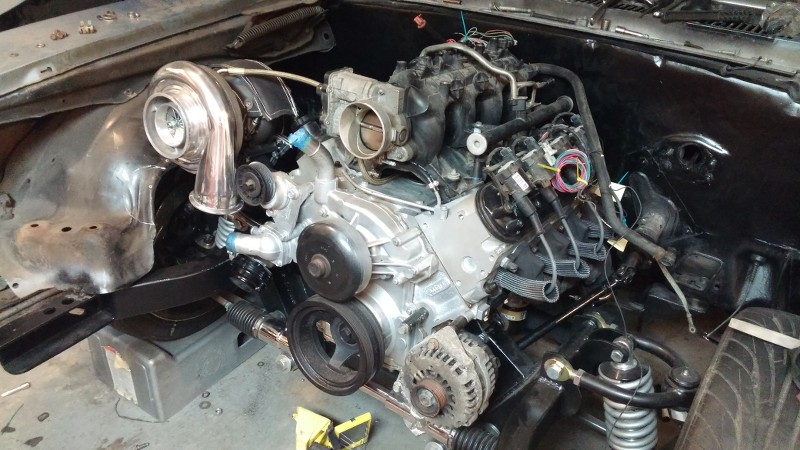
And for the most part, this is where I am now. You'll notice the compressor outlet is no longer facing the fender. I did some measuring, and at full left lock, the tire will hit the cold side piping. This means I have to use a straight thermostat housing and a 90* bend of the end of the compressor cover in order to make sure everything clears.
I've done a done of other stuff. Modify the crossmember to lower the transmission for better clearance. Modify the engine mounts a little bit. The engine was tilted 2 degrees to the passenger side and it was DRIVING ME INSANE, since the intake didn't line up right with the body lines. The passenger side stand is a tiny tiny bit shorter than the driver's side, so it was leaning. Since everything was solid mounted, I had to get creative on how to raise it.
I'll post an update in a few days with the whole wiring situation. I'm going to get most of it gathered up and run it all through the firewall with a Seal-It grommet. I'm just waiting on a large box of small pieces to show up before I can move much further with it
After I left off, I finished up the crossover and manifold.
I painted both the crossover and the passenger side manifold with VHT Ceramic header paint, and then wrapped them with header wrap and sprayed them with the silicone coating that comes with it. Wrapping these is a real PITA, and it looks sloppy as hell, but nobody will ever see it.
I also modified the KB Racing manifold for the external gate. Lots of people are having problems controlling boost with the gate located in the crossover, so I moved it directly into the turbo manifold before the turbo flange.
I picked up an oil sender adapter from Ebay for $15. It threads into the factory pressure sensor switch at the back of the valley cover next to the cam sensor, and has a 1/8" NPT port on the top. The stock sensor just runs a dash light, so in swap cars you can disable it in favor of a gauge fitting.
I took it a step further and drilled/tapped it again for a 1/8" NPT fitting, and threaded in a 1/8" to -4 AN adapter and used it for my oil feed.
I used another truck coolant crossover in the rear and a plastic T fitting to make a 4-point coolant crossover that will run to my radiator.
I tacked up the downpipe earlier too. It looks like I can make the entire downpipe out of a single 4" U-bend. Forgive my sloppy welds. I'm still not very good at this, and for some reason seem to be getting worse haha.
Also, the L33 block apparently has all of the bosses drilled for the car accessories, so I didn't need to drill for an F-body style alternator bracket. Basically, I cut some 2" pieces of pipe and used them to mount the alternator where I want it. I'm going to use the third hole that I indicate in the 2nd picture for a third piece of pipe, and then I'll take some quarter inch plate steel and weld them all together so there is no flexing, and then I'll give it a shot of paint. This means I have one hell of an idler situation to figure out....
And for the most part, this is where I am now. You'll notice the compressor outlet is no longer facing the fender. I did some measuring, and at full left lock, the tire will hit the cold side piping. This means I have to use a straight thermostat housing and a 90* bend of the end of the compressor cover in order to make sure everything clears.
I've done a done of other stuff. Modify the crossmember to lower the transmission for better clearance. Modify the engine mounts a little bit. The engine was tilted 2 degrees to the passenger side and it was DRIVING ME INSANE, since the intake didn't line up right with the body lines. The passenger side stand is a tiny tiny bit shorter than the driver's side, so it was leaning. Since everything was solid mounted, I had to get creative on how to raise it.
I'll post an update in a few days with the whole wiring situation. I'm going to get most of it gathered up and run it all through the firewall with a Seal-It grommet. I'm just waiting on a large box of small pieces to show up before I can move much further with it
03-22-2015, 01:06 AM
#144
On The Tree
iTrader: (1)
Join Date: Oct 2012
Location: Olympia Wa.
Posts: 167
Likes: 0
Received 0 Likes
on
0 Posts
Progress is always good!
On any boosted application I prefer AN fittings for the radiator hoses, it prevents them from blowing off when you lift a head and pressurize the cooling system.
The -20 straight water neck was like $45 on eBay and I just welded a -20 steel AN fitting onto the water pump also.
Cheap insurance as coolant under the tires can ruin a day real easily.
03-23-2015, 08:33 AM
#145
Restricted User
Thread Starter
I picked up an 8.8 over the weekend. Axles, 31 spline carrier, girdle cover, bracing kit, wheel spacers, and leaf perches are on the way as well.
Downpipe is welded up and coated, I'll likely wrap it tonight. Wideband bung is welded in. As soon as I finish the alternator bracket, I'm probably going to start putting the front end back together. Right now, the core support and radiator are on but only to determine how my intercooler piping will be ran.
I'd like to have it back on the ground on all 4 wheels with the front end back on by mid April.
03-27-2015, 09:42 PM
#146
Restricted User
Thread Starter
I guess I could throw an update on here since I'm not doing anything else right now.
I used some leftover scrap to make an alternator bracket. The rest of the pipe that I used to make my steering shaft became spacers on the bracket, and the steel plate that I used to make the engine frame stands became the bracing.
Everything fits and lines up perfect. Unfortunately I don't get nearly enough belt wrap on the water pump, so I'm going to add an idler just above the alternator. I'm out of the pipe I used to make the bracket, so I'm going to have to find some more somewhere (its 1/4" thick wall tubing).
This is the idler I bought. Its a dayco 6 rib idler. Autozone and advance auto has them for less than $20.
http://shop.advanceautoparts.com/p/d...9015/5160000-P
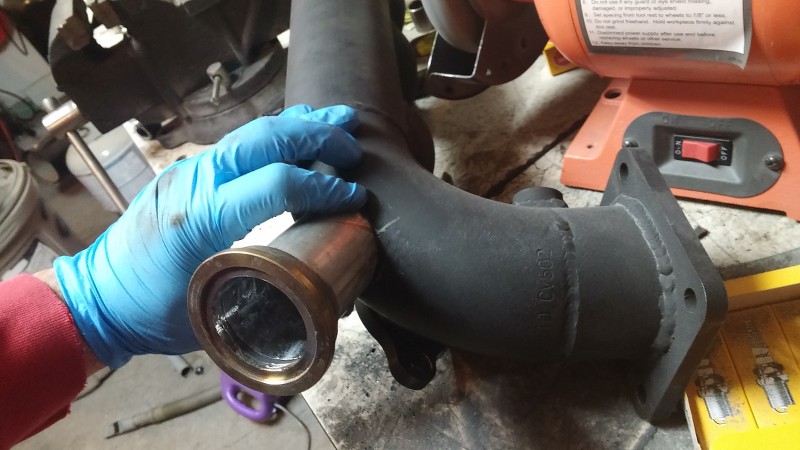
I finished welding up the downpipe. You can see my tire clearance in the first pic. Its going to turn out and dump right below the fender there. I'll eventually add a 2.5" Y pipe that goes to just in front of the rear tire before dumping out the side. I'm hoping to add a boost activated cutout to the downpipe.
Also, the downpipe flange warped when welding. I have a machine shop removing .010" from it, and I'm going to use a V-band gasket and some copper RTV to fill in the rest of it.
I've also decided where the wiring harness will go through the firewall. I picked up some Seal-It firewall grommets since 90 pin bulkhead connectors are far too expensive. Computer will go in the glove box along with the OBD port.
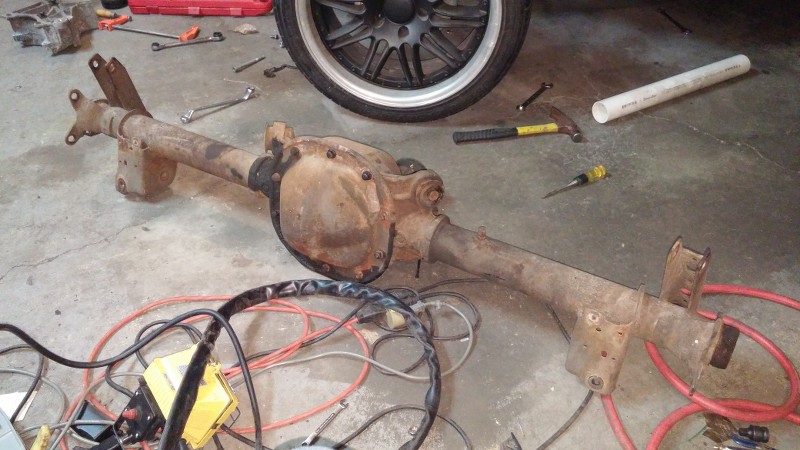
So as far as the rear goes, I picked up an 8.8 last Saturday. Housing, pinion and 3.55 ring gear with backing plates and calipers for $200.
They don't make a 1350 U-joint adapter for this pinion flange, so if I want a 1350 U-joint I have to change out the pinion flange. To be honest, I don't want to tear into it too much because I don't want to have to fool with new pinion bearings and shims.
I did pick up some goodies. Moser axles. Fox length, C-clip. 31 spline with chevy 5x4.75 bolt pattern, machined down for small center rotors. Axles, screw in 3" studs, and bearings shipped to me for $340. I also got a Perfect Launch girdle cover for $88 on ebay, which is a very very nice piece. The powder coating on it is also very impressive. Then I picked up some tube braces. They bolt to the center right next to the pinion, and then you weld the tabs to the tubes. You can use them to set a little pre-load on the tubes to keep them from moving. I'm going to weld the tubes to the housing also, since they are only spot welded from Ford (wtf?). I also have leaf spring perches to weld to the tubes once the control arm brackets get cut off.
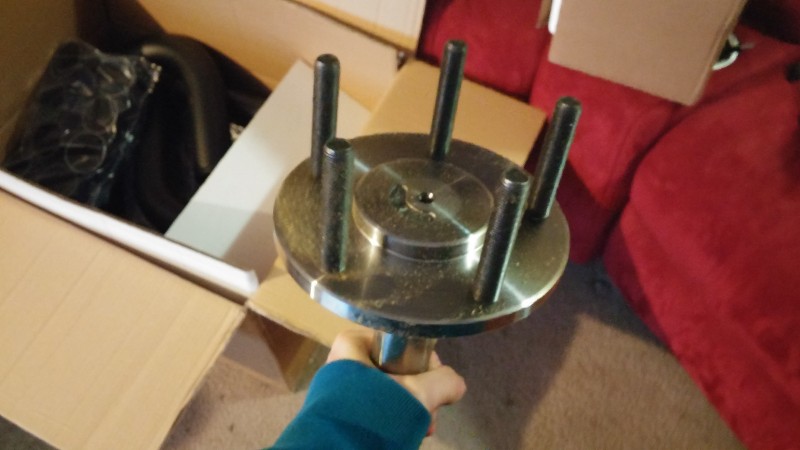


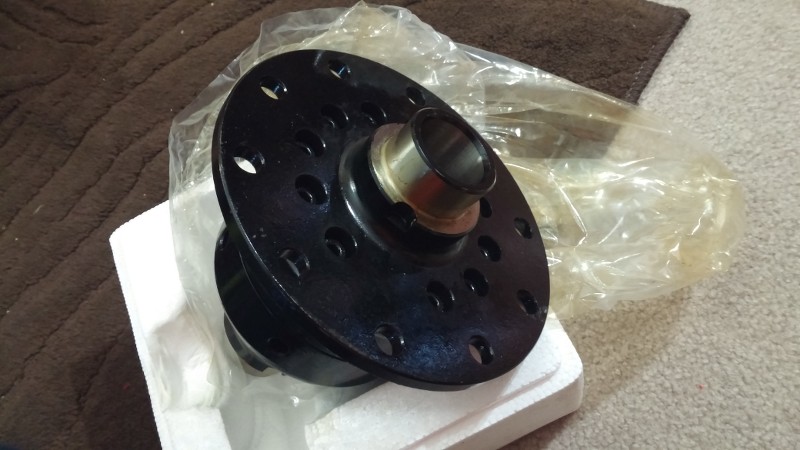
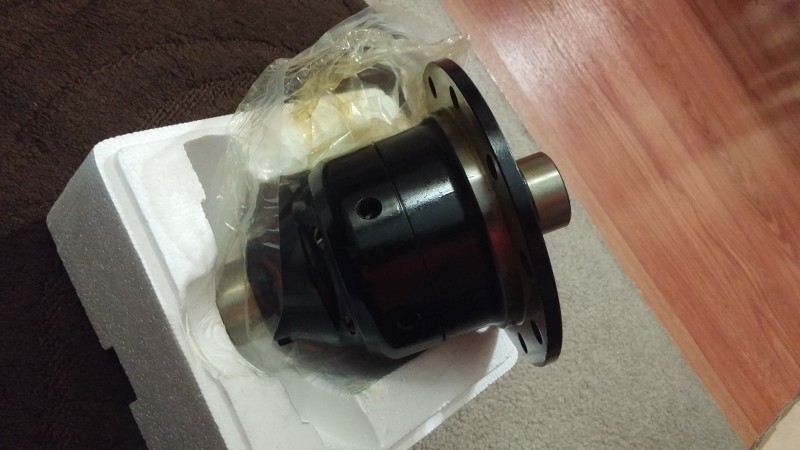
Then there is this thing. 31 spline carrier from Ebay. Its a Speedmaster (Pro Comp) unit. I can very clearly see the worm gears inside. Its not a clutch unit and has no spider gears. I originally thought it was a TrueTrac knockoff unit, but after closer inspection, its very obviously a Wavetrac copy. Since I talked the sellers into letting me having it for less than $200, I'm going to run it. If it busts, I'll probably get a TrueTrac. I still have to pick up carrier bearings....
Ebay intercooler piping showed up this week. Decent powdercoating job. Its a shame I have to cut and weld most of it. Sh*t happens. I still haven't figured out what size V-band my compressor housing has on the discharge. the ID size is 3.25".

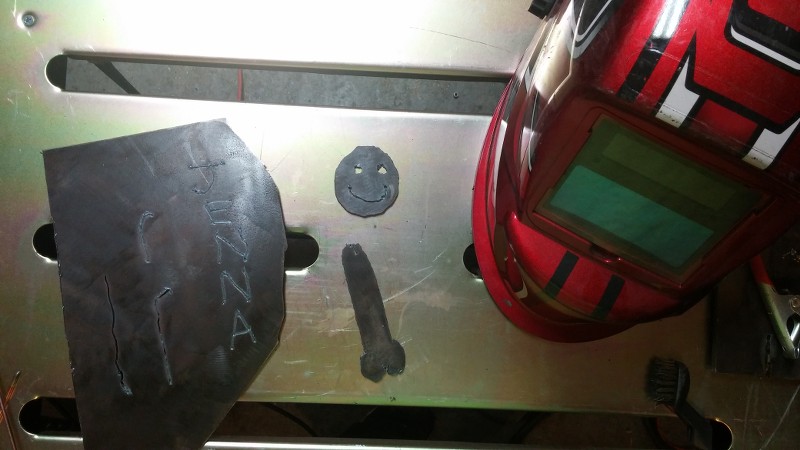
Also, I picked up an ebay plasma cutter for $196 shipped. Figured I would give it a try, so I'm using it to notch the fender for the downpipe to pass through. My girlfriend also wanted to give it a try.
This might be a little inappropriate for some.
I used some leftover scrap to make an alternator bracket. The rest of the pipe that I used to make my steering shaft became spacers on the bracket, and the steel plate that I used to make the engine frame stands became the bracing.
Everything fits and lines up perfect. Unfortunately I don't get nearly enough belt wrap on the water pump, so I'm going to add an idler just above the alternator. I'm out of the pipe I used to make the bracket, so I'm going to have to find some more somewhere (its 1/4" thick wall tubing).
This is the idler I bought. Its a dayco 6 rib idler. Autozone and advance auto has them for less than $20.
http://shop.advanceautoparts.com/p/d...9015/5160000-P
I finished welding up the downpipe. You can see my tire clearance in the first pic. Its going to turn out and dump right below the fender there. I'll eventually add a 2.5" Y pipe that goes to just in front of the rear tire before dumping out the side. I'm hoping to add a boost activated cutout to the downpipe.
Also, the downpipe flange warped when welding. I have a machine shop removing .010" from it, and I'm going to use a V-band gasket and some copper RTV to fill in the rest of it.
I've also decided where the wiring harness will go through the firewall. I picked up some Seal-It firewall grommets since 90 pin bulkhead connectors are far too expensive. Computer will go in the glove box along with the OBD port.
So as far as the rear goes, I picked up an 8.8 last Saturday. Housing, pinion and 3.55 ring gear with backing plates and calipers for $200.
They don't make a 1350 U-joint adapter for this pinion flange, so if I want a 1350 U-joint I have to change out the pinion flange. To be honest, I don't want to tear into it too much because I don't want to have to fool with new pinion bearings and shims.
I did pick up some goodies. Moser axles. Fox length, C-clip. 31 spline with chevy 5x4.75 bolt pattern, machined down for small center rotors. Axles, screw in 3" studs, and bearings shipped to me for $340. I also got a Perfect Launch girdle cover for $88 on ebay, which is a very very nice piece. The powder coating on it is also very impressive. Then I picked up some tube braces. They bolt to the center right next to the pinion, and then you weld the tabs to the tubes. You can use them to set a little pre-load on the tubes to keep them from moving. I'm going to weld the tubes to the housing also, since they are only spot welded from Ford (wtf?). I also have leaf spring perches to weld to the tubes once the control arm brackets get cut off.
Then there is this thing. 31 spline carrier from Ebay. Its a Speedmaster (Pro Comp) unit. I can very clearly see the worm gears inside. Its not a clutch unit and has no spider gears. I originally thought it was a TrueTrac knockoff unit, but after closer inspection, its very obviously a Wavetrac copy. Since I talked the sellers into letting me having it for less than $200, I'm going to run it. If it busts, I'll probably get a TrueTrac. I still have to pick up carrier bearings....
Ebay intercooler piping showed up this week. Decent powdercoating job. Its a shame I have to cut and weld most of it. Sh*t happens. I still haven't figured out what size V-band my compressor housing has on the discharge. the ID size is 3.25".
Also, I picked up an ebay plasma cutter for $196 shipped. Figured I would give it a try, so I'm using it to notch the fender for the downpipe to pass through. My girlfriend also wanted to give it a try.
This might be a little inappropriate for some.
06-07-2015, 10:49 PM
#149
Restricted User
Thread Starter
I'll have to post a picture update soon, but as lot has been done.
The rear end is done, together, painted, and ready to go in as soon as my brakes and spacers show up.
The interior is done, minus gauges. Seats are actually bolted in this time (they weren't in previous pictures) with sliders working. The shifter is in and working. The dash pad has been repaired. Most of the engine wiring has been finished (just need to re-pin the ECU). I also bought a new complete gas tank (extremely nice piece), new master cylinder, new brake hard lines, and lots of misc stuff.
Rear end and brakes will hopefully be in and done within next 2 weeks. Then I measure and purchase a driveshaft, and the car will be a roller for the first time in over a year.
After that, I finish wiring the engine and the body, figure out where to locate the battery, since the truck seems like the best option right now, and go from there. Gas tank is ready to go in as are fuel lines. Hopefully the tank and fuel system will be done in 2 weeks along with rear and brakes.
The intercooler is giving me serious issues right now. The damn thing just won't fit behind the grill. Its a 4" thick intercooler. I can trim the grill, but its still not enough, it won't fit. Its actually looking like I'll need to enlarge the hole in the core support for the radiator, lean the top of the radiator in 4" and mount the intercooler against it (with some sort of spacer so the radiator doesn't transfer heat to the intercooler). The biggest problem there is the upper radiator hose, and the fact that the fan I have goes right into the garbage.
Timeline:
June 20-21: Brakes completely finished, rear end in and rear suspension finished, gas tank in and fuel system finished.
July 4th weekend: All wiring, engine and body, completely finished, battery relocation included. Gauges wired and finished.
July 18-19: Front end installed. Radiator mounted, fans mounted. Engine ready to fire. Intercooler still not installed?
From there, It'll all be tying up loose ends. Hopefully the car will be running before August.
 06-11-2015, 06:16 AM
#151
Restricted User
Thread Starter
There are a couple of pictures of it on their website. I don't think I ever took any decent pictures of just the manifold before it was wrapped.
06-19-2015, 02:38 PM
#152
Restricted User
Thread Starter
Looks like I might hit my goal of rear/suspension/fuel/brakes being done by 21st.
Put the rear end in last night and full rear suspension. The car rolls again for the first time in 8 months.
The gas tank is plumbed and the straps are on the car. Fuel lines are all cut to length with fittings installed. I just have to put the tank in, run the wires into the interior for the relays, and toss the fuel lines back in (need clips to hold them to frame). I'm hoping to have the gas tank in and ready to go tonight.
Brakes are the weekend project. I have everything minus a flex line to connect the hard-line from the chassis to the rear-end. I still need to cut and reweld the backing plates for the calipers because they're an inch too short, but I'm probably going to plumb the front half of the car tomorrow and then finish up the rears on Sunday.
Then I'll have 2 weeks to rewire the car. I might still try to stick the battery under the hood, I haven't decided yet.

 07-02-2015, 07:46 AM
#156
Restricted User
Thread Starter
I posted a long-winded update and got logged out. So I'll make it as short as I can this time.
I filled the rear end last night and mounted the gas tank. Ran the wires and fuel lines. Back half of the car is done other than tail light wiring.
Ordered my 3" driveshaft from strange.
Engine wiring is all ran and most re-pinned into ECU.
Body wiring is still a major issue. Most of the wires are labeled wrong or the wrong size. The connectors for the ignition switch and steering column are wrong. I'm not sure what to do about them. Even though I cut it down from a 18 or so circuit harness to an 8 circuit harness, it doesn't look like its going to be any easier to figure out.
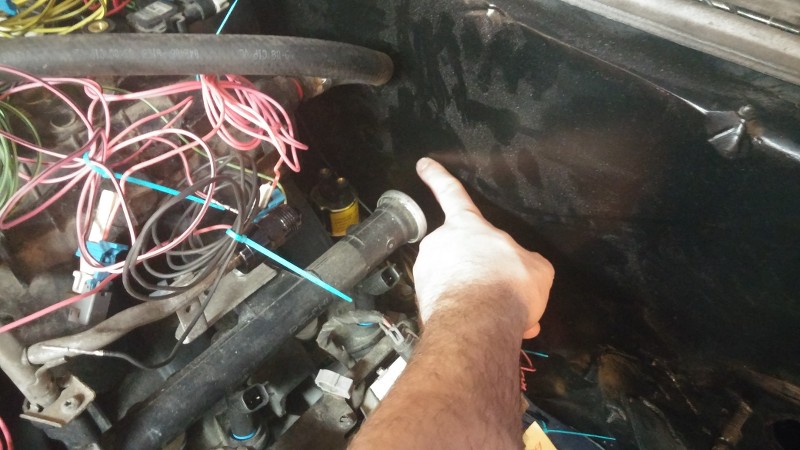
I have a broken bolt in the firewall that holds the fender on. I've welded 3 nuts on it only to snap it in a different place. its now flush with the firewall. I tried drilling out the center. Broke 3 drill bits in it, now I can't drill anymore. Not sure how to fix this, but it MUST come out in order to mount the fender.
I just have some small things to figure out. IAT sensor, body wiring, water/meth injection, etc. It is still looking like the car will be ready to fire at the end of this month, as long as I don't run into any major hang-ups. I have a LOT of pictures and stuff to post that I'll get around to eventually.
I filled the rear end last night and mounted the gas tank. Ran the wires and fuel lines. Back half of the car is done other than tail light wiring.
Ordered my 3" driveshaft from strange.
Engine wiring is all ran and most re-pinned into ECU.
Body wiring is still a major issue. Most of the wires are labeled wrong or the wrong size. The connectors for the ignition switch and steering column are wrong. I'm not sure what to do about them. Even though I cut it down from a 18 or so circuit harness to an 8 circuit harness, it doesn't look like its going to be any easier to figure out.
I have a broken bolt in the firewall that holds the fender on. I've welded 3 nuts on it only to snap it in a different place. its now flush with the firewall. I tried drilling out the center. Broke 3 drill bits in it, now I can't drill anymore. Not sure how to fix this, but it MUST come out in order to mount the fender.
I just have some small things to figure out. IAT sensor, body wiring, water/meth injection, etc. It is still looking like the car will be ready to fire at the end of this month, as long as I don't run into any major hang-ups. I have a LOT of pictures and stuff to post that I'll get around to eventually.
07-06-2015, 08:16 AM
#157
TECH Apprentice
iTrader: (3)

Join Date: Nov 2012
Location: Auburn Alabama
Posts: 339
Likes: 0
Received 0 Likes
on
0 Posts

You dont have to replace the pinion bearings to replace the yoke, just pull the carrier and measure the drag as you would if you were putting a fresh gear in it and once you replace the yoke make sure your drag is the same, just make sure you replace the pinion nut.
07-16-2015, 09:28 PM
#158
Restricted User
Thread Starter
Ran into some hangups. Sh*t happens, especially when working on it all alone lol.
I'll try to get through the updates here without drawing it out too far, so I'll only post a third of the pics.
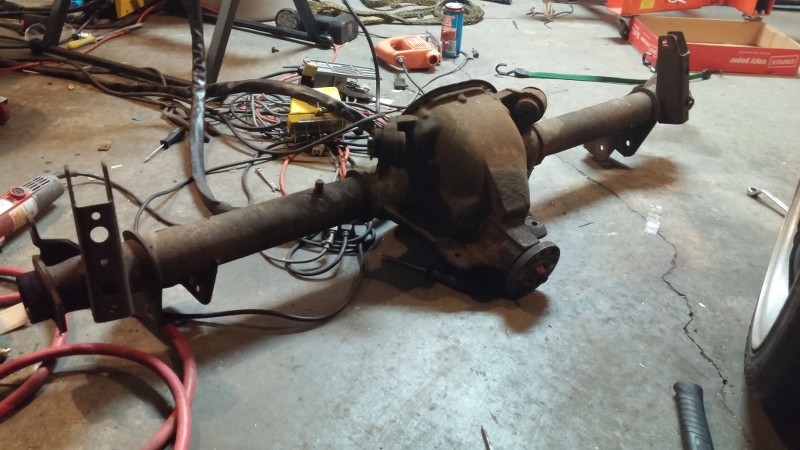
I welded the leaf spring perches onto the rear end, along with the bracing tabs, etc, and then sent it off to a local guy for assembly. This was all suprisingly easy. I have probably 2 solid days of work into swapping the 8.8 rear into my Nova, and I did it all for the same price as a stock 12 bolt goes for around here on Craigslist.
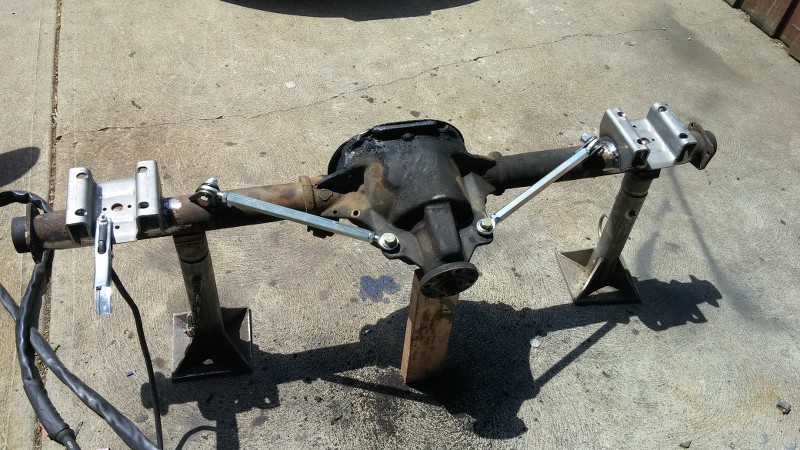
After a couple of hours of cleaning and painting, here it looks like after I got it back.

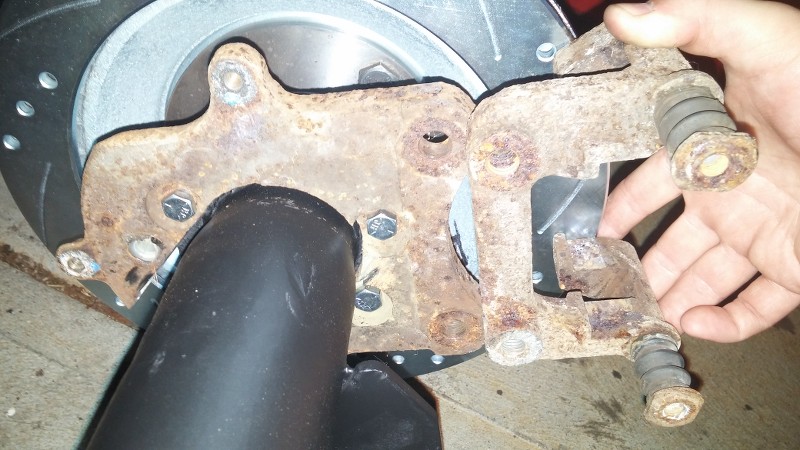
I used 92 camaro rotors. They're roughly the same size as what I have on the front of the car. The best thing is, they are very very close in size and dimension to the Cobra rotors but with a 5x4.75 bolt pattern. All I needed to make them work was Cobra caliper brackets. I checked ebay and they're a fortune, so I decided to just cut and extend the stock brackets. The cobras use the exact same calipers, its just the backing plates and caliper brackets that are slightly different.
Cobra rotor on left, 92 Camaro on right.


The reason for the Cobra backing plates... the Cobra rotors are larger in diameter from the stock mustang brakes, placing the bolt holes for the caliper bracket slightly further away.
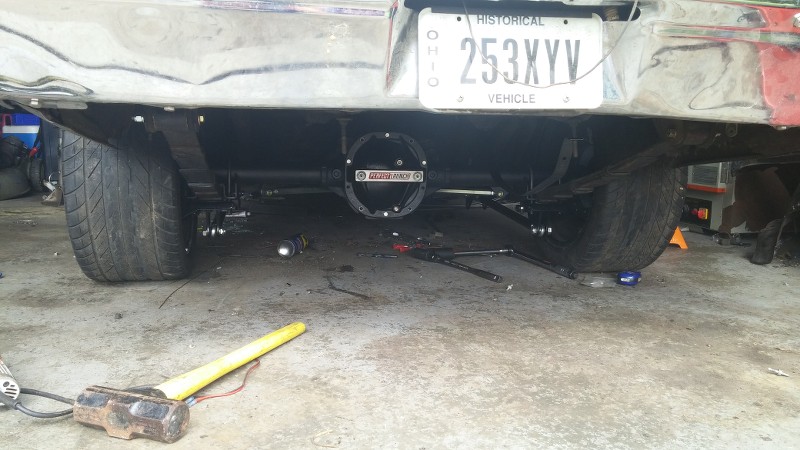
I went ahead and bolted the wheels on. The Fox rear is 1" more narrow than the stock rear, so I had to use billet spacers. My problem now is that I have to use hollow center 'tuner' lugs with these wheels since the stud holes are too small to fit a socket over the lug nut. With 3" studs, the lugs are bottoming out as I try to torque them. I'm going to need to find longer lugs, or another style of lug all together.

And finally, the rear is under the car with the Caltracs installed. I still haven't put on the rear brakes, I still need to extend the stock brackets. I went and got brand new calipers, cobra pads, and brake lines. I'll hopefully get to that in the next week or so.
I'll try to get through the updates here without drawing it out too far, so I'll only post a third of the pics.
I welded the leaf spring perches onto the rear end, along with the bracing tabs, etc, and then sent it off to a local guy for assembly. This was all suprisingly easy. I have probably 2 solid days of work into swapping the 8.8 rear into my Nova, and I did it all for the same price as a stock 12 bolt goes for around here on Craigslist.
After a couple of hours of cleaning and painting, here it looks like after I got it back.
I used 92 camaro rotors. They're roughly the same size as what I have on the front of the car. The best thing is, they are very very close in size and dimension to the Cobra rotors but with a 5x4.75 bolt pattern. All I needed to make them work was Cobra caliper brackets. I checked ebay and they're a fortune, so I decided to just cut and extend the stock brackets. The cobras use the exact same calipers, its just the backing plates and caliper brackets that are slightly different.
Cobra rotor on left, 92 Camaro on right.
The reason for the Cobra backing plates... the Cobra rotors are larger in diameter from the stock mustang brakes, placing the bolt holes for the caliper bracket slightly further away.
I went ahead and bolted the wheels on. The Fox rear is 1" more narrow than the stock rear, so I had to use billet spacers. My problem now is that I have to use hollow center 'tuner' lugs with these wheels since the stud holes are too small to fit a socket over the lug nut. With 3" studs, the lugs are bottoming out as I try to torque them. I'm going to need to find longer lugs, or another style of lug all together.
And finally, the rear is under the car with the Caltracs installed. I still haven't put on the rear brakes, I still need to extend the stock brackets. I went and got brand new calipers, cobra pads, and brake lines. I'll hopefully get to that in the next week or so.
07-16-2015, 09:39 PM
#159
Restricted User
Thread Starter
And then the fuel system. My current head-ache....
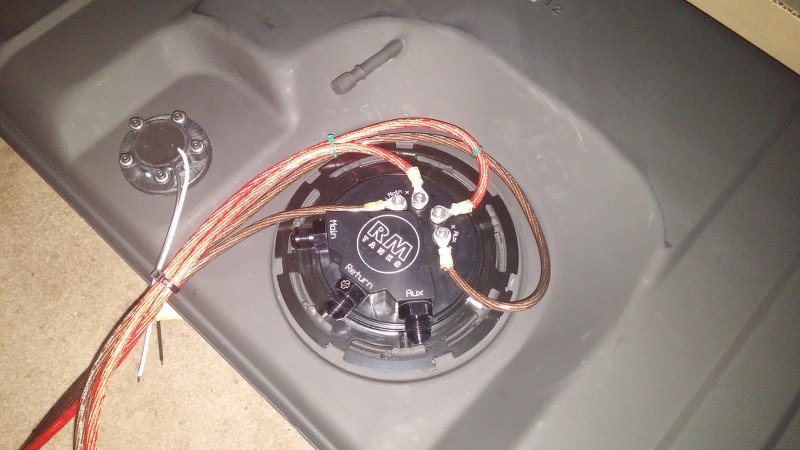
I ordered a nice new stamped Rick's Tank, complete with dual 340s, corner pickups, a billet hat, etc. 'Drop in' unit.
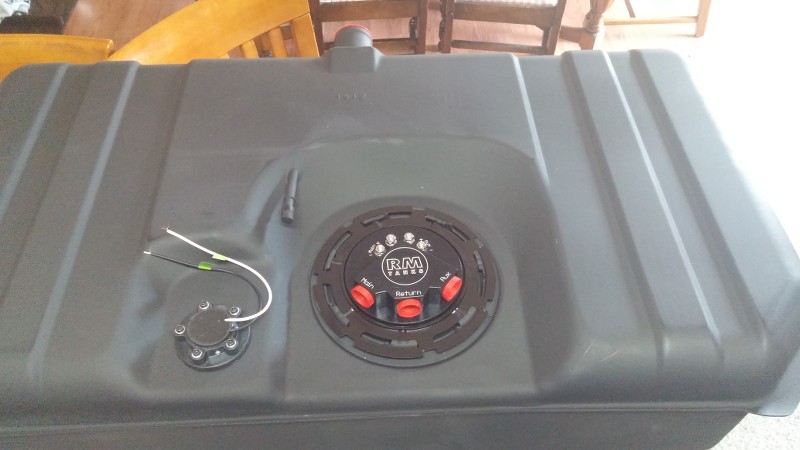
I got 8-gauge amp wire and wired up the tanks. Crimped on some terminals, and bolted everything down tight to connectors. I kept them nice and spaced out, zip-tied them, and then sprayed liquid electrical tape to keep them from corroding. Note the - and + symbols on the billet hat.
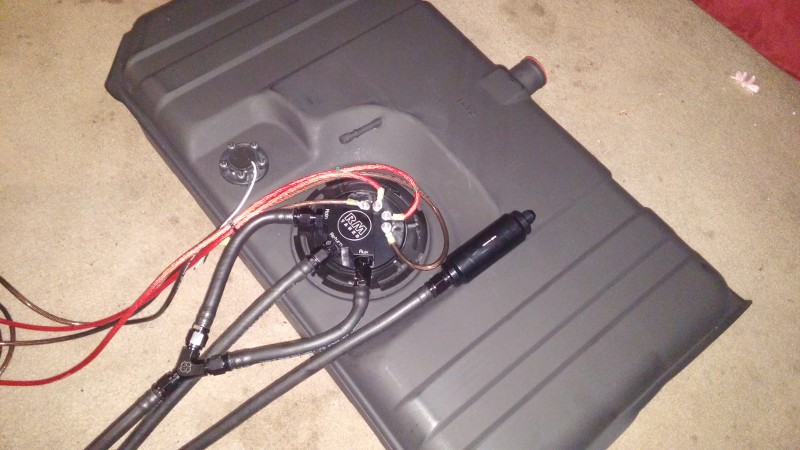
Then I got all of the fuel lines cut the length, fittings on the hoses, Y-fitting for the dual pumps plumbed on, and it was ready to go onto the car.
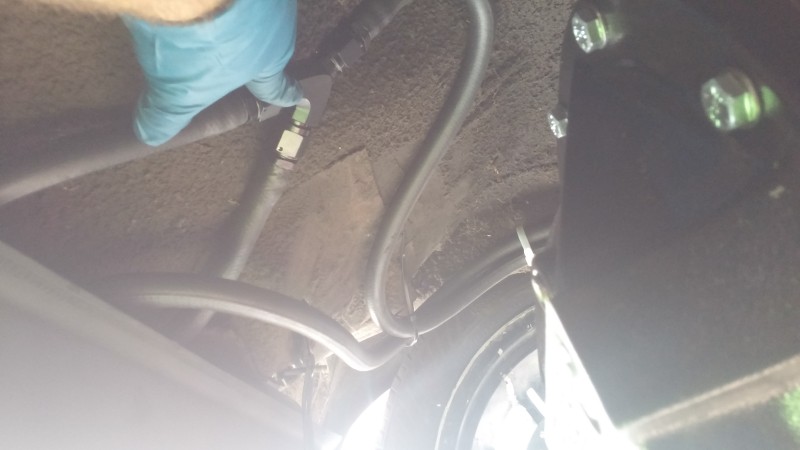
The picture makes it hard to see, but I had to find a way to pin the feed lines to the bottom of the car to keep the rear end from hitting them, so I got a piece of 1" flat stock, cut it a couple of feet long, and bolted it to the frame rails to hold the feed lines up and out of the way.
And now my current problem. I took the ground wires from the pumps and grounded them to the frame rail along with the ground for the sending unit. I then ran the positive wires through the floor into the trunk, behind the rear seat, under the door trim and underneath of the dash.
Tonight I put 3 gallons of gas in the tank and was going to test the pumps. I hooked jumper cables up to the end of the 8 gauge power wires and jumped them to the battery in my girlfriends car. Nothing. No priming of the pumps, no fuel flow, just silence. I'm sure that the wiring is hooked up correctly to the tank, that the grounds are grounded to a very clean section of the frame rail, and that the power wires were jumped with good jumper cables to the battery in her car. I'm not sure whats going on here, but now I'm considering dropping the tank and jumping the leads directly on the top of the tank to one of our cars to kick on the pumps. This is frustrating...
I ordered a nice new stamped Rick's Tank, complete with dual 340s, corner pickups, a billet hat, etc. 'Drop in' unit.
I got 8-gauge amp wire and wired up the tanks. Crimped on some terminals, and bolted everything down tight to connectors. I kept them nice and spaced out, zip-tied them, and then sprayed liquid electrical tape to keep them from corroding. Note the - and + symbols on the billet hat.
Then I got all of the fuel lines cut the length, fittings on the hoses, Y-fitting for the dual pumps plumbed on, and it was ready to go onto the car.
The picture makes it hard to see, but I had to find a way to pin the feed lines to the bottom of the car to keep the rear end from hitting them, so I got a piece of 1" flat stock, cut it a couple of feet long, and bolted it to the frame rails to hold the feed lines up and out of the way.
And now my current problem. I took the ground wires from the pumps and grounded them to the frame rail along with the ground for the sending unit. I then ran the positive wires through the floor into the trunk, behind the rear seat, under the door trim and underneath of the dash.
Tonight I put 3 gallons of gas in the tank and was going to test the pumps. I hooked jumper cables up to the end of the 8 gauge power wires and jumped them to the battery in my girlfriends car. Nothing. No priming of the pumps, no fuel flow, just silence. I'm sure that the wiring is hooked up correctly to the tank, that the grounds are grounded to a very clean section of the frame rail, and that the power wires were jumped with good jumper cables to the battery in her car. I'm not sure whats going on here, but now I'm considering dropping the tank and jumping the leads directly on the top of the tank to one of our cars to kick on the pumps. This is frustrating...
