When you click on links to various merchants on this site and make a purchase, this can result in this site earning a commission. Affiliate programs and affiliations include, but are not limited to, the eBay Partner Network.
Hello All, This is my first LS Build, and first Forced Induction build. By no means am I new to mechanic work, but everyone has something to learn, and this should be a great learning experience. Its such a popular swap that there is tons of info out there, but I will try to document all of the little things that sometimes get skipped over.
I'm a big fan of Denmah so I'm going to *try* to keep it budget friendly. All advice is very welcome, and if you see me doing anything stupid feel free to point it out.
Goals for the car are for it to be streetable, +/- 600whp, and eventually have both power steering and A/C.
On to the pics:
Bought the roller and engine for $1200. Kid said that the mechanic shop where worked was building the 5.0 for a guy that had $10,000 into it. I don't buy it, but it did have a nice set of aluminum heads. I'll save the engine for a later build, maybe a 70's F100.
I started by working on the engine bay. I labeled everything on the harnesses because I wanted to make sure and save the engine harness for the next build.
Engine harness went through the passenger side firewall and body wiring went through the drivers side. I would recommend not messing with anything on the drivers side if you aren't going to paint the engine bay. I started down the rabbit hole and had to keep going.
I ended up working on the harness under the dash and stripping out everything that wasn't needed.
Somewhere in here I started pulling my hair out. I used to work doing a lot of wiring in the Oil and Gas Industry, but this is a whole different animal. I'll post up diagrams of what I did after I get everything working. I wouldn't have needed to do this had I not started messing with the body wiring. Looking back, this part really wasn't worth it, but when I started I didn't know anything about 1990's Ford wiring.
Started getting the wiring cleaned up. Actually finished everything under the dash, but I'll have to get pictures of that tomorrow.
Parts List:
-5.3 out of a 2002 Silverado with around 100k on the odo
-Stock computer/harness/fuseblock
-4l80e with Transgo HD2 shift kit and aftermarket converter – recommendations welcome
-8.8 rear-end. Something about the one in the car isn’t original, the brake lines don’t match up so I need to figure out what I have. Will probably convert over to Explorer 5-lug
-Sub-Frame connectors. Just picked up some used but never installed, for cheap
-Stock K-member and homemade engine and trans mounts
-Truck manifolds down and forward and v-banded
-2” crossover
-On3 76mm or S475, haven’t decided yet
-Siemens Deka 80lb injectors
-In-Tank Walboro 400, in the stock bucket
-Push-Lok fuel hose
-Pac 1218 valve springs
-Heads have never been off, MLS head gaskets.
-China: Aluminum Dual Pass Radiator, Wastegate, BOV, and Trans Cooler
-4” cowl hood, not sure which one yet. Hopefully this is all I need to clear truck intake with the stock K Member
-If budget permits and I can find a friend that will help, I might paint it
-Wheels and tires. Whatever the biggest drag radial is I can fit in the rear.
Trying to keep everything budget within reason, but I'm not afraid to pay extra where I think it counts. I want it to be a true street car with heat and a/c and power steering. We have an old air strip that people drag race at and I'm hoping to hurt some feelings in near future. I'm not trying to blow the world away, but I am shooting for 600 at the wheel, and I am hoping its enough to surprise a few of the 'Race Cars' around here.
Picked up the engine. Its a 5.3 out of 2002 Silverado with something around 100k on it. $700 for the engine, harness, and ECM. About here the fuel line connectors came in also so I had to try them out. They are made by Russell and work great. A little spendy on a build like this but I didn't want to use the plastic style. I used a 3/8" and 5/16" push on to -6AN and then a -6AN to 3/8" Push-Lok
Had hell trying to figure out which way I wanted to go with the exhaust manifolds while trying to keep the power steering. Up and forward will not work because of the stock booster. I didn't really want to chop up the manifolds but finally settled on down and forward with v-bands.
It looks like the stock flanges could be used with a little ingenuity, but I'm going to pass on that one and just use v-bands.
I found 3 exhaust manifold bolts sheared off. I tried welding a nut them but I couldn't get them to stick, so I just welded a tit on the bolt and kept building it up until it was big enough to get with the vise grips. Panther ****, aka PB Blaster is your friend
Got the engine dropped about where I think it will end up. Still waiting on the trans so I can make sure I have everything where it needs to be before I build the engine mounts. Definitely not going to clear the stock hood. Hopefully the truck intake will clear a 4" cowl with the stock K
Again, the engine still isn't in its final resting place but it looks like everything should just clear the master cylinder. I think I can grind some of the manifold if needed. It looks like its touching in the pic but there is about a 1/4" of clearance.
I used the stock fuel tank setup and just added a Walboro 400lph. It looks like it should work, I just need to add a hose clamp to hold everything together. I just chopped off the bottom of the bracket and called it good.
Fuel pump literally barely fits. Not even a millimeter of clearance, but it still fits! I might clearance the hole just little bit just in case.
On my chevelle i had the same issue with clearing the power steering pump with the manifolds flipped don too. I did basically what you have pictured with the stock flange. I welded an elbow to the manifolds and then a v band to it, then snaked it around and down. Works great so far
On my chevelle i had the same issue with clearing the power steering pump with the manifolds flipped don too. I did basically what you have pictured with the stock flange. I welded an elbow to the manifolds and then a v band to it, then snaked it around and down. Works great so far
Which v-bands did you use? Is it very hard to keep them from warping when you weld them?
Only a little bit of progress tonight. I got the pump dropped in the tank and the pressure side hooked up and that's about it. I ended up having to notch the out the hole where the pump goes in so that it would clear the clamp I used.
My return line is kind of ghetto but I don't think it should have much pressure so it should be fine.
I'm going to be starting in the harness tomorrow so so I'm hoping that is as straight forward as it looks. Im thinking about using the stock truck fuse block, does anyone have any thoughts on that?
Iv bought them from both summit and amazon. I did some other manifolds a while back and did the v band directly to the cast and used a ton of heat, so the flange warped a bit but it still sucked up nicely when the v band was tightened and didnt leak. This set i have on my chevelle i have pipe welded to the manifold and then the v band to it, so i couldnt use as much heat on the much thinner gauge pipe, but still no warp whatsoever and holds up fine. I still have yet to really abuse my car, im still working on tuning, but i dont think too many people have issues with them
Just a small update. I am mostly just waiting for the transmission so that I can build engine and trans mounts and then start on the turbo kit. Beyond what is shown in the pictures, I have gotten a lot of small stuff done, including stripping out the wiring harness.
Ugly engine bay.
I got the engine bay all cleaned up and painted. Purple Power works wonders for getting gunk off, but if you use it be careful not to get it on good paint!
I got the engine dropped back in and I am still just waiting for a trans so I can build the engine mounts. I also got all the harnesses cleaned up and I just need to get the fuse blocks put together.
Only a little bit of progress tonight. I got the pump dropped in the tank and the pressure side hooked up and that's about it. I ended up having to notch the out the hole where the pump goes in so that it would clear the clamp I used.
My return line is kind of ghetto but I don't think it should have much pressure so it should be fine.
I'm going to be starting in the harness tomorrow so so I'm hoping that is as straight forward as it looks. Im thinking about using the stock truck fuse block, does anyone have any thoughts on that?
I have the same car. How do you plan on doing the fuel lines? How much power do you plan to make with a single 400 in tank? It looks like an easy, inexpensive upgrade.
I built a kit for a fox body recently, used manifolds and fbody accessories. Snuck a 3.5" downpipe down the driver side of everything. It was a fwd facing kit that used a universal 19x22" radiator and an LX bumper
I built a kit for a fox body recently, used manifolds and fbody accessories. Snuck a 3.5" downpipe down the driver side of everything. It was a fwd facing kit that used a universal 19x22" radiator and an LX bumper
Looks Good! Its pretty clear that you are more patient than me. It looks like your engine sits lower than mine, it hits the steering rack. Which K Member are you using and does that help move the rack down?
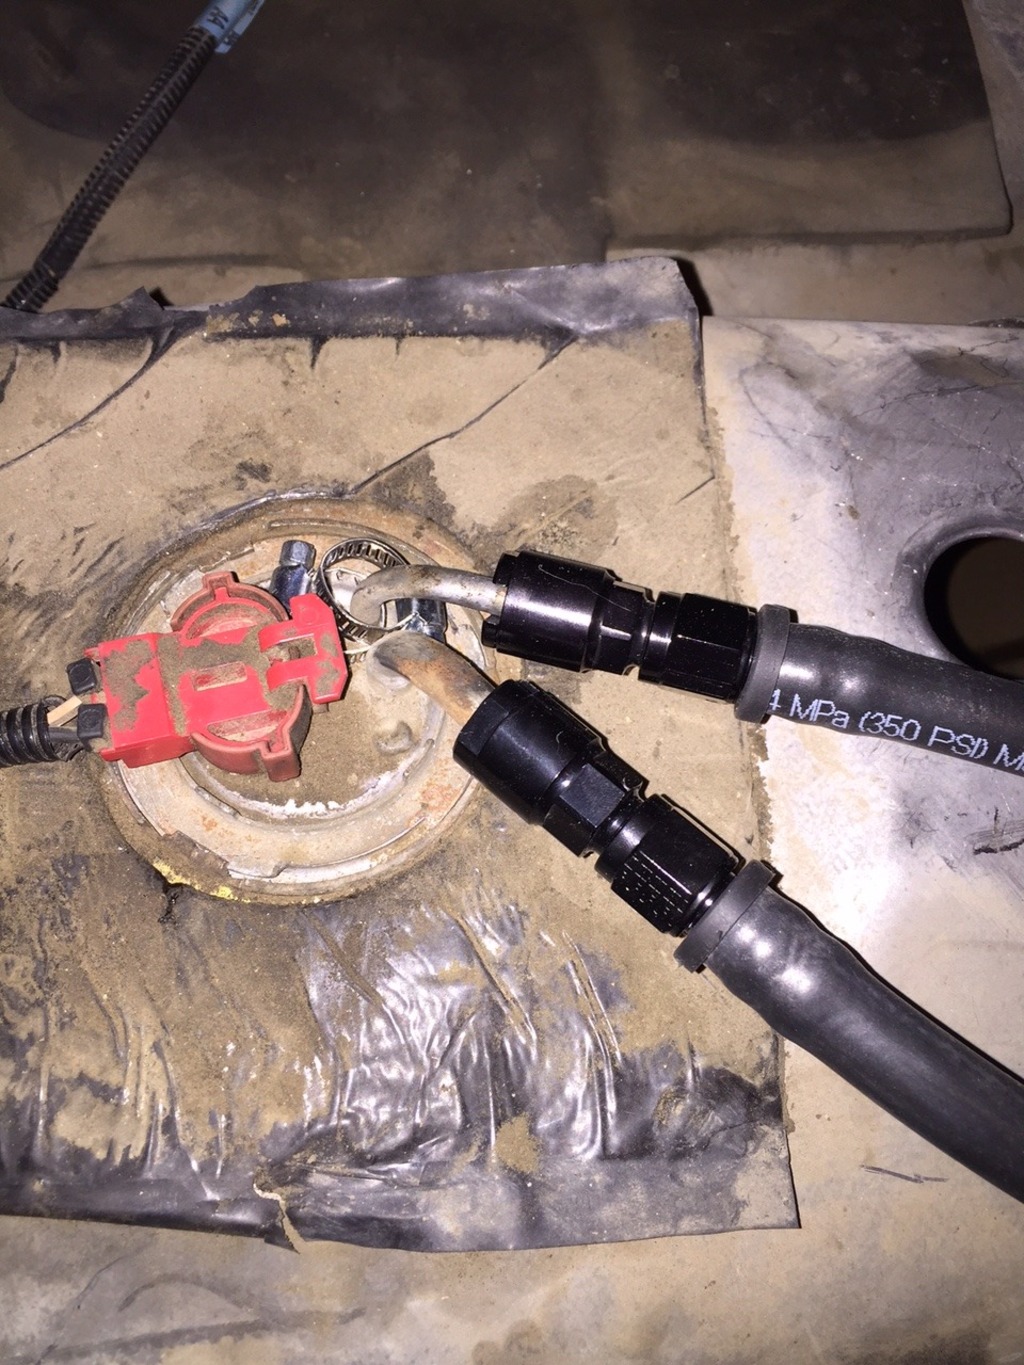
I hated the way the fuel setup came out before. I finally was able to find the right fitting for the 1/4" return. I used 3/8" push-lok on the return and then it necks down right at the very end to 1/4". I really don't think it will be much of a restriction. Also, I was talking to a local hose and fitting supplier and he said he can sell the Gates equivalent of Push-Lok for $0.85 a foot. I haven't used it yet but that might be a viable option for anyone wanting to do their fuel system.
I have the same car. How do you plan on doing the fuel lines? How much power do you plan to make with a single 400 in tank? It looks like an easy, inexpensive upgrade.
I'm doing Push-Lok hose all the way from the tank to the engine for both the feed and return using Russell push on fittings that connect to the tank and the fuel rail. I only plan on making around 600 whp but if I did the math right I think the 80 lb injectors and the Walboro 400lph can do 800whp safely on 91 octane if not a little more
 06-11-2015, 11:53 PM


 . I'll for sure be following along!