Home built D1-SC and fmic, finally got to start it (Vid & Pics)
 04-10-2007, 08:31 PM
#1
10 Second Club
Thread Starter
iTrader: (37)
Join Date: Jan 2004
Posts: 1,935
Likes: 0
Received 0 Likes
on
0 Posts
Well I finally got to start it. I've been parting it together and working on it for about 2-3 months, hour here and there in my free time. Now it's not ready to go beating on it because I still need to have the fuel system installed but it sure felt good to start it and not have any problems. My home made fan shroud seems to be working. It has a 16" spal fan. It's keeping the temp right at 160. I moved the radiator forward about 2 inches so I was able to fit a 4" 90 with a nice big power adder air filter. Not sure about that brand but it was the closest thing to the K&N filter that I wanted. The K&N had to be ordered so I just went with this one. I'll get some pics under there later. I'm getting off topic, heres a vid and some pics. It sounds odd to me but I've never heard one before so I hope it's normal. Theres a wierd shreeking off and on that I think might be the by-pass valve. If you have any questions or comments please feel free.


http://s21.photobucket.com/albums/b2...t=MOV02236.flv
http://s21.photobucket.com/albums/b2...t=MOV02236.flv
 04-10-2007, 08:34 PM
#2
Teching In
iTrader: (5)
Join Date: Mar 2007
Location: Woodbridge, Virginia
Posts: 46
Likes: 0
Received 0 Likes
on
0 Posts
thats a nice clean looking set up, got anymore pics, Im in the process of making a homemade Turbo/SC (most likely turbo) set up, i would like more pics of the underside/manifolds/ect 
04-10-2007, 08:39 PM
#3
10 Second Club
Thread Starter
iTrader: (37)
Join Date: Jan 2004
Posts: 1,935
Likes: 0
Received 0 Likes
on
0 Posts
I'll get more pics of the underside and how I routed the piping. Give me a day or two though.
Actually you can pretty much see all the pipe between those to pipes, you know it's a supercharger not a turbo, right? Manifolds are QTP long tubes lol.
Actually you can pretty much see all the pipe between those to pipes, you know it's a supercharger not a turbo, right? Manifolds are QTP long tubes lol.
 BOSS APPROVED!

 04-10-2007, 08:47 PM
#7
Teching In
iTrader: (5)
Join Date: Mar 2007
Location: Woodbridge, Virginia
Posts: 46
Likes: 0
Received 0 Likes
on
0 Posts
Originally Posted by rufretic
I'll get more pics of the underside and how I routed the piping. Give me a day or two though.
Actually you can pretty much see all the pipe between those to pipes, you know it's a supercharger not a turbo, right? Manifolds are QTP long tubes lol.
Actually you can pretty much see all the pipe between those to pipes, you know it's a supercharger not a turbo, right? Manifolds are QTP long tubes lol.
Trending Topics
04-10-2007, 09:10 PM
#8
10 Second Club
iTrader: (21)
Join Date: Nov 2001
Location: Olive Branch MS/Memphis
Posts: 728
Likes: 0
Received 0 Likes
on
0 Posts

Great looking setup... Did you save any money by doing it yourself? Did you buy all the parts new or did you find used stuff. Where can you buy the procharger parts separately like that. Any more pics?
Josh
Josh
04-10-2007, 09:17 PM
#9
FormerVendor

Join Date: Mar 2006
Location: Hell AFB
Posts: 1,540
Likes: 0
Received 0 Likes
on
0 Posts
Originally Posted by Hugger
Great looking setup... Did you save any money by doing it yourself? Did you buy all the parts new or did you find used stuff. Where can you buy the procharger parts separately like that. Any more pics?
Josh
Josh
 We sell the peice parts from procharger.
04-10-2007, 09:46 PM
We sell the peice parts from procharger.
04-10-2007, 09:46 PM
#10
On The Tree

Join Date: Apr 2005
Posts: 104
Likes: 0
Received 0 Likes
on
0 Posts
Thats bad *** man..
It looks like you did the ebay intercooler and piping as well. Im sure that you saved a grand or two by doing it yourself. and it looks much simpler than a procharger kit. Let us know how much power it makes.
Thats a big 10-4 on the homemade procharger kits
It looks like you did the ebay intercooler and piping as well. Im sure that you saved a grand or two by doing it yourself. and it looks much simpler than a procharger kit. Let us know how much power it makes.
Thats a big 10-4 on the homemade procharger kits
 04-10-2007, 10:10 PM
#12
10 Second Club
Thread Starter
iTrader: (37)
Join Date: Jan 2004
Posts: 1,935
Likes: 0
Received 0 Likes
on
0 Posts
In the end I'll of paid around the same as a kit, BUT I'll have a huge front mount intercooler, a nice race by-pass valve, a non restrictive intake hat/elbow and a fuel system good to 900rwhp. It should make between 50-100 more rwhp than the "kit" from procharger as it is. Plus the system will be set-up to just change the pully and up the boost when my block is built for it. I didn't do it this way to save money over the kit, I did it to not have to up-grade everything down the road. Installing everything myself, now that saved some money.
I'm waiting for another vid and some pics to upload, I'll post them as soon as they are done.
I'm waiting for another vid and some pics to upload, I'll post them as soon as they are done.
04-10-2007, 10:25 PM
#13
10 Second Club
Thread Starter
iTrader: (37)
Join Date: Jan 2004
Posts: 1,935
Likes: 0
Received 0 Likes
on
0 Posts
I need to get some pics of the fan shroud and the intake elbow still but for now this will have to do.


And I like this vid cause it shows how I mounted my gauges and have everything matching blue. I know it's a little too much for some people but I love how it looks and I love monitering as many things as possible, makes me feel a little safer lol. The door is open so it should be a little less loud when in the car driving.
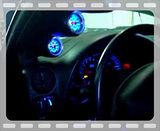
And I like this vid cause it shows how I mounted my gauges and have everything matching blue. I know it's a little too much for some people but I love how it looks and I love monitering as many things as possible, makes me feel a little safer lol. The door is open so it should be a little less loud when in the car driving.
04-11-2007, 05:40 AM
#16
TECH Enthusiast
iTrader: (6)
Join Date: Jul 2006
Location: Hutchinson, MN
Posts: 571
Likes: 0
Received 0 Likes
on
0 Posts
Looks really nice and clean, like your gauge lay out also.
Can we get a video of it idling from the front side? maybe a few small revs?
I think i'm going with a procharger setup, still in the middle of researching.
Can we get a video of it idling from the front side? maybe a few small revs?
I think i'm going with a procharger setup, still in the middle of researching.
04-11-2007, 07:20 AM
#17
10 Second Club
Thread Starter
iTrader: (37)
Join Date: Jan 2004
Posts: 1,935
Likes: 0
Received 0 Likes
on
0 Posts
Thanks for all the comps.
Freak, in my first post, the link at the bottom is another vid from the front. No revs yet because I'm not going to risk anything untill I have the fuel system and tune done.
Freak, in my first post, the link at the bottom is another vid from the front. No revs yet because I'm not going to risk anything untill I have the fuel system and tune done.
04-11-2007, 12:29 PM
#19
TECH Fanatic
iTrader: (9)

Join Date: Apr 2005
Location: ATL/Savannah Georgia
Posts: 1,395
Likes: 0
Received 0 Likes
on
0 Posts
Looks great! Love the blue. Did you just swap all the red bulbs for blue ones?
Very interested in the IC. What size is it? And what all did you cut for it to fit there. I like how you cut the foam. Just what I was looking for. Any more pics? thanks
Cant wait to hear it run
edit: is that a black fernco coupler before the TB?
Very interested in the IC. What size is it? And what all did you cut for it to fit there. I like how you cut the foam. Just what I was looking for. Any more pics? thanks
Cant wait to hear it run
edit: is that a black fernco coupler before the TB?
04-11-2007, 12:35 PM
#20
10 Second Club
Thread Starter
iTrader: (37)
Join Date: Jan 2004
Posts: 1,935
Likes: 0
Received 0 Likes
on
0 Posts
Originally Posted by MikeC5Vert
Did you build up all of those pipes?
Last edited by rufretic; 04-11-2007 at 12:49 PM.