98 Racetronix Fuel pump and hotwire harness /w trap door
 12-01-2012, 06:49 PM
#1
TECH Addict
Thread Starter
iTrader: (2)
Hello everybody!
As the title states im going to show ya'll that have been asking and most people kinda just beat around the bush about it since most people are all about 99 and aboce fuel pumps.
AS everyone knows the 98 f-body is the red headed step child that everyone would rather not deal with since it has a few things different.
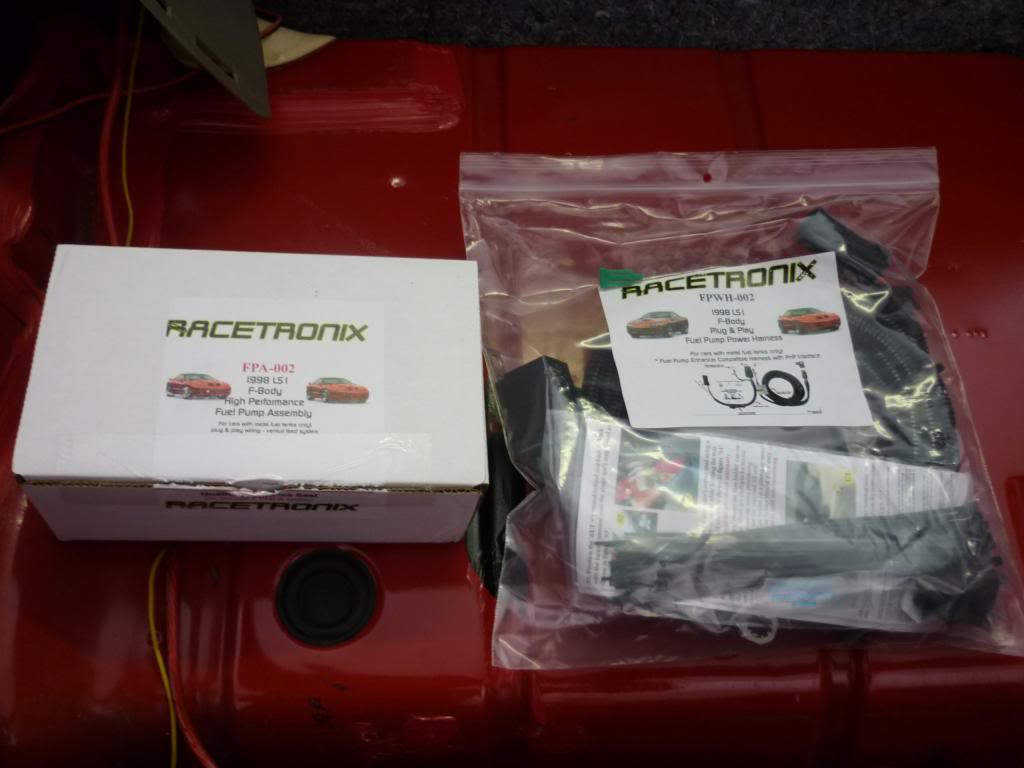
Install the Racetronix 255 Fuel pump and Hotwire kit (and battery wire)
PREP
First things first
You need tools - basic stuff like sockets, wrenches, plyers, cutters, ETC
You need the pump and wiring harness- (you dont "need" the harness per say, but its recommended if you plan on anything over stock HP levels but the pump will work on the stock wiring harness if you choose)
A lift is helpful but not needed. Jacks and jack stands will do.
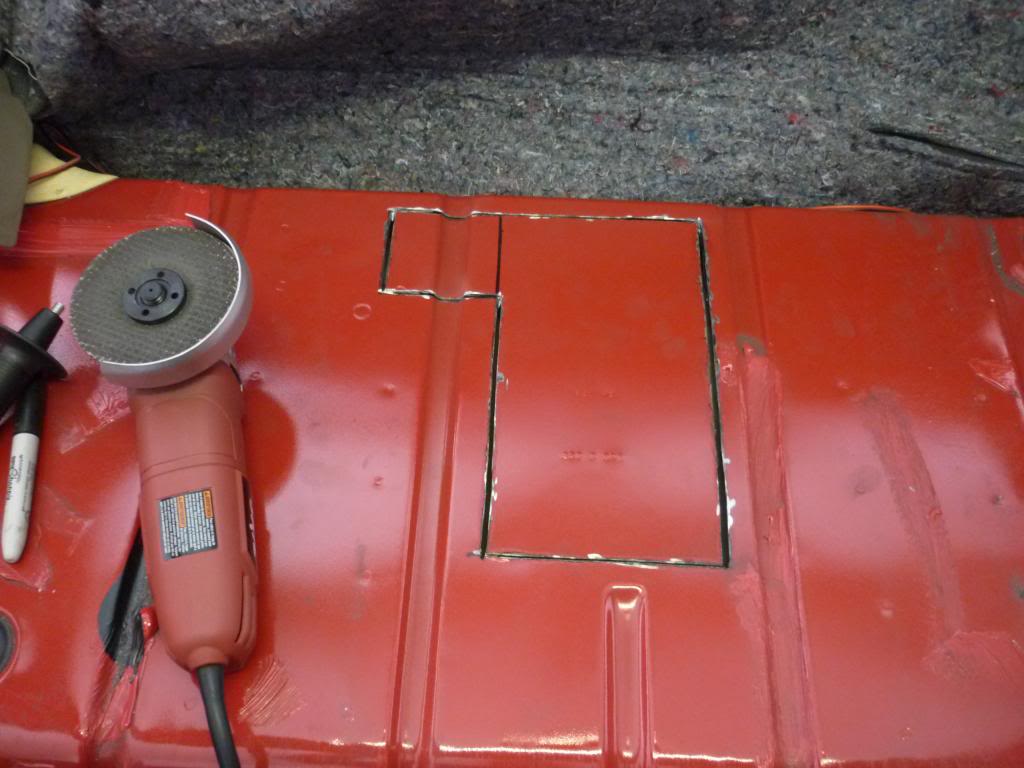
some form of cuting devise. Some use cutoff wheels, dremils... I used an electric angle grinder with a 1/8" cutting wheel. worked great for me.
THE WORK
You have a little work ahead of you but slow and stead wins the race here.
Now this install focusses on using the trap door technique but you can do it the right/hard way and drop the tank if you will, but that requires ALOT more work then i or most of you are willing to do. but if you are so inclined to have at it.
-DISCONNECT THE NEGATIVE TERMINAL ON BATTERY!!!
-Depressurize the fuel system. I used the fuel rail test port.
-That includes dropping the panhard bar, possible the muffler, disconnecting the the tank straps, disconnecting the filler tube, and all kinds of other stuff... up to you. heres what i did
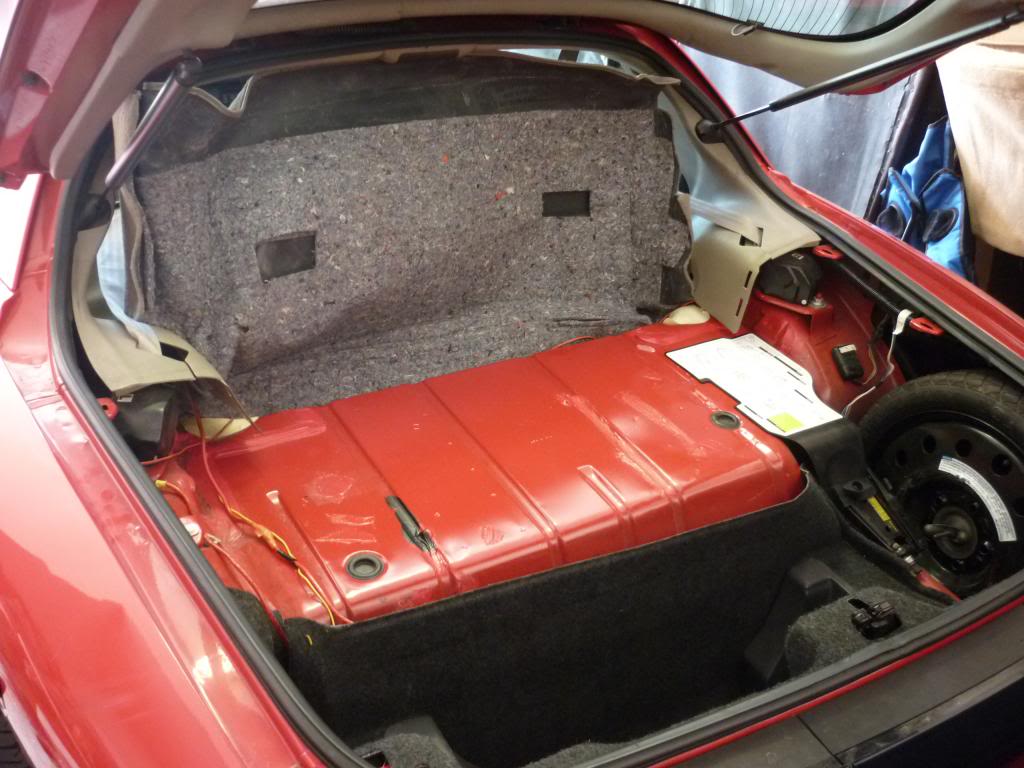
-Take out the little panal thing that covers the trunk area when you have the trunck closed, the two (2) plastic panels in the trunk, unscrew the rear seat top locks with a 47 torx and set them aside, pull up the carpet and set it up so it acts like a barrior between the trunk area and the cabin. like so:
-measure the area to be cut. I measured roughly and inch for each side from the little indents and then an inch from where the seat back sits against. The L postion i measured from roughly where that slight circle in the metal shows and then make and "L" portion from there. As such:
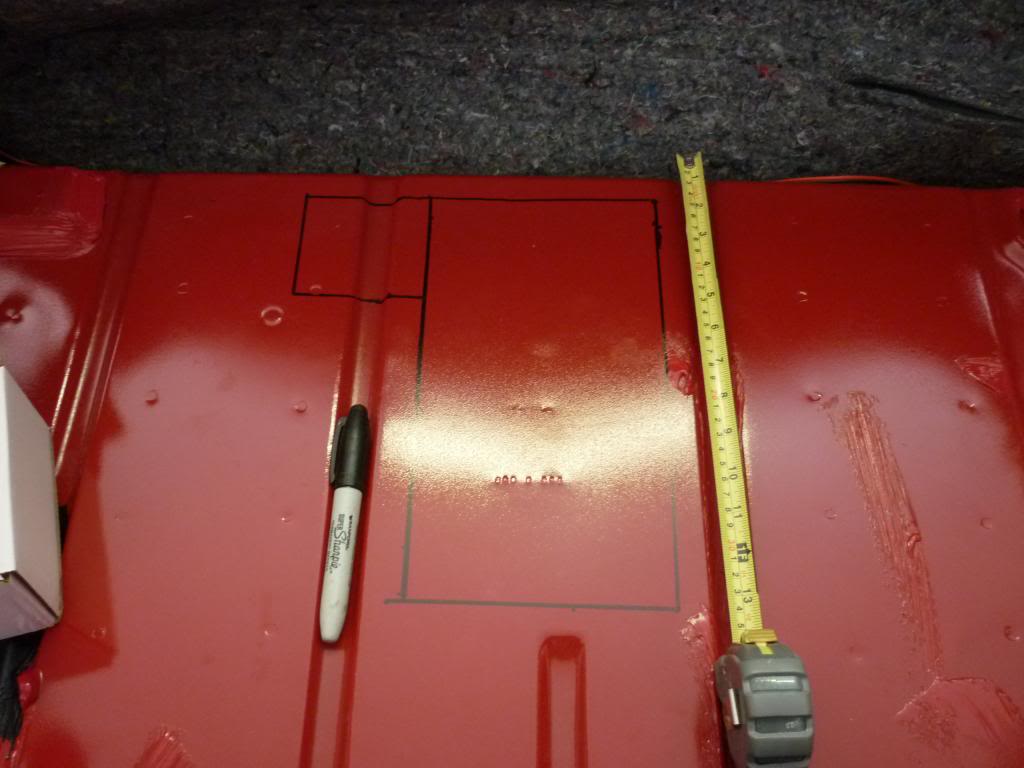
-after measuring and checking it over, obviously you have to make it, so use a sharpee, makes it easy to follow... Time for cutting. What ever devise yor using wear eye protection and hearing protection. please lol
make sure the sparks are being aimed away from sensitive stuff like glass, electronics, flammibles... also, while cutting insure you are going as shallow as possible and dont supper heat the metal while you cutting. that means cut a little at a time and then pull away. you welders out there will understand this but for those of you that arnt... YOU CUTTING OVER A FUEL TANK!! you dont want a super how piece of metal to sit on somthing it isnt suppose to. cutting alittle at a time ensures your not over heating them metal. it also gives you a chance to make sure you arnt going too deep.
If you take your time youll end up with somthing like this.. I used an angle grinder so hows that for metal working lol:
-after you cut it pry it up with a little pry bar since some of the corners might still have metal attached unless you cut through your corners.
Now i dont know why, but on mine where the L portion was a portion of metal that just seem to be "extra" and acted like a hinge whilel bending it, SO I kept it and actualy keeps its shape for the most part. as so.

-Clean it up in there so you dont get metal, dirt, or anthing else in there, that isnt fuel. clean it up good. if its like mine its been 14 years since that part of the car saw daylight. give it some love before you put it back in the dark.
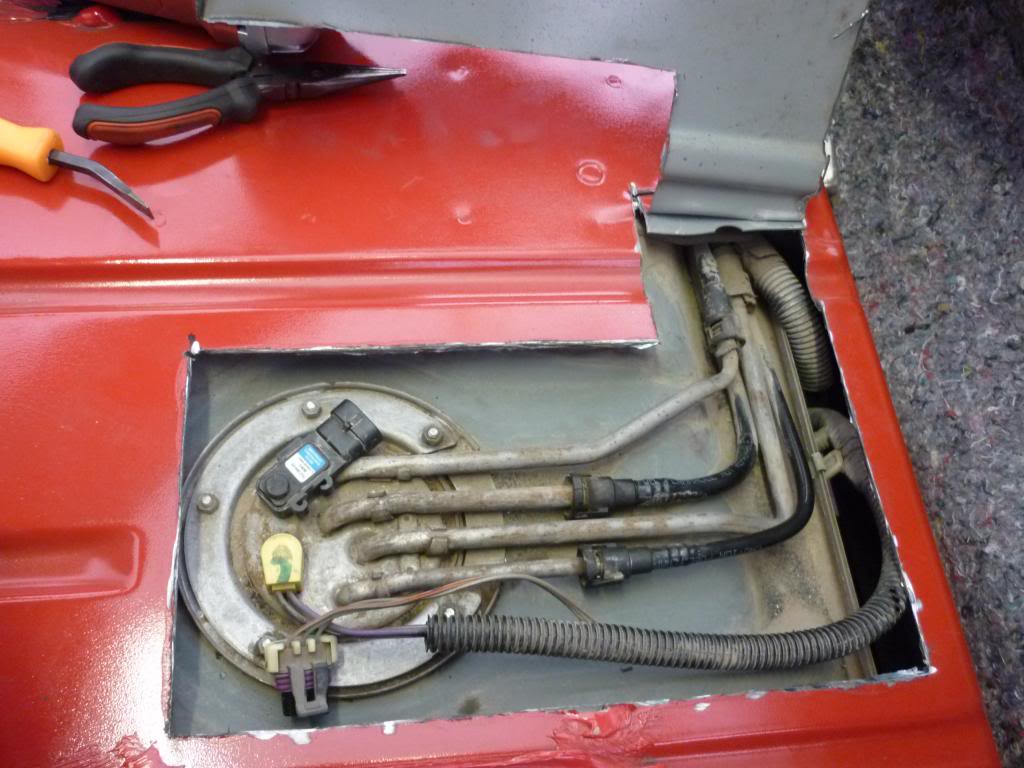
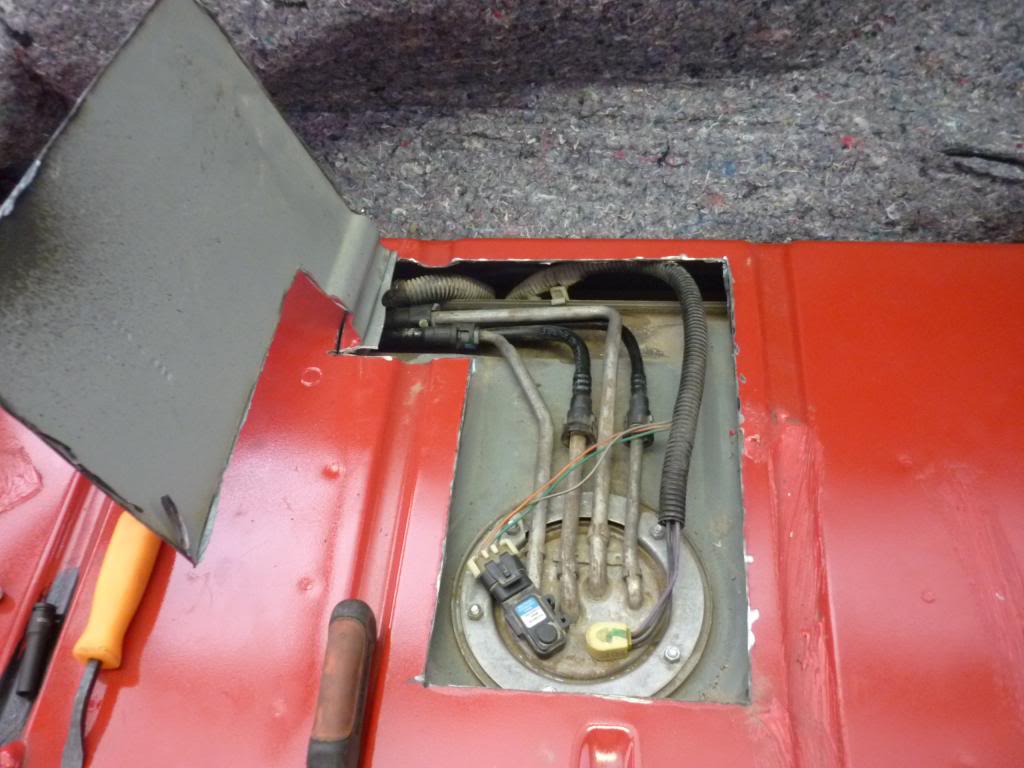
-next disconnect the fuel lines. there are four(4) of them. get some rags to keep fuel off of your interior. now for us 98s, we actually have it easy. we have screws on top instead of some stupid locking collar that ive heard on 99+ is a PITA to take off. just unscrew them and thats it.
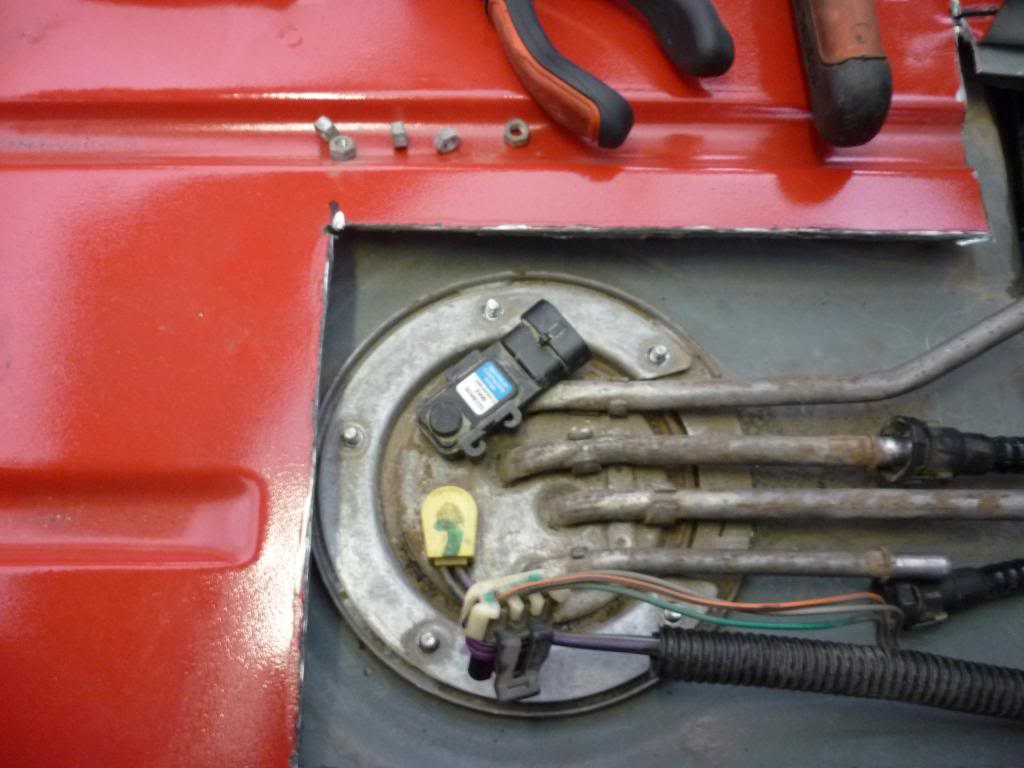
Now after unscrewing the bolts off the fuel pump assembly, slide the collar up out of the way a bit, then pull the whole assembly out UNTIL you get to the sender float. very carfully pop the sender arm out off the sender and set it aside, then pull the whole thing out. youll have to wiggle it abit but its not as hard as it looks.
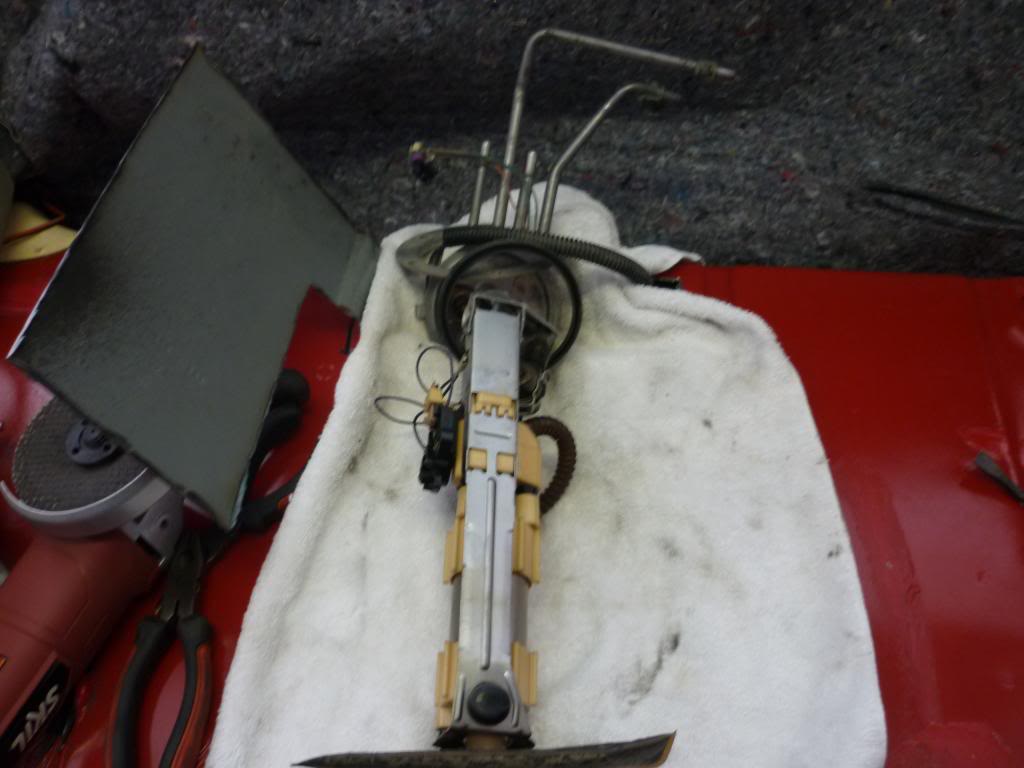
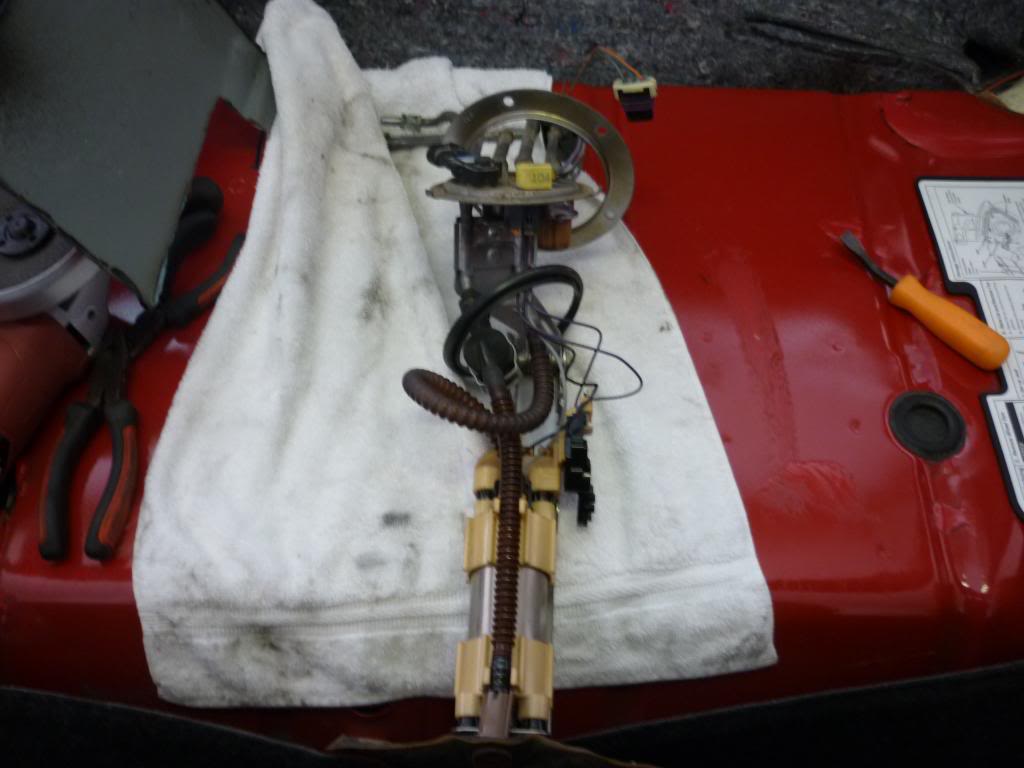
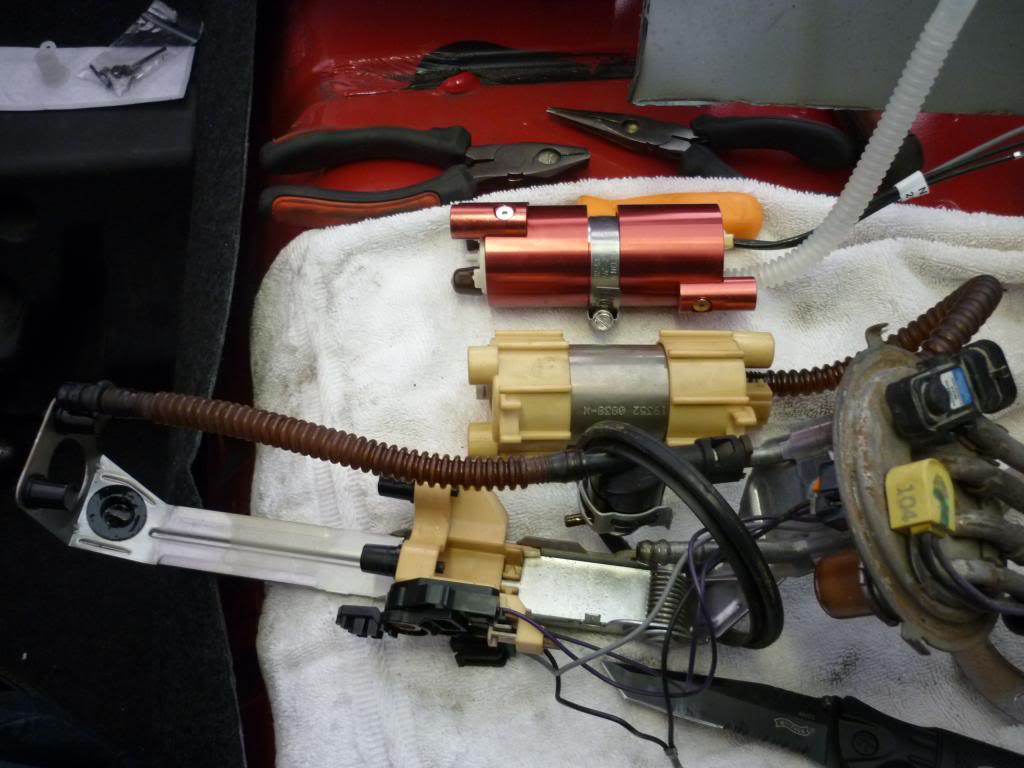
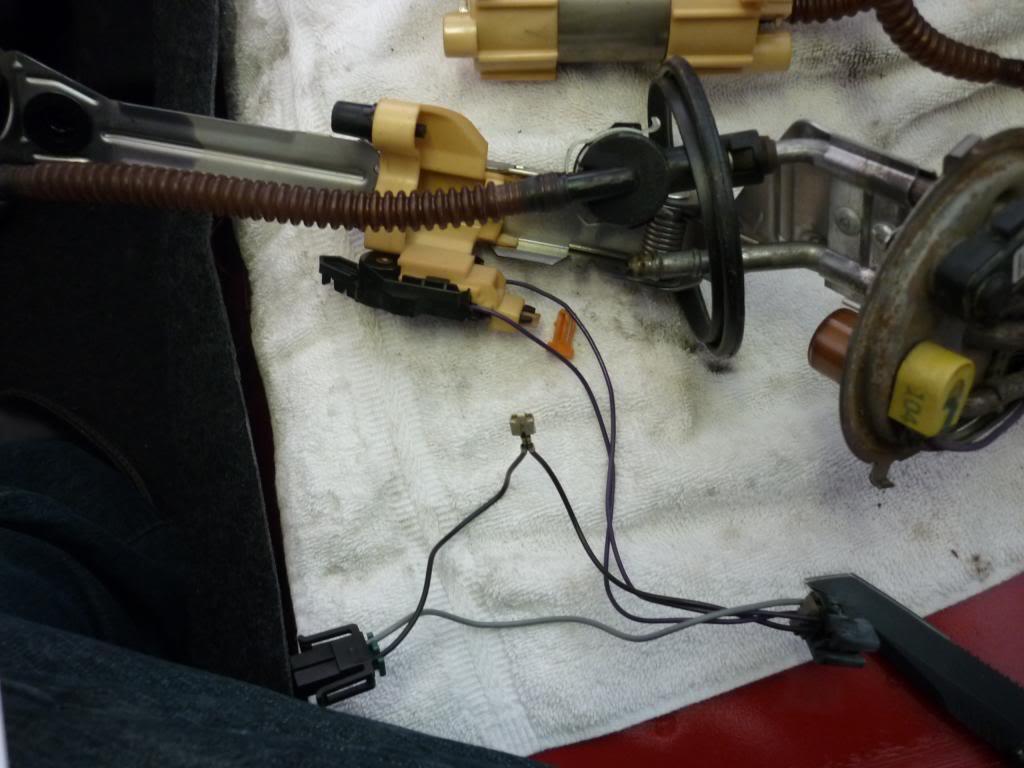
-Now im not gonna rewrite EVERYTHING from the Ractronix install guide, but a few tips too keep you out of trouble.. dont mix up those two VIOLET wire that you unhook from the stock wire from the pump assembly. do as the instruction tell you and youll be fine. heres a few pics of the process

NOw mind you, that liittle locking collar you put on the filter sock is a PITA. take your time and it will come.
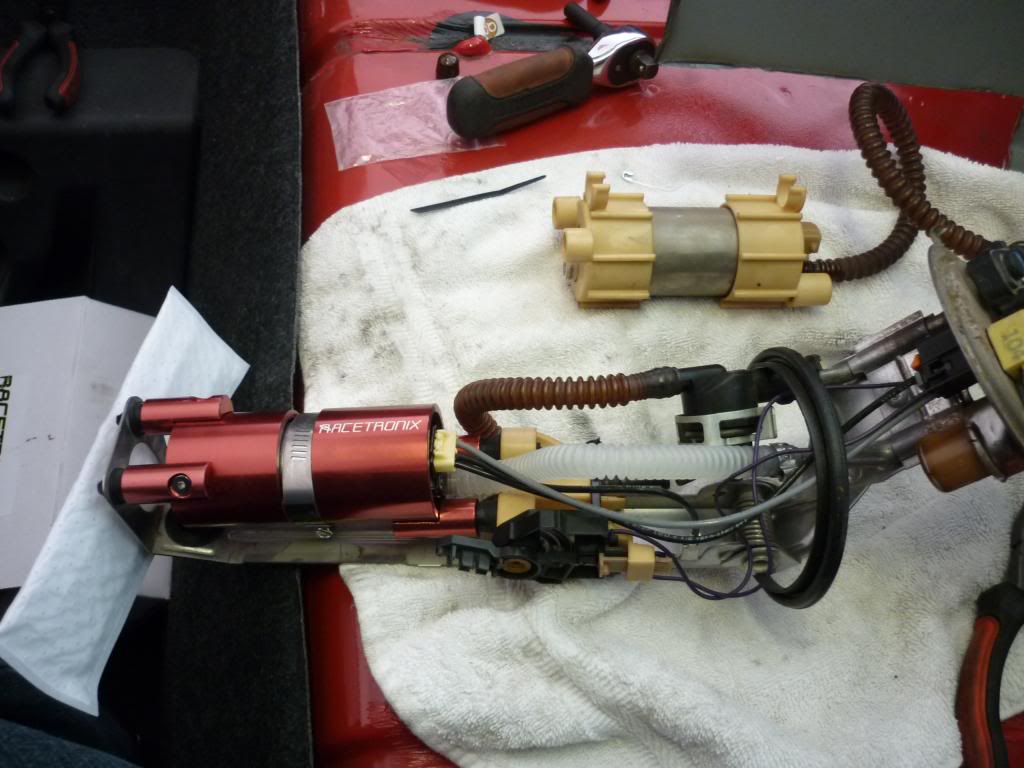
-You almost home free. now i dont have picks of sliding the pump back in since thats just rediculous lol and i only have two hands lol
but a word of advise, the pump needs to "angle" towards the back of the car of it wont fit in the tank. take your time and it will go in there. make sure you put the sender back on and make sure you take youtime. also make sure that little rubber ring doesnt find its way in the fuel tank. make sure its sitting nice and flush on the fuel tank
-ensure all your fuel hook ups are in the right spot and not sitting on or pinching anything, slide the collar back on, screw it down and your almost scotch free,
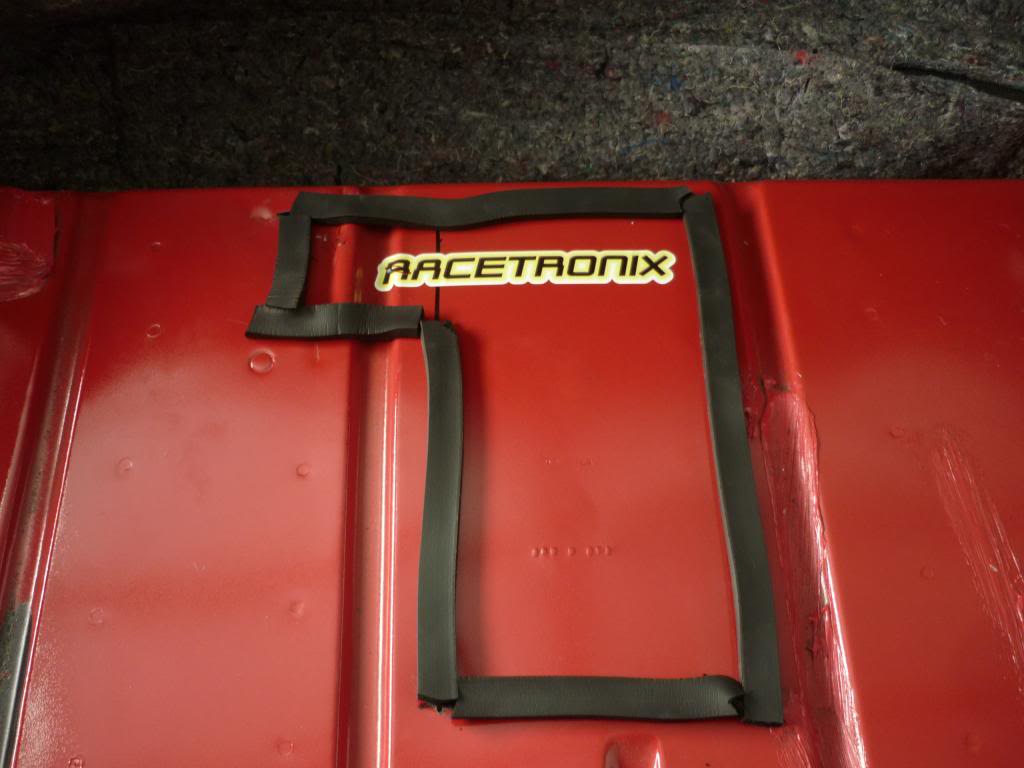
-now theres differnt ways of covering up the trap door once you are done. I myself used some weather stripping with adhiesive backing. worked out well and looks good.
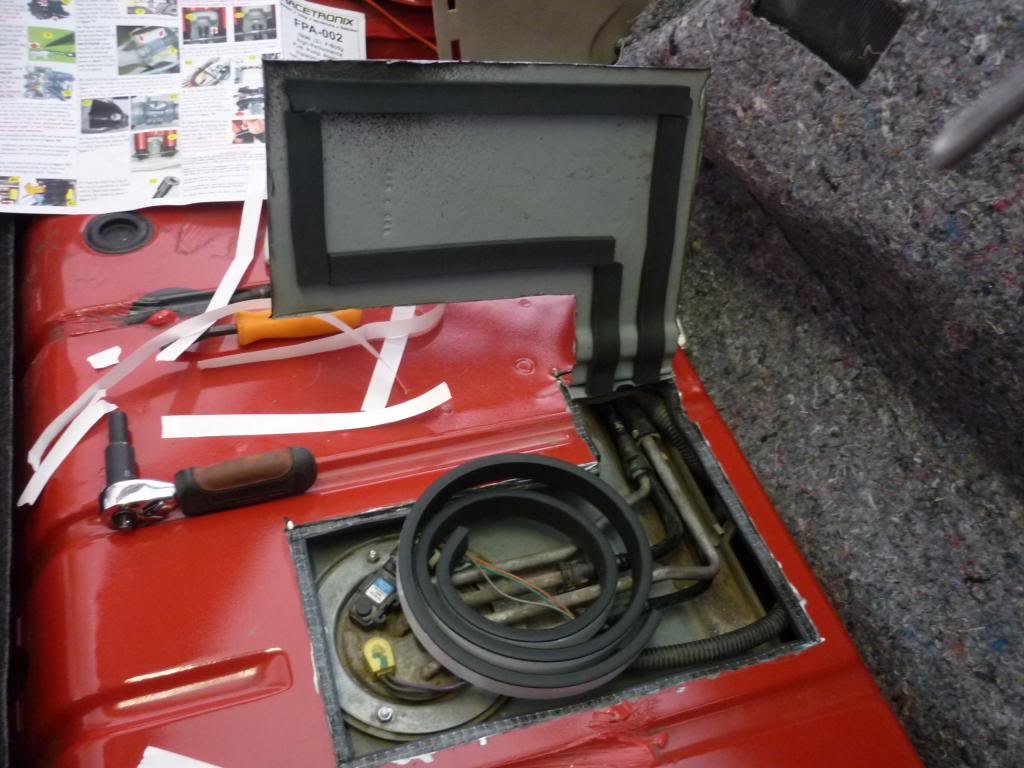
-AND Viola!!! you have yourself a new fuel pump with easy accress for later stuff like dual pumps and whatnots
I just like this pic cause its cheesy lol
PART 2
Wiring harness
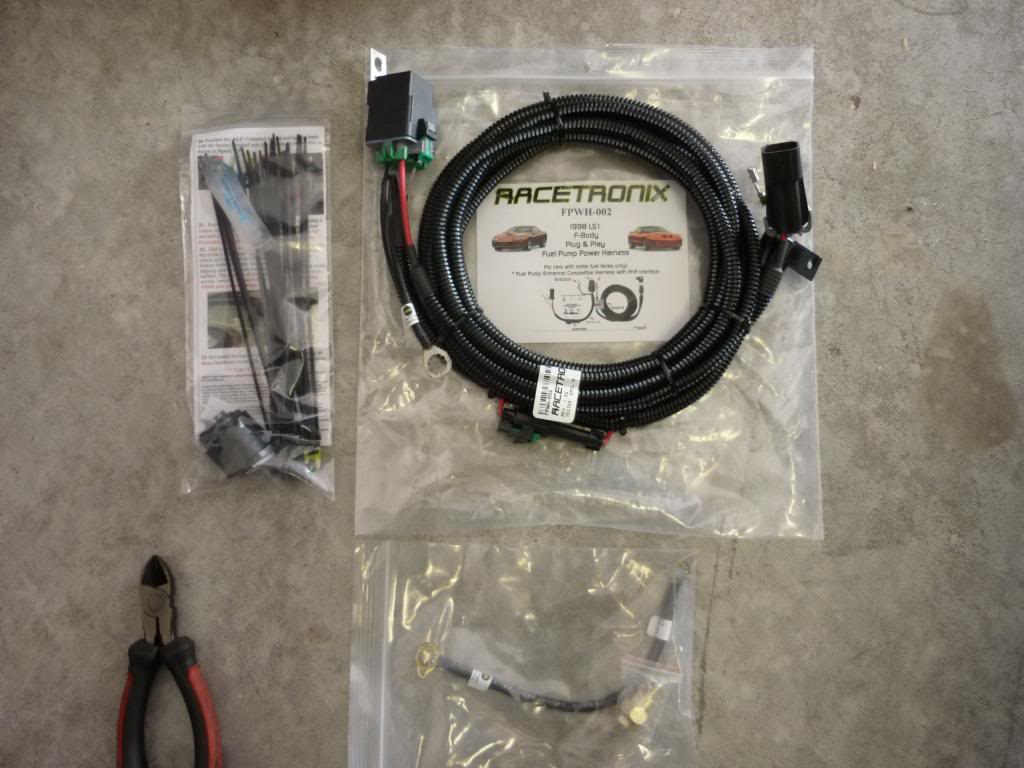
Since you made it this far, why not finish it up. Its not hard, just time consuming and the racetronixs instructions are alittle confusing and unless you have a fine undrstanding of electronic connections.
follow the instruction very carfully on how to re-pin the connectors. its not hard just dont forget the other connector provided by ractronixs in the box and youll do fine lol
- youll have to jack the car up to get under it. not too high, just enough to get to the fuel pump harness connections and the alternator.
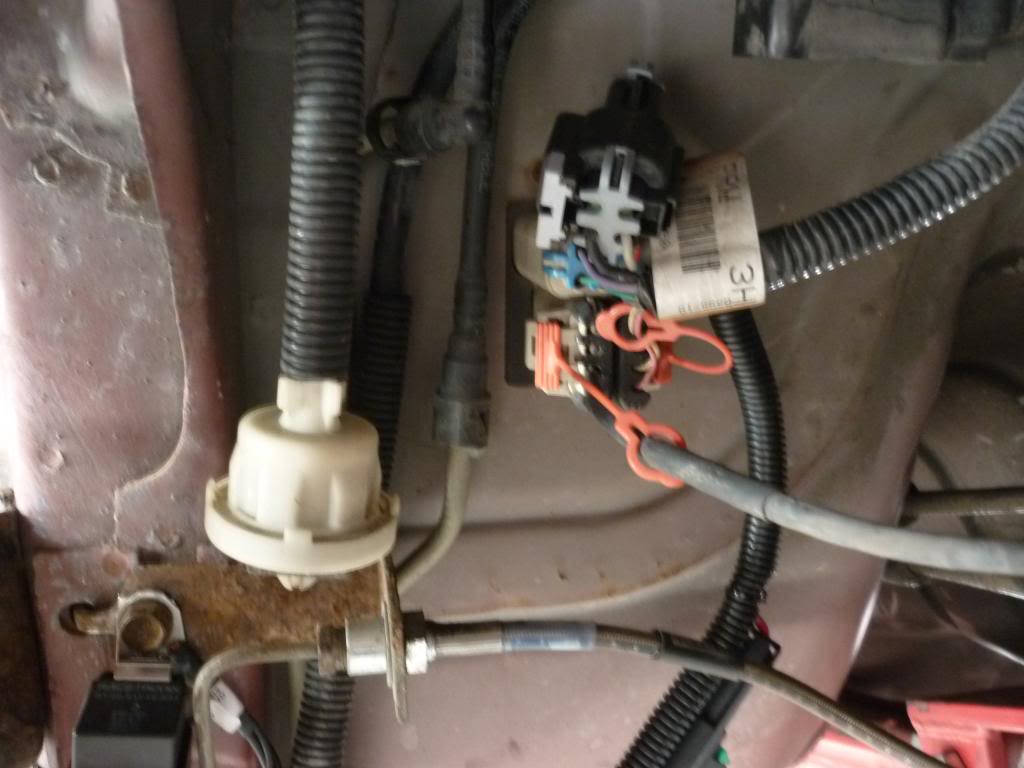
-bolt the ractronix relay on the bolt holding up the brake line shown in diagrams and show in pictures here lol make sure you clean all your connections with sandpaper or a wirebrush.
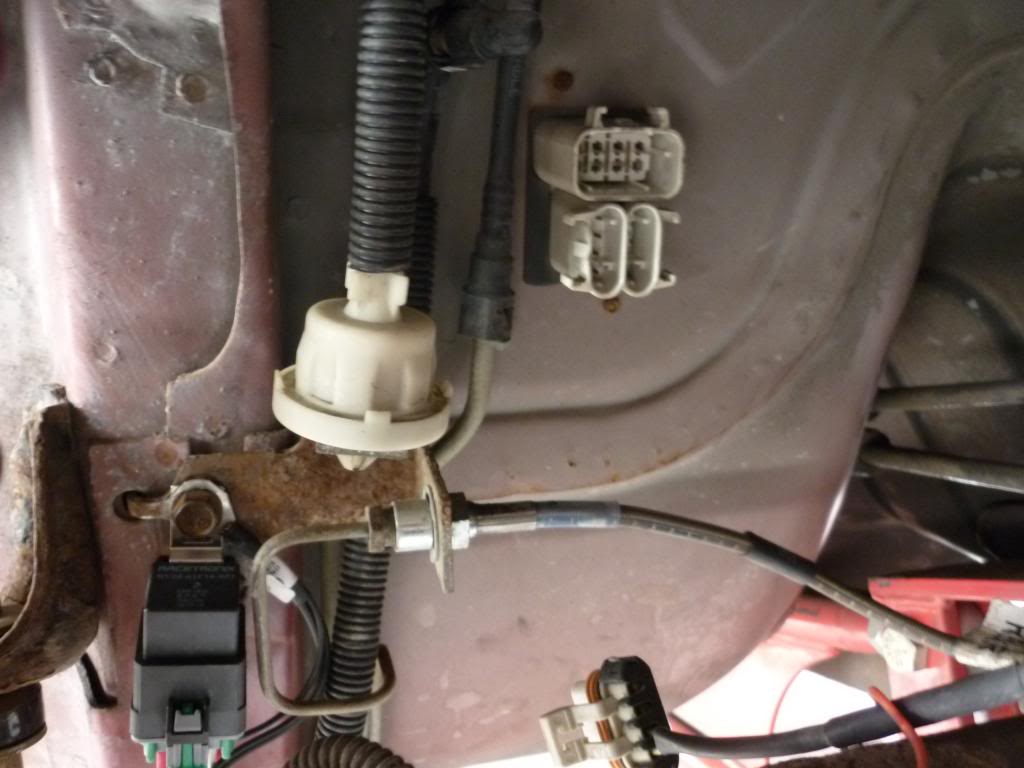
-biggest thing your gonna worry about is the top portion of the connections show here, the others are just disconnected to get them out of the way. The 8 pin connector is all youll have mess with and only two wires. the gray and the black wires. B and C on the connector. its marked.
those get put into the suppled connector and then plugged into the racetronix harness and that parts done, then just routing it to the alternator and finding a spot for the fuse. recommend putting next to the rest of the fuses and relays for "easy" diagnostics.
make sure you tighen the alt nice and tight under there. On a side note, this would be a good time to upgrade your alternator to the truck alt if you havnt already. supplys more amps and doesnt pulsate at stoplights lol
ANd again, chessy pics
If you want to do that racetronix battery wire you can, but its not a huge big deal. just adds another ground strap to the chasis form the battery.
My car fired right up after i cycled the key in on but not run to help prime the pump and to check for leaks. Double check all you work, and clean up and enjoy.
any questions fell free to ask, if i left anything out please let me know, AND i and not responisble if you hurt yourself OR your car. Please be safe.
As the title states im going to show ya'll that have been asking and most people kinda just beat around the bush about it since most people are all about 99 and aboce fuel pumps.
AS everyone knows the 98 f-body is the red headed step child that everyone would rather not deal with since it has a few things different.
Install the Racetronix 255 Fuel pump and Hotwire kit (and battery wire)
PREP
First things first
You need tools - basic stuff like sockets, wrenches, plyers, cutters, ETC
You need the pump and wiring harness- (you dont "need" the harness per say, but its recommended if you plan on anything over stock HP levels but the pump will work on the stock wiring harness if you choose)
A lift is helpful but not needed. Jacks and jack stands will do.
some form of cuting devise. Some use cutoff wheels, dremils... I used an electric angle grinder with a 1/8" cutting wheel. worked great for me.
THE WORK
You have a little work ahead of you but slow and stead wins the race here.
Now this install focusses on using the trap door technique but you can do it the right/hard way and drop the tank if you will, but that requires ALOT more work then i or most of you are willing to do. but if you are so inclined to have at it.
-DISCONNECT THE NEGATIVE TERMINAL ON BATTERY!!!
-Depressurize the fuel system. I used the fuel rail test port.
-That includes dropping the panhard bar, possible the muffler, disconnecting the the tank straps, disconnecting the filler tube, and all kinds of other stuff... up to you. heres what i did
-Take out the little panal thing that covers the trunk area when you have the trunck closed, the two (2) plastic panels in the trunk, unscrew the rear seat top locks with a 47 torx and set them aside, pull up the carpet and set it up so it acts like a barrior between the trunk area and the cabin. like so:
-measure the area to be cut. I measured roughly and inch for each side from the little indents and then an inch from where the seat back sits against. The L postion i measured from roughly where that slight circle in the metal shows and then make and "L" portion from there. As such:
-after measuring and checking it over, obviously you have to make it, so use a sharpee, makes it easy to follow... Time for cutting. What ever devise yor using wear eye protection and hearing protection. please lol
make sure the sparks are being aimed away from sensitive stuff like glass, electronics, flammibles... also, while cutting insure you are going as shallow as possible and dont supper heat the metal while you cutting. that means cut a little at a time and then pull away. you welders out there will understand this but for those of you that arnt... YOU CUTTING OVER A FUEL TANK!! you dont want a super how piece of metal to sit on somthing it isnt suppose to. cutting alittle at a time ensures your not over heating them metal. it also gives you a chance to make sure you arnt going too deep.
If you take your time youll end up with somthing like this.. I used an angle grinder so hows that for metal working lol:
-after you cut it pry it up with a little pry bar since some of the corners might still have metal attached unless you cut through your corners.
Now i dont know why, but on mine where the L portion was a portion of metal that just seem to be "extra" and acted like a hinge whilel bending it, SO I kept it and actualy keeps its shape for the most part. as so.
-Clean it up in there so you dont get metal, dirt, or anthing else in there, that isnt fuel. clean it up good. if its like mine its been 14 years since that part of the car saw daylight. give it some love before you put it back in the dark.
-next disconnect the fuel lines. there are four(4) of them. get some rags to keep fuel off of your interior. now for us 98s, we actually have it easy. we have screws on top instead of some stupid locking collar that ive heard on 99+ is a PITA to take off. just unscrew them and thats it.
Now after unscrewing the bolts off the fuel pump assembly, slide the collar up out of the way a bit, then pull the whole assembly out UNTIL you get to the sender float. very carfully pop the sender arm out off the sender and set it aside, then pull the whole thing out. youll have to wiggle it abit but its not as hard as it looks.
-Now im not gonna rewrite EVERYTHING from the Ractronix install guide, but a few tips too keep you out of trouble.. dont mix up those two VIOLET wire that you unhook from the stock wire from the pump assembly. do as the instruction tell you and youll be fine. heres a few pics of the process
NOw mind you, that liittle locking collar you put on the filter sock is a PITA. take your time and it will come.
-You almost home free. now i dont have picks of sliding the pump back in since thats just rediculous lol and i only have two hands lol
but a word of advise, the pump needs to "angle" towards the back of the car of it wont fit in the tank. take your time and it will go in there. make sure you put the sender back on and make sure you take youtime. also make sure that little rubber ring doesnt find its way in the fuel tank. make sure its sitting nice and flush on the fuel tank
-ensure all your fuel hook ups are in the right spot and not sitting on or pinching anything, slide the collar back on, screw it down and your almost scotch free,
-now theres differnt ways of covering up the trap door once you are done. I myself used some weather stripping with adhiesive backing. worked out well and looks good.
-AND Viola!!! you have yourself a new fuel pump with easy accress for later stuff like dual pumps and whatnots
I just like this pic cause its cheesy lol
PART 2
Wiring harness
Since you made it this far, why not finish it up. Its not hard, just time consuming and the racetronixs instructions are alittle confusing and unless you have a fine undrstanding of electronic connections.
follow the instruction very carfully on how to re-pin the connectors. its not hard just dont forget the other connector provided by ractronixs in the box and youll do fine lol
- youll have to jack the car up to get under it. not too high, just enough to get to the fuel pump harness connections and the alternator.
-bolt the ractronix relay on the bolt holding up the brake line shown in diagrams and show in pictures here lol make sure you clean all your connections with sandpaper or a wirebrush.
-biggest thing your gonna worry about is the top portion of the connections show here, the others are just disconnected to get them out of the way. The 8 pin connector is all youll have mess with and only two wires. the gray and the black wires. B and C on the connector. its marked.
those get put into the suppled connector and then plugged into the racetronix harness and that parts done, then just routing it to the alternator and finding a spot for the fuse. recommend putting next to the rest of the fuses and relays for "easy" diagnostics.
make sure you tighen the alt nice and tight under there. On a side note, this would be a good time to upgrade your alternator to the truck alt if you havnt already. supplys more amps and doesnt pulsate at stoplights lol
ANd again, chessy pics
If you want to do that racetronix battery wire you can, but its not a huge big deal. just adds another ground strap to the chasis form the battery.
My car fired right up after i cycled the key in on but not run to help prime the pump and to check for leaks. Double check all you work, and clean up and enjoy.
any questions fell free to ask, if i left anything out please let me know, AND i and not responisble if you hurt yourself OR your car. Please be safe.
 12-03-2012, 09:14 PM
#2
TECH Addict
Thread Starter
iTrader: (2)
Just for updates, car is running better then it has in a long time actually. I think the stock fuel pump was really effecting fuel delievery and causing irratic running issues. Man im glad i got this! and other then cutting the trap door, was REALLY easy to install. I recommend this for every f-body out there, trap door or not.
12-04-2012, 01:20 PM
#3

Racetronix recommends the removal and cleaning of the fuel tank for all new pump installations:

__________________

Manufacturer / Distributor of Automotive Fuel Systems, Components & Electronics
Please support a Racetronix dealer near you for personalized service.
>WEB SITE<
Manufacturer / Distributor of Automotive Fuel Systems, Components & Electronics
Please support a Racetronix dealer near you for personalized service.
>WEB SITE<
12-04-2012, 02:35 PM
#4
TECH Addict
Thread Starter
iTrader: (2)
i do agree with that, however i flashed a light inside it while I was at it (forgot to mention that in the install) and looked around inside and it was pretty clean actually. You can actually clean it if you had too without dropping it, as long as you have something to reach inside. but i do agree with racetronix.
I actually gotta go back inside it later when i put an adjustable FPR on the rail and delete the stock fuel regulator in the tank.
I actually gotta go back inside it later when i put an adjustable FPR on the rail and delete the stock fuel regulator in the tank.
12-04-2012, 03:45 PM
#5
i do agree with that, however i flashed a light inside it while I was at it (forgot to mention that in the install) and looked around inside and it was pretty clean actually. You can actually clean it if you had too without dropping it, as long as you have something to reach inside. but i do agree with racetronix.
I actually gotta go back inside it later when i put an adjustable FPR on the rail and delete the stock fuel regulator in the tank.
I actually gotta go back inside it later when i put an adjustable FPR on the rail and delete the stock fuel regulator in the tank.
__________________
Manufacturer / Distributor of Automotive Fuel Systems, Components & Electronics
Please support a Racetronix dealer near you for personalized service.
>WEB SITE<
Manufacturer / Distributor of Automotive Fuel Systems, Components & Electronics
Please support a Racetronix dealer near you for personalized service.
>WEB SITE<
 12-04-2012, 04:16 PM
#7

__________________
Manufacturer / Distributor of Automotive Fuel Systems, Components & Electronics
Please support a Racetronix dealer near you for personalized service.
>WEB SITE<
Manufacturer / Distributor of Automotive Fuel Systems, Components & Electronics
Please support a Racetronix dealer near you for personalized service.
>WEB SITE<
Trending Topics
12-04-2012, 07:01 PM
#8
TECH Addict
Thread Starter
iTrader: (2)
well, i didnt. lol obviously
Like I said I agree for everyone to follow racetronix version and have the tank cleaned and whatnot.
Im willing to take the chance that nothing has really ever gotten in my tank and that it doesnt leak, and that the new sock filter and fuel filter will do it job but thats my gamble. Like i said in my install, theres different ways of going about this install. you can drop the tank if you so feel inclined and when your ready to put it all back together, follow the rest of my install. I elected to not drop my tank and just intall the fuel pump as is. Thats my call. if my car breaks down ever for this, ill own up to it. I did my own visial inspection and to my own standard decided that it was fine. If i found chunks of crap in the tank i would have definitly stopped what i was doing and drop the tank.
AS stated im doing my own thing and just posted up a 98 f-body version of the fuelpump swap for people to see specifically what to look for when swapping it out. Its a helpful guide and nothing more. The Chilton Maintence manuals are for when you want to go step by step, bolt by bolt by GM standards. Im pretty sure cutting the hump in the back of the car is NOT in the manual lol this is all on me. If someone wants to use this as a helpful guide, they know the risks involved.
04-07-2013, 01:57 PM
#9

Thanks for the writeup!
I was a bit curious on this. Though Im curious what the largest pump I can throw in there would be. (largest using the stock regulator lines etc).
But big thank you!
I was a bit curious on this. Though Im curious what the largest pump I can throw in there would be. (largest using the stock regulator lines etc).
But big thank you!
04-07-2013, 03:59 PM
#10
TECH Addict
Thread Starter
iTrader: (2)
no prob. i thought id help alittle with more pictures to help everyone out. its easy but pictures always help 
the "largest" pump is relative lol some guys have stuffed 3 walbros in there for a triple setup. the easiest is doing a dual setup. Theres rumor that racetronics have made a 400 pump and is gonna release a "kit" for it. Its suppose to be a "drop" in eventually. the rails, feed, and return have to be beefed up though i believe, but once you get up to the 700+ HP range its time to up the whole system anyway lol
the "largest" pump is relative lol some guys have stuffed 3 walbros in there for a triple setup. the easiest is doing a dual setup. Theres rumor that racetronics have made a 400 pump and is gonna release a "kit" for it. Its suppose to be a "drop" in eventually. the rails, feed, and return have to be beefed up though i believe, but once you get up to the 700+ HP range its time to up the whole system anyway lol
04-07-2013, 08:11 PM
#11
no prob. i thought id help alittle with more pictures to help everyone out. its easy but pictures always help
the "largest" pump is relative lol some guys have stuffed 3 walbros in there for a triple setup. the easiest is doing a dual setup. Theres rumor that racetronics have made a 400 pump and is gonna release a "kit" for it. Its suppose to be a "drop" in eventually. the rails, feed, and return have to be beefed up though i believe, but once you get up to the 700+ HP range its time to up the whole system anyway lol
the "largest" pump is relative lol some guys have stuffed 3 walbros in there for a triple setup. the easiest is doing a dual setup. Theres rumor that racetronics have made a 400 pump and is gonna release a "kit" for it. Its suppose to be a "drop" in eventually. the rails, feed, and return have to be beefed up though i believe, but once you get up to the 700+ HP range its time to up the whole system anyway lol
04-08-2013, 09:43 AM
#12
might be off topic but I figured that this is for a 98 (which I have), is the hard wire necessary? Im just running bolt ons but plan on changing the pump out because of the mileage on it and its making alot more noise as of late, and I dont want it to die on me. I dont plan on making anywhere close to what the pumps hp can handle so im not worried about that.
04-08-2013, 01:01 PM
#14
might be off topic but I figured that this is for a 98 (which I have), is the hard wire necessary? Im just running bolt ons but plan on changing the pump out because of the mileage on it and its making alot more noise as of late, and I dont want it to die on me. I dont plan on making anywhere close to what the pumps hp can handle so im not worried about that.
__________________
Manufacturer / Distributor of Automotive Fuel Systems, Components & Electronics
Please support a Racetronix dealer near you for personalized service.
>WEB SITE<
Manufacturer / Distributor of Automotive Fuel Systems, Components & Electronics
Please support a Racetronix dealer near you for personalized service.
>WEB SITE<
04-08-2013, 01:31 PM
#16
__________________
Manufacturer / Distributor of Automotive Fuel Systems, Components & Electronics
Please support a Racetronix dealer near you for personalized service.
>WEB SITE<
Manufacturer / Distributor of Automotive Fuel Systems, Components & Electronics
Please support a Racetronix dealer near you for personalized service.
>WEB SITE<
04-08-2013, 06:43 PM
#17
TECH Addict
Thread Starter
iTrader: (2)
^^^^ id just get the whole higher powerr kit. its alittle over $200. its defintily worth the little extra money. the harness is very affordable compared to other mods, it just makes sence to get it. if you get ahold of one of the sponsors like WS6stone at the right time, they might have a deal going on. i got my whole thing for a great deal under normal cost.
06-16-2014, 10:39 PM
#18
TECH Apprentice
iTrader: (16)
Join Date: Jan 2011
Location: Central Ohio
Posts: 349
Likes: 0
Received 0 Likes
on
0 Posts

Bumping this back up for anyone who has a 98 to take a look at the violet wires they warn you not to mix up and confirm how they are ran. I am assuming they were run correctly in these pics? I wasn't paying attention when installing mine and forgot which was which, saw this thread and ran mine as JoshuaGrooms has them. However, now I'm paranoid that it's not right 
 Could someone verify the pics in the OP and see if the violet wires are run correctly? Racetronix maybe? Thanks!
Could someone verify the pics in the OP and see if the violet wires are run correctly? Racetronix maybe? Thanks!
08-29-2016, 08:45 PM
#20
TECH Addict
Thread Starter
iTrader: (2)
i dont think I took as much in depth time on the specific wiring since Racetronic did a good job of showing it, I was more of showing where to cut and a few 98 specific details. I did mention to take care and make a note of the violet wires but I don't think I mentioned specifically how they are ran. sorry