
LT Header Guys!!! No more extensions or corvette o2s!
 05-19-2011, 08:30 PM
#1
On The Tree
Thread Starter

Join Date: Jul 2008
Posts: 107
Likes: 0
Received 0 Likes
on
0 Posts
This will show you how to change your front o2 sensors to run off your rear o2 sensor harness. No more extensions, no more corvette sensors, you use your stock wiring harness, and stock length o2s!
***NOTE***
When I did this mod originally, the car was on jacks and getting long tubes installed. If you are INSTALLING the long tubes, enjoy using your stock o2s into the stock harness. If you don't know which connector is front or rear, it's the ONLY ones that fit, and has some slight slack in the wire.
If you already have extensions, then you know you have to take them out, and re-connect your o2s onto the rears now.
If you have the Corvette o2s, you might want to wait on this mod until you need new sensors.
Tools you will need:
7mm socket (1/4� or 3/8� drive is fine)
10mm wrench (or whatever size your negative battery cable is)
small flat-tip screwdriver (not jewelers though)
1. Disconnect the battery. (make sure you know your radio code, sound system settings etc.)
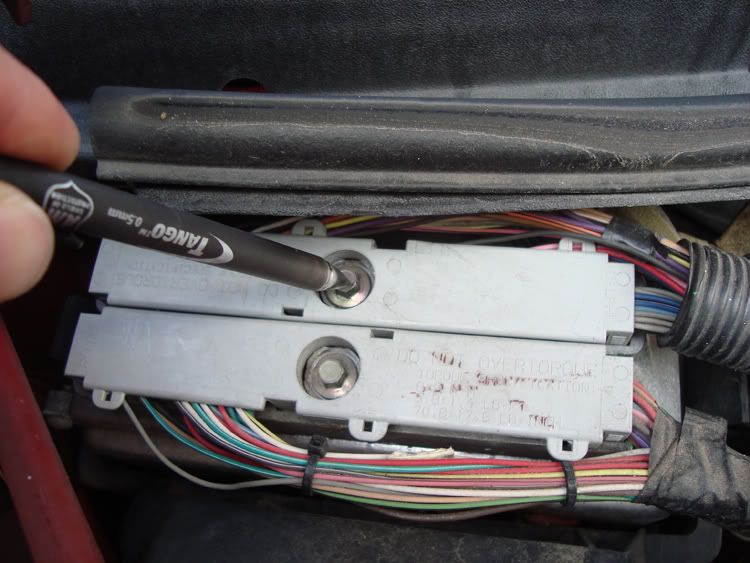
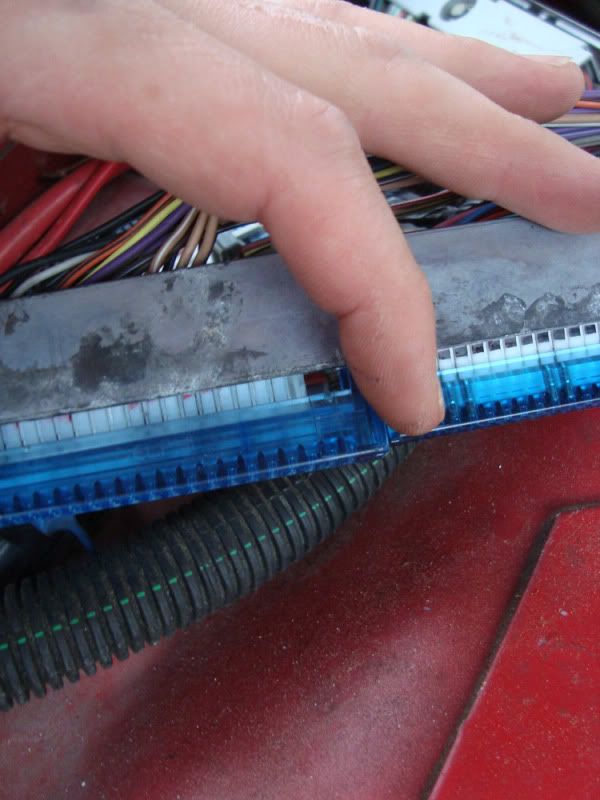
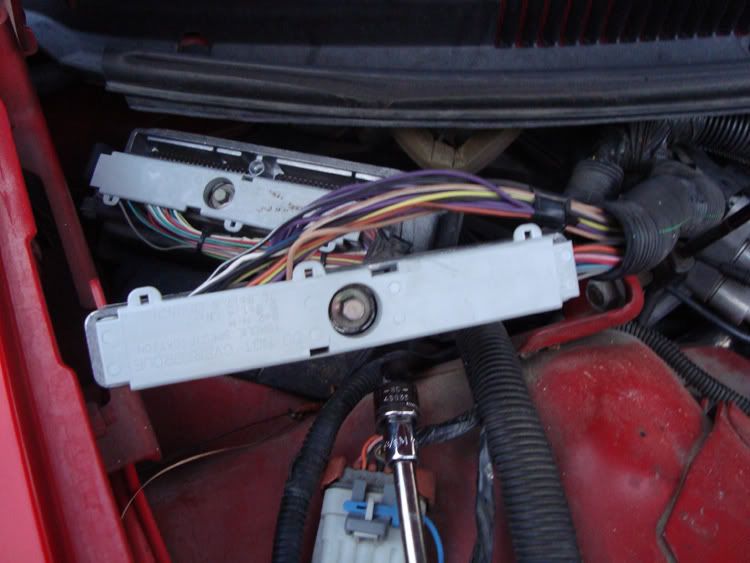
2. Loosen the top connector on the PCM with the 7mm socket. It might seem like forever, but just keep going until you can lift the connector off.
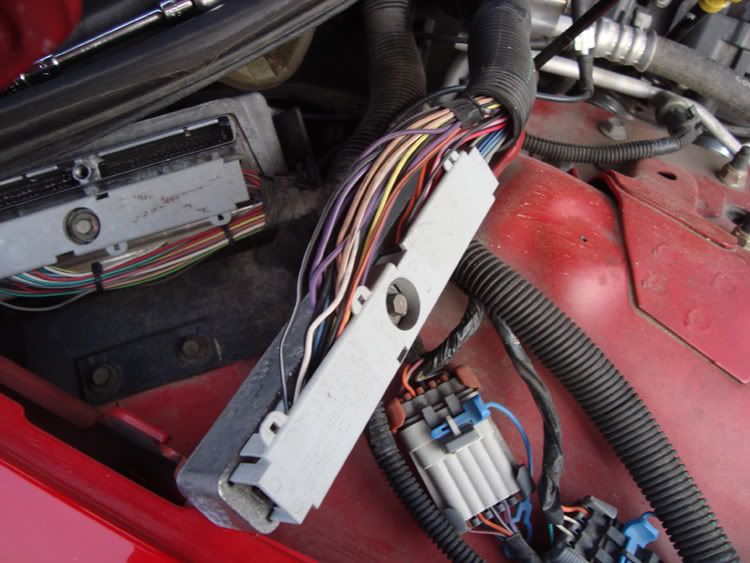
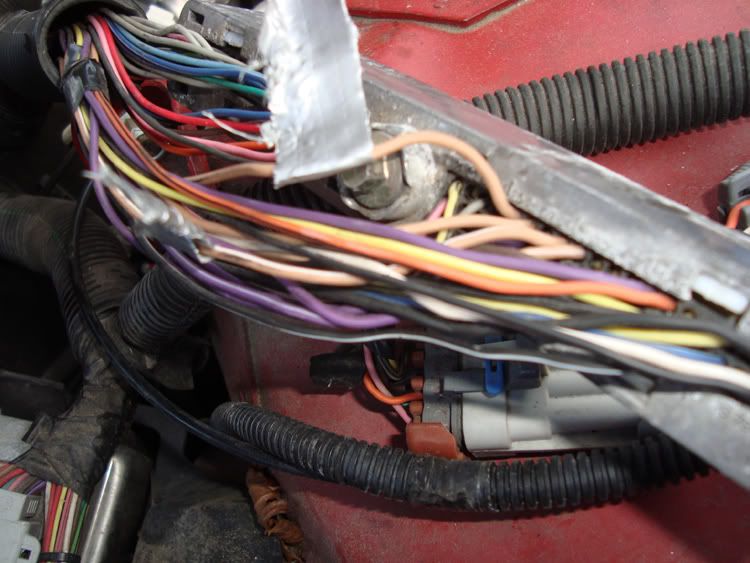
3. Lift the connector off, and move it into a good position with plenty of slack in the wires.
4. Remove the gray plastic cover, pushing in on the four tabs. (on the ends)
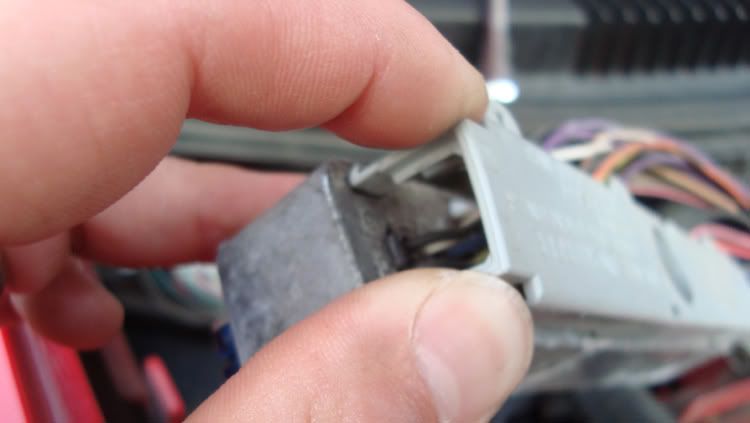
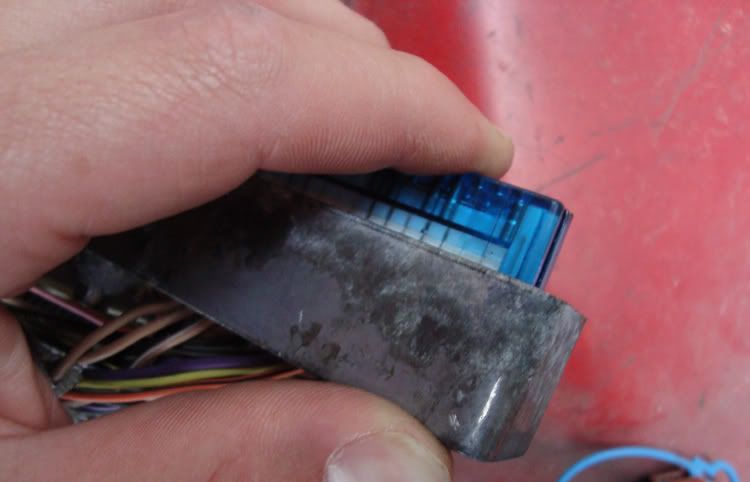
5. Use the screwdriver to assist you in pushing in the white tabs off the connector. This will give you some more room to play with.
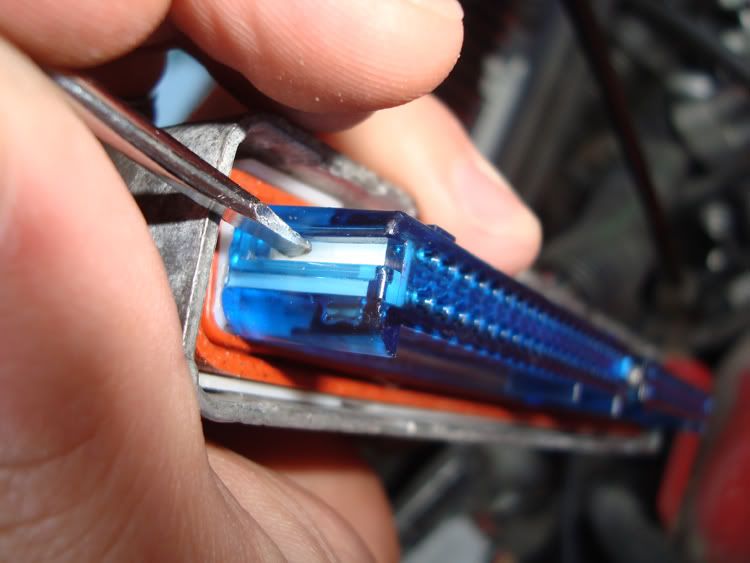
6. Push in the white tabs under the blue cover (the one that ends in wire 40 and 80). It pops right off.
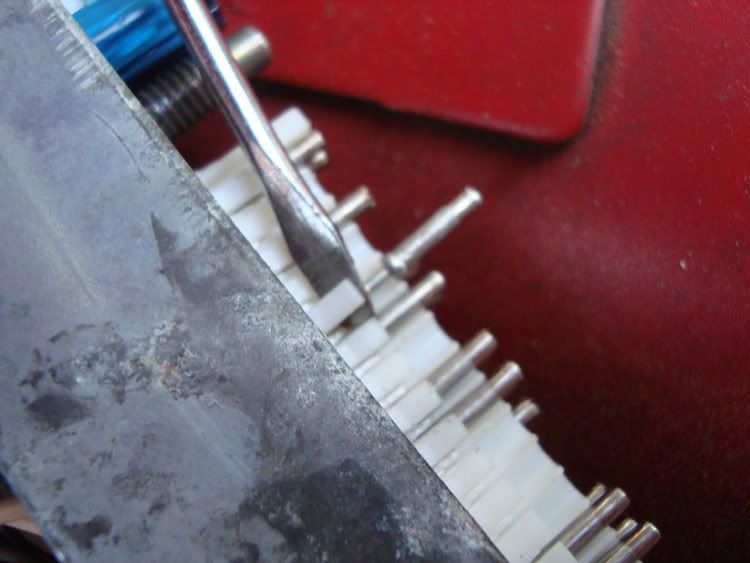
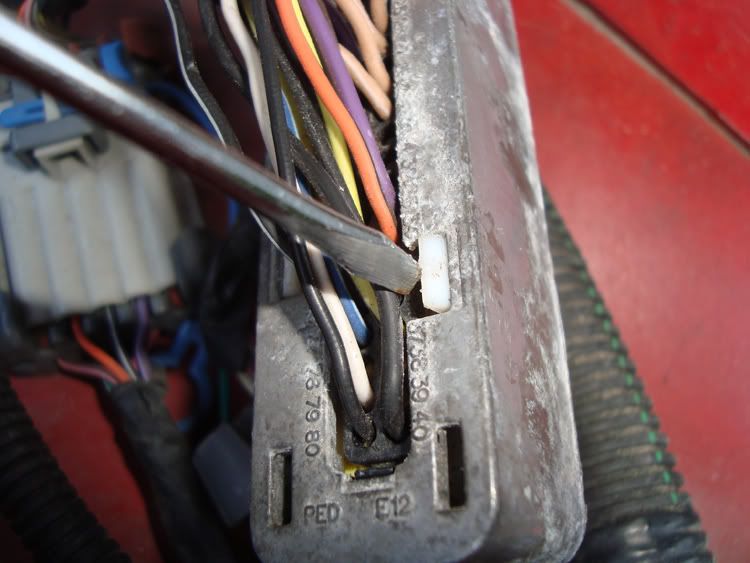
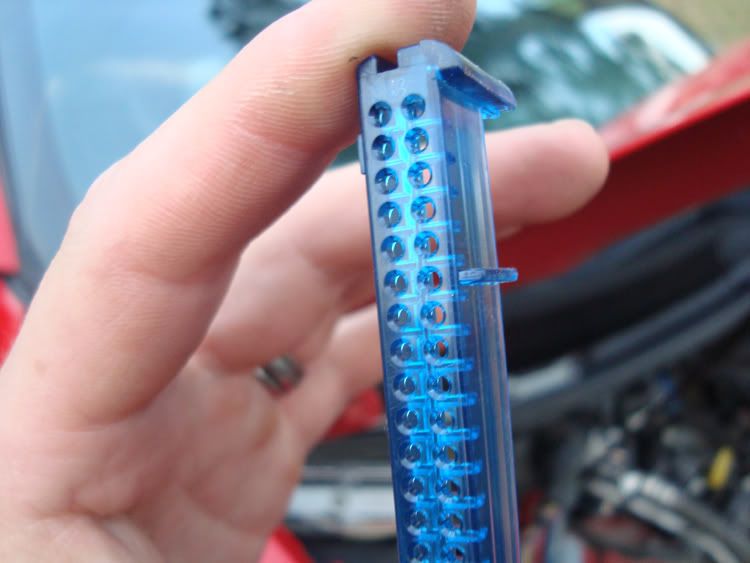
7. Remove the wire by LIGHTLY lifting up on the plastic retainer, sliding the wire FORWARD further into the connector, and then push the wire BACKWARDS (put your finger on the metal end, and give a slight but firm tug on the wire (as close to the metal connector on the WIRE side).
8. Make sure you know what wire you just pulled out. If it was the �Bank 1, Sensor 1 LOW� wire, then this will go into �Bank 1, Sensor 2 LOW� wire slot.
9. The 8 wires you will swap are all colored, a separate color for each oxygen sensor. Pull solid tan wire out, mark it with tape, then pull second tan wire out, insert taped tan wire into un-taped wire's spot.
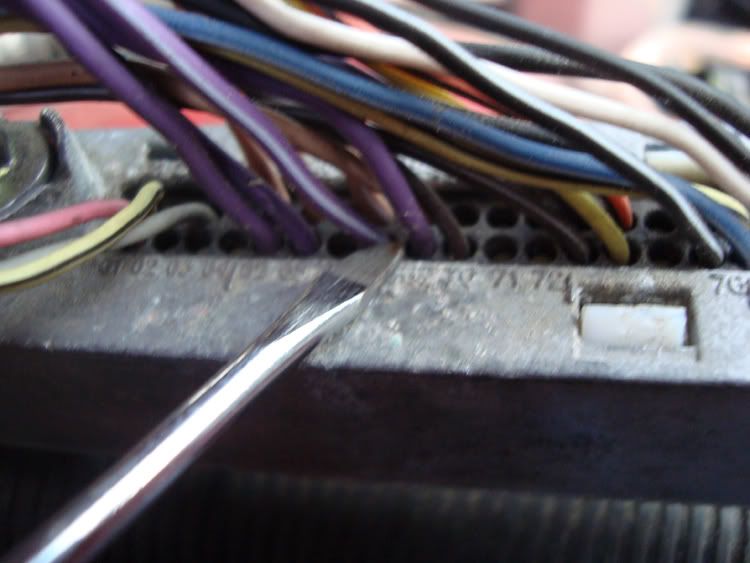
10. Repeat for all 8 wires. Pin out is as follows: TAN 25+26, TAN-WHITE 28+29, PURPLE 65+66, PURPLE-WHITE 68+69. All 8 wires are next to each other. Tans on top row, purples on bottom row. After pulling out a wire, when re-inserting it, make sure the plastic retaining tab catches the wire and that the metal end is flush with the other wires.
11. To re-assemble, pop the blue cover back on (make sure the "tabbed" side matches the orientation of the other blue cover.
Right is "tabbed side"
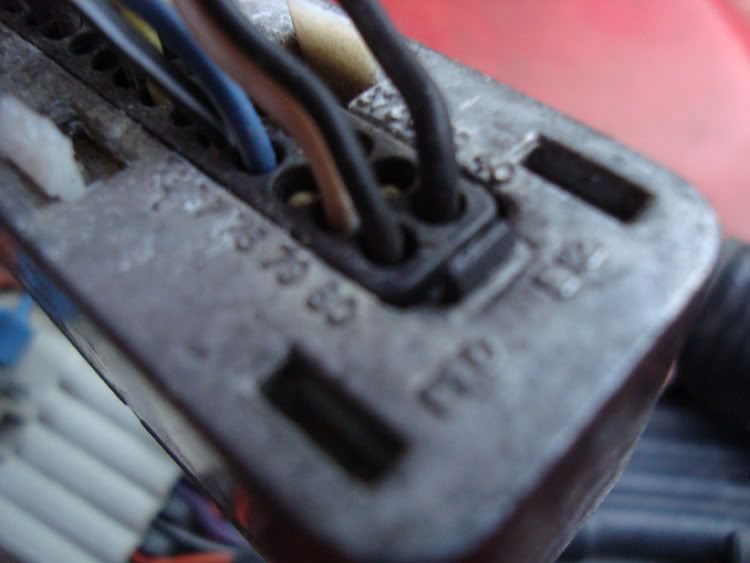
12. Snap the connector assembly back into the aluminum housing, ensuring all the white tabs fully snap into place, and everything is flush.
13. Re-install the gray cover (the wires might be a pain to tuck in, but you'll get it). Note the left wires (o2 wires) go above the connector, and the right wires go through the gray cover.
14. Tuck wires under cowl, press on connector to connect the wires back onto the PCM. Make sure it is seated evenly. Torque bolt to the specs on the cover, OR torque until it stops with hand pressure on ratchet, then go 1/8-1/4 turn further.
15. Re-connect battery, start-up, and ENJOY!
***NOTE***
When I did this mod originally, the car was on jacks and getting long tubes installed. If you are INSTALLING the long tubes, enjoy using your stock o2s into the stock harness. If you don't know which connector is front or rear, it's the ONLY ones that fit, and has some slight slack in the wire.
If you already have extensions, then you know you have to take them out, and re-connect your o2s onto the rears now.
If you have the Corvette o2s, you might want to wait on this mod until you need new sensors.
Tools you will need:
7mm socket (1/4� or 3/8� drive is fine)
10mm wrench (or whatever size your negative battery cable is)
small flat-tip screwdriver (not jewelers though)
1. Disconnect the battery. (make sure you know your radio code, sound system settings etc.)
2. Loosen the top connector on the PCM with the 7mm socket. It might seem like forever, but just keep going until you can lift the connector off.
3. Lift the connector off, and move it into a good position with plenty of slack in the wires.
4. Remove the gray plastic cover, pushing in on the four tabs. (on the ends)
5. Use the screwdriver to assist you in pushing in the white tabs off the connector. This will give you some more room to play with.
6. Push in the white tabs under the blue cover (the one that ends in wire 40 and 80). It pops right off.
7. Remove the wire by LIGHTLY lifting up on the plastic retainer, sliding the wire FORWARD further into the connector, and then push the wire BACKWARDS (put your finger on the metal end, and give a slight but firm tug on the wire (as close to the metal connector on the WIRE side).
8. Make sure you know what wire you just pulled out. If it was the �Bank 1, Sensor 1 LOW� wire, then this will go into �Bank 1, Sensor 2 LOW� wire slot.
9. The 8 wires you will swap are all colored, a separate color for each oxygen sensor. Pull solid tan wire out, mark it with tape, then pull second tan wire out, insert taped tan wire into un-taped wire's spot.
10. Repeat for all 8 wires. Pin out is as follows: TAN 25+26, TAN-WHITE 28+29, PURPLE 65+66, PURPLE-WHITE 68+69. All 8 wires are next to each other. Tans on top row, purples on bottom row. After pulling out a wire, when re-inserting it, make sure the plastic retaining tab catches the wire and that the metal end is flush with the other wires.
11. To re-assemble, pop the blue cover back on (make sure the "tabbed" side matches the orientation of the other blue cover.
Right is "tabbed side"
12. Snap the connector assembly back into the aluminum housing, ensuring all the white tabs fully snap into place, and everything is flush.
13. Re-install the gray cover (the wires might be a pain to tuck in, but you'll get it). Note the left wires (o2 wires) go above the connector, and the right wires go through the gray cover.
14. Tuck wires under cowl, press on connector to connect the wires back onto the PCM. Make sure it is seated evenly. Torque bolt to the specs on the cover, OR torque until it stops with hand pressure on ratchet, then go 1/8-1/4 turn further.
15. Re-connect battery, start-up, and ENJOY!


 05-19-2011, 08:52 PM
#5
It's so easy and saves people money, I'm suprised it hasn't caught much traction here. I did this with my TA when I did my headers, the switch took about 10 minutes and it works like a charm. 
05-19-2011, 08:55 PM
#6
On The Tree
Thread Starter
Join Date: Jul 2008
Posts: 107
Likes: 0
Received 0 Likes
on
0 Posts
I agree. I spent more time trying to take pictures and smoke cigarettes than actually doing it. On top of that, you can get o2 sensors for $40-$50 from places, rather than pay out the @$$ for the corvette ones.
05-19-2011, 09:21 PM
#7
Everything looks good but one thing I'd add is that if you have a '98 f-body you're pins are going to be different. I put differences below:
1999 or Newer
25+26
28+29
65+66
68+69
1998
1+5
2+6
46+41
42+47
Here's a link to pcm pinouts:
'99 pin out
http://www.ls2.com/boggs/torques/99pinpcm.htm
'98 pin out
http://www.ls2.com/boggs/torques/98pinpcm.htm
1999 or Newer
25+26
28+29
65+66
68+69
1998
1+5
2+6
46+41
42+47
Here's a link to pcm pinouts:
'99 pin out
http://www.ls2.com/boggs/torques/99pinpcm.htm
'98 pin out
http://www.ls2.com/boggs/torques/98pinpcm.htm
Last edited by Golf&GM; 11-22-2011 at 08:42 AM. Reason: Better Pinout links
Trending Topics

 05-20-2011, 06:41 PM
#13

Very well done.
I have one suggestion...write up exactly what you did, put it in a plastic bag, and tape it to the ECM. Also toss a copy in the glove box. Can you imagine the poor SOB who has to work on it after you sell it??? He would never figure it out!
I have one suggestion...write up exactly what you did, put it in a plastic bag, and tape it to the ECM. Also toss a copy in the glove box. Can you imagine the poor SOB who has to work on it after you sell it??? He would never figure it out!
05-20-2011, 11:08 PM
#14
On The Tree
Thread Starter
Join Date: Jul 2008
Posts: 107
Likes: 0
Received 0 Likes
on
0 Posts
Actually, my un-used sensor harnesses are tucked up through the wire loom and black taped, so there won't be any confusion. When I get around to it, I'll pull the wires out of the PCM, along with the AIR and EGR ones.
05-20-2011, 11:51 PM
#15
Agree with OldCobraGuy.... Right now, I happen to be the poor SOB trying to sort out a rats nest of stereo wire, spliced, respliced, and mangled.
Good write up too. Saves us all some coin. Now, if we could just get a 5% payment vs money saved from all the members this helps..... LOL
Good write up too. Saves us all some coin. Now, if we could just get a 5% payment vs money saved from all the members this helps..... LOL
 05-25-2011, 06:48 PM
#19
On The Tree
Thread Starter
Join Date: Jul 2008
Posts: 107
Likes: 0
Received 0 Likes
on
0 Posts
Not at all. And that goes for both ends. At the PCM, you are moving them about 1/4" (one slot over). It might be tight at the o2 sensor, but if you reference the part numbers from AutoZone, it specifies the different wire lengths, (cheaper being shorter) so get the longest one (maybe a $5 difference) and that one will fit with decent slack. You might have to tug on the o2 harness underneath, but there should be plenty of slack to reach your long tubes.