
Battery Relocation
 10-01-2005, 11:26 AM
#1
TECH Addict
Thread Starter
iTrader: (17)

Join Date: Dec 2002
Location: Hanover, MD
Posts: 2,190
Likes: 0
Received 0 Likes
on
0 Posts

Well, I did the battery relocation and I must say I am very happy with the way it turned out. I searched and searched and searched and used all that knowledge on this site to my advantage.
Here's basically what I did:
AFCO battery box from Summit mounted in the spare tire location. SAME EXACT thing as BMR except $60 cheaper($24.99), just not powdercoated, but who cares, it's not seen.
2/0 gauge welding wire running through the interior under the carpet and through the hole in the firewall. Then under the fender well liner(same place as my !wire mod) and up to the engine compartement. The 2/0 gauge is 5/8" diameter and is definitely overkill, but it's heavily insulated and very flexible. Something like 1600 strands of copper in there.
2 gauge ground wire from battery to seat post connector on rear seat.
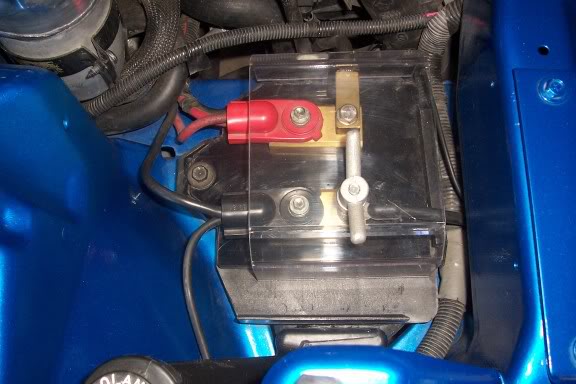
In the engine compartment I used the idea from the guy who has the 1976 LS1 Trans Am and did a brass bar stock distribution block. This kept things extremely simple for the engine compartment connections. No cutting of the stock wires. Basically 2 blocks of 1/2" brass bar stock 3 1/2" long, one for + and one for -. Drilled and tapped them so the stock and my new terminals would screw right in. Stock + to one end, new + from battery to other end. Other block has stock ground to one end and new ground wire(4 ga.) running to the frame rail on the other end. No noticable drop in voltage anywhere along the path.
I mounted these block on a piece of plexiglass cut to fit the stock battery tray and held in place by the stock battery mount. 2nd piece of plexiglass was cut to fit over top all this and covered in Carbon Fiber. Drilled and tapped and hole through the top piece and into the bottom piece to tie it all together and hold it in place with a wing nut bolt. Pretty trick looking.
Car fired right up, no fires, no jumping gauges, just pure power.
Moral of this story is SEARCH, SEARCH, and SEARCH and you will find what you need to do the job right the first time.
Bryan
parbreak
Here's basically what I did:
AFCO battery box from Summit mounted in the spare tire location. SAME EXACT thing as BMR except $60 cheaper($24.99), just not powdercoated, but who cares, it's not seen.
2/0 gauge welding wire running through the interior under the carpet and through the hole in the firewall. Then under the fender well liner(same place as my !wire mod) and up to the engine compartement. The 2/0 gauge is 5/8" diameter and is definitely overkill, but it's heavily insulated and very flexible. Something like 1600 strands of copper in there.
2 gauge ground wire from battery to seat post connector on rear seat.
In the engine compartment I used the idea from the guy who has the 1976 LS1 Trans Am and did a brass bar stock distribution block. This kept things extremely simple for the engine compartment connections. No cutting of the stock wires. Basically 2 blocks of 1/2" brass bar stock 3 1/2" long, one for + and one for -. Drilled and tapped them so the stock and my new terminals would screw right in. Stock + to one end, new + from battery to other end. Other block has stock ground to one end and new ground wire(4 ga.) running to the frame rail on the other end. No noticable drop in voltage anywhere along the path.
I mounted these block on a piece of plexiglass cut to fit the stock battery tray and held in place by the stock battery mount. 2nd piece of plexiglass was cut to fit over top all this and covered in Carbon Fiber. Drilled and tapped and hole through the top piece and into the bottom piece to tie it all together and hold it in place with a wing nut bolt. Pretty trick looking.
Car fired right up, no fires, no jumping gauges, just pure power.
Moral of this story is SEARCH, SEARCH, and SEARCH and you will find what you need to do the job right the first time.
Bryan
parbreak

 10-01-2005, 02:59 PM
#3
TECH Addict
Thread Starter
iTrader: (17)
Join Date: Dec 2002
Location: Hanover, MD
Posts: 2,190
Likes: 0
Received 0 Likes
on
0 Posts
I'll post complete pics of engine compartment and battery compartment once the last coat of epoxy dries on the the carbon fiber cover.
Thanks
Bryan
parbreak
Thanks
Bryan
parbreak

Trending Topics
10-07-2005, 02:24 AM
#8
TECH Addict
Thread Starter
iTrader: (17)
Join Date: Dec 2002
Location: Hanover, MD
Posts: 2,190
Likes: 0
Received 0 Likes
on
0 Posts
Yea, I'll post some pics on Friday. I'm not finished with the final cover that I'm doing in Carbon Fiber but that's not important to the setup anyway. I'll get some pics of the mounted battery and the distribution block I made and post them up.
 10-08-2005, 08:55 PM
#10
76LS1BIRD and parbreak, could you guys post up detailed instructions on what's involved in making this distribution block? I can't tell from the pics how you had the + terminal hooked up FROM the battery 76LS1BIRD, is that the cable in the far side front?
How do you go about cutting the plexiglass? parbreak, where exactly did you run the ground wire to? And lastly, where did you guys get all this stuff and how much did it cost?
Sorry to ask so many questions, but I want to do this too, and want to be perfectly clear on how to go about it.
parbreak, any pics yet?
10-08-2005, 09:20 PM
#11
Staging Lane
iTrader: (1)

Join Date: May 2005
Location: Oswego, IL (~40 miles west of Chicago)
Posts: 83
Likes: 0
Received 0 Likes
on
0 Posts
I relocated my battery too, but i did mine a lil half assed I welded up a bracket to hold the battery painted it and screwed it down where the spare was. Ran some 4 gauge right to the wheel well and screwed it down then just ran some 4 gauge all the way up front under the car and hooked it up the the pos. terminal where the battery used to be. Cranks over fine and the wire doesnt heat up in the least when starting. I liked the mod a lot helped out my traction a lot. Yours looks way cleaner though.
10-08-2005, 10:13 PM
#12
Restricted User
iTrader: (35)

Join Date: Dec 2004
Location: Hanover PA
Posts: 548
Likes: 0
Received 0 Likes
on
0 Posts
Originally Posted by DOUBT IT
76LS1BIRD and parbreak, could you guys post up detailed instructions on what's involved in making this distribution block? I can't tell from the pics how you had the + terminal hooked up FROM the battery 76LS1BIRD, is that the cable in the far side front?
How do you go about cutting the plexiglass? parbreak, where exactly did you run the ground wire to? And lastly, where did you guys get all this stuff and how much did it cost?
Sorry to ask so many questions, but I want to do this too, and want to be perfectly clear on how to go about it.
parbreak, any pics yet?
How do you go about cutting the plexiglass? parbreak, where exactly did you run the ground wire to? And lastly, where did you guys get all this stuff and how much did it cost?
Sorry to ask so many questions, but I want to do this too, and want to be perfectly clear on how to go about it.
parbreak, any pics yet?
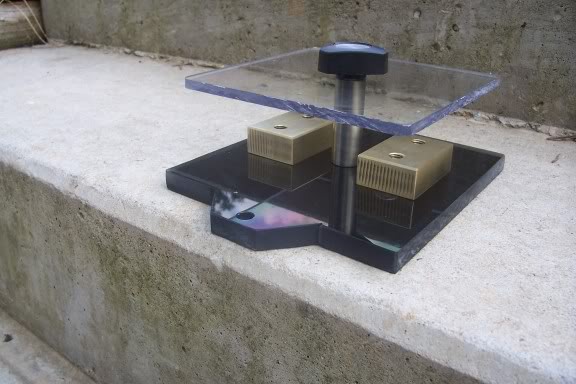
I work in a machine shop & we had scraps @ work. I got brass from
swap meet,you can cut plexiglass with saw ,its like cutting a hard wood.
Good luck Dale
10-08-2005, 11:18 PM
#13
12 Second Club
iTrader: (1)

Join Date: May 2005
Location: Bradenton, FL
Posts: 684
Likes: 0
Received 0 Likes
on
0 Posts
Did it make a big difference in traction? I could use a little help after the heads/cam.
On a side note, on the new Buick Lucerne, the batter is right UNDER the back seat.
Kinda wierd. Kinda scary too. In my first truck (89 bronco), the battery blew up when I started it once and dented the hood out. That would definitely hurt if you were in the backseat.
On a side note, on the new Buick Lucerne, the batter is right UNDER the back seat.
Kinda wierd. Kinda scary too. In my first truck (89 bronco), the battery blew up when I started it once and dented the hood out. That would definitely hurt if you were in the backseat.
10-08-2005, 11:23 PM
#14
TECH Addict
Thread Starter
iTrader: (17)
Join Date: Dec 2002
Location: Hanover, MD
Posts: 2,190
Likes: 0
Received 0 Likes
on
0 Posts
Don't know about the whole traction thing, I did mine strictly as an appearance mod. But if it does help with traction then that's a nice side benefit for me.
I will try to post pics of my setup ASAP.
Thanks
Bryan
parbreak
I will try to post pics of my setup ASAP.
Thanks
Bryan
parbreak
10-09-2005, 10:24 AM
#15
TECH Addict
Thread Starter
iTrader: (17)
Join Date: Dec 2002
Location: Hanover, MD
Posts: 2,190
Likes: 0
Received 0 Likes
on
0 Posts
Here's a pic of my "distribution block" and the ground wire I ran for the front end.
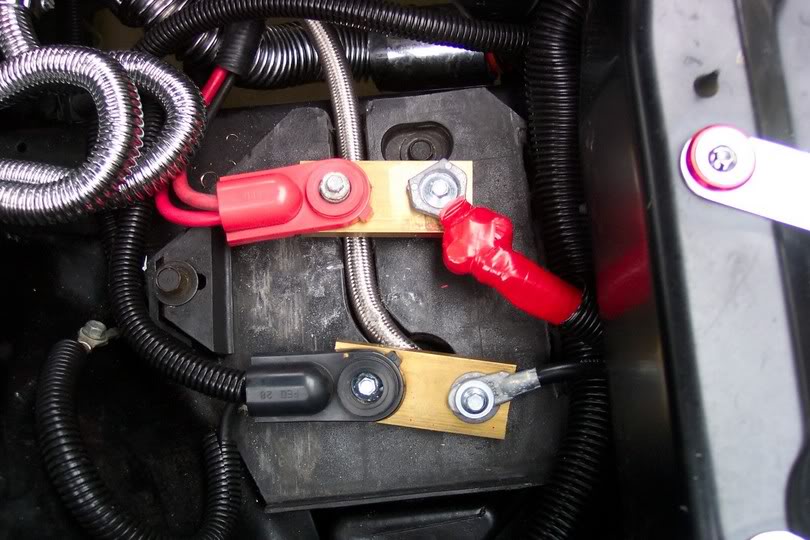

I have a piece of plexiglass that sits under the 2 pieces of brass, but I don't show it in this picture because it's out right now. I am JBWelding a nut to it for it to receive the wing bolt that holds the top piece on. I'll show pics when it's finished.
Bryan
parbreak
I have a piece of plexiglass that sits under the 2 pieces of brass, but I don't show it in this picture because it's out right now. I am JBWelding a nut to it for it to receive the wing bolt that holds the top piece on. I'll show pics when it's finished.
Bryan
parbreak
10-10-2005, 04:21 PM
#17
Keep in mind that if you do a relocation like this that it won't be NHRA legal and an official could kick you off the track. They want you to have a sealed and vented battery box and a rear mounted disconnect switch that will kill the entire electrical system when switched off.
I'm curious, has anyone ever been denied track access for not meeting regulations?
I'm curious, has anyone ever been denied track access for not meeting regulations?
Last edited by white01ss; 10-11-2005 at 12:52 PM. Reason: fix typos
10-11-2005, 02:26 AM
#18
TECH Addict
Thread Starter
iTrader: (17)
Join Date: Dec 2002
Location: Hanover, MD
Posts: 2,190
Likes: 0
Received 0 Likes
on
0 Posts
Originally Posted by white01ss
Keep in mind that if you do a relocation like this that it won't be NHRA legal and a track could kick you off the track. They want to to have a sealed and vented battery box and a rear mounted disconnect switch that will kill the entire electrical system when switched off.
I'm curious, has anyone ever been denied track access for not meeting regulations?
I'm curious, has anyone ever been denied track access for not meeting regulations?
\
10-22-2005, 09:02 PM
#20
Restricted User
iTrader: (35)
Join Date: Dec 2004
Location: Hanover PA
Posts: 548
Likes: 0
Received 0 Likes
on
0 Posts

More remote bat info....
https://ls1tech.com/forums/showthrea...hlight=battery
https://ls1tech.com/forums/showthrea...hlight=battery
Last edited by 76LS1BIRD; 10-25-2005 at 05:14 PM.