
Kooks header install in progress...
 11-09-2006, 10:55 PM
#1
Launching!
Thread Starter
iTrader: (1)
Join Date: Jul 2004
Location: the shit hole of Albuquerque, New Mexico
Posts: 251
Likes: 0
Received 1 Like
on
1 Post

Well I finally got a set of Kooks headers and a catted Y to complete my current SS project, a big 'thanks' to the crew at the WS6 Store and Brian at SDPC for getting the needed parts to me ASAP  !
!
I bought the Kooks because of all the props from everyone and I wanted an easy install. Anyway, I finally started the project this afternoon with the hopes of cranking these out in about 4-5 hours. With access to a lift I thought I could do it- not quite so. I had the original y pipe off in about 20 minutes, it was welded to the cat back so I need to cut it off with a pipe cutter. No biggie. I had the drivers side manifold off in about 45 minutes and all looked good to go. Then one of my friends helped me try to install the header from the bottom but couldn't get it to go in. I removed the oil filter and steering shaft and tried it again, still no dice, Finally I had to undo the motor mount and jacked up the motor, then I was finally able to slide it up into place from the bottom with a little coaxing. Unfortuantly the work day ended and I was booted out of the shop by my boss who wanted to go home. I am into the project about 3 1/2 hours and so far I got the drivers side header in and the bolts finger tight. I didn't have time to check clearencs to see if it was hitting anything yet.
Tommorrow I will tackle the passenger side and the rest of the install. Hopefully it will go a little faster than the drivers side did. I gotta say though, those of you who install these things on the floor with jack stands and such, kudos to you for the putting up with the added aggrevation. I don't have regular access to a computer at work so I may or may not be able to post up until later tommorrow afternoon or evening. I will try to get pix for tomorrow, I didn't get any today because I forgot to bring my camera.

Pt. 2 comming soon...
!I bought the Kooks because of all the props from everyone and I wanted an easy install. Anyway, I finally started the project this afternoon with the hopes of cranking these out in about 4-5 hours. With access to a lift I thought I could do it- not quite so. I had the original y pipe off in about 20 minutes, it was welded to the cat back so I need to cut it off with a pipe cutter. No biggie. I had the drivers side manifold off in about 45 minutes and all looked good to go. Then one of my friends helped me try to install the header from the bottom but couldn't get it to go in. I removed the oil filter and steering shaft and tried it again, still no dice, Finally I had to undo the motor mount and jacked up the motor, then I was finally able to slide it up into place from the bottom with a little coaxing. Unfortuantly the work day ended and I was booted out of the shop by my boss who wanted to go home. I am into the project about 3 1/2 hours and so far I got the drivers side header in and the bolts finger tight. I didn't have time to check clearencs to see if it was hitting anything yet.
Tommorrow I will tackle the passenger side and the rest of the install. Hopefully it will go a little faster than the drivers side did. I gotta say though, those of you who install these things on the floor with jack stands and such, kudos to you for the putting up with the added aggrevation. I don't have regular access to a computer at work so I may or may not be able to post up until later tommorrow afternoon or evening. I will try to get pix for tomorrow, I didn't get any today because I forgot to bring my camera.
Pt. 2 comming soon...
 11-09-2006, 11:38 PM
#3
12 Second Club
iTrader: (3)
Join Date: Mar 2006
Location: Richmond, VA
Posts: 291
Likes: 0
Received 0 Likes
on
0 Posts
I've done two header installs on 99's including my own. The rear header bolt, spark plug, and wire on the passenger side will be a bitch. Hopefully you or a helping friend has long skinny arms. You might have to remove the coil pack otherwise. Good luck.
11-09-2006, 11:54 PM
#4
I did the motor mount bit with my Kooks as well. Didn't touch the steering linkage. Passenger side was a different story. Kinda held it under the car and the header nearly jumped up onto the head.  It went in that damn smooth. I didn't have any contact with my headers on the K-member or anything else. No Y-pipe banging either. Good luck with the rest on the install. Looking foward to pics.
It went in that damn smooth. I didn't have any contact with my headers on the K-member or anything else. No Y-pipe banging either. Good luck with the rest on the install. Looking foward to pics.
11-10-2006, 12:48 AM
#5
TECH Fanatic
iTrader: (30)

Join Date: Aug 2005
Location: Northern VA
Posts: 1,504
Likes: 0
Received 0 Likes
on
0 Posts
This just goes to show you that even very expensive headers sometimes have trouble with fitment. It is more about the car itself than the header. Good luck with the install!!
11-10-2006, 01:03 AM
#6
Bummer! Is this your first time installing headers on an f-body? There is a certain technique required for the DS header. You shouldn't have to undo the motor mount or the steering.
The good news is that the passenger side should go in easily.
Enjoy the headers....
The good news is that the passenger side should go in easily.
Enjoy the headers....
11-10-2006, 01:15 AM
#7
TECH Resident
iTrader: (3)
Join Date: Dec 2005
Location: Burke, VA
Posts: 901
Likes: 0
Received 0 Likes
on
0 Posts
passenger side will be extremely easy... ya there is a certain method of putting in the driver's side header but it usually requires a lift which u have in ur case. I had... well jackstands... and had to cut/jack the motor/do all sorts of crap that made me vow never to install headers w/o a lift ever again.
Trending Topics
11-10-2006, 07:29 AM
#8
Moderator
iTrader: (4)
Join Date: Nov 2003
Location: Plainfield, CT
Posts: 10,520
Likes: 0
Received 0 Likes
on
0 Posts
I have done a lot of these and am doing 2 this weekend for friends. The driver side is put in with the back end facing the front and then rotated in. The passenger will slide right up no problems. The driver side just takes knowing how to do it. I have never had to remove anything. 
11-10-2006, 08:05 AM
#10
TECH Regular
iTrader: (2)
Join Date: Oct 2005
Location: Htown, TEXAS
Posts: 455
Likes: 0
Received 0 Likes
on
0 Posts
I did my Kooks with jackstands and that was interesting. Going in I figured the drivers side would be easier but I had some of the same problems that you ran into. Removed the oil filter and motor mount and finally squeezed it in. Passenger side was cake getting in...well, if you don't count that one rear bolt . Anyways, hopefully the rest goes in well for you without any problems. Good luck and let us know how it goes.
. Anyways, hopefully the rest goes in well for you without any problems. Good luck and let us know how it goes.
11-10-2006, 08:07 AM
#11
TECH Regular
iTrader: (2)
Join Date: Oct 2005
Location: Htown, TEXAS
Posts: 455
Likes: 0
Received 0 Likes
on
0 Posts
Originally Posted by davered00ss
The driver side is put in with the back end facing the front and then rotated in...the driver side just takes knowing how to do it. I have never had to remove anything.
You are my hero!
 11-10-2006, 09:13 AM
#12
Launching!
Thread Starter
iTrader: (1)
Join Date: Jul 2004
Location: the shit hole of Albuquerque, New Mexico
Posts: 251
Likes: 0
Received 1 Like
on
1 Post
Thanks guys for the comments!
Well I got the drivers side all bolted up and the end result fitment is great no hitting on anything!
To answer a couple of questions asked;
This is my third header install.
I did a set of macs on my 93 LT1 bird with no problems and a failed attempt years ago on my 91 GTA trans am with a set of SLP's.
I had taken out the steering linkage before i raised the motor. If i had raised the motor first it doesn't appear that i needed to remove the shaft. Oh well.
davered00ss: thats pretty much what I ended up doing to get them in finally. (rotating the the headers)
Like I said earlier the end fitmant is great (so far) and that's all I'm ultimately worried about.
More to come as time allows...
Last edited by Tall Guy; 11-10-2006 at 08:26 PM.
11-10-2006, 08:07 PM
#13
Launching!
Thread Starter
iTrader: (1)
Join Date: Jul 2004
Location: the shit hole of Albuquerque, New Mexico
Posts: 251
Likes: 0
Received 1 Like
on
1 Post
Well It's pretty much done and I was able to drive the car home. The rear bolt on the passenger side was a bitch to get out when removing the old exhaust manifold. But the passenger side header then went in with NO problems from underneath. The pass. bolts were a little tricky because of my big hands and arms but I finally got them in. The headers fitment was great and no hammering the floor board or notching the k frame, etc was needed. The steering shaft clearance was very good and minor tweaking of a heat sheild was all that was required on the passenger side. The y pipe fit was good too. The fuel lines were a little close to the pipe which I'll fix a little later. There is about 3/8 of an inch clearance between the y pipe and the frame where the slip fit is at. Unfortunalty my original intermediate pipe was cut short from a previously installed custom Y pipe so I will have to get that addressed on Monday at the local muffler shop. After I rechecked everything I fired it up! Without being attached at the I pipe it was pretty loud but throaty. I let it idle for a little while checking everything, fortunatly there doesn't appear to be any clearance problems or leaks after a few revs. I didn't WOT it as it got REAL loud only at part throttle. I know, I know "Wuss!" 
All in all it wasn't too bad to install the set up. It took me about 8 hours total because I had done a few other things (Cleaning the underside with the added access) along with the install so I can't complain too much.
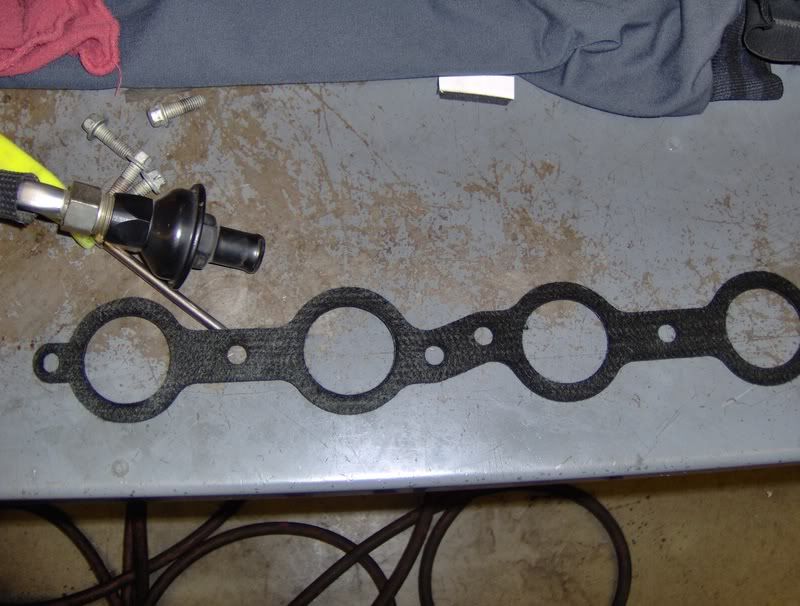
I took a few pictures along the way:
Here is a shot of the nifty gaskets that came with the headers:
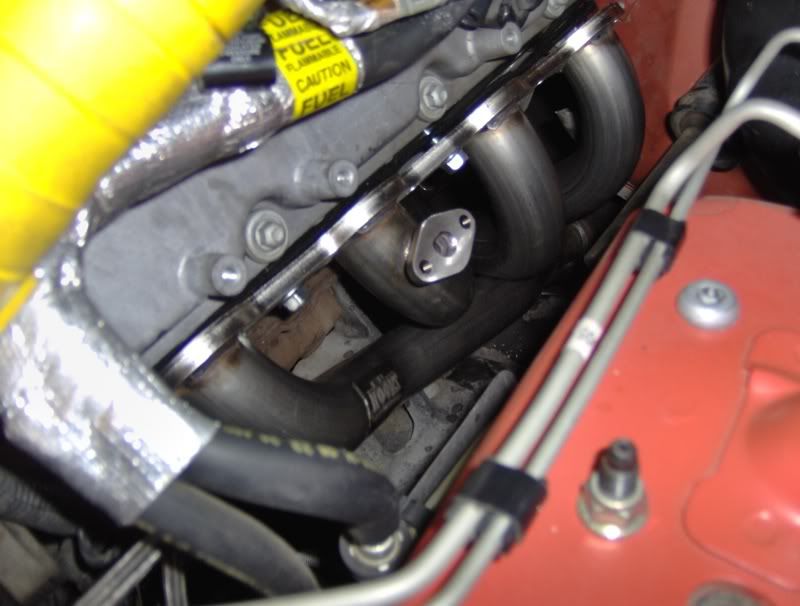
Heres a shot of the drivers side header in place but not tightend up:
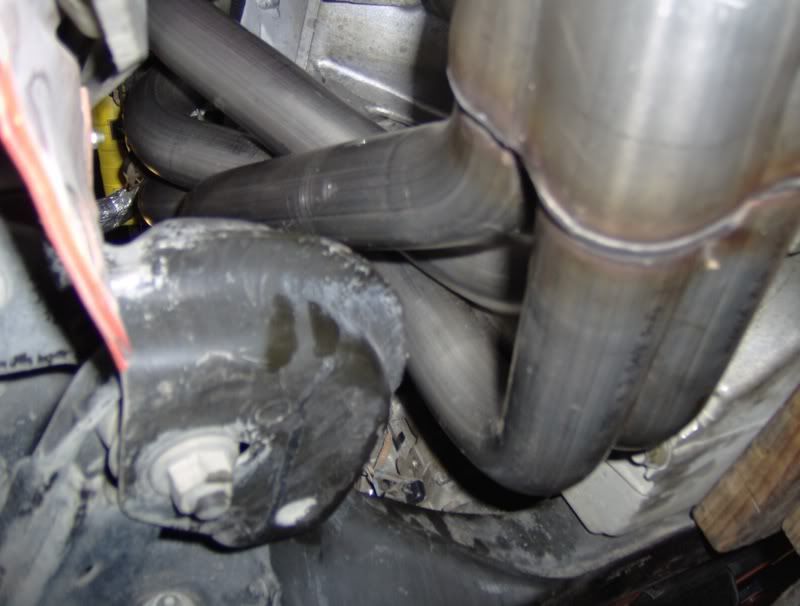
One of the drivers side header from below after install and tightend up:
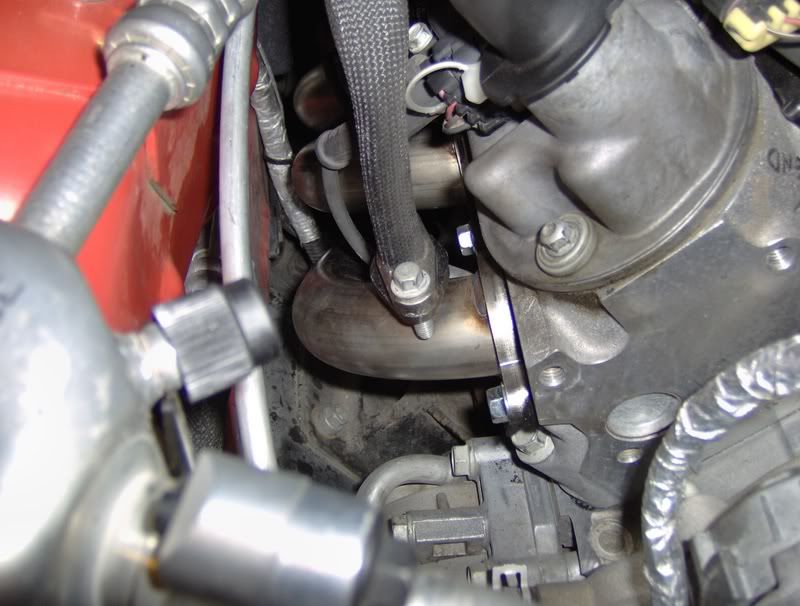
The passenger side installed and finished:
Drivers side installed and finished:
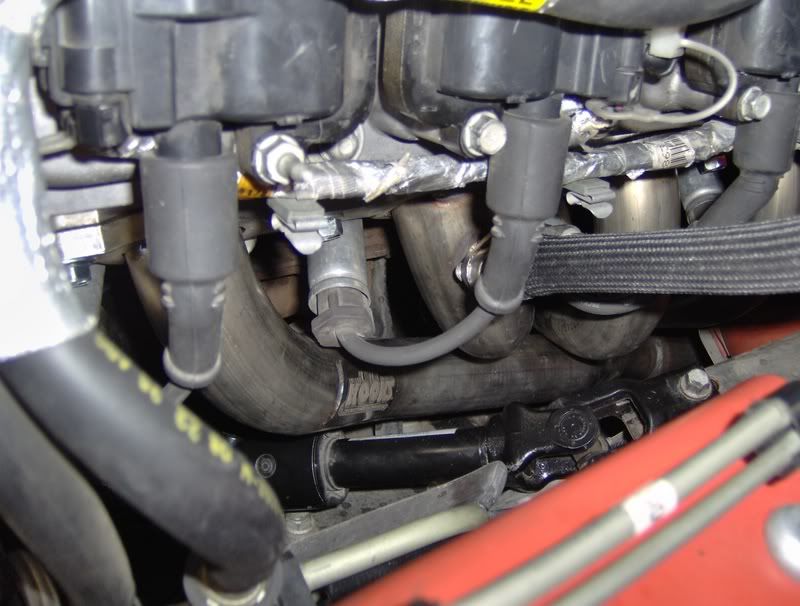
Ground clearance for the Y pipe:
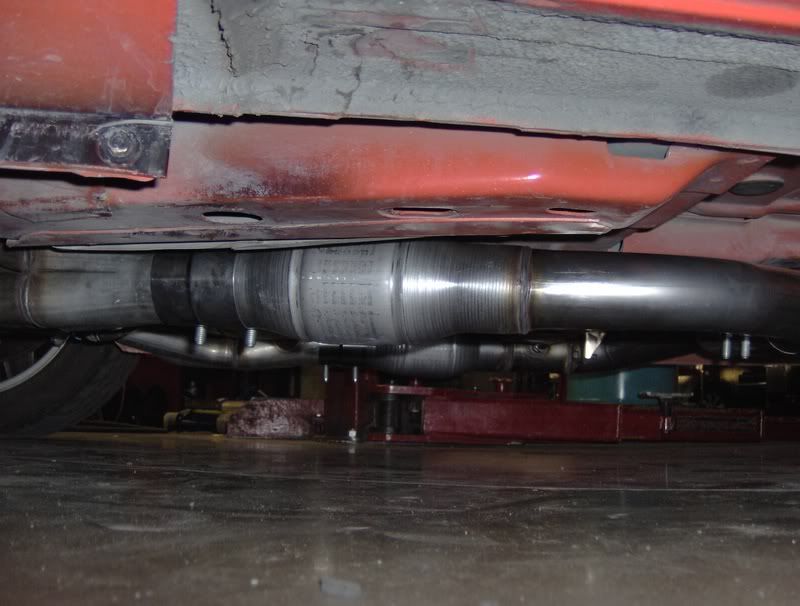
The 2 pictures I took with the car up on the rack and Y pipe installed didn't come out good at all so I will have to retake them next week sometime.
All in all it wasn't too bad to install the set up. It took me about 8 hours total because I had done a few other things (Cleaning the underside with the added access) along with the install so I can't complain too much.
I took a few pictures along the way:
Here is a shot of the nifty gaskets that came with the headers:
Heres a shot of the drivers side header in place but not tightend up:
One of the drivers side header from below after install and tightend up:
The passenger side installed and finished:
Drivers side installed and finished:
Ground clearance for the Y pipe:
The 2 pictures I took with the car up on the rack and Y pipe installed didn't come out good at all so I will have to retake them next week sometime.
Last edited by Tall Guy; 11-10-2006 at 08:32 PM.
11-12-2006, 10:46 AM
#15
Launching!
Thread Starter
iTrader: (1)
Join Date: Jul 2004
Location: the shit hole of Albuquerque, New Mexico
Posts: 251
Likes: 0
Received 1 Like
on
1 Post
Originally Posted by INMY01TA
Hope those aren't the gaskets you used on the install.
but I went off of this post George R. at Kooks made a while back:
https://ls1tech.com/forums/generation-iii-external-engine/435881-new-kooks-ultra-2000-degree-carbon-gaskets.html
Seems to be working ok for now but the car is pretty loud with out the cat-back hooked up so its hard to hear if there are any small leaks. I'll find out monday after I get the I-pipe and y pipe connected if there are small leaks.
 11-13-2006, 06:56 AM
#16
Staging Lane

Join Date: Aug 2005
Posts: 94
Likes: 0
Received 0 Likes
on
0 Posts
Originally Posted by davered00ss
I have done a lot of these and am doing 2 this weekend for friends. The driver side is put in with the back end facing the front and then rotated in. The passenger will slide right up no problems. The driver side just takes knowing how to do it. I have never had to remove anything.

