
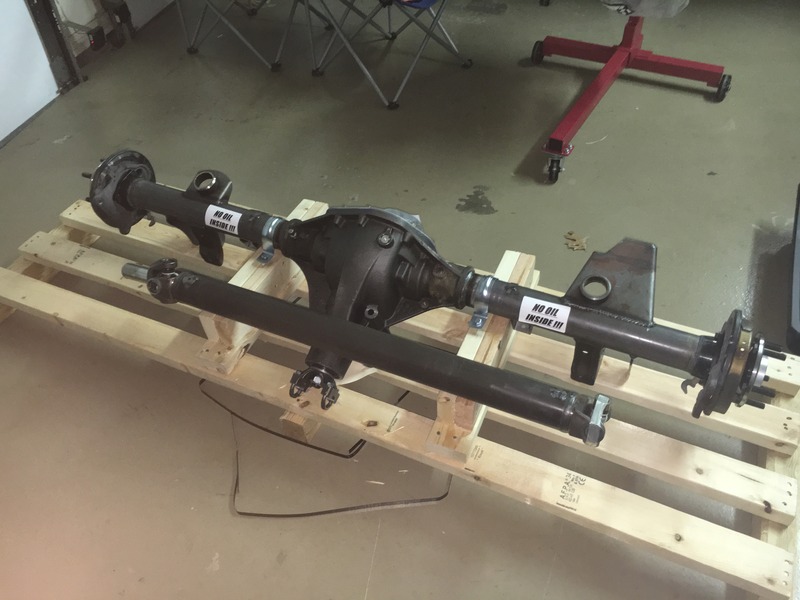
MMS 220 383 and more build - Going Turbo!
 02-03-2016, 02:08 PM
#61
Moderator
iTrader: (4)
Join Date: Jul 2014
Location: My own internal universe
Posts: 10,446
Received 1,835 Likes
on
1,145 Posts
Nothing quite looks as good as fresh machine work. 
Very nice to see this one come together!
Very nice to see this one come together!
 02-03-2016, 06:52 PM
#62

Originally Posted by 69gto96z
Deck bridge is on order. I thought I had one, but I was mistaken. Have 2 dial indicators too, I am taking your word for it on this!
Yep, all we both lack is finishing
Yep, all we both lack is finishing
02-03-2016, 11:58 PM
#64
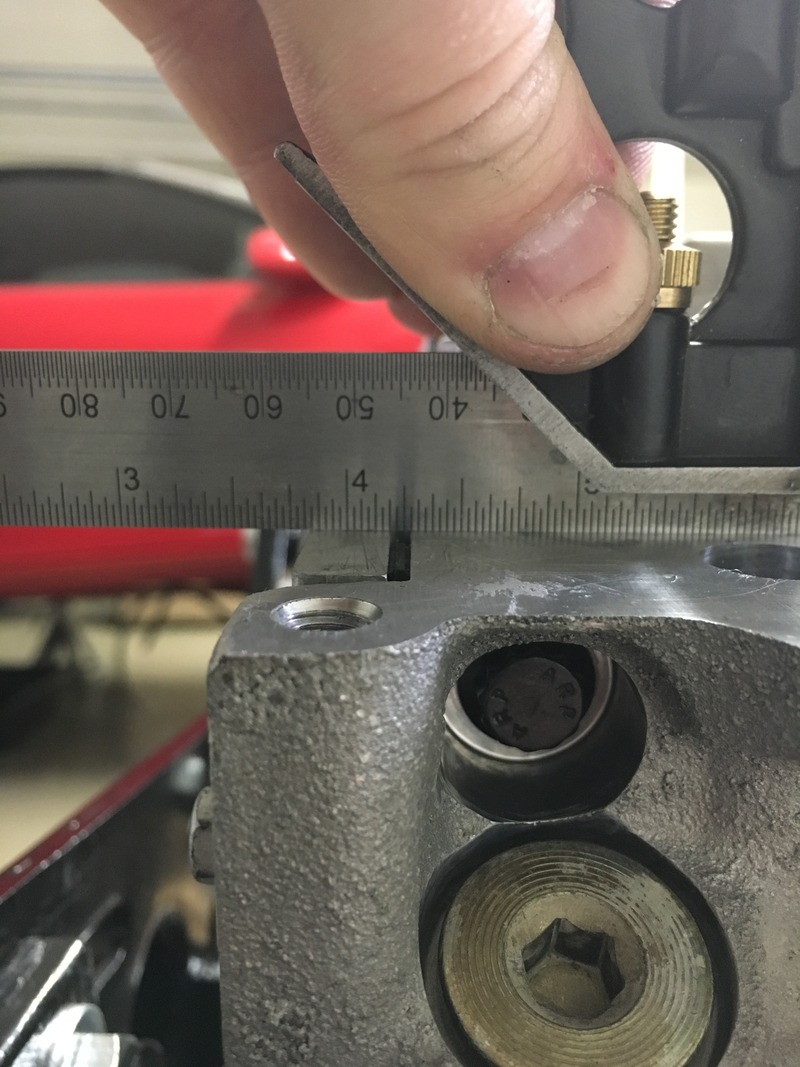
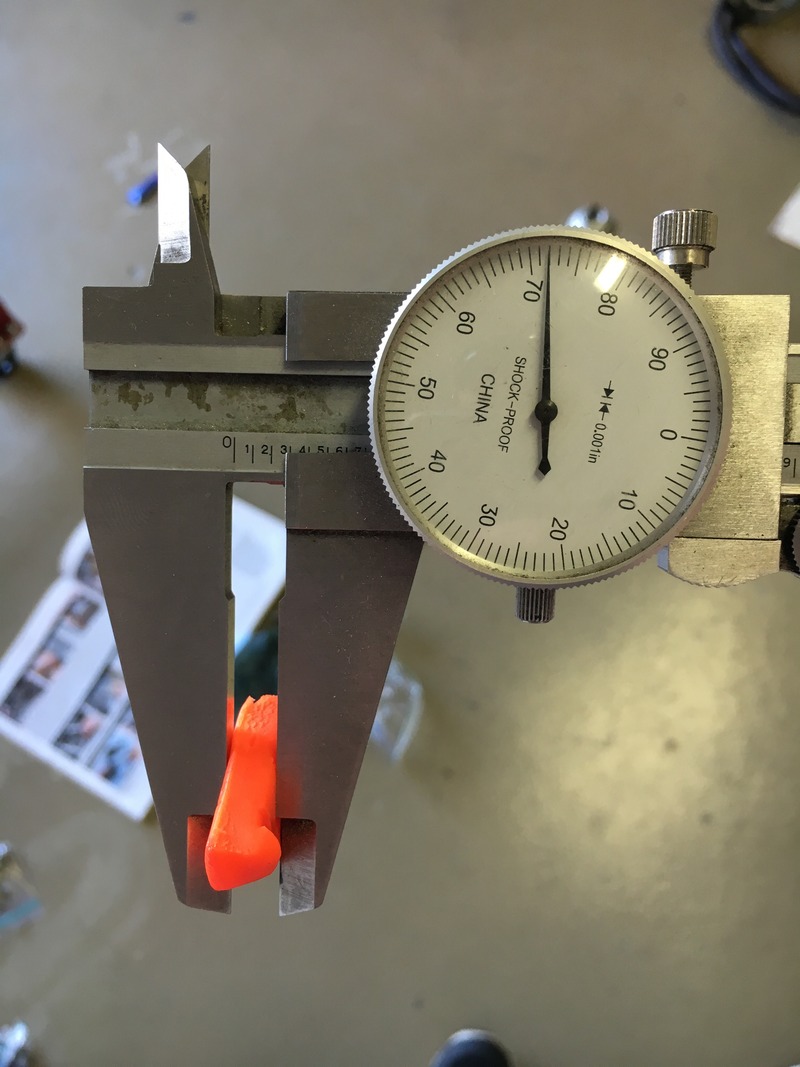
Not wasting anytime here. Rear cover is on. Since I don't have the alignment tool, here is checking to make sure it is lined up with no more than a .020 gap on both sides between the cover and the block. I couldn't fit more than a .01 feeler gauge on either side, so called it good and tightened it down.
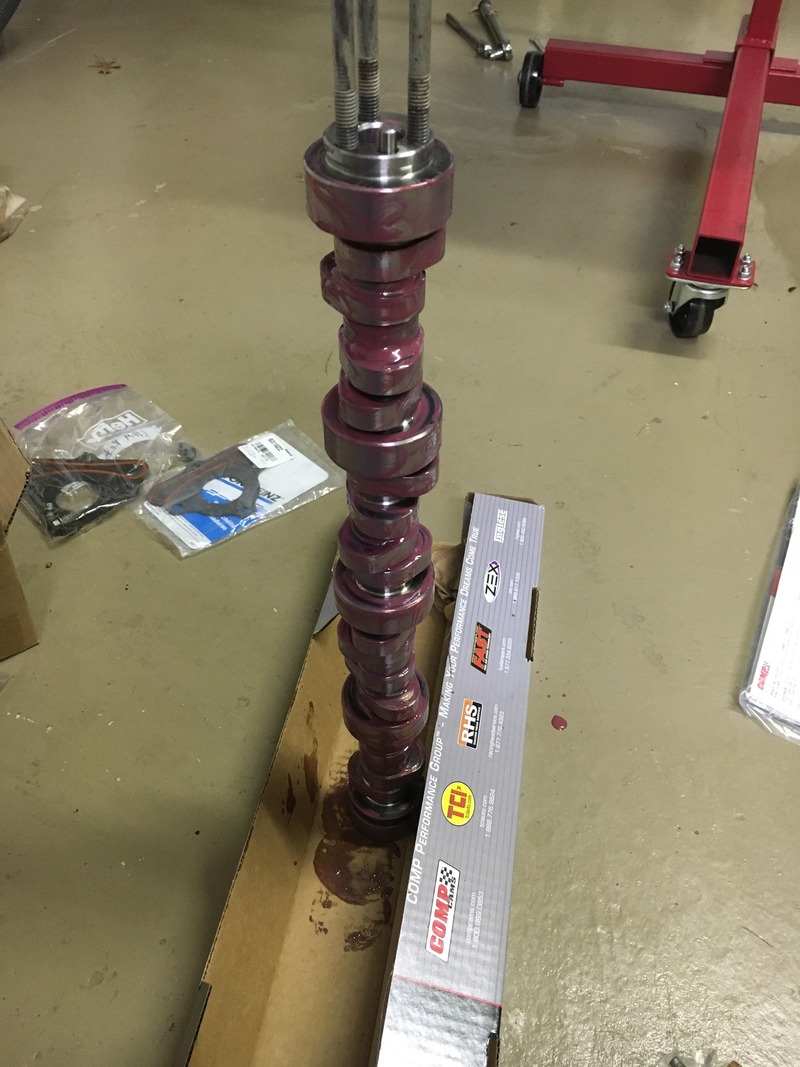
Cam all cleaned up, and coated in assembly lube ready to slide in.
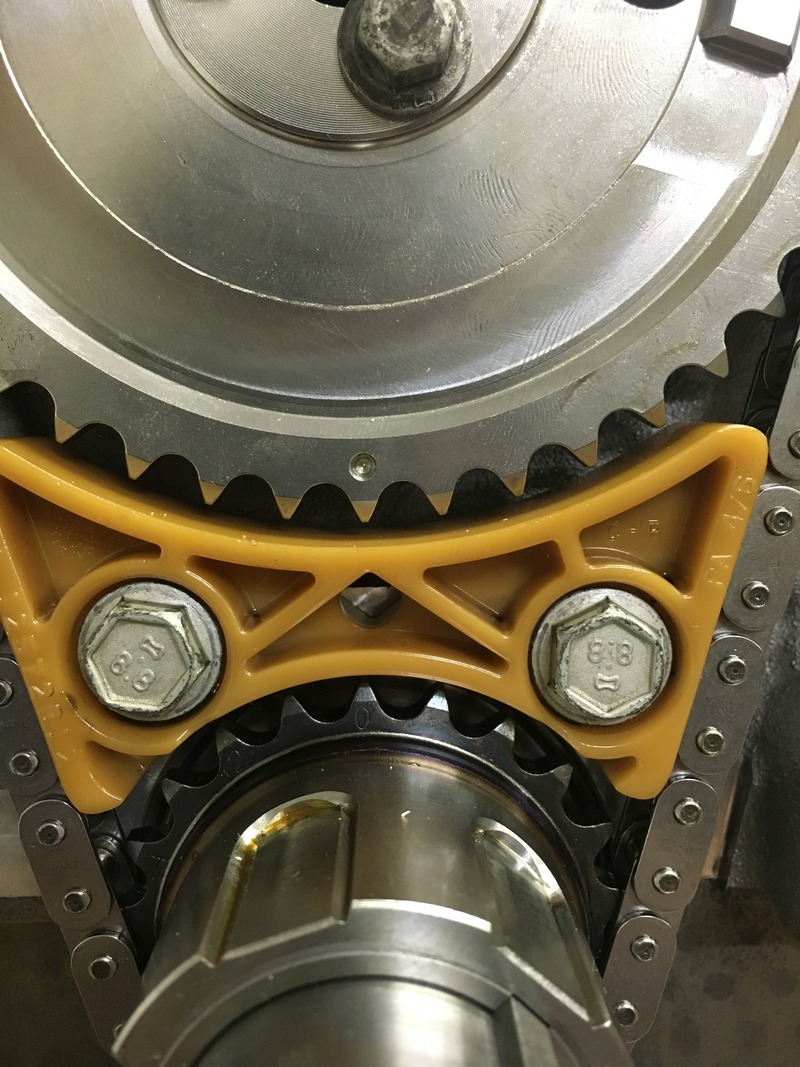
Cam in, timing chain and timing chain damper installed, blue loc-tited, and torqued to spec.
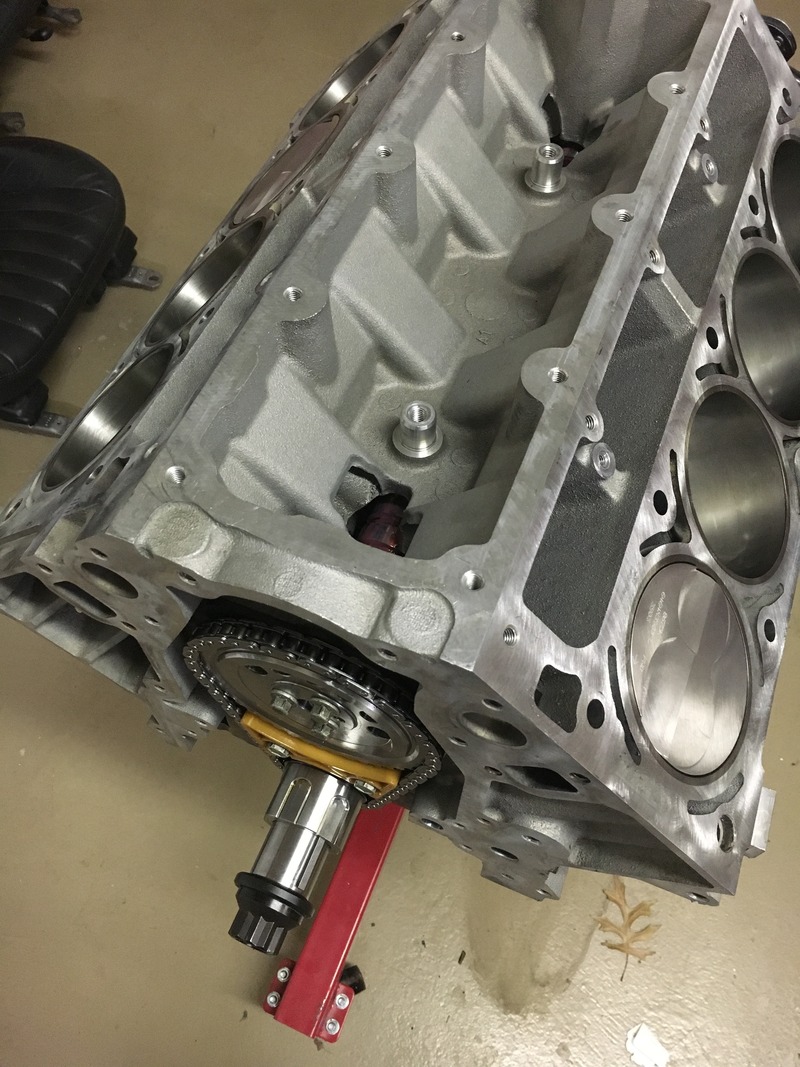
Lined up dot to dot, ready to degree it and make sure all looks good.
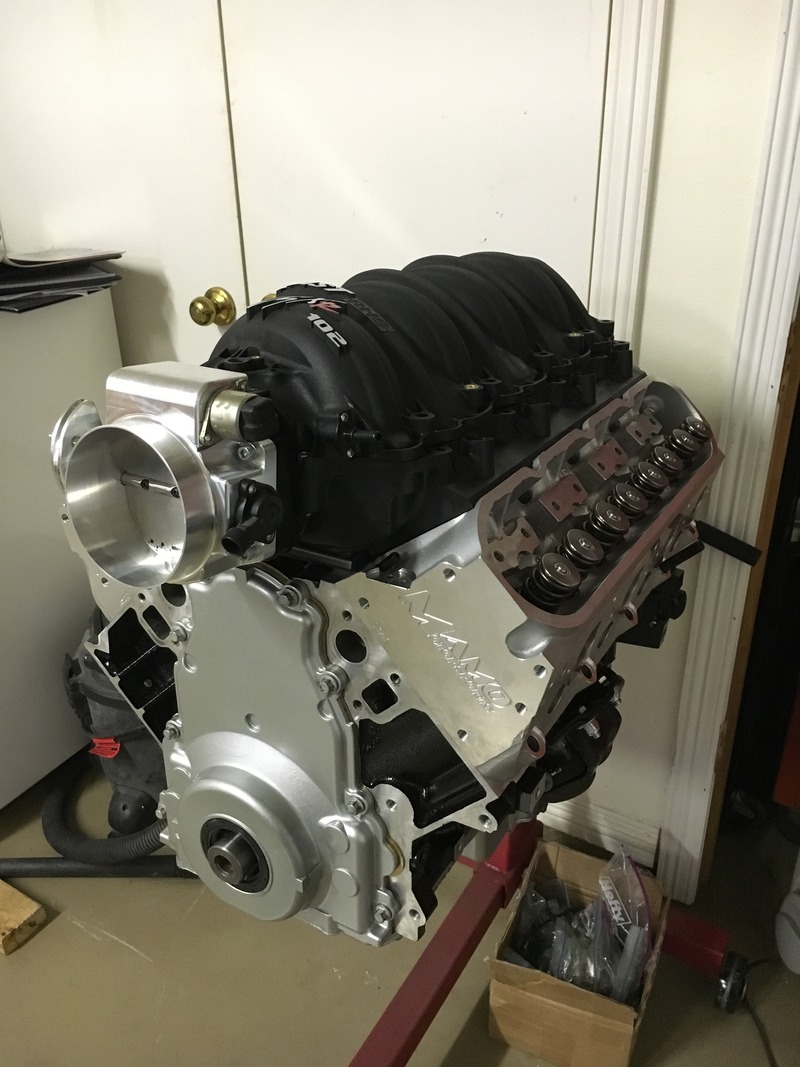
This beauty showed up today as well, time to get it painted and swapped in!!
 02-05-2016, 08:32 AM
#65
Final shipments arrived yesterday! Now its all up to me to get it put together.
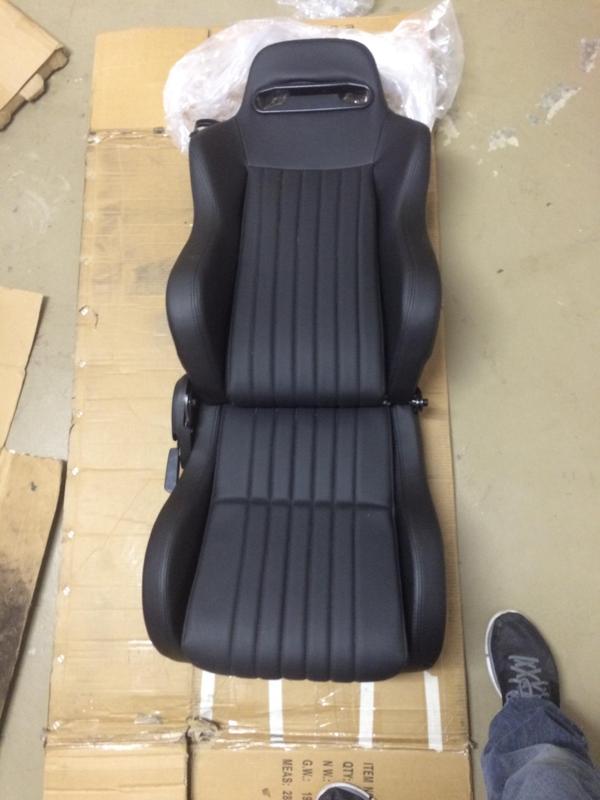
6LE seats with factory inserts
Mamo ported FAST 102

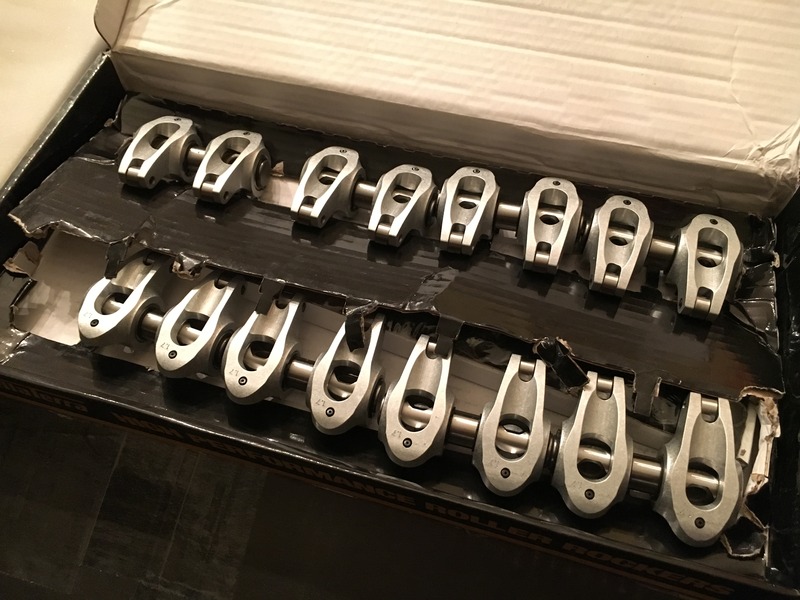
YT 10mm rockers
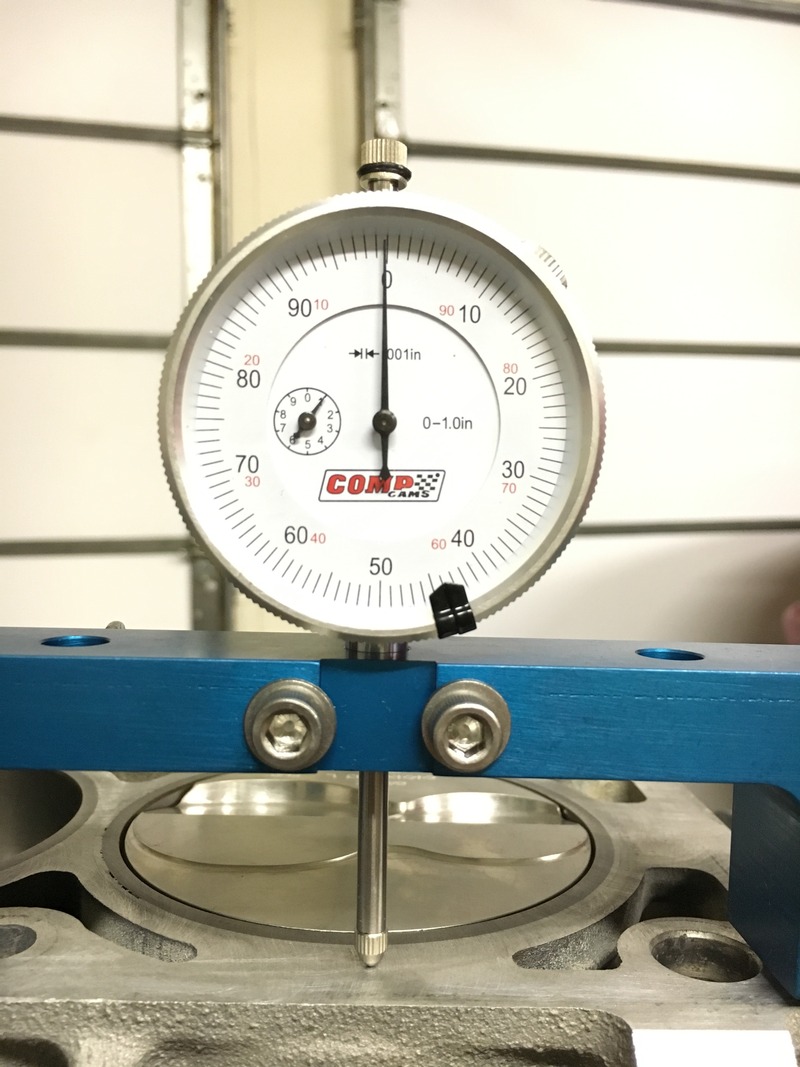
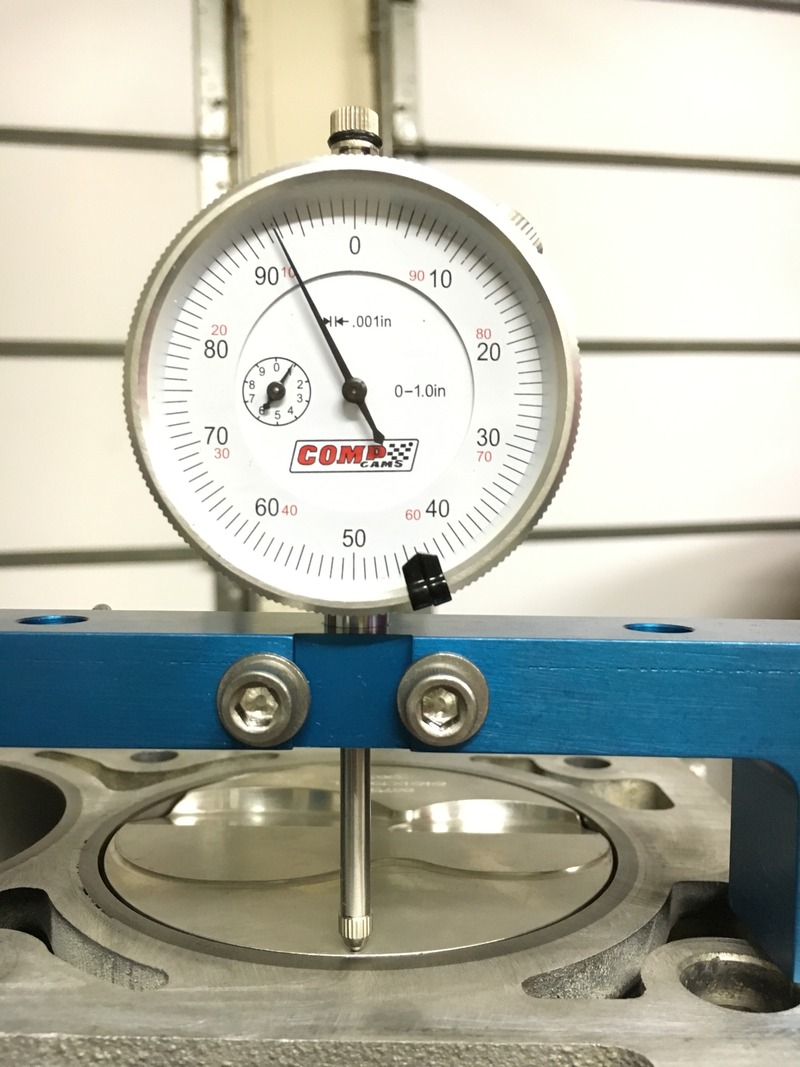
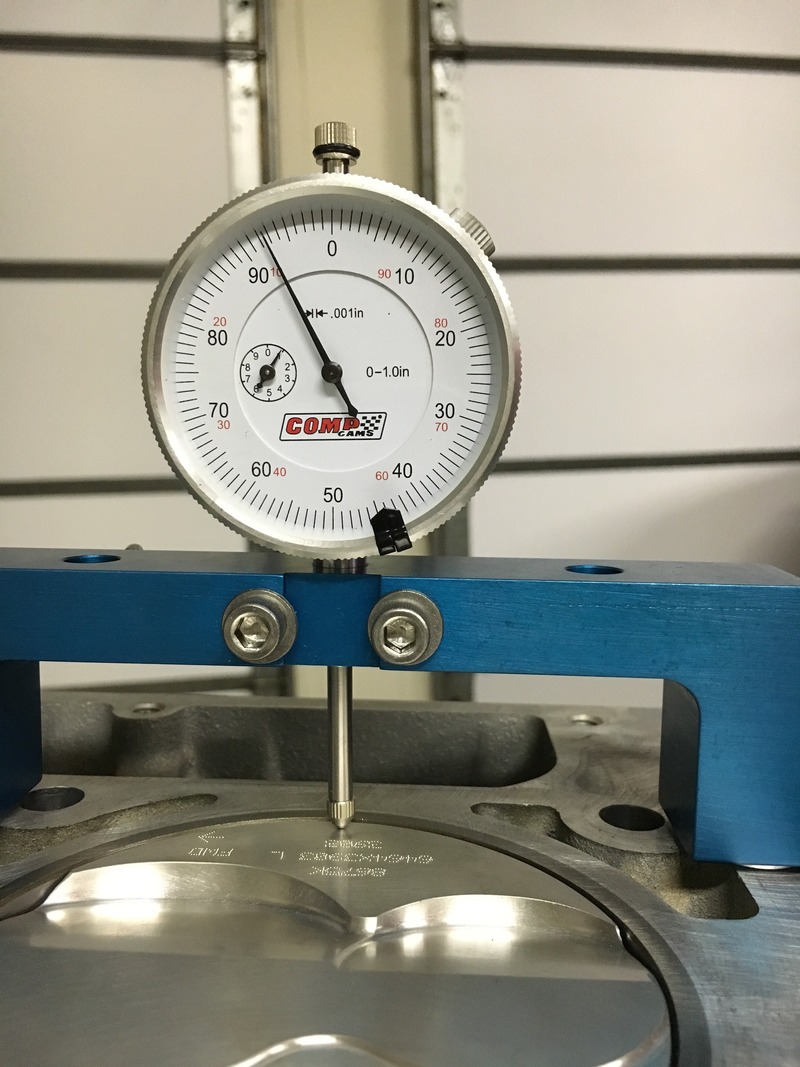
Checking deck height. My pistons were slightly recessed in the hole. Tony is going with .030 gaskets.
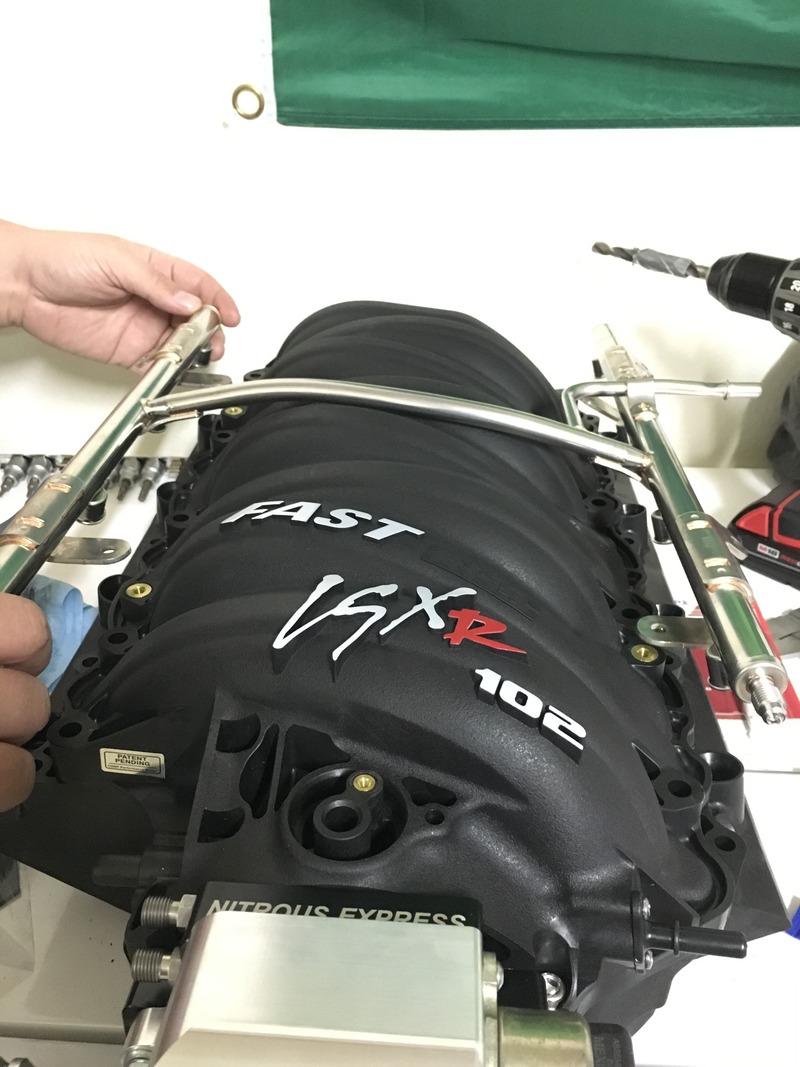
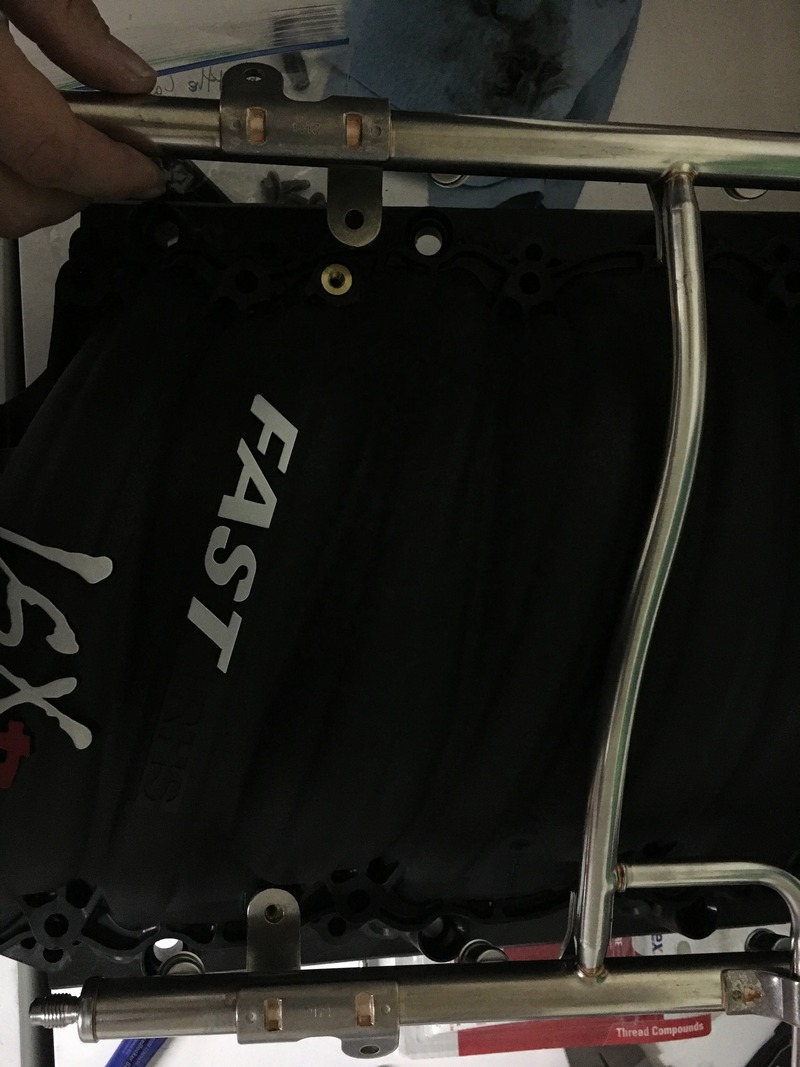
I disassembled the intake and drilled the hole for my MAP. Then began assembly of the intake components, and ran into an issue with the fuel rails not fitting. Just waiting for a reaponse back from Tony on this one.
6LE seats with factory inserts

Mamo ported FAST 102

YT 10mm rockers

Checking deck height. My pistons were slightly recessed in the hole. Tony is going with .030 gaskets.


I disassembled the intake and drilled the hole for my MAP. Then began assembly of the intake components, and ran into an issue with the fuel rails not fitting. Just waiting for a reaponse back from Tony on this one.


Last edited by 69gto96z; 02-11-2016 at 07:21 AM.
02-06-2016, 09:33 AM
#66
TECH Enthusiast
Join Date: Jun 2005
Location: Wichita, KS
Posts: 546
Likes: 0
Received 0 Likes
on
0 Posts

Looks like it's coming together nicely! That's strange with the fuel rail, I've never seen that happen before.
Those seats look pretty nice... I might have to look at getting a set. I sill want to maintain the electronic controls though...
Those seats look pretty nice... I might have to look at getting a set. I sill want to maintain the electronic controls though...
02-06-2016, 10:09 AM
#67
Thanks. Masking off the block to paint it as we speak. The fuel rail is odd. Tony isnt sure either. I feel like it got bent or is a mfg defect. The seats are great. I believe you can keep the electonic controls, there is a write up for it somewhere.
02-06-2016, 10:40 AM
#69
Looked at pics closer. I see what you're saying now. What do you have for the rest of your fuel system? I didn't see it in the build anywhere. Just curious.
I am thinking of painting my block too. What are you using to paint it and mask it off? I don't have good luck with taping stuff. I was thinking of using mastic tape to mask it off and see if that worked but I don't know
I am thinking of painting my block too. What are you using to paint it and mask it off? I don't have good luck with taping stuff. I was thinking of using mastic tape to mask it off and see if that worked but I don't know
02-06-2016, 11:19 AM
#70
TECH Enthusiast
Join Date: Jun 2005
Location: Wichita, KS
Posts: 546
Likes: 0
Received 0 Likes
on
0 Posts
Yeah, looking at the fuel rail pic again, and comparing it to mine, it looks like it got bent. Your tube that connects the two sides looks flatter than mine. I bet it got flattened somewhere along the line.
02-06-2016, 12:23 PM
#71
Looked at pics closer. I see what you're saying now. What do you have for the rest of your fuel system? I didn't see it in the build anywhere. Just curious.
I am thinking of painting my block too. What are you using to paint it and mask it off? I don't have good luck with taping stuff. I was thinking of using mastic tape to mask it off and see if that worked but I don't know
I am thinking of painting my block too. What are you using to paint it and mask it off? I don't have good luck with taping stuff. I was thinking of using mastic tape to mask it off and see if that worked but I don't know
I taped it off, and am cutting around the tape to outline everything, and using masking paper from home depot to cover the big areas. Here it is last night, after about 2 hours of masking. You can see my make shift paint booth back behind it too. I am doing 4 coats of self etching primer, 4 coats of black high temp engine paint, and 4 coats of high temp clear. It should hold up.


 02-07-2016, 02:28 AM
#74
Looks really nice been following both of these Mamo build threads and both you guys have some very nice builds going. What is your final compression going to be with that head gasket? Also what timing chain set are you running?
02-07-2016, 07:24 PM
#76
Doing some more assembly. Checking the pan to pickup tube clearance. Ended up right around .270 after the gasket was compressed. I tweaked the pickup tube just a tad more to make sure i was well into the 1/4-3/8 tolerance. Also attached the front cover and oil pan. Just gotta check PtV, chase the threads, install the head studs, and heads are ready to go on!

 02-08-2016, 09:50 AM
#78
Yeah it definitely does! I have to paint mine now lol. I just need to figure out how to clean it a little better so the paint doesn't peel first.
When you checked pickup tube clearance did you use .100 shims or just torque the gasket to spec? I need to do that next. And then do the P to V as well. I haven't done that before but seems easy enough.
With your fuel system. That's good to 600hp right? You should be real close and way over with the nitrous. Is that ok since you have the standalone fuel setup for the nitrous? I'm not too familiar with nitrous fuel systems yet but curious. I have 80# injectors in my car now and I had the twin in tank pumps before my new setup.
02-08-2016, 12:50 PM
#79
Thanks!
It is worth the time it takes thats for sure! Brake cleaner and alcohol work great.
I used the compressed gasket to check the spacing. I am going to tweak it a tad more, I want to make sure there is no chance of oil starvation.
I will definitely be getting close to maxxing the fuel system. With the standalone, the motor won't rely at all on the tank or pump to feed it. C16 will spray from the tank everytime I hit the bottle.
Yeah it definitely does! I have to paint mine now lol. I just need to figure out how to clean it a little better so the paint doesn't peel first.
When you checked pickup tube clearance did you use .100 shims or just torque the gasket to spec? I need to do that next. And then do the P to V as well. I haven't done that before but seems easy enough.
With your fuel system. That's good to 600hp right? You should be real close and way over with the nitrous. Is that ok since you have the standalone fuel setup for the nitrous? I'm not too familiar with nitrous fuel systems yet but curious. I have 80# injectors in my car now and I had the twin in tank pumps before my new setup.
When you checked pickup tube clearance did you use .100 shims or just torque the gasket to spec? I need to do that next. And then do the P to V as well. I haven't done that before but seems easy enough.
With your fuel system. That's good to 600hp right? You should be real close and way over with the nitrous. Is that ok since you have the standalone fuel setup for the nitrous? I'm not too familiar with nitrous fuel systems yet but curious. I have 80# injectors in my car now and I had the twin in tank pumps before my new setup.
I used the compressed gasket to check the spacing. I am going to tweak it a tad more, I want to make sure there is no chance of oil starvation.
I will definitely be getting close to maxxing the fuel system. With the standalone, the motor won't rely at all on the tank or pump to feed it. C16 will spray from the tank everytime I hit the bottle.
02-11-2016, 12:22 AM
#80
Been doing some more work. All brake components have been repainted, and all engine accesories have been given a nice coat of aluminum high temp paint, except for the alternator. Head bolt holes have been cleaned with ARP thread chasers, and head studs are in 

