
H/C/I build thread: AI/EPS/Mamo


 03-24-2017, 06:13 PM
#63
Thanks, I'm getting motivated now that the snow had melted. I also got a base tune flashed on my PCM so I will be able to start it up and drive with the new setup.
03-25-2017, 11:06 PM
#64
Getting the timing cover all aligned up with the tool that 98_WS6_M6 was nice enough to ship to me to borrow!

Installed with the seal pressed in

Sizing up the interferences between the FAST and the coolant crossover

Would I be stupid not to run a wideband with this setup? I want to keep the interior looking stock, but I also don't want to melt down my engine.
Installed with the seal pressed in
Sizing up the interferences between the FAST and the coolant crossover
Would I be stupid not to run a wideband with this setup? I want to keep the interior looking stock, but I also don't want to melt down my engine.
03-27-2017, 08:17 PM
#65
Front coolant crossover bent to fit

First test fitting before I got to grinding on the water pump

Ground down enough to get the TB on, but I'm going to do some more work on the file so there's a little margin for thermal expansion and all.

First test fitting before I got to grinding on the water pump
Ground down enough to get the TB on, but I'm going to do some more work on the file so there's a little margin for thermal expansion and all.
03-28-2017, 06:01 AM
#66

Looking good! Great progress. Glad to help.
If you want to do a wideband and keep things stock looking you have a couple options. I have a few external gauges hidden in my glove box so you could make a panel out of thin metal and do it that way. Or also an NTK AFRM wideband is a good setup has a little digital display and I just put it in the glove box. Mine isn't done but I'll attach a pic you can see what I mean.

If you want to do a wideband and keep things stock looking you have a couple options. I have a few external gauges hidden in my glove box so you could make a panel out of thin metal and do it that way. Or also an NTK AFRM wideband is a good setup has a little digital display and I just put it in the glove box. Mine isn't done but I'll attach a pic you can see what I mean.
 03-28-2017, 06:53 AM
#67
Moderator
iTrader: (4)
Join Date: Jul 2014
Location: My own internal universe
Posts: 10,446
Received 1,835 Likes
on
1,145 Posts
OP, coming along nicely! I bent that down too. It was the only fit issue I had and really such a non issue.
98, I like that! I put thecWB in that little cubby in front of the shifter. Fits like it belongs
98, I like that! I put thecWB in that little cubby in front of the shifter. Fits like it belongs
03-28-2017, 07:27 AM
#68
Looking good! Great progress. Glad to help.
If you want to do a wideband and keep things stock looking you have a couple options. I have a few external gauges hidden in my glove box so you could make a panel out of thin metal and do it that way. Or also an NTK AFRM wideband is a good setup has a little digital display and I just put it in the glove box. Mine isn't done but I'll attach a pic you can see what I mean.
Attachment 571753
Do you have a NTK WB or a circular display in that cubby hole?
For measuring pushrods how do you guys ensure the cam is on its base circle and the lifters aren't getting stuck in the trays? When I do the measurements I'm going to pull the plugs and use a borescope to make sure the piston is at TDC, but does it have to be TDC on the start of the combustion stroke? I could also use the borescope once I have the PR's in to validate PTV clearance before firing it up.
03-28-2017, 07:57 AM
#69
Moderator
iTrader: (4)
Join Date: Jul 2014
Location: My own internal universe
Posts: 10,446
Received 1,835 Likes
on
1,145 Posts
For measuring pushrods how do you guys ensure the cam is on its base circle and the lifters aren't getting stuck in the trays? When I do the measurements I'm going to pull the plugs and use a borescope to make sure the piston is at TDC, but does it have to be TDC on the start of the combustion stroke? I could also use the borescope once I have the PR's in to validate PTV clearance before firing it up.
What I did was to stick the pushrods in the holes and push down on the lifters for that cylinder. Then, I adjusted both checkers (yeah, I used two at a time) out to be a bit longer than expected. I stuck them in and rotated the engine EOIC wathing the pushrods until the intake rod dropped. Then I installed the rockers and rotated again and trusted the rockers and excessively long PR to force the lifters against the cam. Another EOIC, this time watching the rocker tip until it stopped, rotated an additional 90 degrees for good measure (which is going to be close to TDC on compression stroke). Then I checked length. Then, being my **** retentive self, I set the checkers to the preload I wanted, rotated the engine twice - EOIC plus 90 degrees - and then I checked again. Then, I went with my measured length plus preload, set the checkers to that length, and then I used rocker bolt rotation method ONLY TO CONFIRM the numbers I got with the checkers and calipers.
Sorry for the long version there, but I just find that extra engine rotations and measurements never hurt and usually serve to confirm the original measurements, so I'm much more confident. if I rotate twice and the numbers change, I do it a third time and a fourth time if necessary until the numbers are consistent.
Side note - when I degree a cam, I do eight engine rotations and then recheck the cam degree also. Like I said - **** retentive
03-28-2017, 07:59 AM
#70
I haven't actually driven this car yet. Just got it started yesterday with Darth's help. I actually put a GoPro in the car when I'm running and view the gauges that way after the fact. I'd think once you get it dialed in you won't even pay attention to it anymore. Darth has the same AFR gauge I do
03-28-2017, 08:06 AM
#71
Moderator
iTrader: (4)
Join Date: Jul 2014
Location: My own internal universe
Posts: 10,446
Received 1,835 Likes
on
1,145 Posts
I haven't actually driven this car yet. Just got it started yesterday with Darth's help. I actually put a GoPro in the car when I'm running and view the gauges that way after the fact. I'd think once you get it dialed in you won't even pay attention to it anymore. Darth has the same AFR gauge I do
03-28-2017, 11:52 AM
#73
Nope, no grinding on WP at all. everything just fit. IDK if it's stock vs meziere or I just got lucky on the tolerances, but both the fast102 and MSD102 went in with zero muss.
Edit -- NTK wideband. Looks just like 98 WS6's display /edit
What I did was to stick the pushrods in the holes and push down on the lifters for that cylinder. Then, I adjusted both checkers (yeah, I used two at a time) out to be a bit longer than expected. I stuck them in and rotated the engine EOIC wathing the pushrods until the intake rod dropped. Then I installed the rockers and rotated again and trusted the rockers and excessively long PR to force the lifters against the cam. Another EOIC, this time watching the rocker tip until it stopped, rotated an additional 90 degrees for good measure (which is going to be close to TDC on compression stroke). Then I checked length. Then, being my **** retentive self, I set the checkers to the preload I wanted, rotated the engine twice - EOIC plus 90 degrees - and then I checked again. Then, I went with my measured length plus preload, set the checkers to that length, and then I used rocker bolt rotation method ONLY TO CONFIRM the numbers I got with the checkers and calipers.
Sorry for the long version there, but I just find that extra engine rotations and measurements never hurt and usually serve to confirm the original measurements, so I'm much more confident. if I rotate twice and the numbers change, I do it a third time and a fourth time if necessary until the numbers are consistent.
Side note - when I degree a cam, I do eight engine rotations and then recheck the cam degree also. Like I said - **** retentive
I haven't actually driven this car yet. Just got it started yesterday with Darth's help. I actually put a GoPro in the car when I'm running and view the gauges that way after the fact. I'd think once you get it dialed in you won't even pay attention to it anymore. Darth has the same AFR gauge I do
I'm not doing the tuning myself so the wideband would just be for me to monitor while driving. After looking into it some more I will probably pass on the AEM failsafe setup. Might just try to find a deal in the classifieds for a WB.
03-28-2017, 01:33 PM
#74
I don't know what's going on. Me and Darth concluded the injectors are clogged somehow. But they're brand new so... Could be some stuff in my brand new lines washed into them but it would've had to clog every single one simultaneously. Anyways, we upped fuel pressure and flow rate and it started. We're hoping they just clean up with running. Going to run some sea foam through this tank and see what happens. I called the company and they said try it and see what happens.
As for the other failed startup that was just coil packs plugged in in the wrong order iirc. I did the same thing with my first startup of last build. There's a diagram that will tell you what color wires go to each coil pack if you want to double check. If the coil packs are in stock location you probably won't have an issue. I attached a pic I have on my phone for coil pack wire colors.
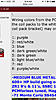
As for the other failed startup that was just coil packs plugged in in the wrong order iirc. I did the same thing with my first startup of last build. There's a diagram that will tell you what color wires go to each coil pack if you want to double check. If the coil packs are in stock location you probably won't have an issue. I attached a pic I have on my phone for coil pack wire colors.
 03-30-2017, 07:48 AM
#76
Well I bought a set of LS2/3 coils off the classifieds for my new Holley valve covers. I got the harmonic damper on, finished filing down the water pump and installed that, put the belts on, dropped the radiator in, and put on the front and rear coolant crossovers.
forgot to bring my laptop so I didn't have the FAST instructions. I need to figure out if I leave the black o-rings on my new injectors, or switch to the thicker green o-rings.
I also need to figure out what to do with the vacuum port on the back of the manifold under the larger port for the brake booster. On my ls6 manifold it looks like the vacuum line went to the solenoid but that was part of the AIR system which I have now removed.
03-30-2017, 08:09 AM
#77
You have to put the thicker o rings on the bottom of the injectors so it will seal properly with the fast intake.
For the vacuum port on the back of the intake. I think that one goes to the vacuum lines that go inside the car for the hvac controls. I could be wrong. I just capped mine for now because I'm not using the hvac system.
For the vacuum port on the back of the intake. I think that one goes to the vacuum lines that go inside the car for the hvac controls. I could be wrong. I just capped mine for now because I'm not using the hvac system.
03-30-2017, 11:51 AM
#78
Thanks again 98, seemed like the injectors slid in a little too easy and some searching showed that the vacuum line is for HVAC.
It will be a few more days before I really make any more progress but I'm starting to see the light at the end of the tunnel. I also ordered a rail style power steering cooler to replace the upper radiator hose/PS cooler combo.
It will be a few more days before I really make any more progress but I'm starting to see the light at the end of the tunnel. I also ordered a rail style power steering cooler to replace the upper radiator hose/PS cooler combo.
03-30-2017, 09:36 PM
#80
Glad they made it back. Yup I found the line back there. I actually had some time to work on it tonight. I got the upper and lower portions of the FAST together, clips and larger orings on the injectors, and the thermal barrier on the bottom.
Unfortunately the FAST didn't come with the washers for the 10 long bolts. Also once I switched the injector o rings and clips they didn't seem to go as far into the manifold and the spacers and bolts that come with the FAST to mount the rail are not big enough. Guess I'll be making a trip to the hardware store.
Unfortunately the FAST didn't come with the washers for the 10 long bolts. Also once I switched the injector o rings and clips they didn't seem to go as far into the manifold and the spacers and bolts that come with the FAST to mount the rail are not big enough. Guess I'll be making a trip to the hardware store.

