
Head Cam Swap Started Any Advice?
 03-12-2006, 12:09 PM
#1
TECH Regular
Thread Starter
iTrader: (18)
Join Date: Mar 2004
Posts: 401
Likes: 0
Received 0 Likes
on
0 Posts

Started my H/C swap yesterday. I am using http://www.ls1howto.com/index.php?article=2
as a guide. Is there anything else I should be aware of besides whats in the how to guide? If anyone has any tips or tricks please let me know. Wish me luck.Thanks
as a guide. Is there anything else I should be aware of besides whats in the how to guide? If anyone has any tips or tricks please let me know. Wish me luck.Thanks
 03-12-2006, 12:28 PM
#2

bolts on back of heads are a pain... when you put it all back together, tie all the grounds together with one bolt instead of the 3 the factory uses. Edges of heads are very sharp too, esp right under the valve covers.. be careful not to butcher your hands on them when removing the rockers.

 03-12-2006, 02:30 PM
#5
FormerVendor
iTrader: (9)
Join Date: May 2003
Location: Jacksonville, Fl
Posts: 1,573
Likes: 0
Received 0 Likes
on
0 Posts
When you remove the last four bolts on the intake put tape around them to hold them up in place so they don't get snagged. Lift up and fwd a little. Make sure to undo the electrical connections to the Oil pressure sending unit, the MAP sensor and the Cam Position sensor before you go too far fwd with the intake. Or else see the photos. Go to you nearest pro bicycle shop and get one their narrow 15mm tools to get the pwr stearing unit off without hassel-see photos. And use greenie pads with alcohol to clean off the block instead of the ice scraper tool. Get some lint free cloths to do the final clean passes.
 03-12-2006, 02:52 PM
#7
TECH Addict
iTrader: (3)
Join Date: Apr 2005
Location: Northern Kentucky
Posts: 2,905
Likes: 0
Received 0 Likes
on
0 Posts
make sure you clean out the pistons aswell after you scrape the headgasket stuff off dont want **** in the block tearing it up, and make sure everything is lined up aswell and as everyone has already said double check everything better to be safe than sorry.
Trending Topics
03-12-2006, 04:33 PM
#9
TECH Fanatic
Join Date: Jan 2003
Location: Northern Va
Posts: 1,094
Likes: 0
Received 0 Likes
on
0 Posts
Originally Posted by JL ws-6
bolts on back of heads are a pain... when you put it all back together, tie all the grounds together with one bolt instead of the 3 the factory uses...
03-12-2006, 05:55 PM
#10
TECH Fanatic
even after you think you have the head bolt holes as clean as they can get, clean them again
good luck....
here are a few pics of mine.........
03-12-2006, 06:03 PM
#11
I used a platic wool sponge and acetone to clean and prep the surface, and wiped down with a damp cloth. To get the coolant out of the bolt holes, simply insert a drinking straw (i know its tempting but dont sip any), then take your wet dry vac and use your hand to seal the straw up against the vacuum nozzle. Takes maybe 5 minutes to do it this way. You could also tape the straw to the nozzle but its clumsy. Just make sure the straw goes to the bottom of the hole as it tends to get hung up where the threads start half way down.
 03-12-2006, 09:50 PM
#13
TECH Regular
Thread Starter
iTrader: (18)
Join Date: Mar 2004
Posts: 401
Likes: 0
Received 0 Likes
on
0 Posts
Great advice. Thanks everyone. Keep em comin.  Hey M6HuggerSS, I see your headers laying over to the sides. Did you have to disconect your Y-pipe or just unbolt them from the head?
Hey M6HuggerSS, I see your headers laying over to the sides. Did you have to disconect your Y-pipe or just unbolt them from the head?  im going to be doing this later on in the summer so this thread will help out a lot! and again- good luck
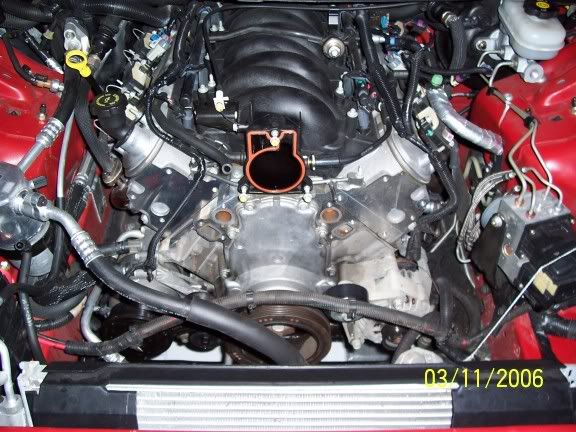
 .
03-13-2006, 05:08 AM
.
03-13-2006, 05:08 AM
#19
I 2nd the stud reccommendation.. and cleanign the bolt holes is pretty easy, make a tap out of one of the old bolts, and thread it into the hole by hand to clean the threads, and then get a small hose that can fit inside the bolt hole, and attach it to a compressor handle.. it makes short work of the cleaning. Spraying carb clean in teh holes also helps loosen anythign that's in there,. and it will dry overnite as well, so after you are done cleanign the holes, a squirt of taht in teh holes until they are full, let it sit overnite, then hose them out again teh next day, and hold a towel around the hole so teh crap doesn't fly everywhere when you do it. The intake bolts, I used some fuel tubign that was about a inch or so long to hold the bolts up, just slit it so you can silde it around the bolt to hold it up.. worked really good.
