Follow along with an engine build @ Weber Racing Engines!!
 03-13-2008, 05:09 PM
#1
Banned
Thread Starter
iTrader: (4)
Join Date: Jan 2007
Location: North Ridgeville, Ohio
Posts: 539
Likes: 0
Received 0 Likes
on
0 Posts
This is from a post that started in the Nitrous Section about a customers engine that we are building. We are doing a step by step follow along of all of the processes that ALL engines go threw here @ WRE. Here is what this build is going to consist of:
408 CI Iron Block
Custom Wiseco Flat Top Pistons
K1 Tech Connecting Rods
Callies Compstar Crankshaft
Solid Roller Camshaft
TEA/Trickflow 235cc CNC Ported Cylinder Heads
Now there will be a pause in production as we have custom pistons going threw for Andrew so we will have a gap in work. I will update as much as possible.
Obviouslly we have to start with a brand new GM Performance Parts 6.0L iron block:

Next the block is put in line for the CNC. A tag is put on it with the work order number. When the work order is pulled, the block is taken over and prepped to go on the CNC.


When the work order is pulled Greg, the CNC machinist picks the engine up on the overhead crane and takes it to the prep table to get it ready to mount in the CNC. Here is a picture of Greg removing sharp edges that are all over these new GM blocks. This is a very important step that we will talk about more later when the block is align honed. This is just a quick clean up.


Next Greg is removing the factory cam bearings. We will be replacing the factory cam bearing with 1 piece Durabond cam bearings later on.

Here is the engine mounted to the fixture that it rides on in the CNC machine, the block is suspended on the chain from the overhead crane:

After the block is setup in the CNC and all measurements are taken and deck height is established the block is decked to the desired heigh ( Sorry I was on the phone with a customer when the measurments were taken, Ill have to get a picture on the next block that Greg gets in the CNC ).
Here is a picture of the the head coming across the deck to make a nice flat head gasket surface on the block.


Next the tools are changed in the machine and the cylinders are bored. Andrews motor is going to be 408 CI, so the finished bore size will end up at 4.030. In the CNC the block is bored to 4.027 leaving .003 for hone stock so we can hone to size with the torque plate. Only going .030 over we complete this in 2 runs through the cylinder, one rough cut, and one finish cut.

This is a picture on the first pass through the cylinder, you can see where the material is being taken out of the cylinder.

After the cylinders are bored to 4.027 we chamfer the cylinders. This helps guide ring installation when we are assembling the motors. ALso gets rid of sharp edges in the combustion chamber :
This is a picture of the top of the cylinder before we chamfer:

Here is a picture of the tool in the process of chamfering the cylinder:

You can see the cylinder to the left has already been chamfered:

Here is the finished product after the cylinder has been chamfered:

After the cylinders are chamfered we spray off all the chips with an air hose and take one last clean up pass on the deck with an abrasive brush that gives a good surface finish and deburs surface at the same time:


Well that is all for today. Tomorrow morning the block will be honed to size with a torque plate and setup in the align hone. Stay tuned!
408 CI Iron Block
Custom Wiseco Flat Top Pistons
K1 Tech Connecting Rods
Callies Compstar Crankshaft
Solid Roller Camshaft
TEA/Trickflow 235cc CNC Ported Cylinder Heads
Now there will be a pause in production as we have custom pistons going threw for Andrew so we will have a gap in work. I will update as much as possible.
Obviouslly we have to start with a brand new GM Performance Parts 6.0L iron block:
Next the block is put in line for the CNC. A tag is put on it with the work order number. When the work order is pulled, the block is taken over and prepped to go on the CNC.
When the work order is pulled Greg, the CNC machinist picks the engine up on the overhead crane and takes it to the prep table to get it ready to mount in the CNC. Here is a picture of Greg removing sharp edges that are all over these new GM blocks. This is a very important step that we will talk about more later when the block is align honed. This is just a quick clean up.
Next Greg is removing the factory cam bearings. We will be replacing the factory cam bearing with 1 piece Durabond cam bearings later on.
Here is the engine mounted to the fixture that it rides on in the CNC machine, the block is suspended on the chain from the overhead crane:
After the block is setup in the CNC and all measurements are taken and deck height is established the block is decked to the desired heigh ( Sorry I was on the phone with a customer when the measurments were taken, Ill have to get a picture on the next block that Greg gets in the CNC ).
Here is a picture of the the head coming across the deck to make a nice flat head gasket surface on the block.
Next the tools are changed in the machine and the cylinders are bored. Andrews motor is going to be 408 CI, so the finished bore size will end up at 4.030. In the CNC the block is bored to 4.027 leaving .003 for hone stock so we can hone to size with the torque plate. Only going .030 over we complete this in 2 runs through the cylinder, one rough cut, and one finish cut.
This is a picture on the first pass through the cylinder, you can see where the material is being taken out of the cylinder.
After the cylinders are bored to 4.027 we chamfer the cylinders. This helps guide ring installation when we are assembling the motors. ALso gets rid of sharp edges in the combustion chamber :
This is a picture of the top of the cylinder before we chamfer:
Here is a picture of the tool in the process of chamfering the cylinder:
You can see the cylinder to the left has already been chamfered:
Here is the finished product after the cylinder has been chamfered:
After the cylinders are chamfered we spray off all the chips with an air hose and take one last clean up pass on the deck with an abrasive brush that gives a good surface finish and deburs surface at the same time:
Well that is all for today. Tomorrow morning the block will be honed to size with a torque plate and setup in the align hone. Stay tuned!
 03-13-2008, 05:54 PM
#3
TECH Enthusiast

Join Date: Jan 2008
Posts: 625
Likes: 0
Received 0 Likes
on
0 Posts
WEBER RACING!!!!!!!!!!!!!!! 
Thanks for thinking of the little guy who wonders about this stuff all the time. I'll be checking this thread constantly.
I did decide to wait for the LSX iron instead of welding the extra bolt holes for each cylinder onto the 6.0L block, if you were wondering where I've been. You'll be doing my 427ci for sure.
 03-13-2008, 07:27 PM
#6
10 Second Club
iTrader: (15)
Join Date: Nov 2001
Location: St. Michael, MN.
Posts: 4,519
Likes: 0
Received 0 Likes
on
0 Posts

Leo - Looks good. I can't wait for my shortblock to be finished. I should post the before and after pics of the head repair you guys did; simply outstanding. I was so impressed with their machine work and customer service, I decided to order my shortblock from them.
For those considering a shortblock, definitely give these guys a call. They are extremely knowledgeable of the LS engines, always answer the phone and are straight shooters. Before they started my build, Leo sent me a quote detailing every step with an itemized cost for each step (down to the freight). No hidden charges or surprises. He even calls me with updates. I can't say enough good things about WRE. They have been great to deal with.
For those considering a shortblock, definitely give these guys a call. They are extremely knowledgeable of the LS engines, always answer the phone and are straight shooters. Before they started my build, Leo sent me a quote detailing every step with an itemized cost for each step (down to the freight). No hidden charges or surprises. He even calls me with updates. I can't say enough good things about WRE. They have been great to deal with.
Trending Topics
03-14-2008, 08:46 AM
#10
Banned
Thread Starter
iTrader: (4)
Join Date: Jan 2007
Location: North Ridgeville, Ohio
Posts: 539
Likes: 0
Received 0 Likes
on
0 Posts
Well its Friday! Thanks for the replies everyone. I was really hoping that everyone would enjoy and learn from this. We do this stuff everyday and really take it for granted. There is alot of work that goes into our engines as you will see in the rest of this post.
Well when I went back in the shop today Greg was just getting ready to take the block out of the CNC but first he stamped the in the deck height on the block. This way the customer knows where it is at. It is just something we do on every engine to take out guesswork later on.

Next the block was taken out of the CNC and out over on a bench where Shaun will debur the block. Deburring the block gets rid of all of the sharp edges that many of us have just about had to go to the hospital for when doing a head swap or something in the car. These blocks are razor sharp when they are new. There is also casting flash in the oil valley that we remove. This is a part of picking up where the production line leaves off.
Here is a picture of the casting flash in the valley that will be removed:


Here is Shaun removing the burs from the block :

Here is one of the oil passages that he finished. This process usually takes about an hour to go through the block. You can not begin to see the value in the cost of a Weber Racing Engine!

After Shaun is done with the block, it will get hooked back onto the crane and put into the align hone to have the mains check and honed. This is also where the main caps will be detailed:

Well when I went back in the shop today Greg was just getting ready to take the block out of the CNC but first he stamped the in the deck height on the block. This way the customer knows where it is at. It is just something we do on every engine to take out guesswork later on.
Next the block was taken out of the CNC and out over on a bench where Shaun will debur the block. Deburring the block gets rid of all of the sharp edges that many of us have just about had to go to the hospital for when doing a head swap or something in the car. These blocks are razor sharp when they are new. There is also casting flash in the oil valley that we remove. This is a part of picking up where the production line leaves off.
Here is a picture of the casting flash in the valley that will be removed:
Here is Shaun removing the burs from the block :
Here is one of the oil passages that he finished. This process usually takes about an hour to go through the block. You can not begin to see the value in the cost of a Weber Racing Engine!
After Shaun is done with the block, it will get hooked back onto the crane and put into the align hone to have the mains check and honed. This is also where the main caps will be detailed:
03-14-2008, 09:23 AM
#11
TECH Apprentice
iTrader: (36)

Join Date: Feb 2004
Location: Wayne, MI
Posts: 377
Likes: 0
Received 0 Likes
on
0 Posts

Wow. Great write up. I can't say enough about WRE. It makes me feel good to see the process that my motor went through before I picked it up. These guys are great to deal with and I am totally pleased with my 408. Keep up the good work and thanks for everything.
 03-14-2008, 02:22 PM
#13
Banned
Thread Starter
iTrader: (4)
Join Date: Jan 2007
Location: North Ridgeville, Ohio
Posts: 539
Likes: 0
Received 0 Likes
on
0 Posts
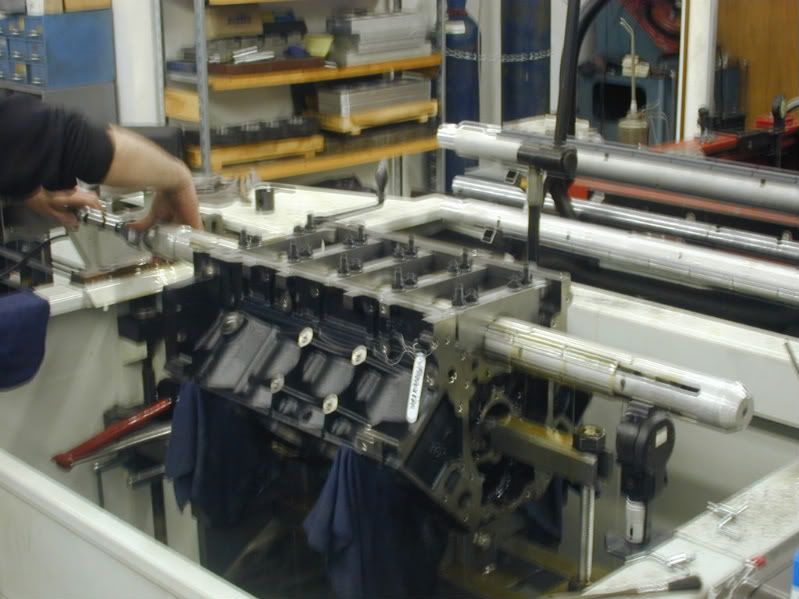
Now the block is hooked back up to the crane and lowered into the align hone where Greg fastens it down.


Here are the ARP main studs that will be used in the block to hold down the main caps.

Here is a picture of the main studs installed in the block before the main caps are put on:

Greg first torques all of the caps in sequence and to spec:

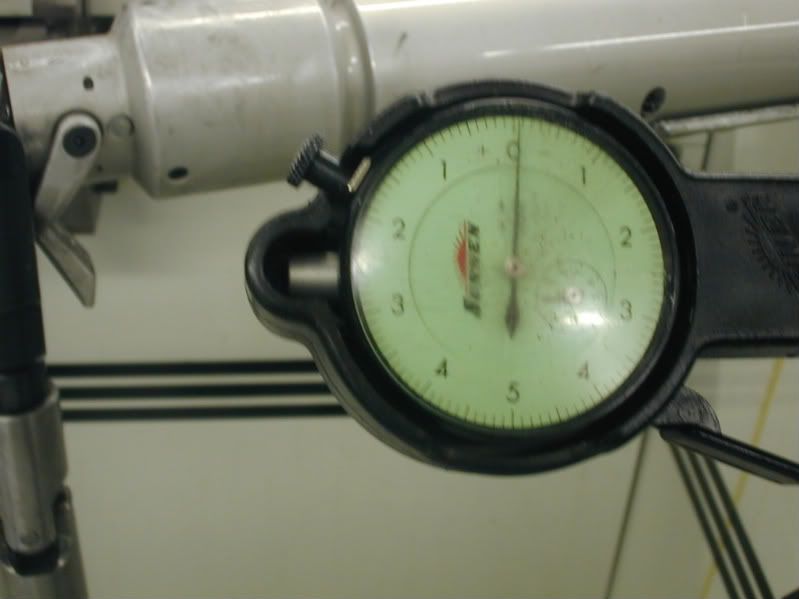
Greg than inserts a dial bore gauge into the rear main cap to check the diameter. The dial bore gauge is set to the max allowed bore size :

Now this is a perfect reason of what we do what we do and why we do it! This is a brand new block from GM. After installing the studs the main cap was measured and shows .001 over the high limit! Remember this gauge is set to the high limit. We can go as much as .001 smaller (to the right of the 0), but do not want to go bigger (to the left of the 0). There is more to this and much more precise figures, but this gives you a general idea. :

Here is the main cap after Greg takes it off the block. He is not going to take this main cap over to the Sunnen Cap and Rod grinder and will take very very small swipes off of the bottom of the main cap to bring it within tolerance. The cap is fixtured into this machine and is run back and forth to take small swipes at the surface. Inside the machine is basically a grinding wheel with a light abrasive pad on it to take precision and clean cuts at the part you are working on:
Here is a pic of the main cap when it is taken off the block before we machine it:

Greg machining the cap in the Sunnen Cap and Rod grinder:

here is a picture of the cap after it comes out. Notice the cross hatching is gone and there is a nice and smooth and shiny surface. In person you can really see the difference. Unfortunately my camera cannot pickup everything and allow you to really feel the difference on the cap.:

Greg than repeats the last step on a couple other caps. The caps are than reinstalled and the align hone is ran through the caps.:


After the hone is ran through the caps and they are taken off again to be cleaned up we come up with a measurement we are looking for:
This is a very long process of trial and error. You never want to take too much off so there is alot of test fitting and measuring that goes on. This may help some people why an align hone is such an expensive task. There is ALOT of time and materials wrapped up in this. Having a qualified machinist such as Greg does help alot on knowing just how much to take off and what procedures work.
Next the block is going to be moved over to the Sunnen CK-10 Cylinder King Cylinder Hone to hone the bores to size.
As I am typing this it is 3:15 on Friday and Greg is finishing detailing all of the caps making sure they are perfect. It is quitting time @ 5:00. We may not have enough time to get the motor in the cylinder hone today, so we may leave ya hanging until next week!
Here are the ARP main studs that will be used in the block to hold down the main caps.
Here is a picture of the main studs installed in the block before the main caps are put on:
Greg first torques all of the caps in sequence and to spec:
Greg than inserts a dial bore gauge into the rear main cap to check the diameter. The dial bore gauge is set to the max allowed bore size :
Now this is a perfect reason of what we do what we do and why we do it! This is a brand new block from GM. After installing the studs the main cap was measured and shows .001 over the high limit! Remember this gauge is set to the high limit. We can go as much as .001 smaller (to the right of the 0), but do not want to go bigger (to the left of the 0). There is more to this and much more precise figures, but this gives you a general idea. :
Here is the main cap after Greg takes it off the block. He is not going to take this main cap over to the Sunnen Cap and Rod grinder and will take very very small swipes off of the bottom of the main cap to bring it within tolerance. The cap is fixtured into this machine and is run back and forth to take small swipes at the surface. Inside the machine is basically a grinding wheel with a light abrasive pad on it to take precision and clean cuts at the part you are working on:
Here is a pic of the main cap when it is taken off the block before we machine it:
Greg machining the cap in the Sunnen Cap and Rod grinder:
here is a picture of the cap after it comes out. Notice the cross hatching is gone and there is a nice and smooth and shiny surface. In person you can really see the difference. Unfortunately my camera cannot pickup everything and allow you to really feel the difference on the cap.:
Greg than repeats the last step on a couple other caps. The caps are than reinstalled and the align hone is ran through the caps.:
After the hone is ran through the caps and they are taken off again to be cleaned up we come up with a measurement we are looking for:
This is a very long process of trial and error. You never want to take too much off so there is alot of test fitting and measuring that goes on. This may help some people why an align hone is such an expensive task. There is ALOT of time and materials wrapped up in this. Having a qualified machinist such as Greg does help alot on knowing just how much to take off and what procedures work.
Next the block is going to be moved over to the Sunnen CK-10 Cylinder King Cylinder Hone to hone the bores to size.
As I am typing this it is 3:15 on Friday and Greg is finishing detailing all of the caps making sure they are perfect. It is quitting time @ 5:00. We may not have enough time to get the motor in the cylinder hone today, so we may leave ya hanging until next week!
03-14-2008, 02:41 PM
#14
TECH Veteran
iTrader: (12)
Join Date: Dec 2004
Location: Rockville, MD
Posts: 4,354
Likes: 0
Received 0 Likes
on
0 Posts
great write-up. the amount of work and detail that goes into JUST the machining of the block alone shows how much it really takes to build an engine. thanks
03-14-2008, 06:58 PM
#16
Banned
Thread Starter
iTrader: (4)
Join Date: Jan 2007
Location: North Ridgeville, Ohio
Posts: 539
Likes: 0
Received 0 Likes
on
0 Posts
Leo - Looks good. I can't wait for my shortblock to be finished. I should post the before and after pics of the head repair you guys did; simply outstanding. I was so impressed with their machine work and customer service, I decided to order my shortblock from them.
For those considering a shortblock, definitely give these guys a call. They are extremely knowledgeable of the LS engines, always answer the phone and are straight shooters. Before they started my build, Leo sent me a quote detailing every step with an itemized cost for each step (down to the freight). No hidden charges or surprises. He even calls me with updates. I can't say enough good things about WRE. They have been great to deal with.
For those considering a shortblock, definitely give these guys a call. They are extremely knowledgeable of the LS engines, always answer the phone and are straight shooters. Before they started my build, Leo sent me a quote detailing every step with an itemized cost for each step (down to the freight). No hidden charges or surprises. He even calls me with updates. I can't say enough good things about WRE. They have been great to deal with.


 03-15-2008, 07:40 PM
#20
Staging Lane

Join Date: Oct 2005
Posts: 61
Likes: 0
Received 0 Likes
on
0 Posts
I love this thread. All the picture are awsome . I love motors and power. thanks for all the work and your work looks nice. I wonder how much power this motor is going to make. LS all the way