
nitrous outlet kit for 98-02 f-body -fitment questions
 11-14-2009, 09:28 AM
#1
Staging Lane
Thread Starter

Join Date: Aug 2009
Location: Lexington, Ky.
Posts: 88
Likes: 0
Received 0 Likes
on
0 Posts
Just picked up the kit for the 98-02 f bodies from Chris... I was under the impression it was a direct fit kit??? First there are no instructions for the new kit, just instuctions for the basic wet EFI nozzle system.. the electrical is the easy part and the instructions are very detailed for that part.. BUT no mention of exactly where the solonoid brackets were designed to bolt to?? You can tell by the hard lines what is close...but what was the system designed bolt pattern?? And more important, the fuel inlet hard tube is not pre bent or even appears to be correct length.. I know these guys spend alot of time on the boards helping out, But it seems like they should spend more time designing COMPLETE kit for a specific car,why go to the effort to make specific kits and then skip the details, like mounting instructions.. I am VERY used to fabbing and working to make things fit, no problem. However this kit was designed for the 98-02's not a basic kit like everyone sells...That is I went with N2O Outlet because this kit was made special for the 98-02 f-bodies... What gives??? If i knew that i had to bend/make my own hard lines, make a universal bracket fit for the noids, etc...I might have gone with NOS brand but since there was alot of "hype" for this company, I thought the kit would be 100 % complete...
_________________
_________________
 11-14-2009, 12:43 PM
#3
Teching In

Join Date: Oct 2009
Posts: 47
Likes: 0
Received 0 Likes
on
0 Posts
Just picked up the kit for the 98-02 f bodies from Chris... I was under the impression it was a direct fit kit??? First there are no instructions for the new kit, just instuctions for the basic wet EFI nozzle system.. the electrical is the easy part and the instructions are very detailed for that part.. BUT no mention of exactly where the solonoid brackets were designed to bolt to?? You can tell by the hard lines what is close...but what was the system designed bolt pattern?? And more important, the fuel inlet hard tube is not pre bent or even appears to be correct length.. I know these guys spend alot of time on the boards helping out, But it seems like they should spend more time designing COMPLETE kit for a specific car,why go to the effort to make specific kits and then skip the details, like mounting instructions.. I am VERY used to fabbing and working to make things fit, no problem. However this kit was designed for the 98-02's not a basic kit like everyone sells...That is I went with N2O Outlet because this kit was made special for the 98-02 f-bodies... What gives??? If i knew that i had to bend/make my own hard lines, make a universal bracket fit for the noids, etc...I might have gone with NOS brand but since there was alot of "hype" for this company, I thought the kit would be 100 % complete...
_________________
_________________
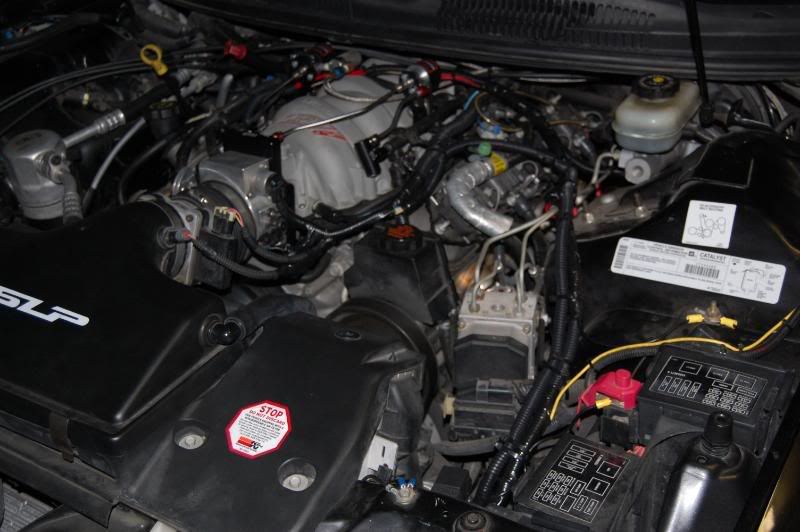
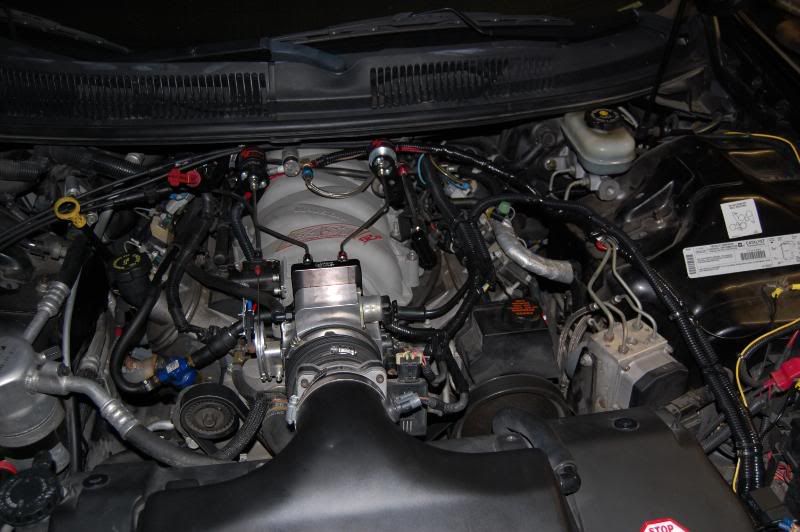
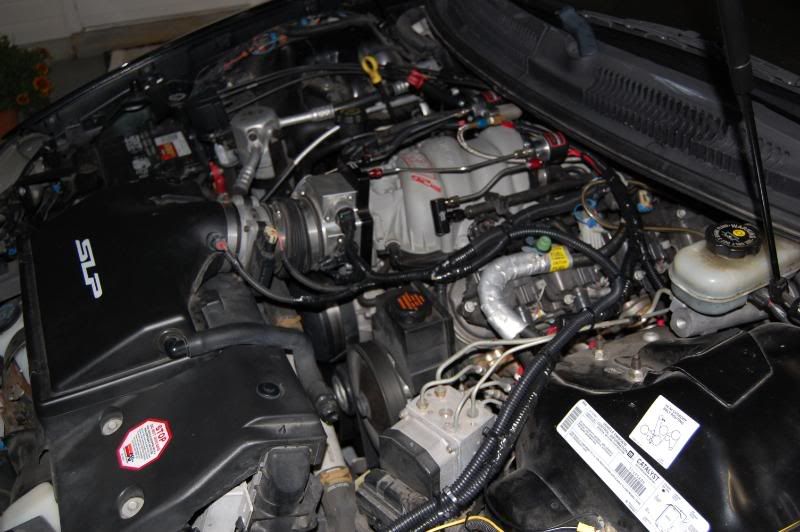
I bought the same kit you have and I did not have any problems at all. I know the kit did not come with any detailed instructions on how it mounts but looking at the pics he had on here it was a given of where the solenoid mounts were to be bolted down. The feed line for the fuel on mine was straight also. You have to install the fitting on the end of the fuel rail and then the feed line hooks to it. I am not around my car right now but I am almost positive that the mounts use the 3rd bolt back from the front on the intake. I have the 92mm kit and it was a good fit not sure about the other size kits. I can get some pics of you want to look at one mounted on a real car. I have yet to see one of the kits mounted and in use.
11-14-2009, 02:44 PM
#4
Staging Lane
Thread Starter
Join Date: Aug 2009
Location: Lexington, Ky.
Posts: 88
Likes: 0
Received 0 Likes
on
0 Posts
hey thanks, Black Nightmare... The 3rd bolt looked right also.. but I just wanted to be sure.. There seems no way the straight fuel line would work, though.. pics would be GREAT, if you have the time...What fuel rail fitting are you talking about, did it come with the kit also?? The fuel tap faces the front of the car, and the fuel solonoid is about 5-6" behind that fuel tap...so how does a straight pipe work?? Also did you have to flare the straight fuel hardline?? Anybody else use this kit???
11-14-2009, 03:22 PM
#5
Teching In
Join Date: Oct 2009
Posts: 47
Likes: 0
Received 0 Likes
on
0 Posts
hey thanks, Black Nightmare... The 3rd bolt looked right also.. but I just wanted to be sure.. There seems no way the straight fuel line would work, though.. pics would be GREAT, if you have the time...What fuel rail fitting are you talking about, did it come with the kit also?? The fuel tap faces the front of the car, and the fuel solonoid is about 5-6" behind that fuel tap...so how does a straight pipe work?? Also did you have to flare the straight fuel hardline?? Anybody else use this kit???
http://www.nitrousoutlet.com/catalog...1&product=3815
the black on on it went to the fuel rail and the straight went to the fuel solenoid.
11-14-2009, 05:20 PM
#7
Staging Lane
Thread Starter
Join Date: Aug 2009
Location: Lexington, Ky.
Posts: 88
Likes: 0
Received 0 Likes
on
0 Posts
There was a 3 port fitting that screwed onto my fuel rail and the straight line went to it. it looked like this
http://www.nitrousoutlet.com/catalog...1&product=3815
the black on on it went to the fuel rail and the straight went to the fuel solenoid.
http://www.nitrousoutlet.com/catalog...1&product=3815
the black on on it went to the fuel rail and the straight went to the fuel solenoid.
 Thanks..
 Trending Topics
11-14-2009, 08:14 PM
#8
Teching In
Join Date: Oct 2009
Posts: 47
Likes: 0
Received 0 Likes
on
0 Posts
As promised I am posting the pics.
Here is a quick write up on how I installed my kit.
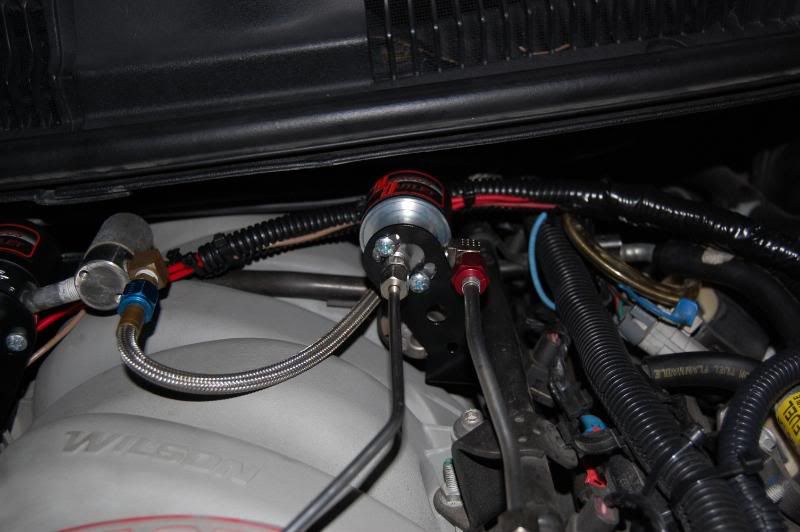
1) I took the 3rd bolt back holding the intake on out and installed the solenoid and bracket. And reinstalled the intake bolt and tightened it back down.
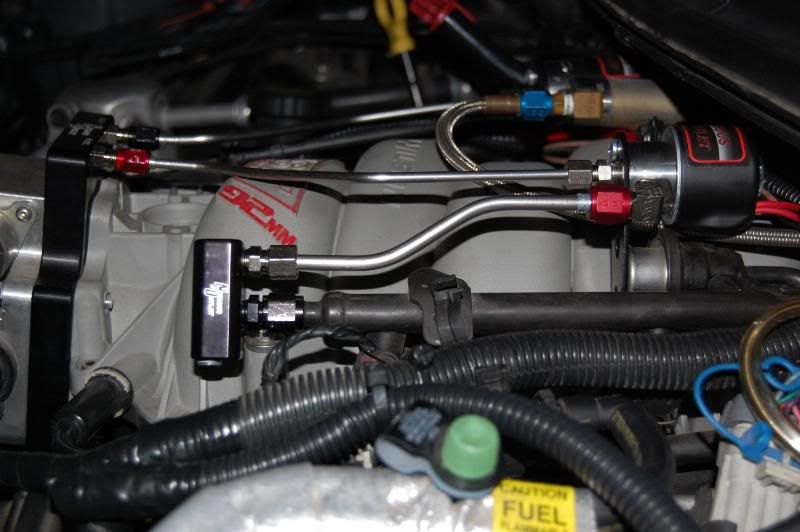

2)I then installed the fuel rail fitting on the fuel rail after taking out the schrader valve. And then installed the larger hard line from the fitting to the solenoid.
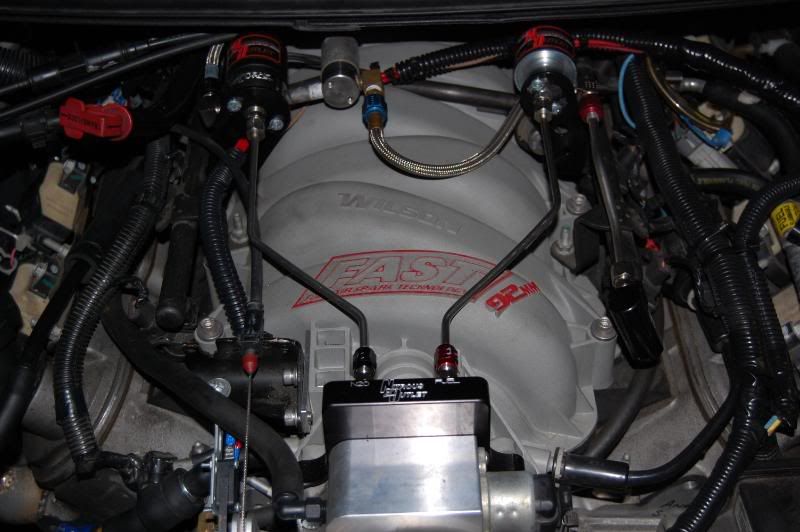
3) I then took the 4 bolts holding the TB on loose and removed the TB and installed the N2O plate and TB with the longer bolts provided with the kit. I then installed the Throttle cable bracket extension on the intake.
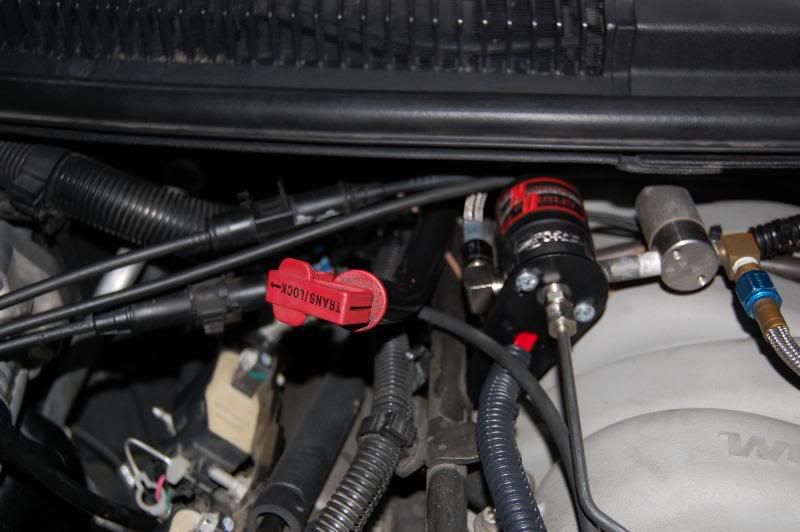
4) Next I installed my purge solenoid onto the N2O solenoid. I then ran the feed line for the bottle under my car and went ahead and finger tightened the line on the IN -4AN fitting on the N2O solenoid. I then loosened the bolt in the intake and installed the bracket and retightened the bolt.
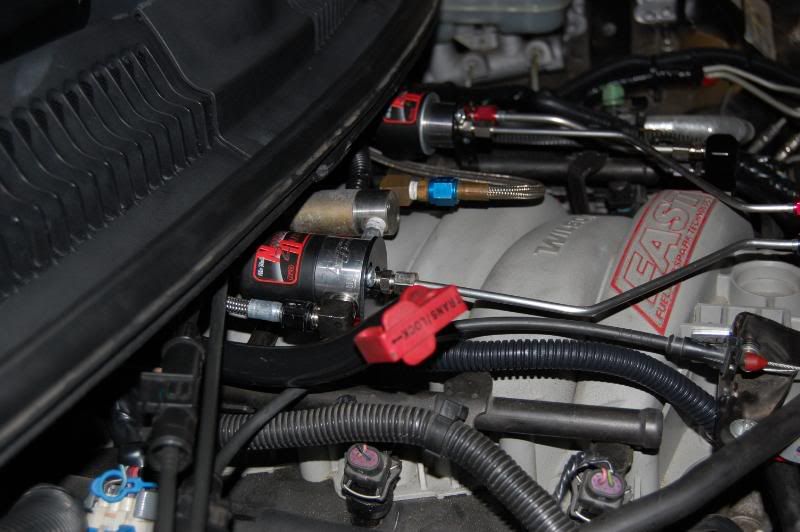
5) I then installed the hard line from the solenoid to the plate.
Be sure to test fit everything before tightening all the fittings I had to adjust the hard lines a little to get a good fit.Here are the rest of my pics.
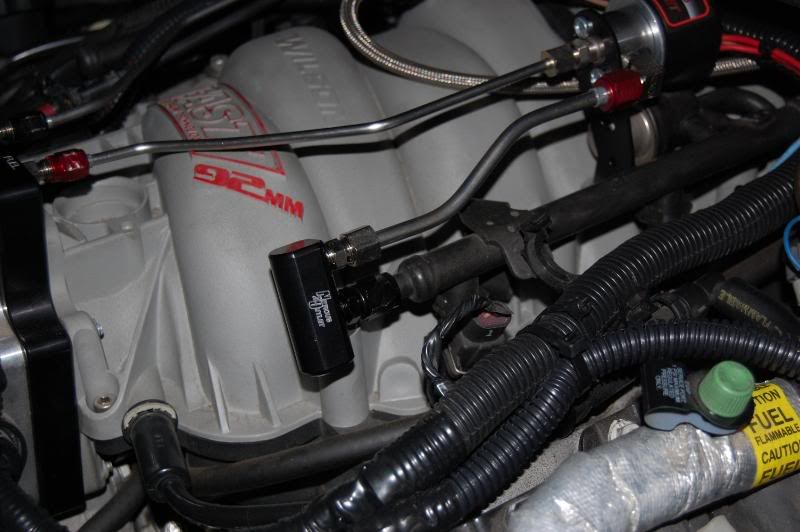
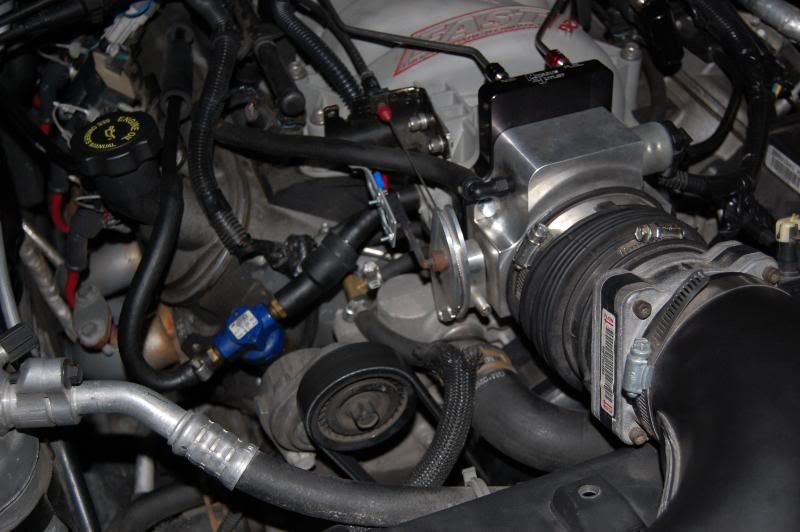
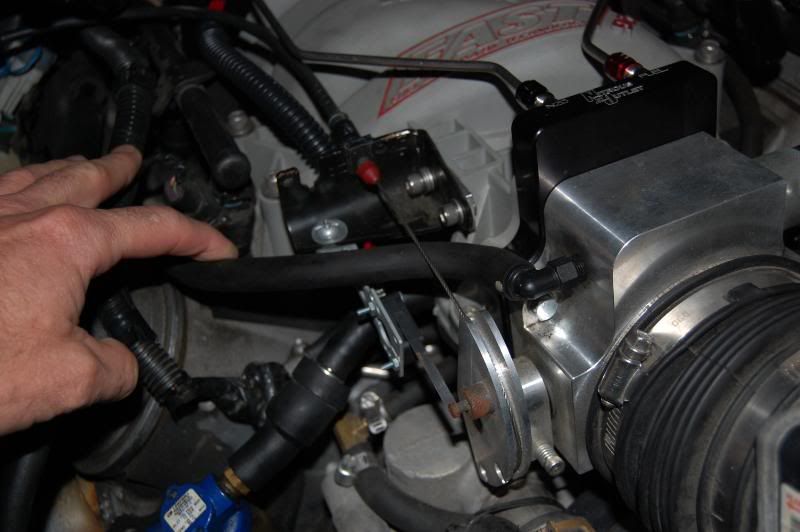
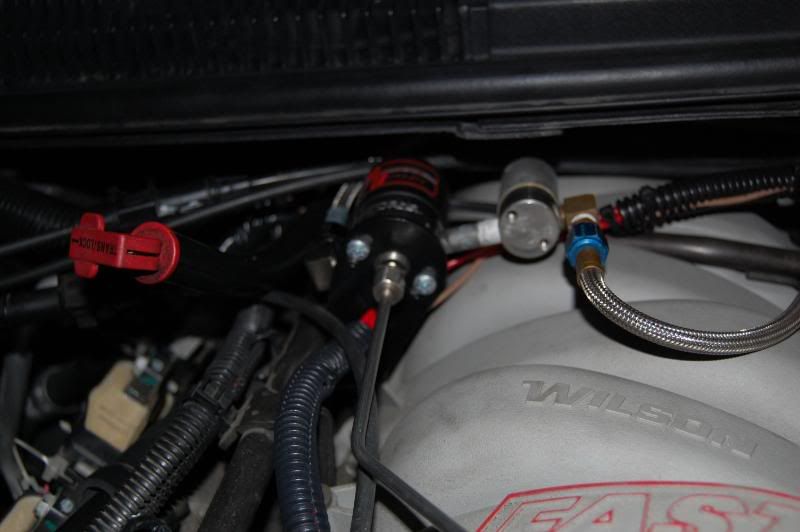
If you have anymore questions just ask. I had to figure it out all on my own. It only took me like 2 hours to get all the noids, plate, micro switch and lines ran and mounted. Take your time it is easy.
Here is a quick write up on how I installed my kit.
1) I took the 3rd bolt back holding the intake on out and installed the solenoid and bracket. And reinstalled the intake bolt and tightened it back down.
2)I then installed the fuel rail fitting on the fuel rail after taking out the schrader valve. And then installed the larger hard line from the fitting to the solenoid.
3) I then took the 4 bolts holding the TB on loose and removed the TB and installed the N2O plate and TB with the longer bolts provided with the kit. I then installed the Throttle cable bracket extension on the intake.
4) Next I installed my purge solenoid onto the N2O solenoid. I then ran the feed line for the bottle under my car and went ahead and finger tightened the line on the IN -4AN fitting on the N2O solenoid. I then loosened the bolt in the intake and installed the bracket and retightened the bolt.
5) I then installed the hard line from the solenoid to the plate.
Be sure to test fit everything before tightening all the fittings I had to adjust the hard lines a little to get a good fit.Here are the rest of my pics.
If you have anymore questions just ask. I had to figure it out all on my own. It only took me like 2 hours to get all the noids, plate, micro switch and lines ran and mounted. Take your time it is easy.
11-14-2009, 10:47 PM
#9
Staging Lane
Thread Starter
Join Date: Aug 2009
Location: Lexington, Ky.
Posts: 88
Likes: 0
Received 0 Likes
on
0 Posts
Black Nightmare, Thank You, I saved all the pics and bookmarked this thread.. Your set-up is awesome, very fine craftmanship on the entire engine bay
 This will be MY reference.. Hey, the crew at N2O outlet
could use your pics as it is a FINE example...maybe you could get some free goodies as payment....
This will be MY reference.. Hey, the crew at N2O outletcould use your pics as it is a FINE example...maybe you could get some free goodies as payment....
Last edited by gateman; 11-14-2009 at 10:53 PM.
11-15-2009, 07:46 AM
#10
Teching In
Join Date: Oct 2009
Posts: 47
Likes: 0
Received 0 Likes
on
0 Posts
Black Nightmare, Thank You, I saved all the pics and bookmarked this thread.. Your set-up is awesome, very fine craftmanship on the entire engine bay This will be MY reference.. Hey, the crew at N2O outlet
could use your pics as it is a FINE example...maybe you could get some free goodies as payment....
This will be MY reference.. Hey, the crew at N2O outletcould use your pics as it is a FINE example...maybe you could get some free goodies as payment....
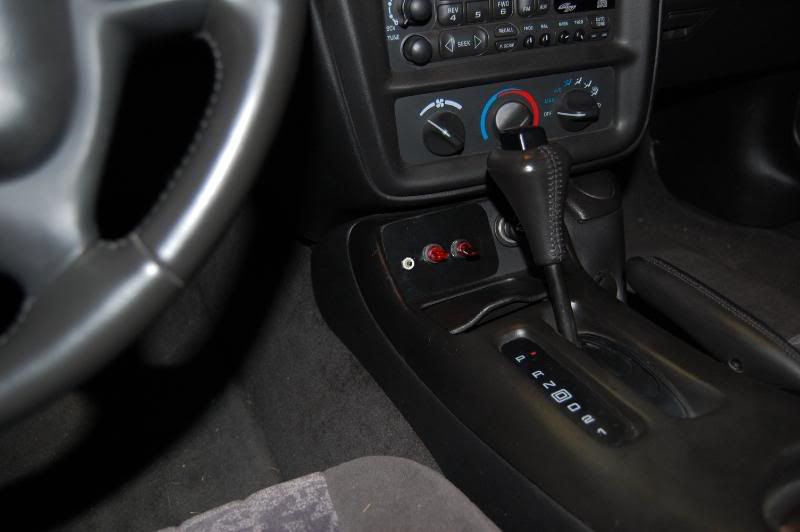
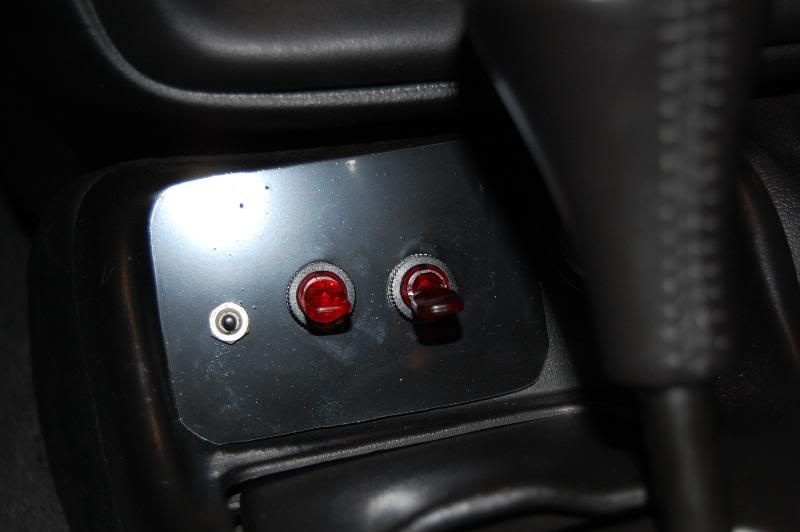
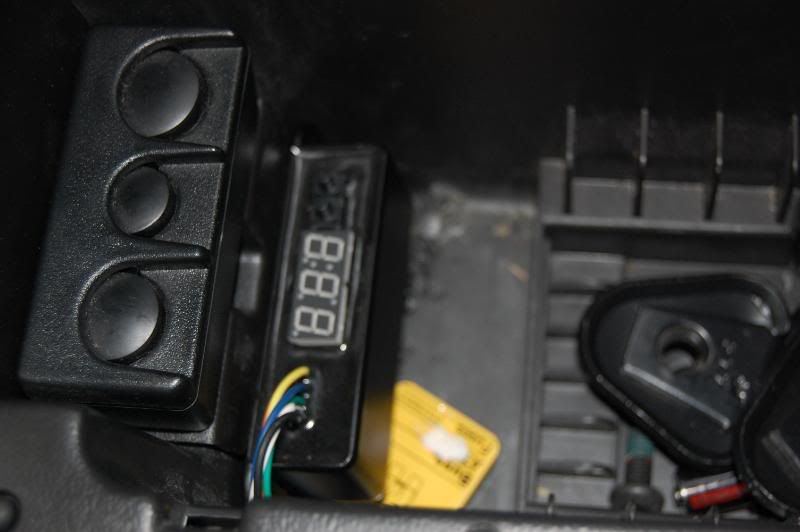
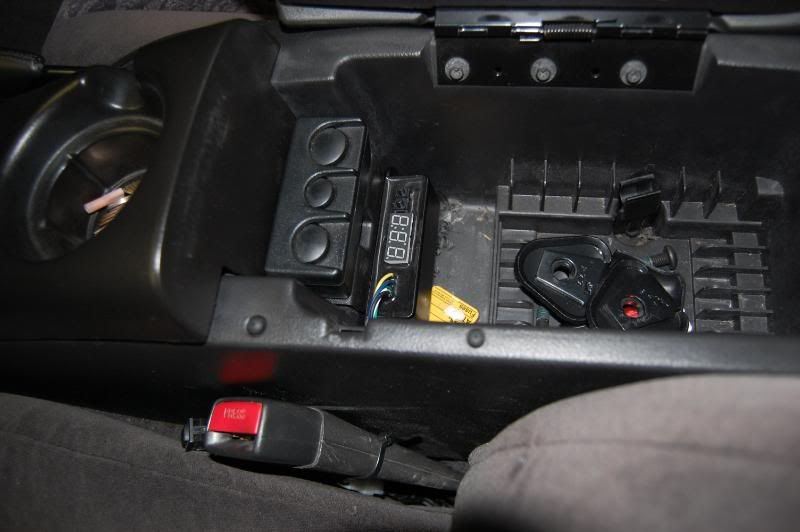
I am not sure as to what kind of electronics you are using but I really like the N2O Outlet/Trick duel window switch that I got from them also. I built my own switch panel for the area behind the shifter. I got $15 in it verse the $50 for the other panels. I worked for 2 days on and off getting my wiring done like I wanted. I wanted it to look a little neat and not have wires all over. I also did the resistor trick for a timing puller and I am really glad that I did. I went alittle higher on my resistor with a 750ohm one and my car pulls 4 to 5 deg of timing with it activated.
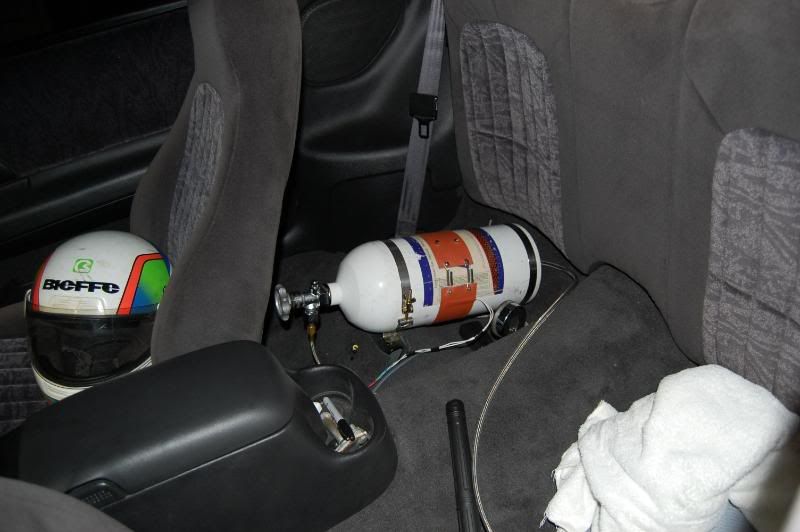
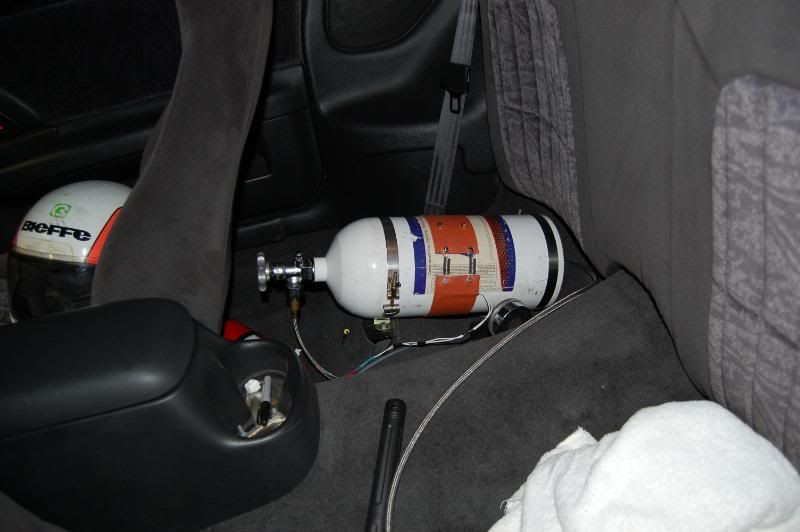
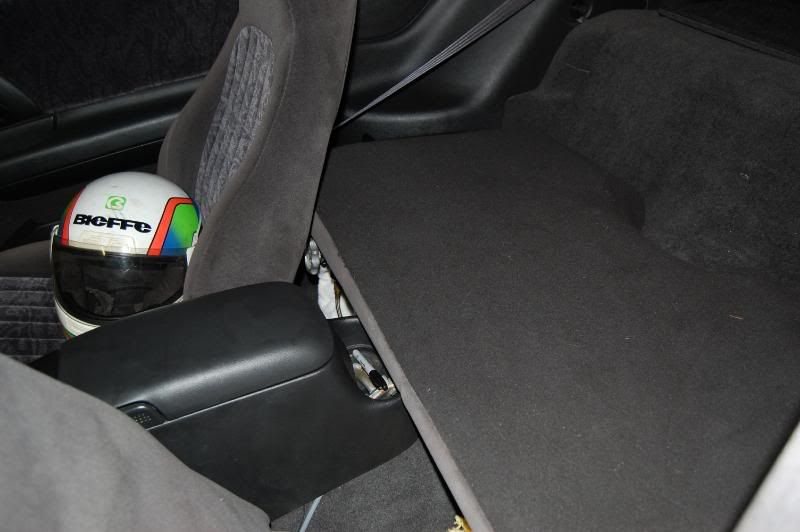
Like I said before if you have anymore questions or need some help let me know. I have a camera and can take more pics if needed of certain things in the kit or where I mounted my bottle behind the passenger seat.
Last edited by BlackNightmare; 11-15-2009 at 07:55 AM.
11-15-2009, 09:50 AM
#11
Banned
iTrader: (22)
Join Date: Jan 2004
Location: Schaumburg,IL
Posts: 4,957
Likes: 0
Received 0 Likes
on
0 Posts
BlackNightmare : nice install and pics
We just did our first 98-02 specific kit and though we had no direction it was pretty straight forward. This setup makes it much easier for the basic guy doing an install to lay a system out.
We just did our first 98-02 specific kit and though we had no direction it was pretty straight forward. This setup makes it much easier for the basic guy doing an install to lay a system out.
11-15-2009, 10:28 AM
#12
Staging Lane
Thread Starter
Join Date: Aug 2009
Location: Lexington, Ky.
Posts: 88
Likes: 0
Received 0 Likes
on
0 Posts
Black Nightmare, I also have the trick window switch plus the Lingenfelter 2 two step, so I can pull timing and use a reliable high end rev limiter..The electronics are very easy to me. (I am a Electrical/Mechanical Engineer by trade).. I noticed you used the micro-switch, why not use the TPS signal as an input to the Trick window switch for WOT??? I did buy the switch plate for the ashtray.. (would cost way too much once my labor is figured in). I have my electronics programmed to be armed from the drivers seat, remote bottle open, bottle heater and purge all controlled from drivers seat. Once armed, the system will see WOT from the TPS signal, then apply power to solonoids and timing retard input to the Lingenfelter, once 3200 RPM is reached and then drop power to solonoids and release timing retard at 6400. Keeping the high RPM limit at 6600 which is monitored by the Lingenfelter which is active at all times.
I can also EASILY set the Lingenfelter to control a launch RPM and let the factory PCM monitor the high RPM limit..all in about 5 seconds..
The N2O kit is very well made and designed, just could use a little some documentation..I figured it out EXCEPT for the crucial fuel rail fitting, I was like .. Thanks again Black Nightmare...
I can also EASILY set the Lingenfelter to control a launch RPM and let the factory PCM monitor the high RPM limit..all in about 5 seconds..
The N2O kit is very well made and designed, just could use a little some documentation..I figured it out EXCEPT for the crucial fuel rail fitting, I was like
.. Thanks again Black Nightmare... 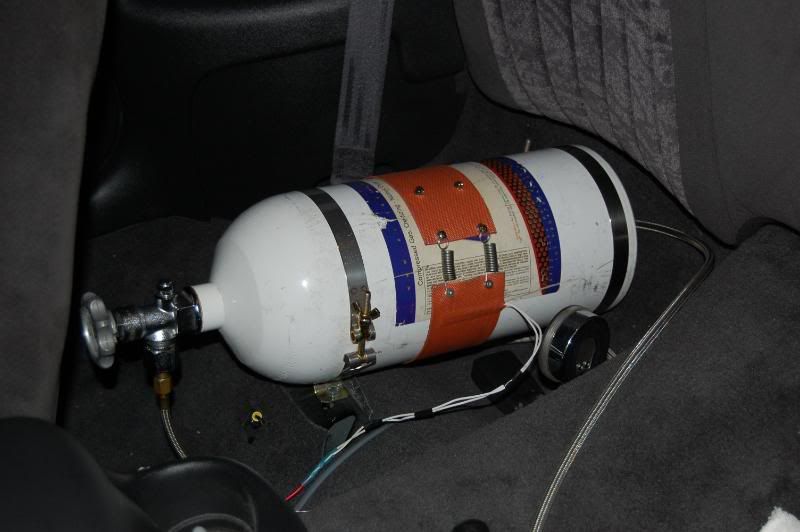
 11-17-2009, 10:48 PM
#15


Sorry for the inconvience.
Ray is currently working on revised instructions. The system should have came with the basic instructions in the system box and then there should have been seperate instructions in the plate box on how to bolt the plate on. The only instructions that should be missing are the ones explaining how the solenoids bolt on to the intake using the already assembled units. These solenoids come bolted to the solenoid brackets with the fittings loc-tite in place. They are layed out in the packaging in a manner that it bolts onto the car.
We will have our revised instructions next week. We had so many new products hit completion at the same time that our instructions fell behind. Ray is redoing all of our instructions across the board so this should not be an issue in the future..
If you have any further questions please give us a call and we will explain how it bolts together.
Thanks
Dave
12-14-2009, 03:10 PM
#17
TECH Fanatic
Join Date: Jul 2006
Location: reykjav�k, iceland
Posts: 1,843
Likes: 0
Received 0 Likes
on
0 Posts

there isn't any one way to install this,
first when i opened my kit i also thougth.. WTF no instructions?!?
but then i just wen on and installed it, the staff@nitrous outlet are always up for some tips if you get in trouble

first when i opened my kit i also thougth.. WTF no instructions?!?
but then i just wen on and installed it, the staff@nitrous outlet are always up for some tips if you get in trouble