
How to replace your pinched oil pump pickup tube o-ring with PICS!
 10-07-2010, 04:37 PM
#1
On The Tree
Thread Starter
iTrader: (16)
Join Date: May 2010
Location: Stillwater, OK
Posts: 174
Likes: 0
Received 0 Likes
on
0 Posts
Okay, just finished up my cam swap last week, only to find that I had low oil pressure when I got it all back together & fired it off. I realized immediately that I had pinched the o-ring, like many seem to do. Dang, & I was so careful!
I had an oil pan issue to take care of anyway, so I figured I would go about replacing it by dropping the oil pan (without an engine hoist) rather than going through the timing cover & taking my chances on pinching it again. The whole process took me about 4 or 5 hours. I took my time, & I must say, it went very smoothly.
If someone has already posted this method, sorry, I must have missed it! This is my first write-up, so hopefully it will do somebody some good. Here’s how I went about replacing it...
FYI, I DIDN’T TAKE ANY PICTURES WHEN I DID THIS, SO I AM USING PICS FROM OTHER EXCELLENT WRITE-UPS BY CYBERKILL (motor mount install) & KRAB (rod bolt install). IF THIS IS A PROBLEM, PLEASE LET ME KNOW & I WILL REMOVE THE PICS. Thanks!
First, unhook your battery & remove your lid/MAF assembly & strut tower brace if you have one. I think everybody is familiar with this process. If not, don’t go any further & take your car to the nearest shop.
Chock your rear wheels & jack up the front end of the car & put it on jack stands on the frame.
On a side note: I must say, wobble sockets will be your friend on this install (& others). Not sure if I could have done it all without a 3/8 wobble socket extension, fyi.
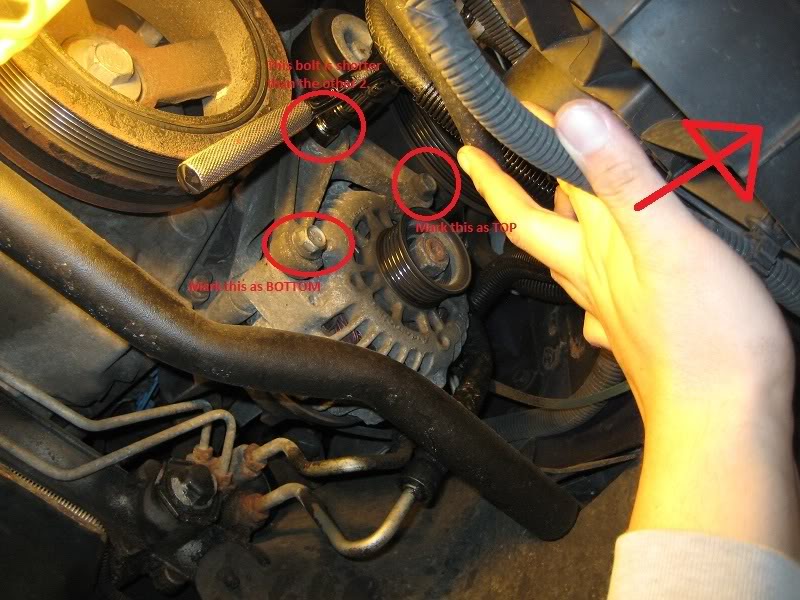
Okay, next, you will need to unbolt the alternator & its bracket from underneath on the driver’s side of the car. It’s held in by three 15mm bolts on the front side & one 13mm bolt on the top back side. Get all of those bolts out & slide the alternator forward & out of the way as much as possible. We’re just gonna work around it & move it around as we need to for this install. FYI, there is a short thin wire connected to the alternator that will tear easily, so be careful. Ask me how I know.
Now get back on top of the car on the passenger side & remove the four 15mm bolts holding the A/C compressor in from the top. If you’re vertically challenged (as I am) you may need a step stool to reach them with the car up on jack stands.

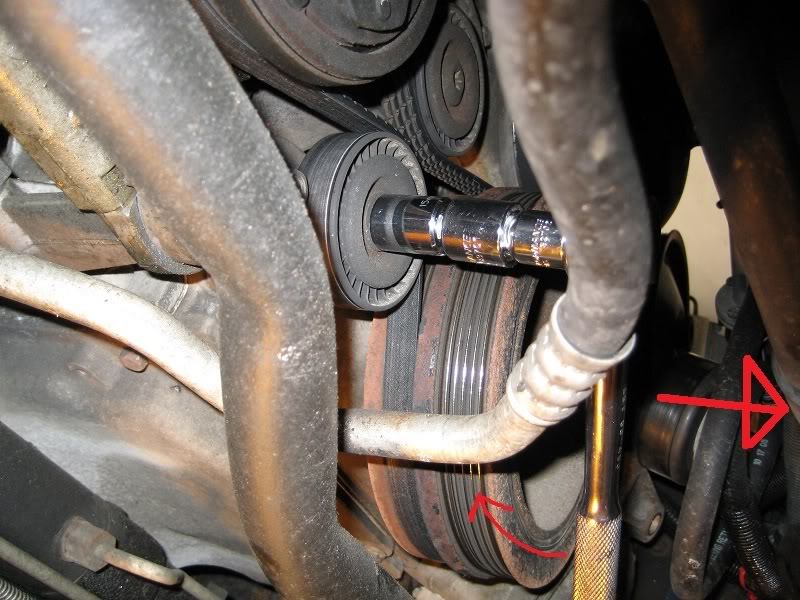
Slide back underneath the car & remove the A/C belt. You’ll need a 15mm socket to turn the pulley & remove the belt very easily.
Remove the two remaining 15mm bolts holding the AC compressor to the mounting bracket. Then you can move the compressor out of the way a little & remove the two remaining 15mm AC bracket bolts. At this point, the entire A/C & bracket can be moved around enough to get to the motor mount bolt.
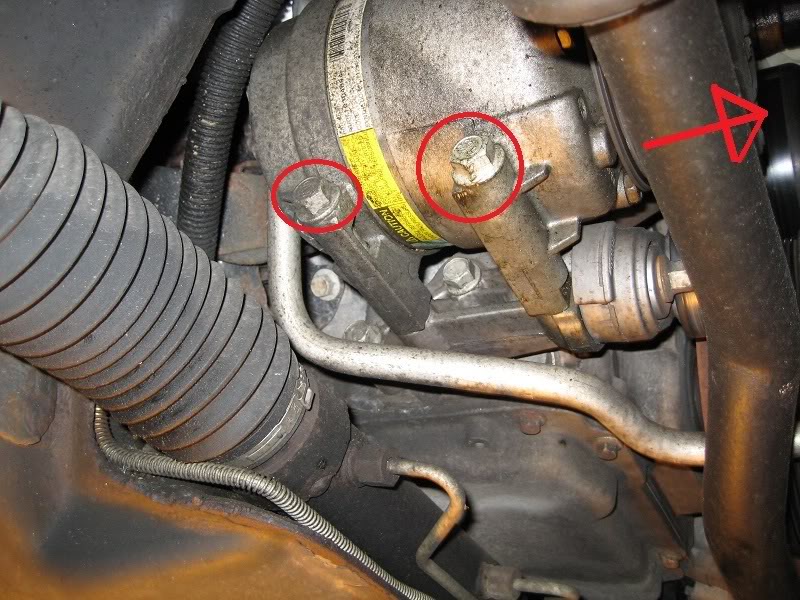
Now move to the starter near the passenger rear of the oil pan & remove the two 13mm bolts holding it in. I kind of just let it dangle from this point & had no problems, but you may want to unhook it. I would also go ahead & unplug the wiring going to the oil level sensor while you’re near the starter. It’s the big cream colored thing coming out of the passenger side of the oil pan. Definitely use a screw driver to unclip the black connection so you don’t break it.

Go ahead & remove the two black plastic plates between the oil pan & the bell housing while you’re here. There’s one on the drivers side & one on the passenger side, each held in by a single 10mm bolt. you can see the one on the pass side in the pic above. The starter goes right through it when it's in place & bolted up.
Now that we have access to both motor mounts, we will remove the single bolt going through the center of each mount. I used an 18mm wiggle socket on the bolt heads toward the front of the car, & an 18mm closed end wrench on the nut facing the rear of the car. You may have better luck another way, but this worked well for me. Once these are broken loose about 4 or 5 turns, I just backed them out by hand the rest of the way very easily. Again, do this on the driver & passenger side.
If the bolt is hard to actually get out, don’t worry. It’ll come out pretty easily in this next step.

Now get your jack & a piece of 2x4, maybe 6-8 inches long. Get the jack underneath the oil pan & use the block of wood as a barrier to protect the oil pan. Go ahead & start jacking the engine up by the oil pan very slowly. If you haven’t gotten the motor mount bolts out yet, now is the time as they will wiggle out as you jack the engine slowly. You may have to go back & forth a few times, but they will come out.
Once you get those bolts out of the way, continue jacking the engine by the oil pan. You’re gonna want to get it about as high as it will go before the intake manifold hits the cowl up under the hood. I didn’t have any problems, but I was told to keep an eye on the power steering hose & make sure it doesn’t get too tight & pop off. Just be careful there.
Now your gonna need 2 more blocks of 2x4, maybe a 2-3 inches each. Take these pieces of 2x4 & place one between the motor mount & the engine on each side of the car. Make sure they’re in there good & go ahead & let the jack down slowly. These 2x4’s will hold the engine up & give you several inches of clearance between the oil pan & the k-member.
Go ahead & drain your oil & remove your oil filter. Once it’s drained, go ahead & torque the drain plug back down.
Remove all of the bolts holding the oil pan in. There are two 15mm bolts holding the back of the pan to the bell housing, & the rest of the bolts are all 10mm. Once these bolts are all out, the pan should drop down fairly easily with a little persuasion.
At this point, we need to remove the 10mm pickup tube bolt just under the lip of the front of the oil pan. If you did this during a cam swap, you’ll know exactly where it is & you know how easy it is to drop that bolt in the pan. I stuffed a towel in the front of the oil pan & used a pen magnet to kind of hold the bolt as I removed it & had no problems. Whatever method works for you, you need to remove that bolt, & the pan should be dropped plenty low enough to remove it with your head kind of up in between the radiator & the crank pulley.
Here comes the tricky part, & you really have to know what you’re dealing with since this is somewhat of a blind job. You need to loosen the 13mm bolt that holds the pickup tube to the oil deflector just under the crank. It’s around 1/3 of the way back from the front of the car on the driver’s side & a few inches to the inside of the pan. You can reach in there & feel it with your fingers, & a little mirror may come in handy here. Once you know where it is, it really isn’t that hard. Again, you just need to loosen this bolt enough to give the pickup tube some play, it doesn’t have to be completely removed. I used a small �” ratchet & it worked perfectly, but don’t drop it in the pan! Maybe tie a long string to the ratchet just in case.

Once you have it loosened 4 or 5 turns, go back to the front of the engine & see if the pickup tube will drop down far enough to get the o-ring out. Mine pulled right out, & the oring I installed with my cam swap was completely cut in half!
Once you get to that point, lube up your new oring with some clean, fresh engine oil, & put that puppy on the tube. The tube does not bind in any way like it does when doing this with a cam install. It slides back up in the hole very easily with a little care.
Once you get the oring back on the tube & get the tube slid back up, go ahead & reinstall the bolt. Again, this can be tricky, but with a towel shoved in there & a pen magnet, I felt pretty safe. Once it’s started, you’re good to go. I tightened it back down about � of the way, then went back to the rear pickup tube bolt & tightened it back down, then cam back & tightened the front bolt down all the way.
Now we’re ready to put it all back together!
Start with the oil pan & bolt it back up. You may want to add some RTV to the 4 corners of the gasket. From what I could gather, you’re supposed to start with the two 15mm bolts that hold the pan to the boll housing. Torque them down to 36 ft. lbs. Then start at the center of the oil pan & zig zag back & forth torquing all the remaining bolts to 9 ft. lbs. Then make one more pass & torque all of them EXCEPT THE TWO LONG THIN REAR BOLTS to 18 ft. lbs. The long thin rear bolts stay at 9 ft. lbs, so DO NOT over torque them.
Once the pan is all torqued down, install a new oil filter & reinstall the two black plastic pieces between the bell housing & oil pan.
Jack your engine up by the oil pan, again, using the block of wood to protect the pan. Get it just high enough that the blocks of wood in the motor mounts come out. They just fell right out for me.
Now let the jack back down slowly & get the motor mount bolts back in their holes. Like when you removed them, you may have to jack it up & down a little to get the bolts to slide in. Didn’t take much for me & they slid right in.
Go ahead & bolt them back in, & I believe they need to be torqued to 70 ft. lbs.
Now reinstall the starter, alternator, & A/C compressor, put the A/C belt back on the pulley system, & let the car back down off the jack stands.
Refill it with 5.5 quarts of oil, & reinstall the lid/MAF assembly, steering knuckle bolt, & strut tower brace if applicable.
Pretty self explanatory on the re-assembly, so not much detail here.
Any questions or corrections, please let me know!
I had an oil pan issue to take care of anyway, so I figured I would go about replacing it by dropping the oil pan (without an engine hoist) rather than going through the timing cover & taking my chances on pinching it again. The whole process took me about 4 or 5 hours. I took my time, & I must say, it went very smoothly.
If someone has already posted this method, sorry, I must have missed it! This is my first write-up, so hopefully it will do somebody some good. Here’s how I went about replacing it...
FYI, I DIDN’T TAKE ANY PICTURES WHEN I DID THIS, SO I AM USING PICS FROM OTHER EXCELLENT WRITE-UPS BY CYBERKILL (motor mount install) & KRAB (rod bolt install). IF THIS IS A PROBLEM, PLEASE LET ME KNOW & I WILL REMOVE THE PICS. Thanks!
First, unhook your battery & remove your lid/MAF assembly & strut tower brace if you have one. I think everybody is familiar with this process. If not, don’t go any further & take your car to the nearest shop.
Chock your rear wheels & jack up the front end of the car & put it on jack stands on the frame.
On a side note: I must say, wobble sockets will be your friend on this install (& others). Not sure if I could have done it all without a 3/8 wobble socket extension, fyi.
Okay, next, you will need to unbolt the alternator & its bracket from underneath on the driver’s side of the car. It’s held in by three 15mm bolts on the front side & one 13mm bolt on the top back side. Get all of those bolts out & slide the alternator forward & out of the way as much as possible. We’re just gonna work around it & move it around as we need to for this install. FYI, there is a short thin wire connected to the alternator that will tear easily, so be careful. Ask me how I know.
Now get back on top of the car on the passenger side & remove the four 15mm bolts holding the A/C compressor in from the top. If you’re vertically challenged (as I am) you may need a step stool to reach them with the car up on jack stands.
Slide back underneath the car & remove the A/C belt. You’ll need a 15mm socket to turn the pulley & remove the belt very easily.
Remove the two remaining 15mm bolts holding the AC compressor to the mounting bracket. Then you can move the compressor out of the way a little & remove the two remaining 15mm AC bracket bolts. At this point, the entire A/C & bracket can be moved around enough to get to the motor mount bolt.
Now move to the starter near the passenger rear of the oil pan & remove the two 13mm bolts holding it in. I kind of just let it dangle from this point & had no problems, but you may want to unhook it. I would also go ahead & unplug the wiring going to the oil level sensor while you’re near the starter. It’s the big cream colored thing coming out of the passenger side of the oil pan. Definitely use a screw driver to unclip the black connection so you don’t break it.
Go ahead & remove the two black plastic plates between the oil pan & the bell housing while you’re here. There’s one on the drivers side & one on the passenger side, each held in by a single 10mm bolt. you can see the one on the pass side in the pic above. The starter goes right through it when it's in place & bolted up.
Now that we have access to both motor mounts, we will remove the single bolt going through the center of each mount. I used an 18mm wiggle socket on the bolt heads toward the front of the car, & an 18mm closed end wrench on the nut facing the rear of the car. You may have better luck another way, but this worked well for me. Once these are broken loose about 4 or 5 turns, I just backed them out by hand the rest of the way very easily. Again, do this on the driver & passenger side.
If the bolt is hard to actually get out, don’t worry. It’ll come out pretty easily in this next step.
Now get your jack & a piece of 2x4, maybe 6-8 inches long. Get the jack underneath the oil pan & use the block of wood as a barrier to protect the oil pan. Go ahead & start jacking the engine up by the oil pan very slowly. If you haven’t gotten the motor mount bolts out yet, now is the time as they will wiggle out as you jack the engine slowly. You may have to go back & forth a few times, but they will come out.
Once you get those bolts out of the way, continue jacking the engine by the oil pan. You’re gonna want to get it about as high as it will go before the intake manifold hits the cowl up under the hood. I didn’t have any problems, but I was told to keep an eye on the power steering hose & make sure it doesn’t get too tight & pop off. Just be careful there.
Now your gonna need 2 more blocks of 2x4, maybe a 2-3 inches each. Take these pieces of 2x4 & place one between the motor mount & the engine on each side of the car. Make sure they’re in there good & go ahead & let the jack down slowly. These 2x4’s will hold the engine up & give you several inches of clearance between the oil pan & the k-member.
Go ahead & drain your oil & remove your oil filter. Once it’s drained, go ahead & torque the drain plug back down.
Remove all of the bolts holding the oil pan in. There are two 15mm bolts holding the back of the pan to the bell housing, & the rest of the bolts are all 10mm. Once these bolts are all out, the pan should drop down fairly easily with a little persuasion.
At this point, we need to remove the 10mm pickup tube bolt just under the lip of the front of the oil pan. If you did this during a cam swap, you’ll know exactly where it is & you know how easy it is to drop that bolt in the pan. I stuffed a towel in the front of the oil pan & used a pen magnet to kind of hold the bolt as I removed it & had no problems. Whatever method works for you, you need to remove that bolt, & the pan should be dropped plenty low enough to remove it with your head kind of up in between the radiator & the crank pulley.
Here comes the tricky part, & you really have to know what you’re dealing with since this is somewhat of a blind job. You need to loosen the 13mm bolt that holds the pickup tube to the oil deflector just under the crank. It’s around 1/3 of the way back from the front of the car on the driver’s side & a few inches to the inside of the pan. You can reach in there & feel it with your fingers, & a little mirror may come in handy here. Once you know where it is, it really isn’t that hard. Again, you just need to loosen this bolt enough to give the pickup tube some play, it doesn’t have to be completely removed. I used a small �” ratchet & it worked perfectly, but don’t drop it in the pan! Maybe tie a long string to the ratchet just in case.
Once you have it loosened 4 or 5 turns, go back to the front of the engine & see if the pickup tube will drop down far enough to get the o-ring out. Mine pulled right out, & the oring I installed with my cam swap was completely cut in half!
Once you get to that point, lube up your new oring with some clean, fresh engine oil, & put that puppy on the tube. The tube does not bind in any way like it does when doing this with a cam install. It slides back up in the hole very easily with a little care.
Once you get the oring back on the tube & get the tube slid back up, go ahead & reinstall the bolt. Again, this can be tricky, but with a towel shoved in there & a pen magnet, I felt pretty safe. Once it’s started, you’re good to go. I tightened it back down about � of the way, then went back to the rear pickup tube bolt & tightened it back down, then cam back & tightened the front bolt down all the way.
Now we’re ready to put it all back together!
Start with the oil pan & bolt it back up. You may want to add some RTV to the 4 corners of the gasket. From what I could gather, you’re supposed to start with the two 15mm bolts that hold the pan to the boll housing. Torque them down to 36 ft. lbs. Then start at the center of the oil pan & zig zag back & forth torquing all the remaining bolts to 9 ft. lbs. Then make one more pass & torque all of them EXCEPT THE TWO LONG THIN REAR BOLTS to 18 ft. lbs. The long thin rear bolts stay at 9 ft. lbs, so DO NOT over torque them.
Once the pan is all torqued down, install a new oil filter & reinstall the two black plastic pieces between the bell housing & oil pan.
Jack your engine up by the oil pan, again, using the block of wood to protect the pan. Get it just high enough that the blocks of wood in the motor mounts come out. They just fell right out for me.
Now let the jack back down slowly & get the motor mount bolts back in their holes. Like when you removed them, you may have to jack it up & down a little to get the bolts to slide in. Didn’t take much for me & they slid right in.
Go ahead & bolt them back in, & I believe they need to be torqued to 70 ft. lbs.
Now reinstall the starter, alternator, & A/C compressor, put the A/C belt back on the pulley system, & let the car back down off the jack stands.
Refill it with 5.5 quarts of oil, & reinstall the lid/MAF assembly, steering knuckle bolt, & strut tower brace if applicable.
Pretty self explanatory on the re-assembly, so not much detail here.
Any questions or corrections, please let me know!
Last edited by osuhog; 10-07-2010 at 04:44 PM.


 10-08-2010, 01:44 PM
#4
Good write up. I would like to critique one little thing that may or may not be of concern to you or anyone else. IMHO, I wouldn't put the wood sandwiched between the pedestals and the engine/mounts. Instead, I removed the (2) bolts from the oil pan that are threaded through the bellhousing first and then lifted the engine via the bellhousing.
I, personally, wouldn't feel comfortable with the wooden blocks, but to each his own. Another idea is you could use both. Put the wood under the engine mounts and use the floor jack as a backup on the bellhousing. That would be ideal, IMO.
Either way, good write-up, I am sure this will help a lot of people. Even more so, if you have an aftermarket k-member, a tubular unit such as BMR's for example, you can remove the oil pan entirely this way. A few months back I dropped the pan with my BMR turbo tubular k-member by jacking the engine up as high as it would go via the bellhousing.
10-09-2010, 09:15 AM
#5
On The Tree
Thread Starter
iTrader: (16)
Join Date: May 2010
Location: Stillwater, OK
Posts: 174
Likes: 0
Received 0 Likes
on
0 Posts
bjamick, yeah, the LS1howto install write-up is awesome, but I wish they would have elaborated a little more on HOW to keep from pinching the o-ring.
1SLwLS1, great idea, I think using both methods would definitely be the safest way. I was pretty much winging it when I did this & never thought of that.
1SLwLS1, great idea, I think using both methods would definitely be the safest way. I was pretty much winging it when I did this & never thought of that.
