
Master Budget Build H/C/I
 01-14-2011, 11:51 PM
#1

Well first things first.
I went into this build with intentions to just upgrading headers and doing motor mounts. Read a lot here and did research, spent more than 8 months of reading and I will admit even though I never got my hands dirty in a Ls1, (I only helped two other builds) I was VERY confident and found all warnings, cautions and tips with tricks very useful from this site.
Not the best build. Times and Numbers coming soon!
I like the idea of a light weight car, so I am making the car go on a wittle diet. My money pit is a 2000 Z28 A4. I don’t care about comfort that’s why I got this F-Body you know? Anyways I already had the following. FLT Level 5 transmission, PI Vigilante 3200 stall, SLP-Bilstein Shocks, Eibach Sportline springs (shocks and spring on all 4 corners), polyurethane transmission mount, SLP 3” Y-Pipe, 3" Texas Speed Rumbler Cat-Back, K&N III Generation FIPK Air Charger, ported TB, all FREE MODS known to Ls1, and a bunch of appearance modifications, meh.
This was a major budget build. And yup I know I will get cut by most of you.
I Bought;
Ls6 Intake
Ls2 243 Heads
Pacesetter 1 � Headers
Texas Speed 7.4 Push Rods
Secret Small Cam
Used Ls1 Lifters
Ls2 Timing Chain
Cam Retainer Plate
Dual .650" spring kit
Spohn Solid Motor Mounts
B&M Trans Cooler
OPSU Sensor
BMR Battery Relocation
All New Bolts
02 Extensions
All Gaskets
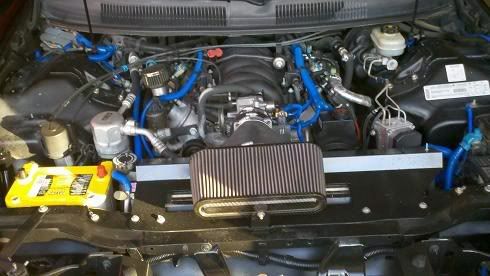
Removed A/C in its entirety and the windshield reservoir plus AIR and EGR provisions. I am keeping everything though.
With all of this I only spent $1,200. Call me lucky but I waited like a ******* shark to get the best deals. Not including new fluids. My car has 153,000 miles on it and it was probably a good idea to keep everything new and not cheap out, but I just said the hell with it, I’m only going to be in there once on this motor since I am saving for something better, cough ls3 cough. The cam is small and only a few know since I had to ask for help since I also ended up milling my heads to get a nice 11:1 Compression Ratio.
The block was completely disgusting, I used Royal Purple for six months several years ago, two oil change cycles, I am not blaming the gunk build up BUT everyone does blame them so I’m going to jump on the band wagon too. I owned the car since 80,000 miles, I am the second owner and the first owner was a young blonde chick that sold it to me for 9K back in ‘05, and there was no problems with it, I still cant figure out if it was a good deal or not though…
Anyways, I REALLY wish I documented this so I could finally have a sticky up on this site but I was not in the mood to become a photographer.

My parts. CAm not shown, muahaha.
OVERALL H/C/I experience, it was good. I learned a lot, and I troubleshooted which was kick *** I felt like a god damn doctor doing this ****. Some tips for any beginners, I consider myself novice since this is the 3rd motor I went and did some major work on.
DAY 1:
I woke up in the AM every day thinking this was going to take 3 full days at most. I took 5 days.
I cleaned the garage and cleaned the engine bay with degreaser, rinsed and dried everything, laid down some rags. Disconnected Battery and all sensors labeled all the bolts according to what part they belonged to. Numbered the sensors in pairs so not to be confused later in the week. Removed injectors not disconnecting the fuel line I just moved it to the side. Worked from 5AM to 11PM, yup 18 hours (non stop.)
Yeah yeah, I hate the blue wire too...
DAY 2:
Woke up at 7AM took out the intake and all the front pulleys except crank and power steering. The car was lifted and drained ALL fluids, took the radiator out and a bunch of little stuff. Found a lot of small problems. Very stressful day. 7AM to 2AM around 15 hours, (took some breaks.)
DAY 3:
Took out the heads and headers, disconnected the Y-Pipe and cleaned up some major spills from the heads and radiator, plus the tranny and power steering. Had to go to several Auto Zones to get a Pulley Puller because they gave me kit with a bolt that would NOT fit inside the pulley. Did not think about the crank pulley for some reason, needed a Impact wrench as it turns out to remove the bolt. I but a metal rod in between the block and crank pulley spokes to loosen it, I was just fidgeting around and DAMN got it loose. 10AM to 3AM around 13 hours.
Yeah I figured out I need a lot more time and I am going too slow…
DAY 4:
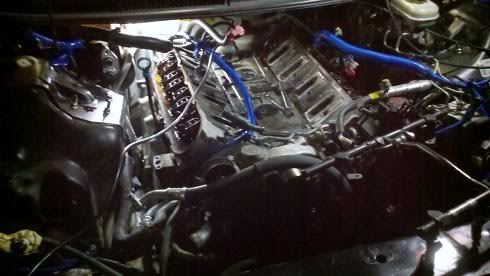
Started to clean the block and removed front cover and took out lifters and cam. Did some major cleaning as you can see from the pictures I posted the block was a complete ******* nightmare. I don’t know how it was able to get that dirty. But I soon realized after I broke my OPSU a few days before that my PCV line was in half and was sucking in dirty air from the bay, GUYS I kid you not I didn’t know there was mud in my engine and the ******* thing was still pulling hard before this swap. I could not believe how dirty it was, freaking shameful. 9AM to 11PM I am slowly getting stressed out, I grew grey hair. Found more problems.
DAY 5:
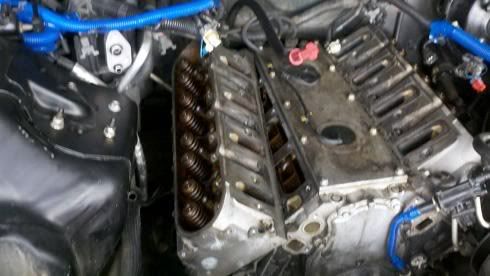
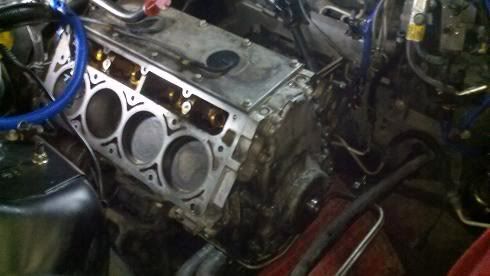
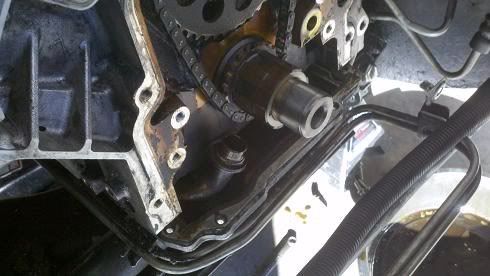
The block was bare and spent 4 hours just scrubbing the **** out of my block to super clean, it looked nice I did not take any pics I don’t know why but everything was spotless it really did look new I am VERY happy with what I did. The only things that still looked brown are the rocker arms and lifter trays/guides. Had to drop my engine pan to remove the pick up tube form the oil pump. Damn little *******. Installed motor mounts and cam, installed everything internal and wrapped it up with the heads and headers plus the intake at 4AM after contemplating if I should sleep or not. 9AM to 6AM around 19 hours, (took some breaks.)
I hate you pick up tube...

DAY 6:
Woke up at 9AM and installed every little sensor and started to slowly put everything back in order all the way to the battery. Filled all fluids and checked the radiator and trans lines to make sure no leaks were visible, forgo tto change my oil filter and install my oil pan bolt, noticed it was stripped, used a helical to help plug it up for now. I filled the RAD with water and I had a massive leak in the rear.
I seriously just got up after looking underneath and saw the water Niagara fall on my dreams. I gave up got super heated believing I did not torque down the heads because what else could it have been? Oh yeah, the plug from my old heads were not on my new 243 heads. Easy fix felt relieved and the damn thing was an Alan wrench tool something I did not have….grrrrr. 9Am to 3AM
The car started at 1:56AM on day six Thursday morning.
ITS ALIVE!
…Need a tune now….
TIPS:
1.) Tape Up All Bolts together and Label ’em
You should not have any left overs and label sensors if you are not familiar with them connecting back to the original harness pairs.
2.) Put the Battery on Wood surface
Otherwise they drain.
3.) Intake Removal
Watch out for the OPSU sensor and tape up last 4 bolts so they don’t hold you back. Take out the provision crap.
4.) Removing Crank and Power Steering Pulleys
The crank pulley does not require an impact wrench, you can find a method to secure the pulley from moving and muscle the crank bolt loose and make sure you research the power steering puller.
5.) Removing Front Cover
Removing the pick up tube form the oil pump requires you to drop the oil pan for 1 freaking bolt. Dammit. The cam gear and crank gear need to match up on the dots in order to not have any issues with timing later when installing a new cam. Install all of this back very carefully and straight flush, you cant just eyeball this ****!
6.) The Passenger Side
Everything on that freaking side is HELL. Be prepared for little or no room there is ways to figuring out all this when the time comes, I advise you have a friend when putting everything back on and ONLY someone that knows as much or more as you.
7.) Double check all bolts no matter what!
Make sure all lines are closed off and have no endings, they need to cycle endlessly. Head bolts, pay attention to them and don’t forget about that plug in the passenger side rear, that **** scared me.
8.) Use super gasket maker where EVER possible its never stupid to make sure things are nice and tight EXCEPT heads, not necessary.
And good luck. My car turned on the first start up this is it.
And to those that helped me with cam selection I ask you keep it a secret please, thank you.
ANYONE WANT TO ADD ANY MORE INFO IS MORE THAN WELCOME TO
Hopefully I sepnt 1200 dollars ona few good amount of ponies eh?
Shitty sound. Stay tuned for a day time vid.
http://www.youtube.com/watch?v=NtbZBsCpfN4
The actual start up. The smoking was from my headers burning the 9 coats of paint I put on.
http://www.youtube.com/watch?v=O1pMjhKU1m4
I went into this build with intentions to just upgrading headers and doing motor mounts. Read a lot here and did research, spent more than 8 months of reading and I will admit even though I never got my hands dirty in a Ls1, (I only helped two other builds) I was VERY confident and found all warnings, cautions and tips with tricks very useful from this site.
Not the best build. Times and Numbers coming soon!
I like the idea of a light weight car, so I am making the car go on a wittle diet. My money pit is a 2000 Z28 A4. I don’t care about comfort that’s why I got this F-Body you know? Anyways I already had the following. FLT Level 5 transmission, PI Vigilante 3200 stall, SLP-Bilstein Shocks, Eibach Sportline springs (shocks and spring on all 4 corners), polyurethane transmission mount, SLP 3” Y-Pipe, 3" Texas Speed Rumbler Cat-Back, K&N III Generation FIPK Air Charger, ported TB, all FREE MODS known to Ls1, and a bunch of appearance modifications, meh.
This was a major budget build. And yup I know I will get cut by most of you.
I Bought;
Ls6 Intake
Ls2 243 Heads
Pacesetter 1 � Headers
Texas Speed 7.4 Push Rods
Secret Small Cam
Used Ls1 Lifters
Ls2 Timing Chain
Cam Retainer Plate
Dual .650" spring kit
Spohn Solid Motor Mounts
B&M Trans Cooler
OPSU Sensor
BMR Battery Relocation
All New Bolts
02 Extensions
All Gaskets
Removed A/C in its entirety and the windshield reservoir plus AIR and EGR provisions. I am keeping everything though.
With all of this I only spent $1,200. Call me lucky but I waited like a ******* shark to get the best deals. Not including new fluids. My car has 153,000 miles on it and it was probably a good idea to keep everything new and not cheap out, but I just said the hell with it, I’m only going to be in there once on this motor since I am saving for something better, cough ls3 cough. The cam is small and only a few know since I had to ask for help since I also ended up milling my heads to get a nice 11:1 Compression Ratio.
The block was completely disgusting, I used Royal Purple for six months several years ago, two oil change cycles, I am not blaming the gunk build up BUT everyone does blame them so I’m going to jump on the band wagon too. I owned the car since 80,000 miles, I am the second owner and the first owner was a young blonde chick that sold it to me for 9K back in ‘05, and there was no problems with it, I still cant figure out if it was a good deal or not though…
Anyways, I REALLY wish I documented this so I could finally have a sticky up on this site but I was not in the mood to become a photographer.
My parts. CAm not shown, muahaha.
OVERALL H/C/I experience, it was good. I learned a lot, and I troubleshooted which was kick *** I felt like a god damn doctor doing this ****. Some tips for any beginners, I consider myself novice since this is the 3rd motor I went and did some major work on.
DAY 1:
I woke up in the AM every day thinking this was going to take 3 full days at most. I took 5 days.
I cleaned the garage and cleaned the engine bay with degreaser, rinsed and dried everything, laid down some rags. Disconnected Battery and all sensors labeled all the bolts according to what part they belonged to. Numbered the sensors in pairs so not to be confused later in the week. Removed injectors not disconnecting the fuel line I just moved it to the side. Worked from 5AM to 11PM, yup 18 hours (non stop.)
Yeah yeah, I hate the blue wire too...
DAY 2:
Woke up at 7AM took out the intake and all the front pulleys except crank and power steering. The car was lifted and drained ALL fluids, took the radiator out and a bunch of little stuff. Found a lot of small problems. Very stressful day. 7AM to 2AM around 15 hours, (took some breaks.)
DAY 3:
Took out the heads and headers, disconnected the Y-Pipe and cleaned up some major spills from the heads and radiator, plus the tranny and power steering. Had to go to several Auto Zones to get a Pulley Puller because they gave me kit with a bolt that would NOT fit inside the pulley. Did not think about the crank pulley for some reason, needed a Impact wrench as it turns out to remove the bolt. I but a metal rod in between the block and crank pulley spokes to loosen it, I was just fidgeting around and DAMN got it loose. 10AM to 3AM around 13 hours.
Yeah I figured out I need a lot more time and I am going too slow…
DAY 4:
Started to clean the block and removed front cover and took out lifters and cam. Did some major cleaning as you can see from the pictures I posted the block was a complete ******* nightmare. I don’t know how it was able to get that dirty. But I soon realized after I broke my OPSU a few days before that my PCV line was in half and was sucking in dirty air from the bay, GUYS I kid you not I didn’t know there was mud in my engine and the ******* thing was still pulling hard before this swap. I could not believe how dirty it was, freaking shameful. 9AM to 11PM I am slowly getting stressed out, I grew grey hair. Found more problems.
DAY 5:
The block was bare and spent 4 hours just scrubbing the **** out of my block to super clean, it looked nice I did not take any pics I don’t know why but everything was spotless it really did look new I am VERY happy with what I did. The only things that still looked brown are the rocker arms and lifter trays/guides. Had to drop my engine pan to remove the pick up tube form the oil pump. Damn little *******. Installed motor mounts and cam, installed everything internal and wrapped it up with the heads and headers plus the intake at 4AM after contemplating if I should sleep or not. 9AM to 6AM around 19 hours, (took some breaks.)
I hate you pick up tube...
DAY 6:
Woke up at 9AM and installed every little sensor and started to slowly put everything back in order all the way to the battery. Filled all fluids and checked the radiator and trans lines to make sure no leaks were visible, forgo tto change my oil filter and install my oil pan bolt, noticed it was stripped, used a helical to help plug it up for now. I filled the RAD with water and I had a massive leak in the rear.
I seriously just got up after looking underneath and saw the water Niagara fall on my dreams. I gave up got super heated believing I did not torque down the heads because what else could it have been? Oh yeah, the plug from my old heads were not on my new 243 heads. Easy fix felt relieved and the damn thing was an Alan wrench tool something I did not have….grrrrr. 9Am to 3AM
The car started at 1:56AM on day six Thursday morning.
ITS ALIVE!
…Need a tune now….
TIPS:
1.) Tape Up All Bolts together and Label ’em
You should not have any left overs and label sensors if you are not familiar with them connecting back to the original harness pairs.
2.) Put the Battery on Wood surface
Otherwise they drain.
3.) Intake Removal
Watch out for the OPSU sensor and tape up last 4 bolts so they don’t hold you back. Take out the provision crap.
4.) Removing Crank and Power Steering Pulleys
The crank pulley does not require an impact wrench, you can find a method to secure the pulley from moving and muscle the crank bolt loose and make sure you research the power steering puller.
5.) Removing Front Cover
Removing the pick up tube form the oil pump requires you to drop the oil pan for 1 freaking bolt. Dammit. The cam gear and crank gear need to match up on the dots in order to not have any issues with timing later when installing a new cam. Install all of this back very carefully and straight flush, you cant just eyeball this ****!
6.) The Passenger Side
Everything on that freaking side is HELL. Be prepared for little or no room there is ways to figuring out all this when the time comes, I advise you have a friend when putting everything back on and ONLY someone that knows as much or more as you.
7.) Double check all bolts no matter what!
Make sure all lines are closed off and have no endings, they need to cycle endlessly. Head bolts, pay attention to them and don’t forget about that plug in the passenger side rear, that **** scared me.
8.) Use super gasket maker where EVER possible its never stupid to make sure things are nice and tight EXCEPT heads, not necessary.
And good luck. My car turned on the first start up this is it.
And to those that helped me with cam selection I ask you keep it a secret please, thank you.
ANYONE WANT TO ADD ANY MORE INFO IS MORE THAN WELCOME TO
Hopefully I sepnt 1200 dollars ona few good amount of ponies eh?
Shitty sound. Stay tuned for a day time vid.
http://www.youtube.com/watch?v=NtbZBsCpfN4
The actual start up. The smoking was from my headers burning the 9 coats of paint I put on.
http://www.youtube.com/watch?v=O1pMjhKU1m4
Last edited by masterz28; 01-15-2011 at 12:24 AM.
 01-15-2011, 03:19 AM
#2
Staging Lane

Join Date: Jan 2010
Location: des moines, iowa
Posts: 85
Likes: 0
Received 0 Likes
on
0 Posts
Nice man, My h/c cost about $4,500 bucks. When you get ready to crank that key after you double triple check everything, your heart is racin, feel light headed, then you hit that ignition and it fires up almost brings a tear to your eye lol nice job.
 01-15-2011, 05:58 AM
#4
Launching!

Join Date: Mar 2009
Location: Melbourne, Australia
Posts: 281
Likes: 0
Received 0 Likes
on
0 Posts
Well done on the build mate
One thing, about the battery on the wood, I have all my new batteries at my workshop sitting on a steel rack, never had a problem with them being flat
One thing, about the battery on the wood, I have all my new batteries at my workshop sitting on a steel rack, never had a problem with them being flat

 01-15-2011, 09:44 AM
#7

if you want another quick 20-30 hp pick up a lid, sell the fipk and get a nice ram air kit...one of the best bangs for bucks besides nitrous...only reason is I see you have the ac gone, which gives a ton more room to get air into the engine...sux2bu, ssra, or the one I make will all work great...
https://ls1tech.com/forums/generatio...air-worth.html
https://ls1tech.com/forums/generatio...sults-tom.html
https://ls1tech.com/forums/generatio...air-worth.html
https://ls1tech.com/forums/generatio...sults-tom.html
Trending Topics
01-15-2011, 05:51 PM
#8
Thanks guys! I would love to do a Sux2BU or Chris1313 ram air, right now its totally open at the front bumper and bottom i need to direct that massive flow of air somehow. Haha I dont think I can find a cheap dyno I need to wait for that.
Here is a idle clip. I recorded on a droid and put it at low quality came out crappy but eh I barely got this new phone.
http://www.youtube.com/watch?v=Rk6z5cYnUVM
Here is a idle clip. I recorded on a droid and put it at low quality came out crappy but eh I barely got this new phone.
http://www.youtube.com/watch?v=Rk6z5cYnUVM