Restarting the build thread... forged 76mm front mount
 02-19-2012, 01:09 PM
#1
TECH Resident
Thread Starter
iTrader: (10)
Join Date: May 2008
Location: Faribault, MN
Posts: 882
Likes: 0
Received 0 Likes
on
0 Posts
My last thread really got off track with the motor rebuild. Long story short, stock 347 spun a rod bearing and toasted the motor. Almost a year later it was back on the road with a forged 347 and now is under the knife again with a front mount 76mm going on. Here's the car, motor, and parts list on the motor.
-1998 347 LS1
-New stock crank
-Diamond -9.6cc pistons
-Scat 6.125" I beam connecting rods with ARP 2000 rod bolts
-241 heads
-ARP head bolts
-LS6 intake
-Stock mains and bolts
-2002 Z06 camshaft
-Melling oil pump
-LS2 timing chain
-7.400" TSP pushrods
-Stock rockers with Comp Cams trunion kit
-PAC beehive valvesprings
-Rebuilt stock T56
-Monster Level 3 clutch/flywheel
-Tick Master Cylinder

Here's the turbo hot side and the parts list on the turbo kit.
-Custom made flipped manifolds hot side
-Custom front bumper with intercooler mounts
-Godspeed intercooler
-On 3 Performance 76mm turbo
-Turbosmart 44mm wastegate
-Tial BOV
-Dual Walbro 255 fuel pumps
-Siemens 60lb injectors
-AEM wideband AFR gauge
-Glowshift boost/vacuum and fuel pressure gauges
-Godspeed vacuum distribution block and manual boost controller

Did the a-pillar mount for the gauges. This is the unit from Glowshift. Fit really well.

Did some cutting on the front bumper cover for the intercooler. Full props to ZL1Killa for the idea!

And a test fit on the bumper and intercooler on the car. The car had been in an accident prior to me owning it and the holes didn't line up exactly. Will have to do a little tweaking for it.

Yesterday I got the fuel pumps installed. The hardest part was getting the assembly to drop in the damn tank! It is significantly wider than the stock setup and really took some finesse to get in there.

Got the crossover mounted yesterday as well. It's running pretty close to the front of the motor, but should be fine with the heat wrap.

Also got the turbo temporarily fit on so I could clock it correctly and test fit the downpipe. It is a CLOSE fit with the stock k-member, but it will fit. I will also have to figure out a way to move a couple of sensor down there, along with rerouting some starter wiring. The low oil sensor wiring sits right on the DP.

Here's a better shot of where the turbo and wastegate sit. As you can see, the stock location for the radiator will not work. The coolant level sensor is touching the v-band here. I will have to find a way to pull the radiator forward as well as moving the passenger side fan to the front of the radiator.

And finally, here is a big problem. I will likely have to get the PS kit from Modular Turbo as well as the bracket if they ever start selling it. Can't really find a good way to get these lines out of the way of the manifold and this is the farthest I've been able to get them yet.

So there we go, should be just a few more days of working on it before it's ready for a tune!
-1998 347 LS1
-New stock crank
-Diamond -9.6cc pistons
-Scat 6.125" I beam connecting rods with ARP 2000 rod bolts
-241 heads
-ARP head bolts
-LS6 intake
-Stock mains and bolts
-2002 Z06 camshaft
-Melling oil pump
-LS2 timing chain
-7.400" TSP pushrods
-Stock rockers with Comp Cams trunion kit
-PAC beehive valvesprings
-Rebuilt stock T56
-Monster Level 3 clutch/flywheel
-Tick Master Cylinder
Here's the turbo hot side and the parts list on the turbo kit.
-Custom made flipped manifolds hot side
-Custom front bumper with intercooler mounts
-Godspeed intercooler
-On 3 Performance 76mm turbo
-Turbosmart 44mm wastegate
-Tial BOV
-Dual Walbro 255 fuel pumps
-Siemens 60lb injectors
-AEM wideband AFR gauge
-Glowshift boost/vacuum and fuel pressure gauges
-Godspeed vacuum distribution block and manual boost controller
Did the a-pillar mount for the gauges. This is the unit from Glowshift. Fit really well.
Did some cutting on the front bumper cover for the intercooler. Full props to ZL1Killa for the idea!
And a test fit on the bumper and intercooler on the car. The car had been in an accident prior to me owning it and the holes didn't line up exactly. Will have to do a little tweaking for it.
Yesterday I got the fuel pumps installed. The hardest part was getting the assembly to drop in the damn tank! It is significantly wider than the stock setup and really took some finesse to get in there.
Got the crossover mounted yesterday as well. It's running pretty close to the front of the motor, but should be fine with the heat wrap.
Also got the turbo temporarily fit on so I could clock it correctly and test fit the downpipe. It is a CLOSE fit with the stock k-member, but it will fit. I will also have to figure out a way to move a couple of sensor down there, along with rerouting some starter wiring. The low oil sensor wiring sits right on the DP.
Here's a better shot of where the turbo and wastegate sit. As you can see, the stock location for the radiator will not work. The coolant level sensor is touching the v-band here. I will have to find a way to pull the radiator forward as well as moving the passenger side fan to the front of the radiator.
And finally, here is a big problem. I will likely have to get the PS kit from Modular Turbo as well as the bracket if they ever start selling it. Can't really find a good way to get these lines out of the way of the manifold and this is the farthest I've been able to get them yet.
So there we go, should be just a few more days of working on it before it's ready for a tune!

 02-19-2012, 06:12 PM
#3

If you look in the faq section, for truck manifold kit, it has all the part numbers listed to make new power steering lines. THis is what i did on my car when i first did my truck manifold kit like 4 yrs ago.
Do I need to make new powersteering lines to clear the driver side truck manifold?
No not really some careful bending will give you the clearance you need BUT if you want to make new lines here is a PN list. Everything can be ordered from summitracing. Thanks goes to Brains for this list:
2 x EAR-991955ERL (M16x1.50 o-ring to -6AN Male) - rack return, pressure side of pump
1 x EAR-991956ERL (M18x1.50 o-ring to -6AN Male) - pressure side of rack
3 x RUS-620421 (90 degree -6 hose ends) - Both rack ports, pressure side of pump hose ends
1 x RUS-620401 (Straight -6 hose end) - Hose to pump reservoir, along with
RUS-670300 (Straight -6 to hose barb) - Braided line to rubber hose, which clamps to reservoir fitting
1 x RUS-632610 (6 foot section of power steering hose)
Good luck, Chris
 02-19-2012, 08:43 PM
#5
TECH Resident
Thread Starter
iTrader: (10)
Join Date: May 2008
Location: Faribault, MN
Posts: 882
Likes: 0
Received 0 Likes
on
0 Posts
If you look in the faq section, for truck manifold kit, it has all the part numbers listed to make new power steering lines. THis is what i did on my car when i first did my truck manifold kit like 4 yrs ago.
Do I need to make new powersteering lines to clear the driver side truck manifold?
No not really some careful bending will give you the clearance you need BUT if you want to make new lines here is a PN list. Everything can be ordered from summitracing. Thanks goes to Brains for this list:
2 x EAR-991955ERL (M16x1.50 o-ring to -6AN Male) - rack return, pressure side of pump
1 x EAR-991956ERL (M18x1.50 o-ring to -6AN Male) - pressure side of rack
3 x RUS-620421 (90 degree -6 hose ends) - Both rack ports, pressure side of pump hose ends
1 x RUS-620401 (Straight -6 hose end) - Hose to pump reservoir, along with
RUS-670300 (Straight -6 to hose barb) - Braided line to rubber hose, which clamps to reservoir fitting
1 x RUS-632610 (6 foot section of power steering hose)
Good luck, Chris
Do I need to make new powersteering lines to clear the driver side truck manifold?
No not really some careful bending will give you the clearance you need BUT if you want to make new lines here is a PN list. Everything can be ordered from summitracing. Thanks goes to Brains for this list:
2 x EAR-991955ERL (M16x1.50 o-ring to -6AN Male) - rack return, pressure side of pump
1 x EAR-991956ERL (M18x1.50 o-ring to -6AN Male) - pressure side of rack
3 x RUS-620421 (90 degree -6 hose ends) - Both rack ports, pressure side of pump hose ends
1 x RUS-620401 (Straight -6 hose end) - Hose to pump reservoir, along with
RUS-670300 (Straight -6 to hose barb) - Braided line to rubber hose, which clamps to reservoir fitting
1 x RUS-632610 (6 foot section of power steering hose)
Good luck, Chris
so glad i havnt ordered guages yet... does the glowshift black match the ebony internior nicely?
How much power you hoping to get?
02-19-2012, 10:08 PM
#6
Staging Lane
iTrader: (23)
Join Date: Jun 2009
Location: Henderson, NV
Posts: 99
Likes: 0
Received 0 Likes
on
0 Posts

I priced out ordering all those power steering parts before buying my power steering lines from Modular Turbo. It came to about $130 for the parts before shipping and handling. For $150, the MT lines were the way to go. Good luck with your build.
03-18-2012, 03:10 PM
#7
TECH Resident
Thread Starter
iTrader: (10)
Join Date: May 2008
Location: Faribault, MN
Posts: 882
Likes: 0
Received 0 Likes
on
0 Posts
Back to work!
Almost have the exhaust work underneath finished up. Lap bands sure do make things simple.
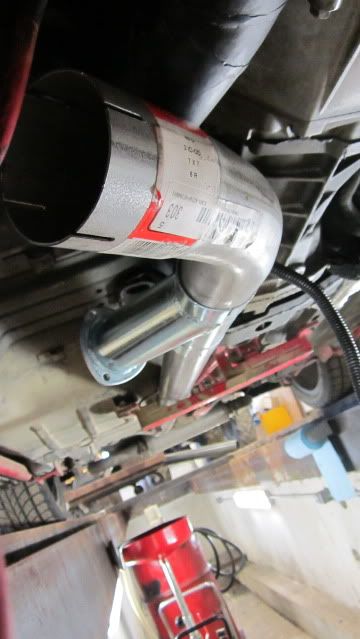
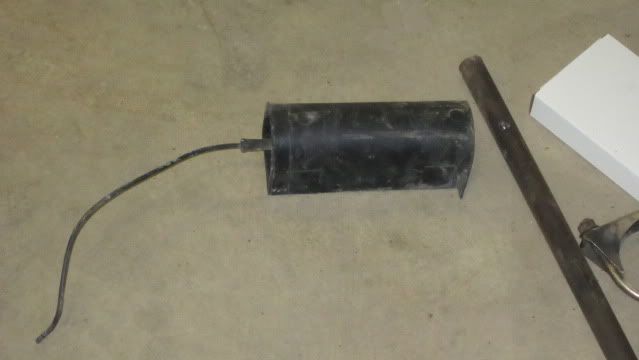
When I was underneath the passenger side making room for the cold side piping I found this little bugger. Had to move it so we could make room for the next radiator mount. Anyone have any idea what it is? Wasn't hooked up to anything.
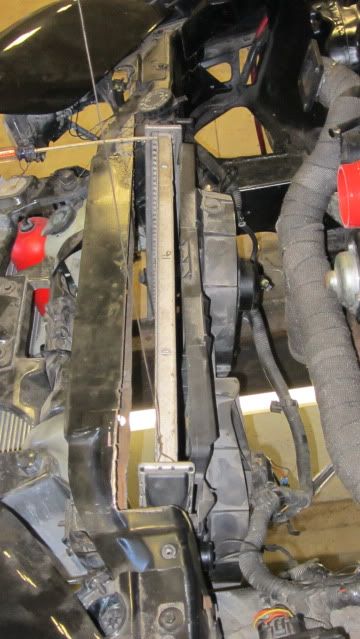
Got the radiator mocked up and made the proper cuts to fit. Actually had to take out the entire bottom support. Not too hard, just a little heat and a chisel to break the spot welds. Fabricating a new lower support farther forward to slip the radiator into. It will have a bit less of an angle than stock but it came forward quite a bit. Now have about 2 inches between the crossover and the back of the fan.
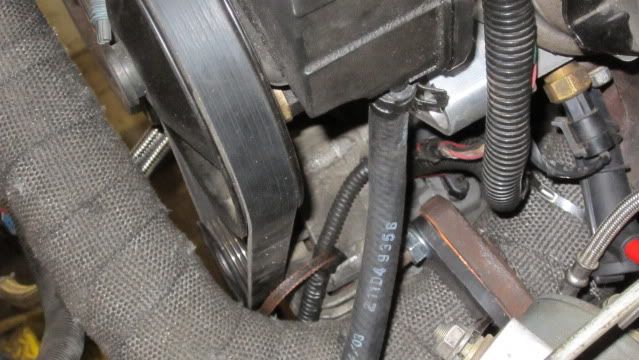
Also picked up the new power steering relocation bracket from CBR Performance. Worked perfectly! Moved the belt well out of range of the crossover where before it was rubbing right on it.
Here's the clearance
And here's a shot of where the PS pump sits now.
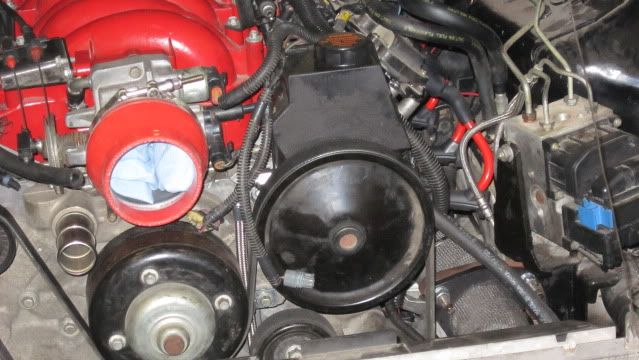
So next time I have to get the pumps wired in and ready to go and hope to finish off the cold side piping and get the sensors that are close to the exhaust pipes extended and re-run.
Almost have the exhaust work underneath finished up. Lap bands sure do make things simple.
When I was underneath the passenger side making room for the cold side piping I found this little bugger. Had to move it so we could make room for the next radiator mount. Anyone have any idea what it is? Wasn't hooked up to anything.
Got the radiator mocked up and made the proper cuts to fit. Actually had to take out the entire bottom support. Not too hard, just a little heat and a chisel to break the spot welds. Fabricating a new lower support farther forward to slip the radiator into. It will have a bit less of an angle than stock but it came forward quite a bit. Now have about 2 inches between the crossover and the back of the fan.
Also picked up the new power steering relocation bracket from CBR Performance. Worked perfectly! Moved the belt well out of range of the crossover where before it was rubbing right on it.
Here's the clearance
And here's a shot of where the PS pump sits now.
So next time I have to get the pumps wired in and ready to go and hope to finish off the cold side piping and get the sensors that are close to the exhaust pipes extended and re-run.
Trending Topics
03-19-2012, 04:28 AM
#8
TECH Regular
iTrader: (2)

Join Date: Mar 2010
Location: Wood river IL
Posts: 423
Likes: 0
Received 0 Likes
on
0 Posts
My friend and I were wondering what that little black box is used for as well. I tried tracing the line and it appears to go back to the ac box. In for an answer to what exactly it is. Lol
03-19-2012, 10:09 AM
#10
TECH Resident
Thread Starter
iTrader: (10)
Join Date: May 2008
Location: Faribault, MN
Posts: 882
Likes: 0
Received 0 Likes
on
0 Posts
That would probably be my guess as well. That small line appears to be a vacuum line but it wasn't hooked up to anything. My AC has been deleted so if it was hooked up to that I'll probably just leave it out and see what happens.
 03-19-2012, 10:30 PM
#13
TECH Resident
Thread Starter
iTrader: (10)
Join Date: May 2008
Location: Faribault, MN
Posts: 882
Likes: 0
Received 0 Likes
on
0 Posts
 Flange was moved quite a few degrees upward. It worries me slightly due to its close proximity to the alternator, but I don't think it will be much of a problem.
 If you look at the pic of the hot pipes in the first post here, that should give you an idea of how it was modified.
03-25-2012, 11:51 PM
#15
TECH Resident
Thread Starter
iTrader: (10)
Join Date: May 2008
Location: Faribault, MN
Posts: 882
Likes: 0
Received 0 Likes
on
0 Posts
Thanks! Final compression was right around 9.4:1. I'll probably be driving on 10 PSI daily and with the '98 PCM and 2 bar MAP sensor I'll max out around 14-15. I'm predicting that the .88 A/R is going to be choking me but hopefully I'll still be able to clear 600rwhp.
04-01-2012, 07:11 PM
#17
TECH Resident
Thread Starter
iTrader: (10)
Join Date: May 2008
Location: Faribault, MN
Posts: 882
Likes: 0
Received 0 Likes
on
0 Posts
Got a lot of the big stuff done this weekend. Finished fabricating the lower radiator mount, got it welded in, and got the radiator in where I wanted it. Turned out great. Brought it forward enough to get about 2 inches of clearance between the crossover and the fan. The new bottom mount is strong enough for me to hang off of. Also modified my BMR radiator support so we got that in as well.

Still lots of little **** left to do, but we're getting there. Had to de-loom and rerun a few wires to clear the crossover and have a lot more left to do but it's all pretty much peanuts.
Still lots of little **** left to do, but we're getting there. Had to de-loom and rerun a few wires to clear the crossover and have a lot more left to do but it's all pretty much peanuts.
04-01-2012, 10:06 PM
#18
TECH Resident
Thread Starter
iTrader: (10)
Join Date: May 2008
Location: Faribault, MN
Posts: 882
Likes: 0
Received 0 Likes
on
0 Posts
Also, FYI for those who were asking. I'm fairly certain that the plastic thing is a vacuum canister for the AC. Someone on another site suggested it and after some research it looks like he was correct.
05-07-2012, 06:37 PM
#19
TECH Resident
Thread Starter
iTrader: (10)
Join Date: May 2008
Location: Faribault, MN
Posts: 882
Likes: 0
Received 0 Likes
on
0 Posts
So... put in the dipstick a couple of weeks ago and managed to break the bottom of the tube off inside the oil pan. Tried to get it but no go. Got an endoscopic camera into the pan today and still no luck finding it. Has to be hiding somewhere so we're going to drop the oil pan as low as we can without lifting or removing the motor and see what we can see. If all else fails, I guess the pan will have to come off. What a pain in the ***...
On the plus side, everything else is going pretty smooth. Aside from the dipstick tube, pretty much all I have left to do is some wiring for the fuel and meth pumps.

Figuring out another way to run the vacuum lines. They look like hell just hanging across the top of the engine bay.

I thought I would miss the foglights. Starting to think I like this look better
On the plus side, everything else is going pretty smooth. Aside from the dipstick tube, pretty much all I have left to do is some wiring for the fuel and meth pumps.
Figuring out another way to run the vacuum lines. They look like hell just hanging across the top of the engine bay.
I thought I would miss the foglights. Starting to think I like this look better
