
67 Firebird Convertable/LS2 Pro Touring Build
 01-07-2013, 05:48 PM
#1
Teching In
Thread Starter

Join Date: Oct 2012
Posts: 10
Likes: 0
Received 0 Likes
on
0 Posts
It's my hope that over the next year or so I'll be able to transform this rough 6 cyl 3 speed rag top (literally) and a wrecked 05' GTO in to something like this:

Never done a build thread, or a build like this but I'll keep you posted as I go. I've found this site and other similar sites invaluable so I feel indebted to the community and hope to pay something back. My greatest contribution will likely be sharing what not to do.
Currently the plan is as follows (subject to change based on budget concerns, marital constraints or whimsy):
67 Firebird Convertible
LS2/Procharger/Intercooler/LS3 heads/Cam/Long tube Headers
Stock Front Clip with new uppers/lowers/coil overs/sway bar (mfg still tbd)
Ford 9" rear end w/BMD torque arm/watts link set up
Lowered 2", mini-tub, 285-17 fronts, 335-17 rear
either GTO take off's for brakes or wilwood
Custom interior (modern gauges, stereo, seats)
In the end it will be a daily driver to replace my truck that I intend to give my daughter when she turns 16, so I need to be rolling by Sept 23 of 2014.
I've been at it for about a month now so I'll try to catch up over the next few posts.
Enjoy.
 01-07-2013, 06:10 PM
#2
TECH Fanatic

Welcome aboard, If the reality equals the concept you will have a sure winner. Make sure to ask plenty of questions, there is a tremendous wealth of information here.
01-07-2013, 06:30 PM
#3
Teching In
Thread Starter
Join Date: Oct 2012
Posts: 10
Likes: 0
Received 0 Likes
on
0 Posts
started with the engine because that's what I'm most comfortable working on. Since it was coming out of a wrecked GTO with 77k miles I wanted to pull it apart to get a look at all the moving bits, clean it up and do some general maintenance. It still ran, so I know it had an aftermarket cam, could see the CAI and knew it was tuned, but that was it. My objective was to pull it apart, identify what had been done to it, assess its general condition, do routine/preventative maintenance, clean it up and put it back together.
Still waiting on a bunch of parts, so decided to clean up some of the stuff I had.
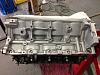
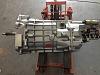
My guess is you won't be able to see much of the block or tranny, but it sure looks good now. Just used a rattle can with "Aluminum" Engine Paint. Cleaned them first with simple green and pressure washer (I did the engine when it was fully assembled), then followed up with a can or two of brake cleaner.
01-07-2013, 06:39 PM
#4
Teching In
Thread Starter
Join Date: Oct 2012
Posts: 10
Likes: 0
Received 0 Likes
on
0 Posts
In which case I would have learned that the water jacket is VERY close on the bottom of the exhaust runner. Which is also why you may have noted in my current plan I now have LS3 heads...
A friend taught me that "Experience is that which is gained, the moment after you needed it"https://ls1tech.com/forums/images/smilies/LS1Tech/gr_banghead.gif
 01-07-2013, 08:01 PM
#6

That is a sweet looking ride. It will be great having the gto for a donar vehicle. Im shur you will end up using more things off that car than you think. lol.
If you dont mind me asking, who did the rendering for you? Is there a place that can do that at a price? Thanks
If you dont mind me asking, who did the rendering for you? Is there a place that can do that at a price? Thanks
Trending Topics
 01-08-2013, 07:00 AM
#9
Staging Lane

Great looking car and rendering!
I am doing a similar project, mine is a 71 Lemans convertible and I am using a wrecked 04 GTO as a parts donor car. Check out my build thread (link below) for more info, PM me if you have any questions getting and using parts from the new GTO, I ended up using quite a bit from it. I used the GTO's electrical harness which made wiring very easy (also using the GTO interior, BCM and gauges). I just transferred it over and plugged it back together, easy peasy. I agree with previous posters, don't get rid of the GTO until you are sure you have gotten everything you want from it - keep it until the end of the build if you can. Sell what you don't use, there is a market for it (although I haven't gotten around to that yet).
I am doing a similar project, mine is a 71 Lemans convertible and I am using a wrecked 04 GTO as a parts donor car. Check out my build thread (link below) for more info, PM me if you have any questions getting and using parts from the new GTO, I ended up using quite a bit from it. I used the GTO's electrical harness which made wiring very easy (also using the GTO interior, BCM and gauges). I just transferred it over and plugged it back together, easy peasy. I agree with previous posters, don't get rid of the GTO until you are sure you have gotten everything you want from it - keep it until the end of the build if you can. Sell what you don't use, there is a market for it (although I haven't gotten around to that yet).
01-08-2013, 09:08 PM
#10
Teching In
Thread Starter
Join Date: Oct 2012
Posts: 10
Likes: 0
Received 0 Likes
on
0 Posts
Great looking car and rendering!
I am doing a similar project, mine is a 71 Lemans convertible and I am using a wrecked 04 GTO as a parts donor car. Check out my build thread (link below) for more info, PM me if you have any questions getting and using parts from the new GTO, I ended up using quite a bit from it. I used the GTO's electrical harness which made wiring very easy (also using the GTO interior, BCM and gauges). I just transferred it over and plugged it back together, easy peasy. I agree with previous posters, don't get rid of the GTO until you are sure you have gotten everything you want from it - keep it until the end of the build if you can. Sell what you don't use, there is a market for it (although I haven't gotten around to that yet).
I am doing a similar project, mine is a 71 Lemans convertible and I am using a wrecked 04 GTO as a parts donor car. Check out my build thread (link below) for more info, PM me if you have any questions getting and using parts from the new GTO, I ended up using quite a bit from it. I used the GTO's electrical harness which made wiring very easy (also using the GTO interior, BCM and gauges). I just transferred it over and plugged it back together, easy peasy. I agree with previous posters, don't get rid of the GTO until you are sure you have gotten everything you want from it - keep it until the end of the build if you can. Sell what you don't use, there is a market for it (although I haven't gotten around to that yet).
I plan on using most of the interior out of the goat, but still undecided on the dash.
01-08-2013, 09:21 PM
#11
Teching In
Thread Starter
Join Date: Oct 2012
Posts: 10
Likes: 0
Received 0 Likes
on
0 Posts
I did see this software on another forum that looked like it would do the job and am considering purchasing it. It looked pretty cool. Watch the demo.
http://www.hokdigitalpaintbooth.com/
01-09-2013, 01:26 AM
#12
Teching In

Join Date: Mar 2008
Location: NewcastleWA
Posts: 15
Likes: 0
Received 0 Likes
on
0 Posts
Awesome project. I would suggest Detroit Speed for your "undetermined mfg" and if it's a daily driven car, why not a set of Baers? The kits being based on readily available (read replaceable) corvette bits makes for easy and cheap(er) maintenance at most run of the mill auto parts stores.
01-09-2013, 08:18 PM
#14
Awesome project. I would suggest Detroit Speed for your "undetermined mfg" and if it's a daily driven car, why not a set of Baers? The kits being based on readily available (read replaceable) corvette bits makes for easy and cheap(er) maintenance at most run of the mill auto parts stores.
02-05-2013, 05:17 PM
#15

Sonny, great project, and looking forward to see your progress. I am doing a very similar project, but on a 68 of sorts vert as well. I suggest 4th gen Camaro\Firebird disc brakes to keep things within budget and availability of parts is great.
The rendering looks great what wheels are you planning to run? I have 18" T2's that look very similar to the ones you have on my other 67 bird.
Look forward to seeing updates!
Gui
The rendering looks great what wheels are you planning to run? I have 18" T2's that look very similar to the ones you have on my other 67 bird.
Look forward to seeing updates!
Gui
05-27-2013, 09:05 AM
#16
Teching In
Thread Starter
Join Date: Oct 2012
Posts: 10
Likes: 0
Received 0 Likes
on
0 Posts
Well I've come to two conclusions:
1.This is going to take ALOT longer than I had thought
2. My budget is becoming more of a guideline.
Over the past few months, I've disassembled the bird with the intent of media blasting then starting the process of putting it back together.
I started with the Front Subframe clean up and modifications:
Weld all seams, install Chicane coil-over kit, notch frame for low AC mount compressor, and POR 15 inside and out.
05-27-2013, 09:25 AM
#17
Teching In
Thread Starter
Join Date: Oct 2012
Posts: 10
Likes: 0
Received 0 Likes
on
0 Posts
I also completed much of the engine work:
Added LS3 Heads and intake, ProCharger D1SC, Comp Cam's blower Cam,
Camaro Oil Pan, injectors.
They tell me it will fit, but that procharger sure is hanging out in space.
Added LS3 Heads and intake, ProCharger D1SC, Comp Cam's blower Cam,
Camaro Oil Pan, injectors.
They tell me it will fit, but that procharger sure is hanging out in space.
05-27-2013, 09:38 AM
#18
Teching In
Thread Starter
Join Date: Oct 2012
Posts: 10
Likes: 0
Received 0 Likes
on
0 Posts
On to the body...
Just starting replacing the rusted out or damaged panels.
Right now it looks like left and rear quarters, left and right fenders, Passenger floor, trunk, inner and outer wheel wells (will mini tub so inners were going anyway), a dozen or so miscellaneous patches around the car. I've never done any real bodywork, so I'm not sure how much I will try myself, but I'm starting on the floor to get some practice.
That's it for now. Back to bloody knuckles.
05-27-2013, 02:15 PM
#20
Teching In
Thread Starter
Join Date: Oct 2012
Posts: 10
Likes: 0
Received 0 Likes
on
0 Posts
finished up the passenger side floor. It turned out alot better than I thought it would for a newbe.
The last picture shows how mine turned out (butt welded) versus an earlier repair on the drivers side that was overlapped.
The last picture shows how mine turned out (butt welded) versus an earlier repair on the drivers side that was overlapped.

