Appearance & Detailing Interior & Exterior Appearance Modifications
Sponsored by:
Sponsored by: DashLynx

Smoothed LS1 valve covers (PICS UPDATE POST #27)

Thread Tools
 
Search this Thread
 
Old 01-13-2013, 06:34 PM
  #1  
9 Second Club
Thread Starter
iTrader: (4)
 
QucikSilver's Avatar
 
Join Date: Oct 2005
Location: San Antonio
Posts: 201
Likes: 0
Received 1 Like on 1 Post

Default Smoothed LS1 valve covers (PICS UPDATE POST #27)

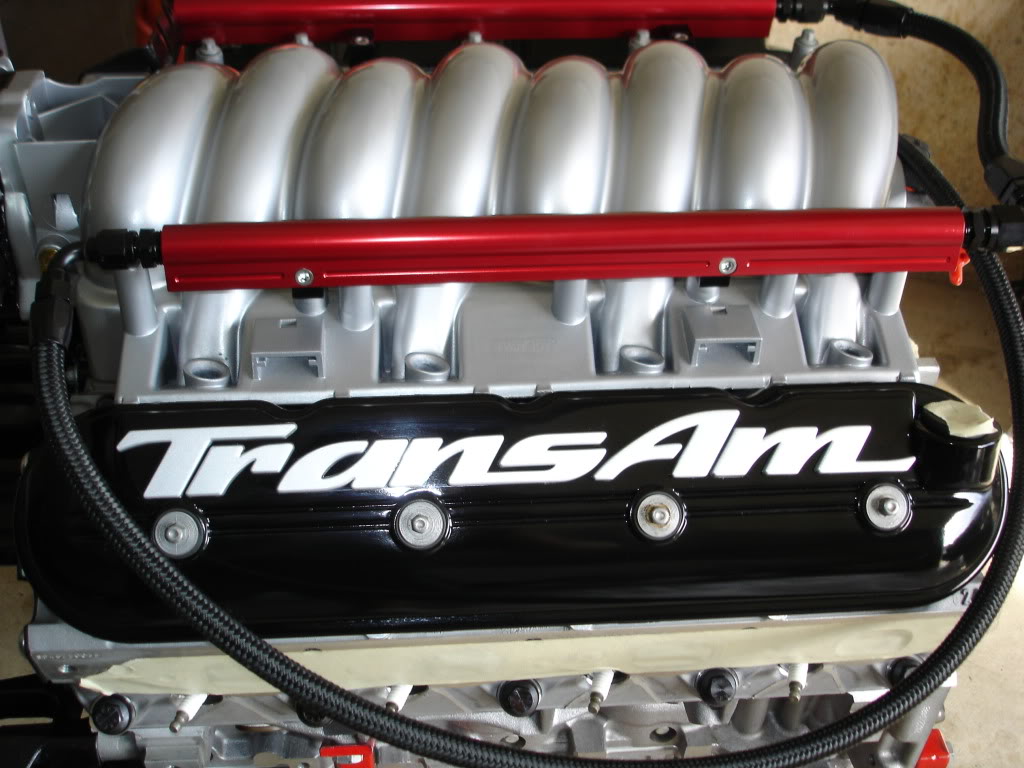
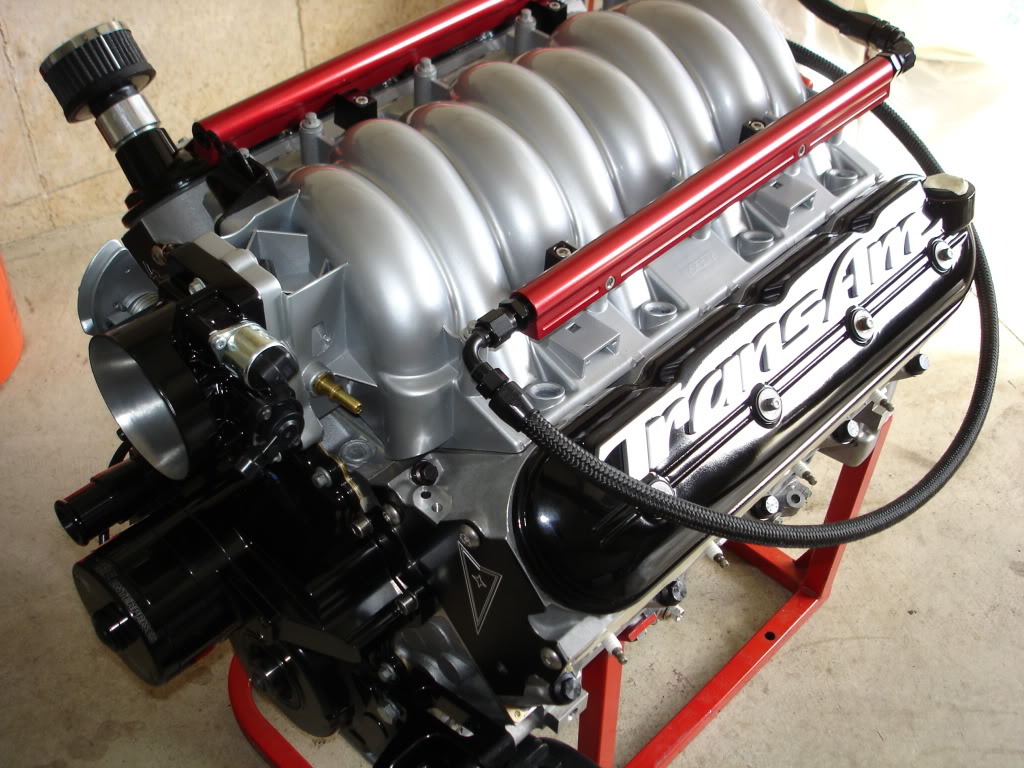
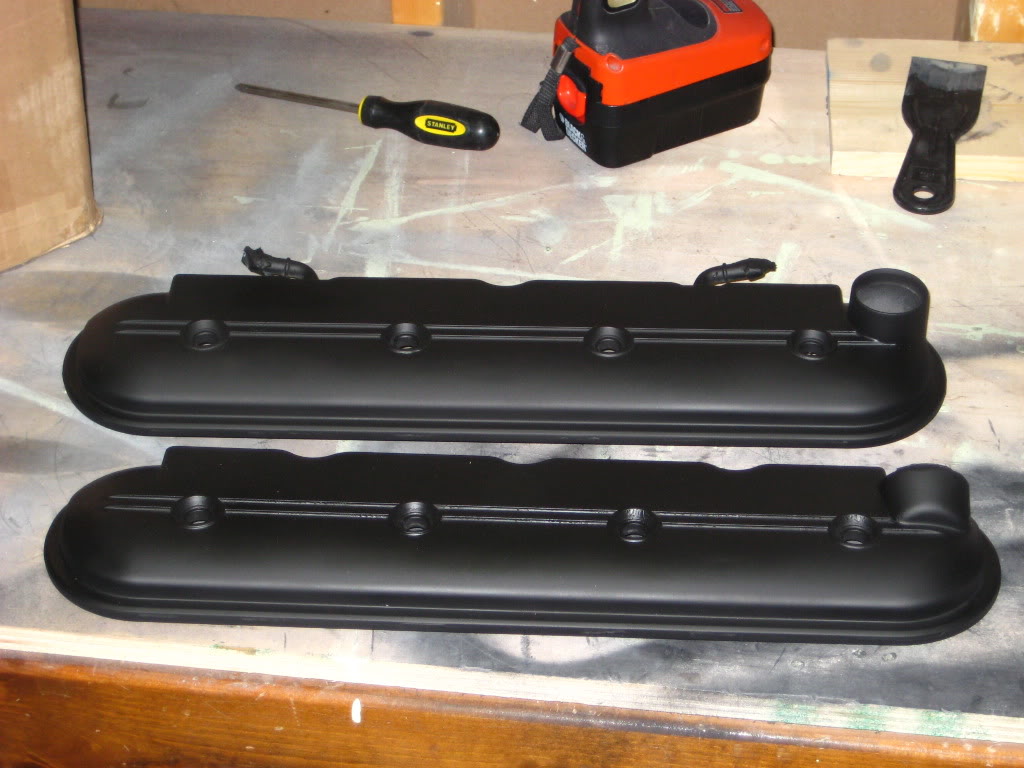
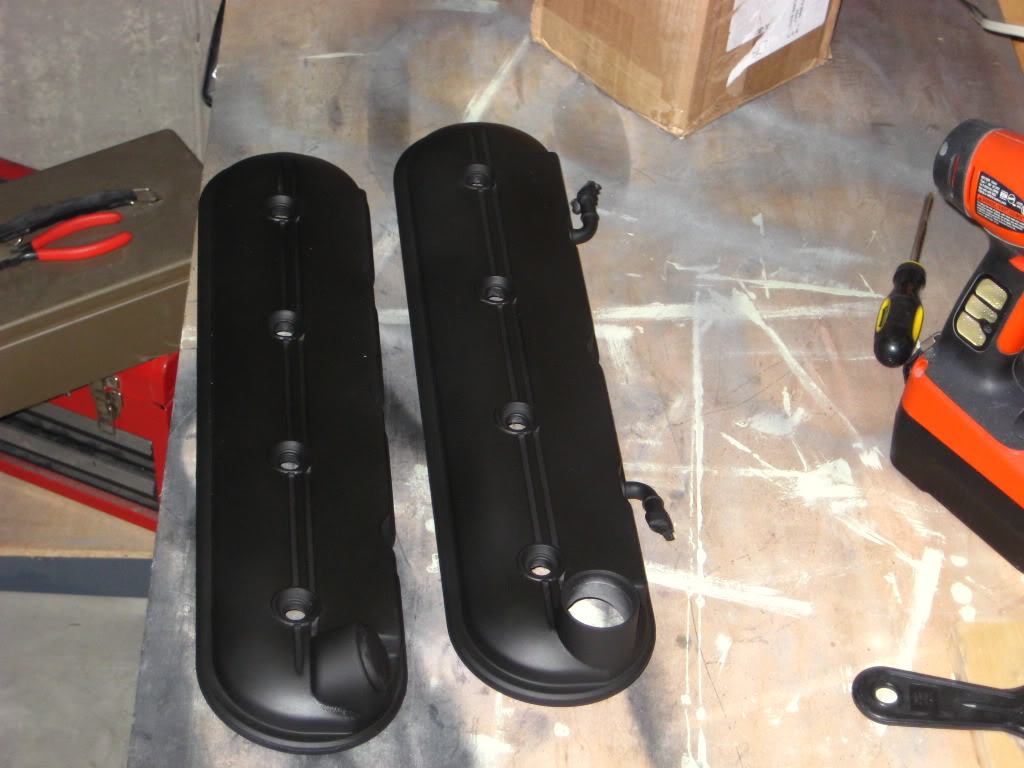
I've been looking around for a nice set of smooth valve covers with the LSx logo on them, only to find they have a price point higher than my intake manifold. So here is my progress so far of cutting, smoothing, painting and LSx lettering my stock covers.

Enjoy.
Attached Thumbnails Smoothed LS1 valve covers (PICS UPDATE POST #27)-img_20130112_180756.jpg   Smoothed LS1 valve covers (PICS UPDATE POST #27)-1358035327653.jpg   Smoothed LS1 valve covers (PICS UPDATE POST #27)-1358044942157.jpg   Smoothed LS1 valve covers (PICS UPDATE POST #27)-1358044943976.jpg   Smoothed LS1 valve covers (PICS UPDATE POST #27)-img_20130112_193815.jpg  

Smoothed LS1 valve covers (PICS UPDATE POST #27)-img_20130113_151441.jpg   Smoothed LS1 valve covers (PICS UPDATE POST #27)-img_20130113_154510.jpg  

Last edited by QucikSilver; 01-20-2013 at 07:57 PM.
The following users liked this post:
Homer_Simpson (09-01-2023)
Old 01-13-2013, 06:36 PM
  #2  
9 Second Club
Thread Starter
iTrader: (4)
 
QucikSilver's Avatar
 
Join Date: Oct 2005
Location: San Antonio
Posts: 201
Likes: 0
Received 1 Like on 1 Post

Default

The last shot is with only the first coat of primer. It got too cold to paint anymore tonight.
Old 01-13-2013, 08:03 PM
  #3  
TECH Enthusiast
iTrader: (8)
 
DCC!!'s Avatar
 
Join Date: Oct 2009
Location: Abilene Texas
Posts: 551
Likes: 0
Received 0 Likes on 0 Posts

Default

Looks good so far. Are you going to go with the black/ chevy orange color?
Old 01-13-2013, 08:09 PM
  #4  
TECH Enthusiast
iTrader: (5)
 
AGearHead4Life's Avatar
 
Join Date: Jan 2010
Location: Huntsville, Alabama - SA, TX is home
Posts: 676
Likes: 0
Received 1 Like on 1 Post
Default

Cool! I've had a set sitting on the shelf that i've been wanting to do this to. I didnt know that hole went all the way threw and would have to be filled. Glad I came across this thread.

THanks! Looking good!
Old 01-13-2013, 08:32 PM
  #5  
9 Second Club
Thread Starter
iTrader: (4)
 
QucikSilver's Avatar
 
Join Date: Oct 2005
Location: San Antonio
Posts: 201
Likes: 0
Received 1 Like on 1 Post

Default

I am going to gloss black with heavy clear. and the wife made me a LSx stencil that will be gloss Chevy Red/Orange.

I actually filled the holes in mine with $1.49 Harbor Frieght 2 part epoxy. worked great.

Thanks, I hope to have at least one finished and cleared by tomorrow pending temperature.
Old 01-13-2013, 09:01 PM
  #6  
TECH Enthusiast
iTrader: (8)
 
DCC!!'s Avatar
 
Join Date: Oct 2009
Location: Abilene Texas
Posts: 551
Likes: 0
Received 0 Likes on 0 Posts

Default

I cant wait to see it done,! What kinda paint are you using?
Old 01-13-2013, 10:00 PM
  #7  
9 Second Club
Thread Starter
iTrader: (4)
 
QucikSilver's Avatar
 
Join Date: Oct 2005
Location: San Antonio
Posts: 201
Likes: 0
Received 1 Like on 1 Post

Default

I am using Rustoleum Sandable dark gray primer, and Rustoleum Engine Enamal Gloss Black, finishing with Rustoleum High Heat Clear. The lettering will be done in Engine Enamel Chevy Red/Orange.

The great thing is the total cost for everything, paint and all, is right around $45.00 (over $20.00 of that is just in paint.)
Old 01-14-2013, 10:06 PM
  #8  
TECH Addict
iTrader: (48)
 
a98ws6's Avatar
 
Join Date: Aug 2003
Location: KCMO
Posts: 2,273
Likes: 0
Received 1 Like on 1 Post

Default

Did something similar to my old ones.
Name:  DSC00250.jpg
Views: 5254
Size:  111.7 KB
Name:  DSC00249.jpg
Views: 5815
Size:  149.3 KB
Old 01-15-2013, 01:55 PM
  #9  
9 Second Club
Thread Starter
iTrader: (4)
 
QucikSilver's Avatar
 
Join Date: Oct 2005
Location: San Antonio
Posts: 201
Likes: 0
Received 1 Like on 1 Post

Default

Nice. Getting them smooth sure can be a bitch. And I am getting set back on getting mine finished because of the cold weather. The primer is taking forever to dry and I dont even want to try to shoot paint when it's 30 degrees outside.
Old 01-15-2013, 02:41 PM
  #10  
11 Second Club
iTrader: (54)
 
OIF1VET's Avatar
 
Join Date: Mar 2006
Location: Muskegon, MI
Posts: 835
Likes: 0
Received 1 Like on 1 Post

Default

I did mine a few years go. I filled the 2 lines in the middle also. I found these, this was before I filled the lines in the middle.. Takes a little time, but the end result is well worth the effort..

Name:  v23.jpg
Views: 7967
Size:  112.4 KB
Name:  v25.jpg
Views: 5154
Size:  115.0 KB

Last edited by OIF1VET; 01-15-2013 at 03:05 PM.
Old 01-15-2013, 04:06 PM
  #11  
9 Second Club
Thread Starter
iTrader: (4)
 
QucikSilver's Avatar
 
Join Date: Oct 2005
Location: San Antonio
Posts: 201
Likes: 0
Received 1 Like on 1 Post

Default

Those do look nice. I actually prefer the lines in mine. I think it will bring the logo I am painting on them out a little bit more. To each there own, right?
Old 01-15-2013, 04:14 PM
  #12  
11 Second Club
iTrader: (54)
 
OIF1VET's Avatar
 
Join Date: Mar 2006
Location: Muskegon, MI
Posts: 835
Likes: 0
Received 1 Like on 1 Post

Default

Originally Posted by QucikSilver
Those do look nice. I actually prefer the lines in mine. I think it will bring the logo I am painting on them out a little bit more. To each there own, right?
Looking forward to seeing yours done. Lol, I don't even remember why I filled mine now. If you'd like to see pics(with the lines filled) I can shoot a couple. Car is sitting in the garage..
Old 01-15-2013, 04:54 PM
  #13  
11 Second Club
iTrader: (54)
 
OIF1VET's Avatar
 
Join Date: Mar 2006
Location: Muskegon, MI
Posts: 835
Likes: 0
Received 1 Like on 1 Post

Default

Don't mind the mess. This is a couple years old. I was rewiring, amongst other things, at the time. Smoothed valve cover.
Attached Thumbnails Smoothed LS1 valve covers (PICS UPDATE POST #27)-image.jpg  
Old 01-15-2013, 09:53 PM
  #14  
TECH Enthusiast
iTrader: (5)
 
AGearHead4Life's Avatar
 
Join Date: Jan 2010
Location: Huntsville, Alabama - SA, TX is home
Posts: 676
Likes: 0
Received 1 Like on 1 Post
Default

Cool thread. Sounds like a fun lil project and all of y'alls photos look like you did well.
Old 01-15-2013, 09:56 PM
  #15  
On The Tree
 
MylesF7's Avatar
 
Join Date: Oct 2012
Location: Kennesaw, GA
Posts: 136
Likes: 0
Received 0 Likes on 0 Posts
Default

Looks much better so far!
Old 01-15-2013, 10:05 PM
  #16  
On The Tree
iTrader: (10)
 
JAY-R's Avatar
 
Join Date: Oct 2008
Posts: 145
Likes: 0
Received 0 Likes on 0 Posts

Default

OIF1VET those look good, what color is that? semi or matte black? looks matte.
Old 01-16-2013, 04:05 AM
  #17  
11 Second Club
iTrader: (54)
 
OIF1VET's Avatar
 
Join Date: Mar 2006
Location: Muskegon, MI
Posts: 835
Likes: 0
Received 1 Like on 1 Post

Default

Originally Posted by JAY-R
OIF1VET those look good, what color is that? semi or matte black? looks matte.
It was a matte black.. Now they match the car, but am thinking of going back to matte..
Old 01-16-2013, 04:36 AM
  #18  
12 Second Club
 
JDEP162's Avatar
 
Join Date: Jun 2012
Posts: 1,550
Likes: 0
Received 1 Like on 1 Post

Default

Originally Posted by OIF1VET
I did mine a few years go. I filled the 2 lines in the middle also. I found these, this was before I filled the lines in the middle.. Takes a little time, but the end result is well worth the effort..
http://i100.photobucket.com/albums/m36/OIF1VET/v23.jpg
http://i100.photobucket.com/albums/m36/OIF1VET/v25.jpg
nothing to do with this thread, just a fellow oif1 vet here wanted to say hey. i was stationed at camp steel dragon, baghdad, march 04-march-05. 1st cav
but also badass valve covers
Old 01-16-2013, 04:14 PM
  #19  
9 Second Club
Thread Starter
iTrader: (4)
 
QucikSilver's Avatar
 
Join Date: Oct 2005
Location: San Antonio
Posts: 201
Likes: 0
Received 1 Like on 1 Post

Default

I will say, it's not real hard to do this the right way, but it sure is time consuming. I really like the completely sooth look as well. I am just going to be using the lines for my graphic inlay. I should have some good pictures up of at least one by the end of the week. Work is keeping me too busy to get anything done right now.
Old 01-16-2013, 04:20 PM
  #20  
11 Second Club
iTrader: (54)
 
OIF1VET's Avatar
 
Join Date: Mar 2006
Location: Muskegon, MI
Posts: 835
Likes: 0
Received 1 Like on 1 Post

Default

Originally Posted by QucikSilver
I will say, it's not real hard to do this the right way, but it sure is time consuming. I really like the completely sooth look as well. I am just going to be using the lines for my graphic inlay. I should have some good pictures up of at least one by the end of the week. Work is keeping me too busy to get anything done right now.
I hear ya dude.. Time consuming for sure... But well worth it and you can say you did it! Looking forward to pics.


Quick Reply: Smoothed LS1 valve covers (PICS UPDATE POST #27)


All times are GMT -5. The time now is 09:41 AM.