Fox Mustang Swap with AC?
 02-03-2013, 12:47 PM
#1

Anyone done a Fox Mustang LS swap and retained the Air Conditioning? Trying to see what all would be involved in doing it. Would it be as simple as just mounting the compressor on the LS motor, and having new lines made up to hook to the GM compressor instead of the Ford compressor? Any info and/or pics would be great.
 02-03-2013, 01:33 PM
#2
12 Second Club
iTrader: (2)
Join Date: Apr 2009
Location: PNW
Posts: 900
Likes: 0
Received 0 Likes
on
0 Posts
Thats what it looks like,i plan to keep ac on mine.im going to use the fbody condenser since it mounts to the radiator and maybe my dryer accumulator.I will use the fbody pressure switch and get the ac request signal for the pcm from the hvac controls, other than that just have to have lines made up
02-04-2013, 03:48 PM
#7

I am not sure if I did it the easiest way or not, but it works.
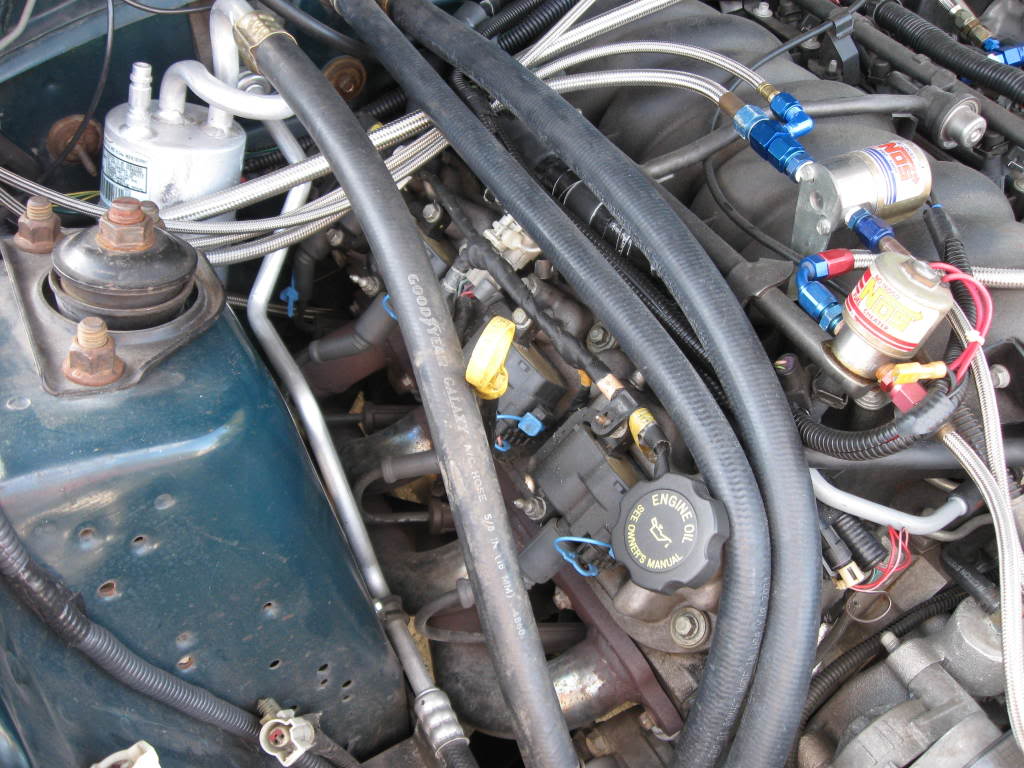
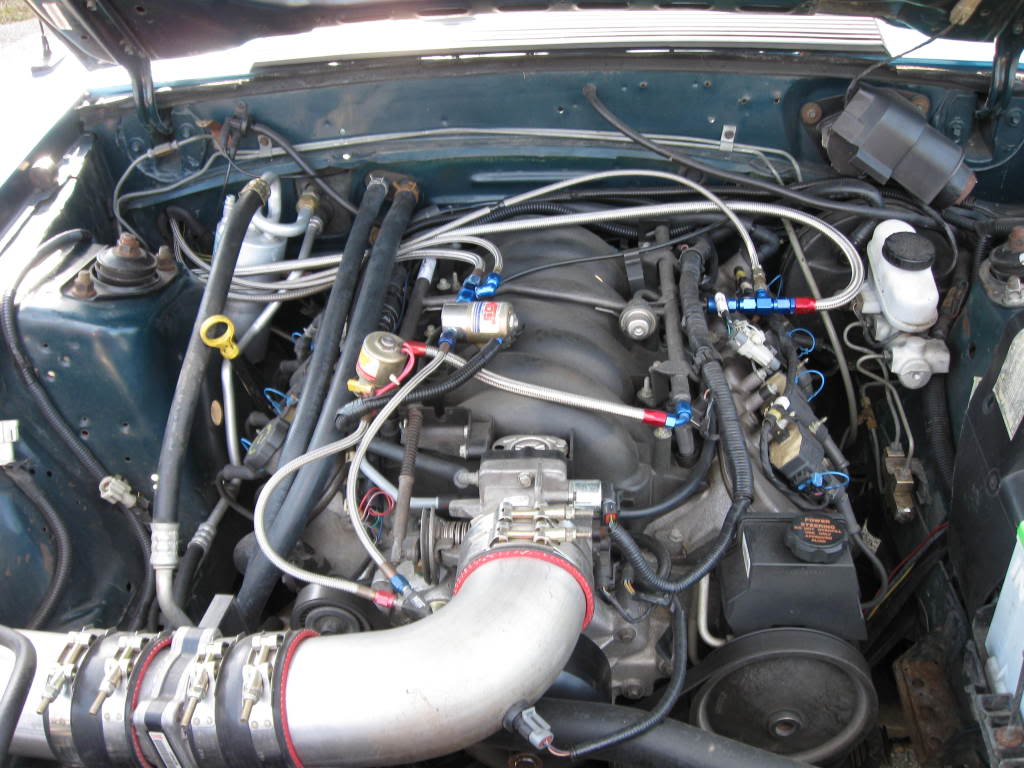
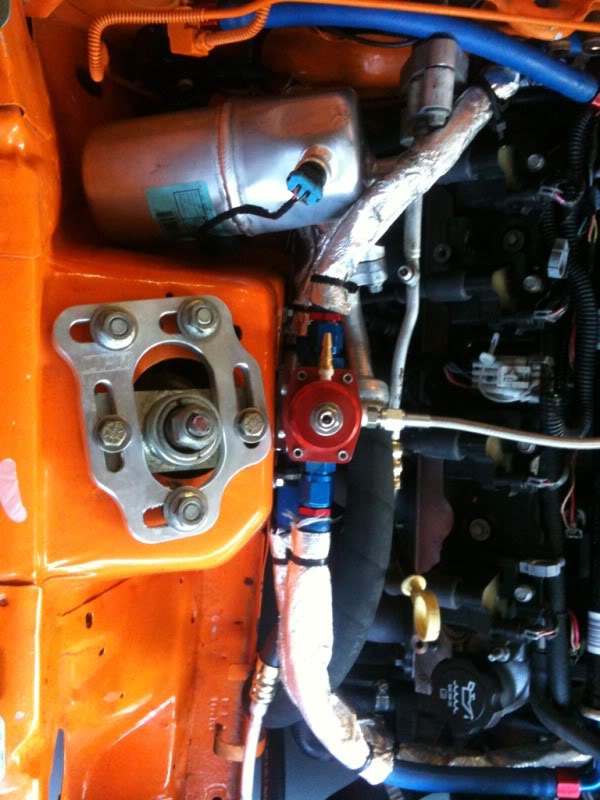
I used all GM components under the hood. F-body condenser, truck compressor (cause I am using truck accessories), then I am using a factory f-body upper a/c line (the one that connects the evap to the top of the condenser and that line has the orfice tube in it, I just had it lengthened cause it is like 12" too short. The hose from the bottom of the condenser to the compressor is custom, the hose from the compressor to the accumulator is custom, and the accumulator is from a escalade, I just reclocked/brazed the fitting that goes to the evap so it would fit behind the shock tower.
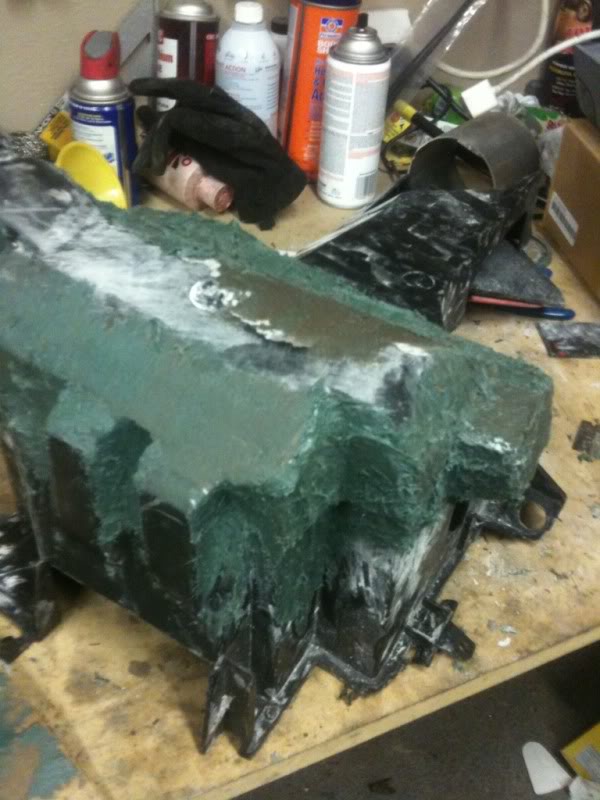
for the inside i cut the stock a/c-heater box open, removed the factory evap, then put the f-body evap inside. it is slightly larger so I had to cut the bottom out and fiberglass some of it to make it fit.
This is where I am grafting a new bottom on with fiberglass. The finished product is nice as smooth, but you can see the part that juts out, you have to do that to get the part of the coil the sticks out of the evap.
Now this is not the actual components or the custom lines I used, but it gives you and idea of how the system is laid out.
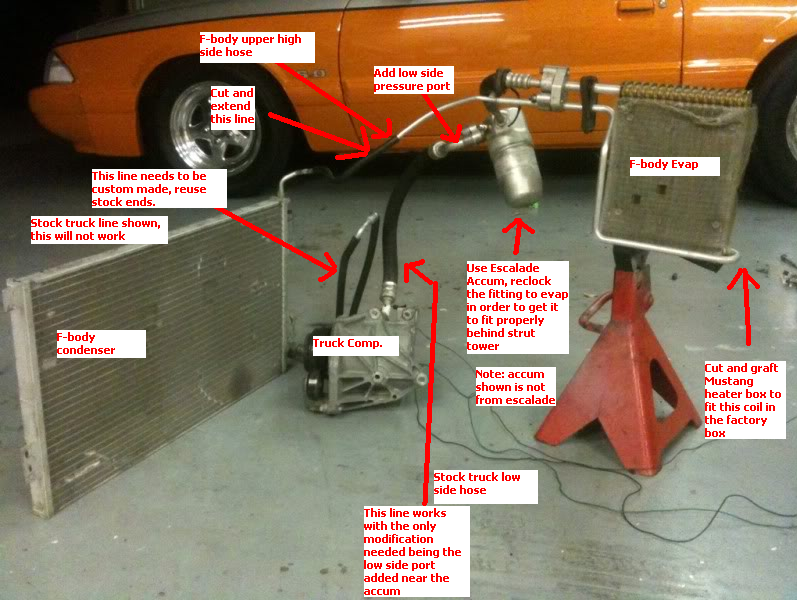
Oh, and the Escalade accum has a port for a low side pressure switch, I have this wired to a relay so the comp. won't be turned on if the system is too low on pressure.
Here is a picture of the Escalade accum.

I used all GM components under the hood. F-body condenser, truck compressor (cause I am using truck accessories), then I am using a factory f-body upper a/c line (the one that connects the evap to the top of the condenser and that line has the orfice tube in it, I just had it lengthened cause it is like 12" too short. The hose from the bottom of the condenser to the compressor is custom, the hose from the compressor to the accumulator is custom, and the accumulator is from a escalade, I just reclocked/brazed the fitting that goes to the evap so it would fit behind the shock tower.
for the inside i cut the stock a/c-heater box open, removed the factory evap, then put the f-body evap inside. it is slightly larger so I had to cut the bottom out and fiberglass some of it to make it fit.
This is where I am grafting a new bottom on with fiberglass. The finished product is nice as smooth, but you can see the part that juts out, you have to do that to get the part of the coil the sticks out of the evap.
Now this is not the actual components or the custom lines I used, but it gives you and idea of how the system is laid out.
Oh, and the Escalade accum has a port for a low side pressure switch, I have this wired to a relay so the comp. won't be turned on if the system is too low on pressure.
Here is a picture of the Escalade accum.
Last edited by dville_gt; 02-04-2013 at 04:04 PM.
Trending Topics
02-04-2013, 09:05 PM
#10
12 Second Club
iTrader: (2)
Join Date: Apr 2009
Location: PNW
Posts: 900
Likes: 0
Received 0 Likes
on
0 Posts
Thats a good question, I was gonna use all fbody stuff minus the evaporator.is there a purpose besides the larger surface area?
Thanks dville_gt for sharing that with us.it will help alot of people im sure
Thanks dville_gt for sharing that with us.it will help alot of people im sure
02-06-2013, 11:32 AM
#11
The benefit in my opinion is that all the components are designed to work together and are R134a from the factory. Plus the a/c pressure sensors screws right into the accumulator and all the connections are factory GM o-ring style. It might be a little more work, but in my opinion the end product is just nicer. It looks like a PITA and expensive but it really isn't just lengthen a line and make one new line. The hardest part is glassing the heater box to fit the larger evap.
02-07-2013, 06:33 PM
#12
Here is how i did mine. My ac blew 40 degrees all day in the FL heat
Fox 4 cylinder accumulator w/o hose (has a barbed fitting)
The reason for this is the suction hose on the 5.0 accumulator runs paralell to the firewall running behind the intake to the drivers side. The 4 cylinder accumulator points forward towards the core support.
Fox condensor and liquid line
F body manifold hose and compressor. You have to slightly bend the aluminum lines to point in the correct direction. I used the hose that came out with my dropout motor/trans. The suction side of the hose was long enough to reach the accumulator. Using an AC line crimper i attached it to the new accumulator. The pressure hose was cut short so i cut the crimp off of the manifold hose and used new AC hose.
The only "tricky" part is if you are using the high side pressure switch to turn on the factory fans like i had. (i ran the stock Fbody radiator and fans)
I went to the junk yard and found a FWD GM (i think a late 90s cavalier) car that had the high pressure hose with the high side switch about 2 inches from the service port. I just cut it off at the hose and unbolted it from the condensor.
I had someone weld the GM fitting to the spring lock fitting going into the condensor (both are aluminum). The hose end i cut the crimp off and re-crimped the new hose to it.
Thats it. SERIOUSLY easy. (i have the AC hose crimping tool, if not you just have to pay someone to make three crimps)