So I Finally Installed My 8.8...
 02-17-2013, 09:29 PM
#1

As many of you know, 3 years ago i started a 8.8 build for my Camaro. Reference HERE. It had taken me quite some time to muster all the parts to get the rear completed. It was a long arduous build with alot of worrying aspects as far as it fitting or keeping together. Eventually I finished it but never got the chance to install it. Until about amonth ago my friend gave me permission to use his garage and finally throw it in 
I was nervous with this build from the jump. I was worried about things not fitting properly and causing more issues then what it would be worth. As is any project however, especially on a custom car. Nothing will ever be 100% right off the bat.
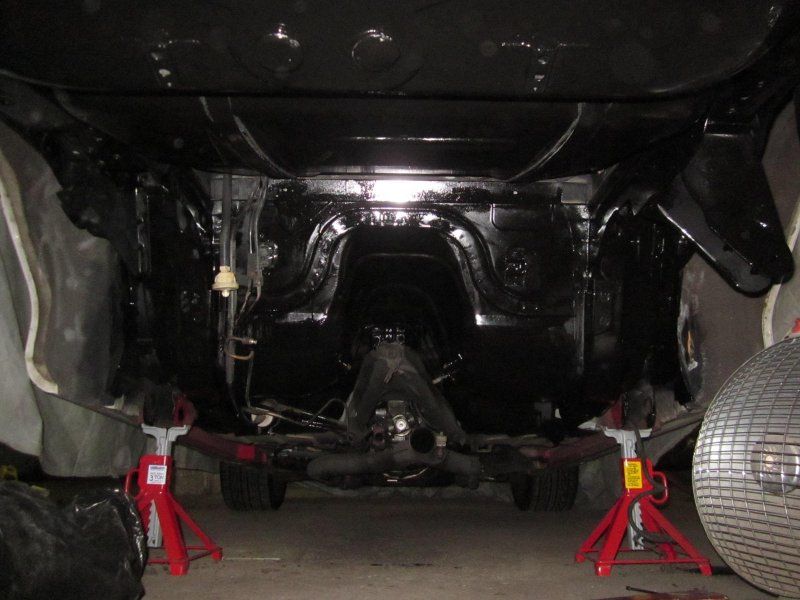
Step one, get the back of the car in position.
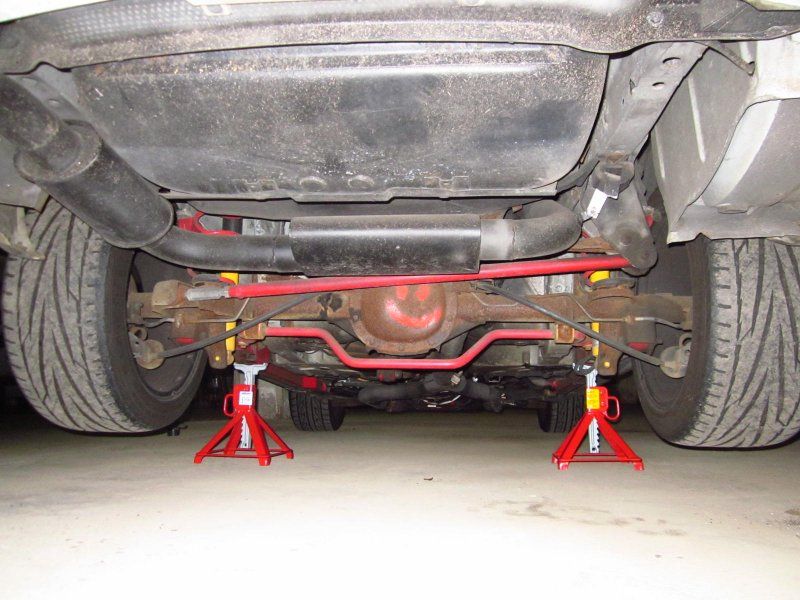
Notice the American made jackstards
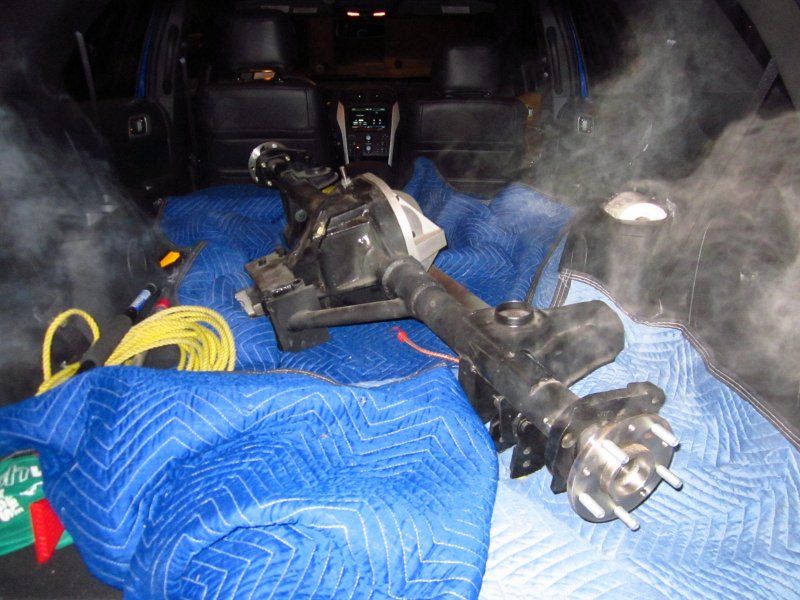
My friends dad was nice enough to let me use his brand new Ford Explorer to move the behemoth.
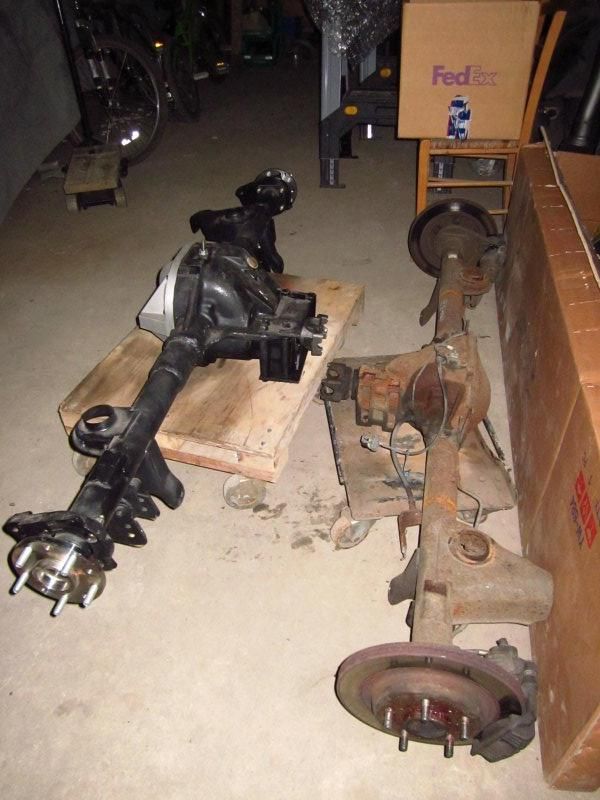
Face to face.
Right about here i realized that i needed to do my fair share of derusting to the underbody. The shocks and panhard bar came out shortly after to get cleaned.
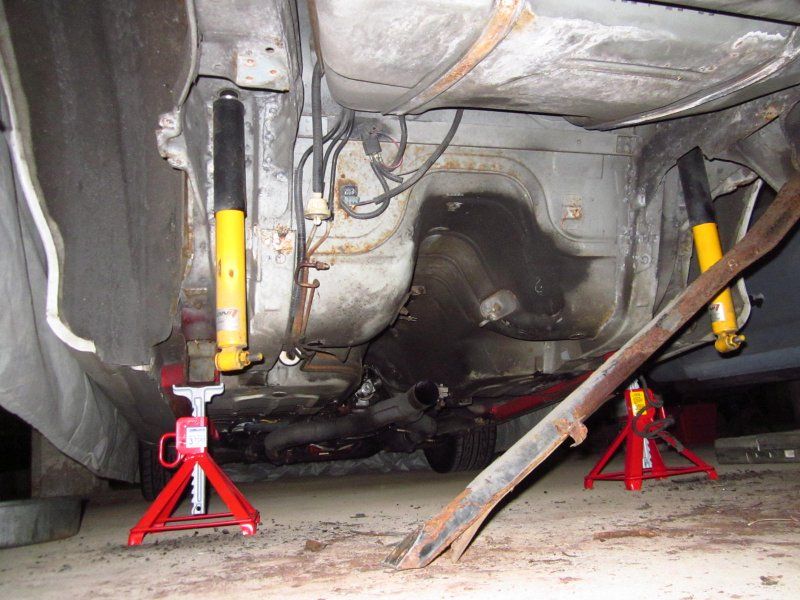
Think ive bottomed out the car? Hahaha
After about a week of grinding, cleaning and painting. It was ready for reassembly.
First test fit.
First test fit results.

The torque arm mount that I madr for my 8.8 was slightly farther Left then stock. I knew this when making it and didnt worry to much because my TA has 2 sets of holes for mounting. Alittle magic with a 3lbs hammer and Viola!

Those pic's are from when there as no suspension in and the rear was jacked to the bump stops.
After that was all sorted out everything else went in. The biggest task by far was my brake lines. I purchased new, stock fitted stainless steel hardlines and hoses. Well, the 8.8 pumpkin is much larger then the only 7.5". Afew bends and new 3rd brake line mount and it was all buttoned up and bled.
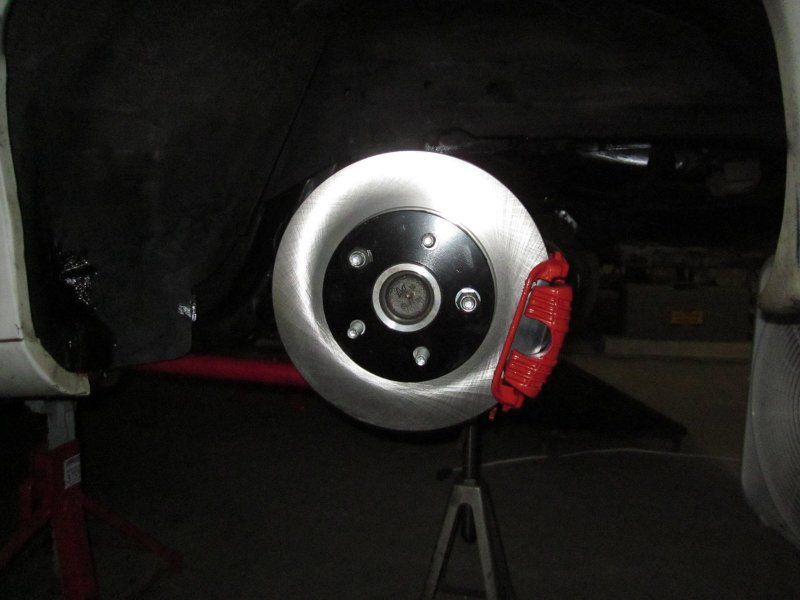
Completely new brakes.
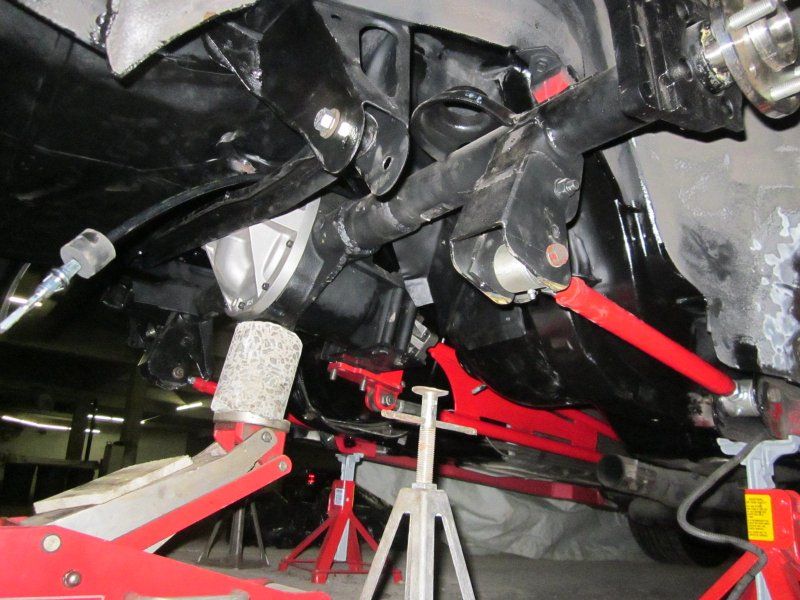
I always had a fear of having the spring 'unseat' itself and falling out. To ease my worrying mind i made these slip fit extensions and welded them in from the bottom.

Doing that will also allow me to put spacers under the spring to adjust the ride height if i ever wanted too.
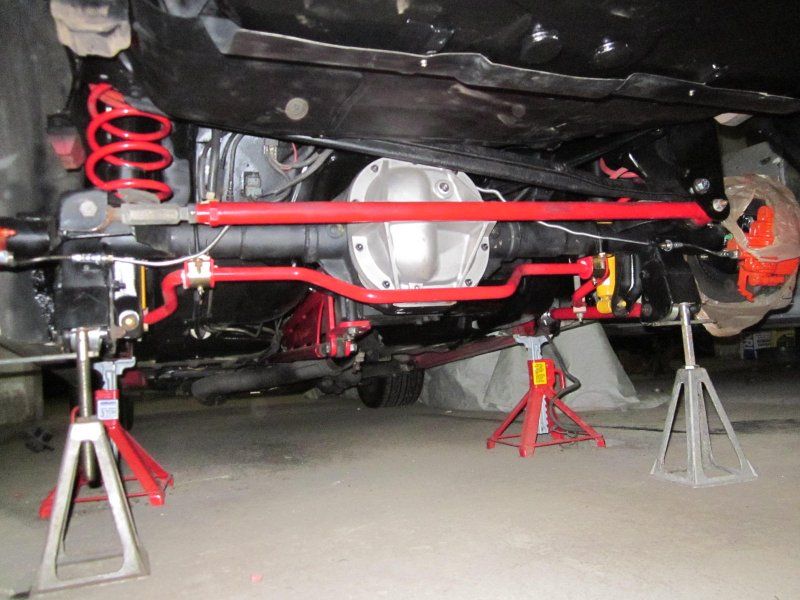
100% Together and looking fine! At this point i was very happy with how everything turned out. I ran into Minimal issues and hoped to not have anything else pop up from driving.
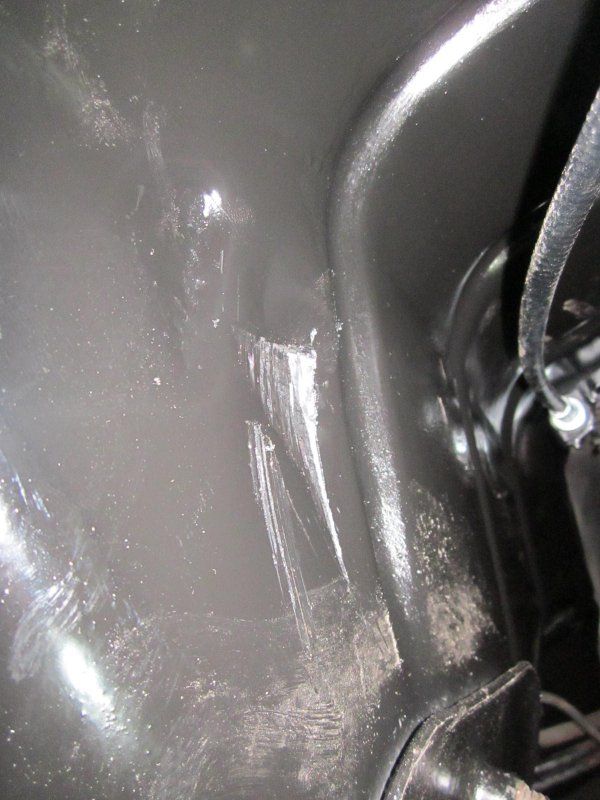
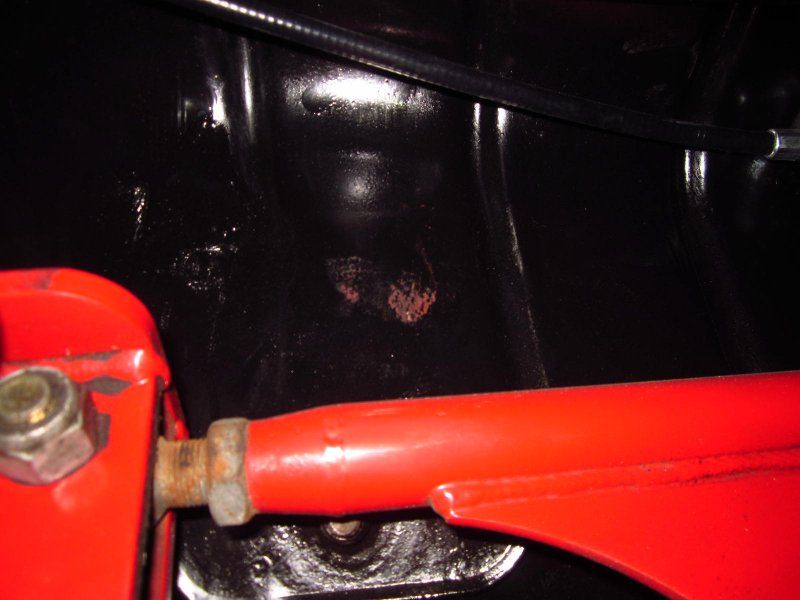
I took it out for its first 15 minute heat cycle today and figured id refresh the month old gas that was in her. It was much smoother from a stand still! Before with the stock 3.42 gears and the slightly taller tire it would buck and chatter severely. It was considerably smoother, even with a bad clutch. The 3 mile journey was going great! Until i his a small speed bump and it felt like my car bottomed out. Despite the fact that I was only doing 5 mph. It felt like the entire suspension was solid when I hit it. I drove it back into the garage and found these.
This one wasnt so bad.
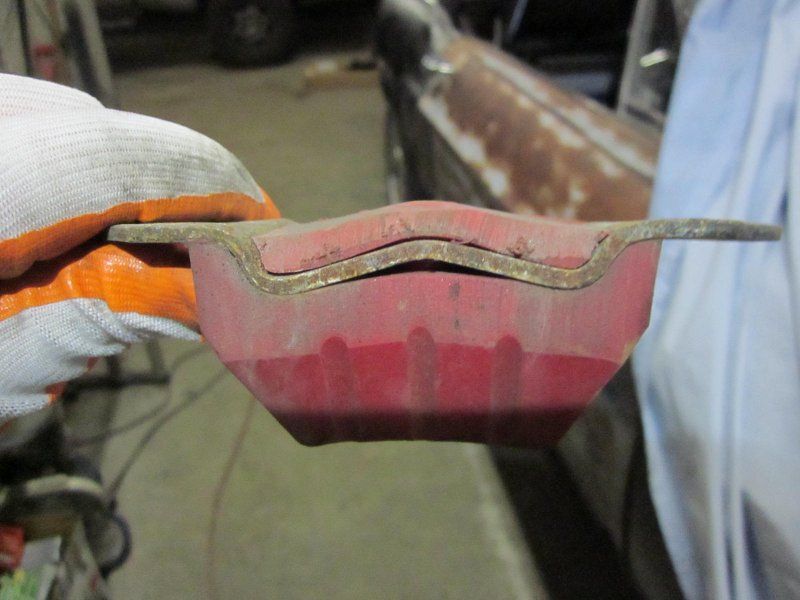
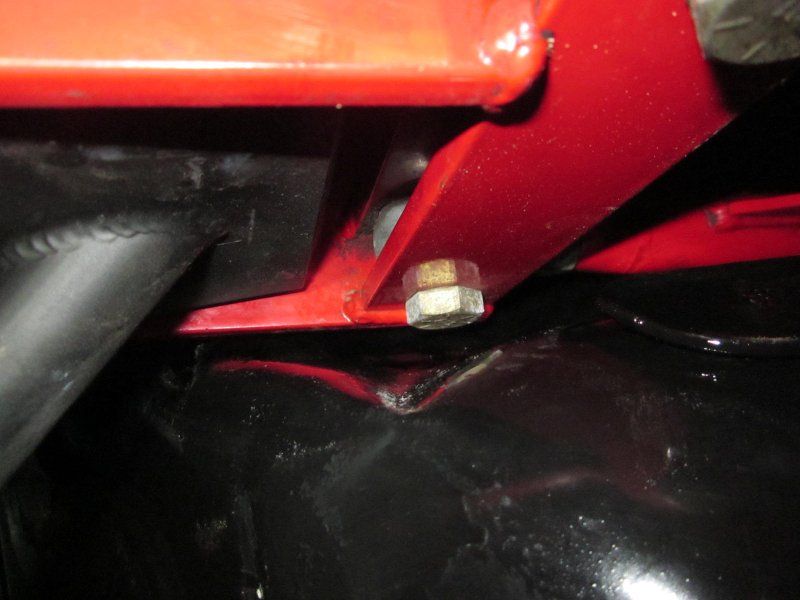
This one worried me.
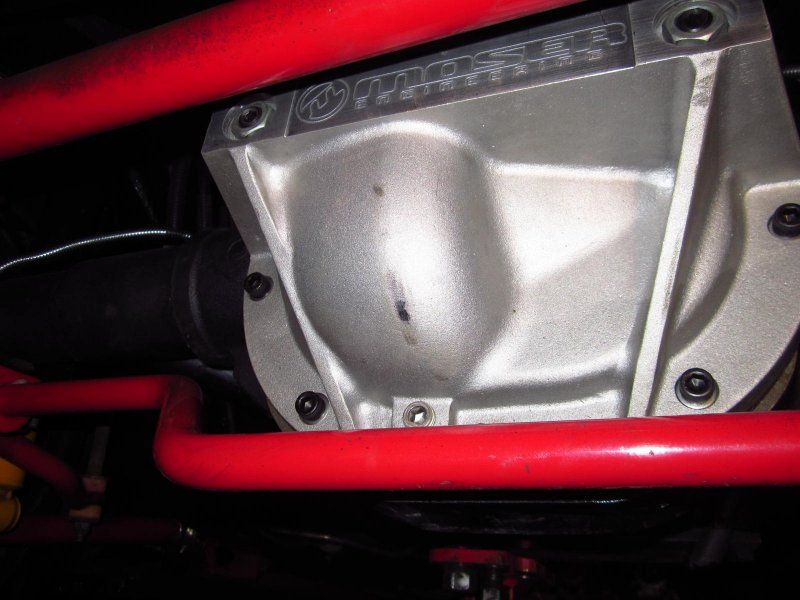
Because the pumpkin is so much larger, and the moser diff cover is much thicker. The entire assembly sticks much farther out then the stock rear. So whenever the suspension cocked the anti sway bar would bottom itself into the diff cover preventing it from moving. It was wedging itself together.
Im going to clearance the trans tunnel and call that one fixed but with the anti sway bar. Im going to first make spacers to space it down and see if it will clear. Im going to try my best to avoid grinding the cover.
All in all im Very happy. Afew issues.. No problem! I jacked up the front and started tearing down for the clutch replacement shortly after. I pulled off the slave cylinder to have this hit me in the head.
 WTF! I said... Where the f#ck did that come from???? After i saw that i stopped for the day. Tomorrow the trans will be out and ill find out exactly what is happening.. Sorry for the waiting everyone. Im very happy to finally have it in. Even if its not 100%
I was nervous with this build from the jump. I was worried about things not fitting properly and causing more issues then what it would be worth. As is any project however, especially on a custom car. Nothing will ever be 100% right off the bat.
Step one, get the back of the car in position.
Notice the American made jackstards
My friends dad was nice enough to let me use his brand new Ford Explorer to move the behemoth.
Face to face.
Right about here i realized that i needed to do my fair share of derusting to the underbody. The shocks and panhard bar came out shortly after to get cleaned.
Think ive bottomed out the car? Hahaha
After about a week of grinding, cleaning and painting. It was ready for reassembly.
First test fit.
First test fit results.
The torque arm mount that I madr for my 8.8 was slightly farther Left then stock. I knew this when making it and didnt worry to much because my TA has 2 sets of holes for mounting. Alittle magic with a 3lbs hammer and Viola!
Those pic's are from when there as no suspension in and the rear was jacked to the bump stops.
After that was all sorted out everything else went in. The biggest task by far was my brake lines. I purchased new, stock fitted stainless steel hardlines and hoses. Well, the 8.8 pumpkin is much larger then the only 7.5". Afew bends and new 3rd brake line mount and it was all buttoned up and bled.
Completely new brakes.
I always had a fear of having the spring 'unseat' itself and falling out. To ease my worrying mind i made these slip fit extensions and welded them in from the bottom.
Doing that will also allow me to put spacers under the spring to adjust the ride height if i ever wanted too.
100% Together and looking fine! At this point i was very happy with how everything turned out. I ran into Minimal issues and hoped to not have anything else pop up from driving.
I took it out for its first 15 minute heat cycle today and figured id refresh the month old gas that was in her. It was much smoother from a stand still! Before with the stock 3.42 gears and the slightly taller tire it would buck and chatter severely. It was considerably smoother, even with a bad clutch. The 3 mile journey was going great! Until i his a small speed bump and it felt like my car bottomed out. Despite the fact that I was only doing 5 mph. It felt like the entire suspension was solid when I hit it. I drove it back into the garage and found these.
This one wasnt so bad.
This one worried me.
Because the pumpkin is so much larger, and the moser diff cover is much thicker. The entire assembly sticks much farther out then the stock rear. So whenever the suspension cocked the anti sway bar would bottom itself into the diff cover preventing it from moving. It was wedging itself together.
Im going to clearance the trans tunnel and call that one fixed but with the anti sway bar. Im going to first make spacers to space it down and see if it will clear. Im going to try my best to avoid grinding the cover.
All in all im Very happy. Afew issues.. No problem! I jacked up the front and started tearing down for the clutch replacement shortly after. I pulled off the slave cylinder to have this hit me in the head.
WTF! I said... Where the f#ck did that come from???? After i saw that i stopped for the day. Tomorrow the trans will be out and ill find out exactly what is happening.. Sorry for the waiting everyone. Im very happy to finally have it in. Even if its not 100% 


Trending Topics
02-18-2013, 09:54 PM
#8
TECH Fanatic
iTrader: (26)

Join Date: Mar 2010
Location: Milledgeville, GA
Posts: 1,909
Likes: 0
Received 0 Likes
on
0 Posts
Looking good. I know you are happy to finally have it in and not have to worry about breaking the little 7.5" any time you wanna play. Hopefully your clutch issues aren't too bad.
02-18-2013, 10:15 PM
#9
Thanks guys!  I got the trans and clutch pulled out today. Trans looks fine but the Clutch was destroyed!
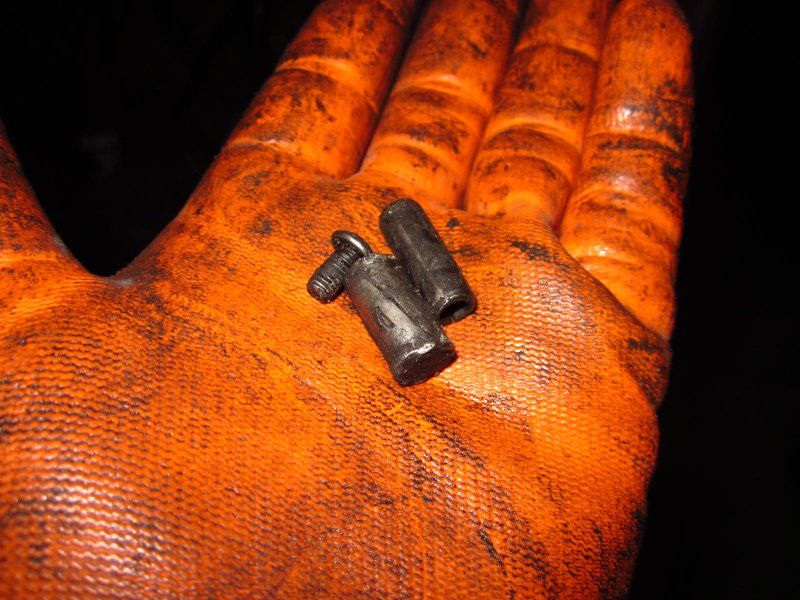
I know what these are tho. The roll pin is from my pressure plate. Pulled out somehow. The screw is also from my pressure plate and the guide pin is the one that connects my transmission to my bellhousing!It slide out from the trans into the bellhousing and went round and round afew times. My Clutch plate was worn down to almost nothing. My clutch face and pressure plate were badly heat damaged. All will be replaced soon 
I also found that my new rubber trans mount was ripped clean in half! Going back to my polyurethane one when it all goes back together. Ill post pictures tomorrow
I got the trans and clutch pulled out today. Trans looks fine but the Clutch was destroyed! I know what these are tho. The roll pin is from my pressure plate. Pulled out somehow. The screw is also from my pressure plate and the guide pin is the one that connects my transmission to my bellhousing!
It slide out from the trans into the bellhousing and went round and round afew times. My Clutch plate was worn down to almost nothing. My clutch face and pressure plate were badly heat damaged. All will be replaced soon I also found that my new rubber trans mount was ripped clean in half! Going back to my polyurethane one when it all goes back together. Ill post pictures tomorrow
02-18-2013, 10:19 PM
#10
TECH Fanatic
iTrader: (26)
Join Date: Mar 2010
Location: Milledgeville, GA
Posts: 1,909
Likes: 0
Received 0 Likes
on
0 Posts
I've read good things about Competition Clutches from here in GA. There's a long thread on here about them. I'm still rocking the Duralast clutch with no problems so far. LOL
02-19-2013, 10:21 AM
#14
Glad to see its done SOX, Mine has been on hold since Thanksgiving. I just stopped at making upper control arms. Just needed a good solid day to finish mock up and finish welds. Reason I on hold is because I need to pull my motor. I either have a spun bearing or something else major. Unfortunately I have to wait till I fix my wife's Jeep first. A good thing is I have a LQ4 short block that may go in  depending on what I find with the LS.
depending on what I find with the LS.
02-19-2013, 05:42 PM
#15
Stage 4
Ive heard alot of good things about the Ram's aswell. I went with there aluminum flywheel. Its a nice looking piece!
Ah that sucks man! Engine problems are Never a good thing. Goodluck with it!
Glad to see its done SOX, Mine has been on hold since Thanksgiving. I just stopped at making upper control arms. Just needed a good solid day to finish mock up and finish welds. Reason I on hold is because I need to pull my motor. I either have a spun bearing or something else major. Unfortunately I have to wait till I fix my wife's Jeep first. A good thing is I have a LQ4 short block that may go in depending on what I find with the LS.
depending on what I find with the LS. 02-19-2013, 10:50 PM
#17
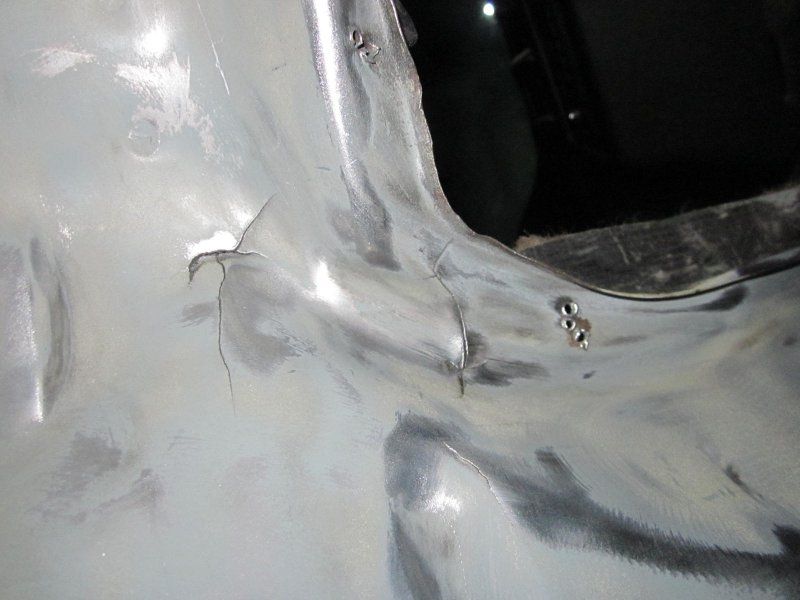
Some lovely stress cracks by my shifter hole
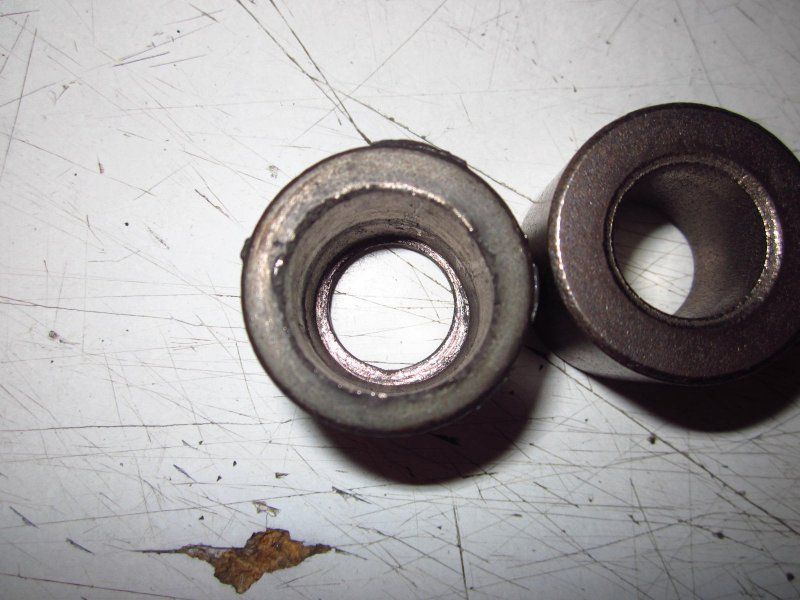
Torn up pilot bushing vs new
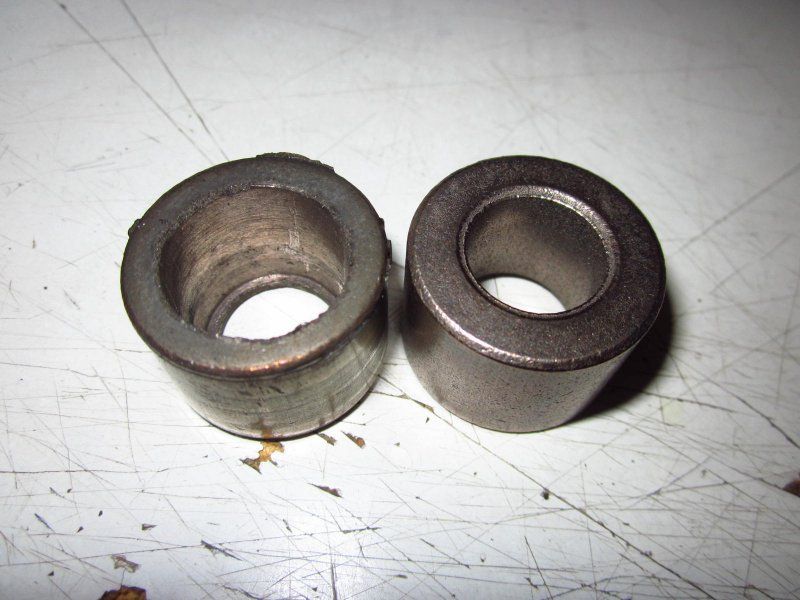
Notice how offset the wear hole is in relation to the OD.. I think thats from the guide pin falling out and cocking the transmission. That mixed with my torn trans mount made for disaster
 02-21-2013, 10:40 PM
#18
When it rains it pours.... and when it pours it floods... So rear is dont. Time to do the clutch. Fine and dandy. Clean everything up and paint it.. No problem.. Pull out my Brand spanking new Ram aluminum flywheel and bolt her up (of course cleaning the crank and making sure there were no burrs...) and finding out that my runout is .014"  Pull it off afew times to make sure that its seated probably and again and again. The exact same numbers.
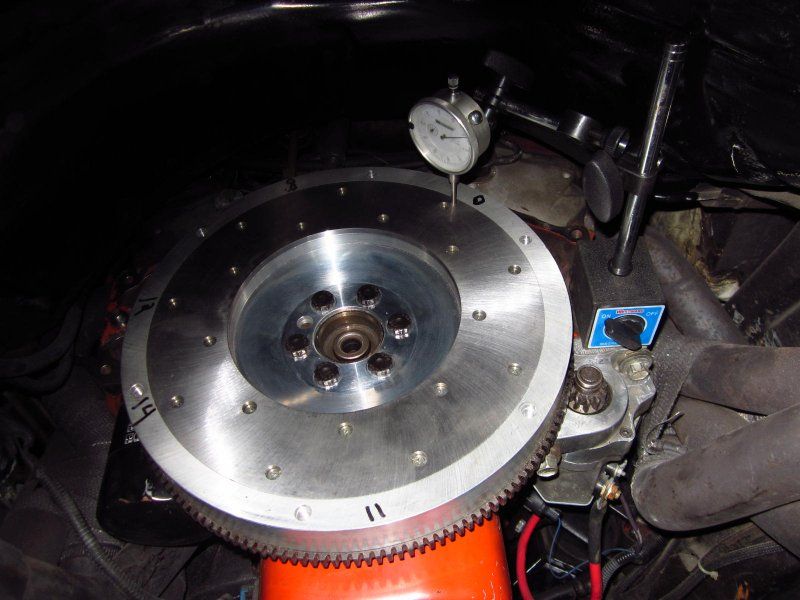
Took it to work today to see if this Brand new flywheel of mine was cut properly from factory....
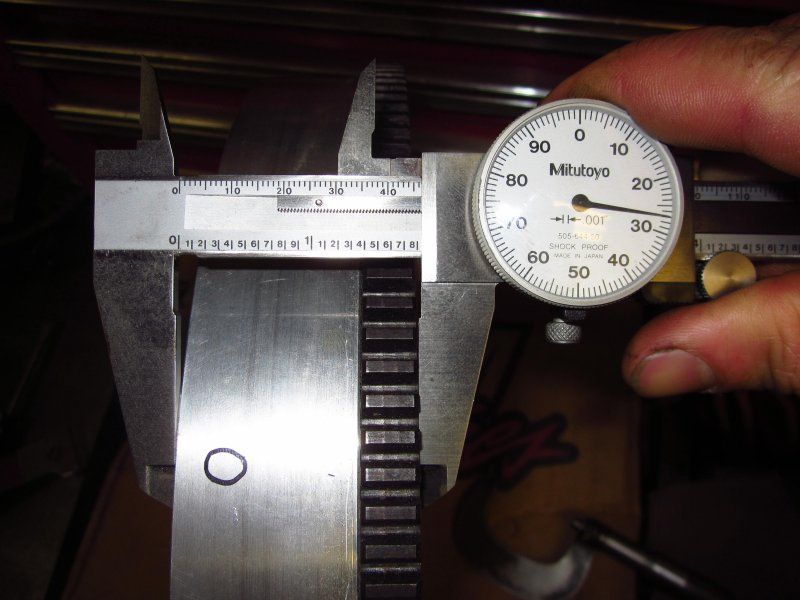
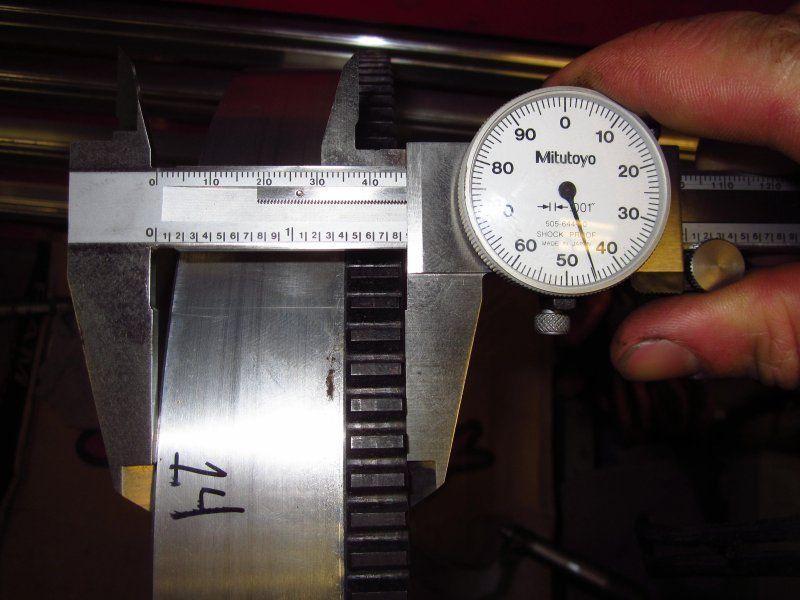
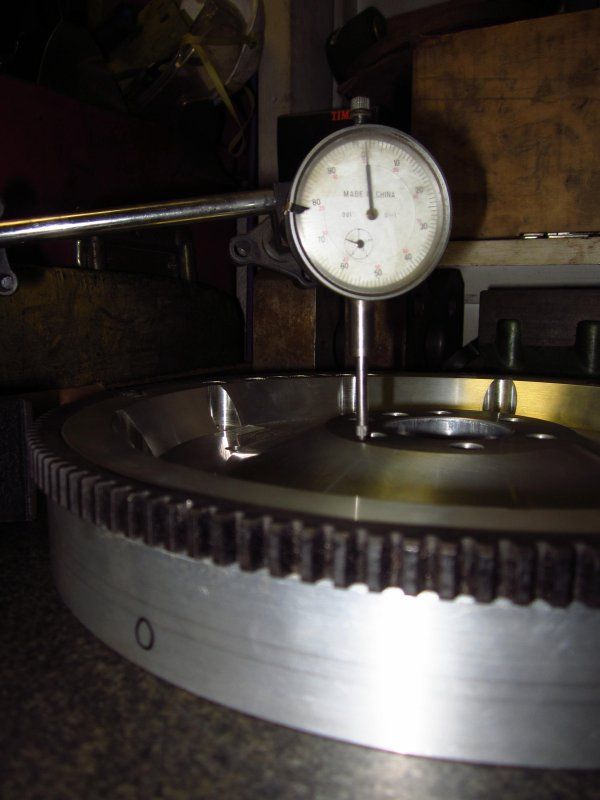
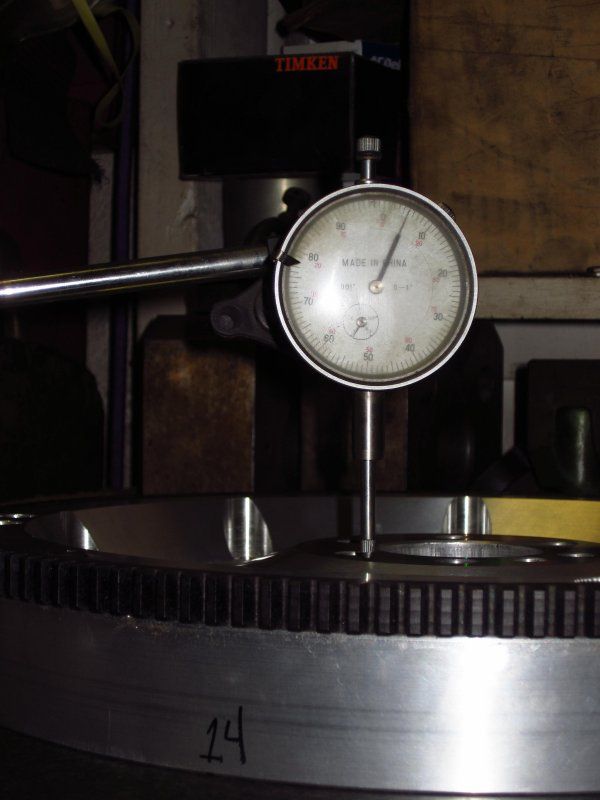
Nope..... Its completely wrong. The back of the flywheel is perfect. Where it bolts to the crank and where the ring gear for the starter goes is all in check. The face of the flywheel was cut crooked And to make matters worse.. I have to be out of my friends garage this weekend! So i cant even send the flywheel back for a new one!...... yay
Pull it off afew times to make sure that its seated probably and again and again. The exact same numbers.Took it to work today to see if this Brand new flywheel of mine was cut properly from factory....
Nope..... Its completely wrong. The back of the flywheel is perfect. Where it bolts to the crank and where the ring gear for the starter goes is all in check. The face of the flywheel was cut crooked
And to make matters worse.. I have to be out of my friends garage this weekend! So i cant even send the flywheel back for a new one!...... yay
02-22-2013, 05:46 AM
#19
TECH Fanatic
iTrader: (26)
Join Date: Mar 2010
Location: Milledgeville, GA
Posts: 1,909
Likes: 0
Received 0 Likes
on
0 Posts
Throw a stock one, or stock replacement, in and ride. You can send that one back for replacement and swap it in down the road. You'll be able to tell how much you like the difference better that way. Changing it now you wouldn't be able to tell since you are changing so many things at once. Don't get me wrong, it I had it and was doing the work anyway I'd put it in....I'm just saying it won't be that bad to wait and do that one thing later.
02-22-2013, 05:31 PM
#20
Thats what i did. I got a brand new stock acdelco unit for $180!  Its atad expensive but I need it. I did the same checks that I did on the ram flywheel and its perfect! Ill have it bolted up tomorrow and if all checks well the car will be done by sunday
Its atad expensive but I need it. I did the same checks that I did on the ram flywheel and its perfect! Ill have it bolted up tomorrow and if all checks well the car will be done by sunday