
LS1 Rear brakes installed into 2nd Gen - Shock relocation NOT needed.
 03-18-2013, 05:28 PM
#1

Well, the subject says it all. I wanted the nicer bigger brakes but didn't want to futz with the shock setup. I put this in the brakes forum, but figured it might be helpful to post here as well.
Requirements:
Step one: drain and open your rear diff, take off your tires, and remove all the old brake hardware. I went from disc to disc, and already had a Wilwood prop valve in place, so nothing special was needed for me. Original drum brake guys will certainly want a new prop valve.
Step two: if anything looks bad or damaged inside your diff, this would be a good time to fix it. My diff is new, so no worries there. Take out the main differential carrier pin (requires 5/16 socket on 2nd Gens), push your axles inward, remove the axle c-clips and set them aside. Pull out the axle. Have a towel handy. This is messy.
Step three: immediate gratification. Do the passenger side first. It is idiot-simple, and requires no special work beyond sliding the axles out to get the plate mounted. I used the driver-side backing plate from a 4th gen F-body donor on the passenger side of my 2nd gen toy. I added 1/4 inch of washers between the plate and the axle in order to center the rotor properly in the caliper bracket. I also retained the parking brake. The lever even pulls in the correct direction to work with the 2nd gen E-brake cable. Woo Hoo!
Step four: Drudgery. The driver side requires thought. I didn't want to get into cutting and welding if I could avoid it (my welding skills aren't so hot). I also wanted to avoid clearance problems with the front of the tire well. Keeping in mind that this car is not a beauty queen (see my sig), and e-brakes aren't a big concern, I aligned the passenger side 4th gen plate in various positions until I got something that worked. There are three ways that do this:
1. Rotating the passenger-side plate a quarter turn so that it places the caliper at 12 o'clock succeeds in avoiding clearance problems entirely, but makes subsequent bleeding a bit of a chore, since the bleeder would not be at the top of the caliper body. If you go this route, you first align the plate such that the caliper mount holes are the top and the bottom left and upper right axle flange bolts line up. Only two bolt holes will line up.
2. Rotating the passenger-side plate a half turn so that it places the caliper at 9 o'clock succeeds in eliminating the bleeding problem, but introduces the slight possibility of contact between the bleeder and the wheel well when the suspension is compressed hard. If you go this route, you'll need to align the plate such that the caliper holes are toward the front of the vehicle and the two bolt holes furthest from the caliper align with the axle flange holes closest to the shock. Only two bolt holes will line up. This is the route I took.
3. Get another driver side LS1 backing plate and use it instead. Aligned such that all four bolt holes line up, it positions the caliper at roughly 10:30 clock position, and has the very strong likelihood of contact between the bleeder and the body. Only about 1 inch of suspension travel would be needed before contact. If you don't mind doing a LOT of BFH massage work on the tire well, go for it. I'm lazy and cheap.
With options 1 or 2, drilling is involved in order to get all four axle flange bolt holes to line up. You are taking your life in your hands if you don't use all four bolts. Start by bolting down the plates snugly to the axle flange as mentioned above (don't use washers yet, that comes later). If you do this right, the backing plate will self-center on the axle end. Then do a light spray with primer across the back of the plate and axle mounting surface. You can see where I sprayed the plate below. Then, unbolt the plate, center-punch the dots where you need to drill, and drill your plate. Start with a small bit to make a pilot, and graduate up to the 7/16.
Picture taken from the bottom. Leaf spring at the upper edge, axle to the left. Don't worry, I only used the carriage bolts for mock up. I used 10.8 spec 12mm bolts for the final assembly.

Step five: Test fit & center the rotor in the caliper mount: take 4 grade-8 bolts, and insert them into the axle flange holes so the threaded part sticks out. Then, put on the approprate amount of washers to center the rotor in the caliper backet. A 1/4 inch is a good starting point. I started with no washers/shimming, and required a couple go-rounds of test fitting to get things right. I had to put the washers on, bolt the bracket down, slide the axle in, put the c-clip in place, slide the main pin into the diff so the axle won't move, bolt on a rotor, and then bolt on the caliper. It's a pain, but don't skimp on this. This pic shows what my backing plate looks like after being drilled and putting all the bolts and washers in place. When doing the final plate install, make sure to put a drop of red lock-tite on the axle flange bolt threads.

Step Six: Assemble your brakes for final fit. Put your c-clips back in, re-install the differential main carrier pin, re-seal and refill the axle. Check for leaks. Hand spin the rotors to see if any weird noises or resistance occurs. Note the signs of BFH massage work on the wheel well. This was done to increase the suspension travel distance before potential contact between the bleeder and the car body (up to approximately 4" from 2.5" pre-BFH)

Step seven: Wheel fitment. Put your wheels on and see if they fit. Hand spin and be careful to note any grinding or contact between the wheel and the caliper. This wheel is a 16x8 Trans Am GTA mesh wheel and clears the caliper by about 3/8 of an inch.

After the upgrade, I took the car out for a spin. The brakes are much better, and I've eliminated the pad knock-back issue I had with the original 1981 WS6 rear discs.
Requirements:
- backing plates from a 1998-2002 LS1 4th gen Camaro/firebird/Trans Am donor car.
- 2 driver-side Ls1 rear calipers
- 2 rotors for 1998-2002 LS1 F-body
- New brake pads for 1998-2002 LS1 F-body. I used EBC Yellow
- 8 new grade-8 3/8 bolts that are 1.5" or 2" I used fine thread (24 TPI)
- 8 grade-8 nuts and enough washers to center the brake brackets
- Red lock-tite
- A drill + 7/16 drill bit.
- spray paint.
- A "BFH" body massaging device.

- (optional) adjustable proportioning valve.
- new brake lines / fittings appropriately made to connect the new calipers to the 2nd gen plumbing.
Step one: drain and open your rear diff, take off your tires, and remove all the old brake hardware. I went from disc to disc, and already had a Wilwood prop valve in place, so nothing special was needed for me. Original drum brake guys will certainly want a new prop valve.
Step two: if anything looks bad or damaged inside your diff, this would be a good time to fix it. My diff is new, so no worries there. Take out the main differential carrier pin (requires 5/16 socket on 2nd Gens), push your axles inward, remove the axle c-clips and set them aside. Pull out the axle. Have a towel handy. This is messy.
Step three: immediate gratification. Do the passenger side first. It is idiot-simple, and requires no special work beyond sliding the axles out to get the plate mounted. I used the driver-side backing plate from a 4th gen F-body donor on the passenger side of my 2nd gen toy. I added 1/4 inch of washers between the plate and the axle in order to center the rotor properly in the caliper bracket. I also retained the parking brake. The lever even pulls in the correct direction to work with the 2nd gen E-brake cable. Woo Hoo!
Step four: Drudgery. The driver side requires thought. I didn't want to get into cutting and welding if I could avoid it (my welding skills aren't so hot). I also wanted to avoid clearance problems with the front of the tire well. Keeping in mind that this car is not a beauty queen (see my sig), and e-brakes aren't a big concern, I aligned the passenger side 4th gen plate in various positions until I got something that worked. There are three ways that do this:
1. Rotating the passenger-side plate a quarter turn so that it places the caliper at 12 o'clock succeeds in avoiding clearance problems entirely, but makes subsequent bleeding a bit of a chore, since the bleeder would not be at the top of the caliper body. If you go this route, you first align the plate such that the caliper mount holes are the top and the bottom left and upper right axle flange bolts line up. Only two bolt holes will line up.
2. Rotating the passenger-side plate a half turn so that it places the caliper at 9 o'clock succeeds in eliminating the bleeding problem, but introduces the slight possibility of contact between the bleeder and the wheel well when the suspension is compressed hard. If you go this route, you'll need to align the plate such that the caliper holes are toward the front of the vehicle and the two bolt holes furthest from the caliper align with the axle flange holes closest to the shock. Only two bolt holes will line up. This is the route I took.
3. Get another driver side LS1 backing plate and use it instead. Aligned such that all four bolt holes line up, it positions the caliper at roughly 10:30 clock position, and has the very strong likelihood of contact between the bleeder and the body. Only about 1 inch of suspension travel would be needed before contact. If you don't mind doing a LOT of BFH massage work on the tire well, go for it. I'm lazy and cheap.
With options 1 or 2, drilling is involved in order to get all four axle flange bolt holes to line up. You are taking your life in your hands if you don't use all four bolts. Start by bolting down the plates snugly to the axle flange as mentioned above (don't use washers yet, that comes later). If you do this right, the backing plate will self-center on the axle end. Then do a light spray with primer across the back of the plate and axle mounting surface. You can see where I sprayed the plate below. Then, unbolt the plate, center-punch the dots where you need to drill, and drill your plate. Start with a small bit to make a pilot, and graduate up to the 7/16.
Picture taken from the bottom. Leaf spring at the upper edge, axle to the left. Don't worry, I only used the carriage bolts for mock up. I used 10.8 spec 12mm bolts for the final assembly.
Step five: Test fit & center the rotor in the caliper mount: take 4 grade-8 bolts, and insert them into the axle flange holes so the threaded part sticks out. Then, put on the approprate amount of washers to center the rotor in the caliper backet. A 1/4 inch is a good starting point. I started with no washers/shimming, and required a couple go-rounds of test fitting to get things right. I had to put the washers on, bolt the bracket down, slide the axle in, put the c-clip in place, slide the main pin into the diff so the axle won't move, bolt on a rotor, and then bolt on the caliper. It's a pain, but don't skimp on this. This pic shows what my backing plate looks like after being drilled and putting all the bolts and washers in place. When doing the final plate install, make sure to put a drop of red lock-tite on the axle flange bolt threads.
Step Six: Assemble your brakes for final fit. Put your c-clips back in, re-install the differential main carrier pin, re-seal and refill the axle. Check for leaks. Hand spin the rotors to see if any weird noises or resistance occurs. Note the signs of BFH massage work on the wheel well. This was done to increase the suspension travel distance before potential contact between the bleeder and the car body (up to approximately 4" from 2.5" pre-BFH)
Step seven: Wheel fitment. Put your wheels on and see if they fit. Hand spin and be careful to note any grinding or contact between the wheel and the caliper. This wheel is a 16x8 Trans Am GTA mesh wheel and clears the caliper by about 3/8 of an inch.
After the upgrade, I took the car out for a spin. The brakes are much better, and I've eliminated the pad knock-back issue I had with the original 1981 WS6 rear discs.
Last edited by 1981TA; 03-18-2013 at 06:40 PM.
 03-18-2013, 07:04 PM
#2
Launching!
iTrader: (1)
Join Date: Apr 2011
Location: Adamsville Tennessee
Posts: 231
Likes: 0
Received 0 Likes
on
0 Posts
After the change did your wheels/tires move outward/ toward the outer fender? If so, how much?
Is the parking brakes made on the calibers or are they similar to the trucks and have a hub/disc configuration? I never paid any attention to the 2 Gen 4's I owned.
Is the parking brakes made on the calibers or are they similar to the trucks and have a hub/disc configuration? I never paid any attention to the 2 Gen 4's I owned.
03-19-2013, 04:14 PM
#5
TECH Fanatic
iTrader: (27)

That is a great swap, and I look forward to doing mine soon. I have all the parts just waiting to finish my LS1 swap. And FWIW, you can use a right and left side assembly if you move the passengers side shock rearward about 1" and drill a new hole. I saw it done on another site and by doing that it isn't going to change the shocks dampening capabilities any significant amount. It saves the hassle of buying two complete left sides. Looks great though.
And quick question, Why did you have to drill new holes in the backing plates? I though that they were direct bolt on?
Looks great, thanks for sharing.
And quick question, Why did you have to drill new holes in the backing plates? I though that they were direct bolt on?
Looks great, thanks for sharing.
03-19-2013, 05:06 PM
#6
Hi Rye, glad you like it. I did it to position the caliper such that it had the greatest chance to avoid bleeder to wheel well contact. It would have been direct bolt on with a second driver side plate, but that put it much closer to the inner wheel well sheet metal. The drilling wasn't hard, since it's just iron. Steel would have been a real pain.
03-19-2013, 07:46 PM
#7
Launching!
iTrader: (7)

Join Date: Dec 2006
Location: Maryland
Posts: 252
Likes: 0
Received 0 Likes
on
0 Posts
well I would never redrill that plate.... plus you have to get new caliper here is how I did mine....
Ok, for those of us that want 4 wheel disc, dont care for the factory discs, and want better braking here is my DIY for some 4th gen brakes...
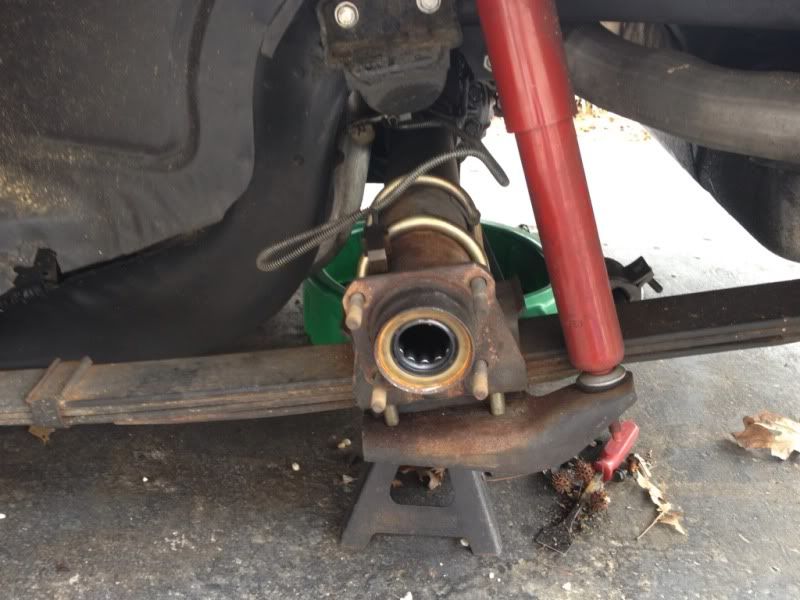
First you need everything stripped down, backing plates and all will be removed it will look like this :
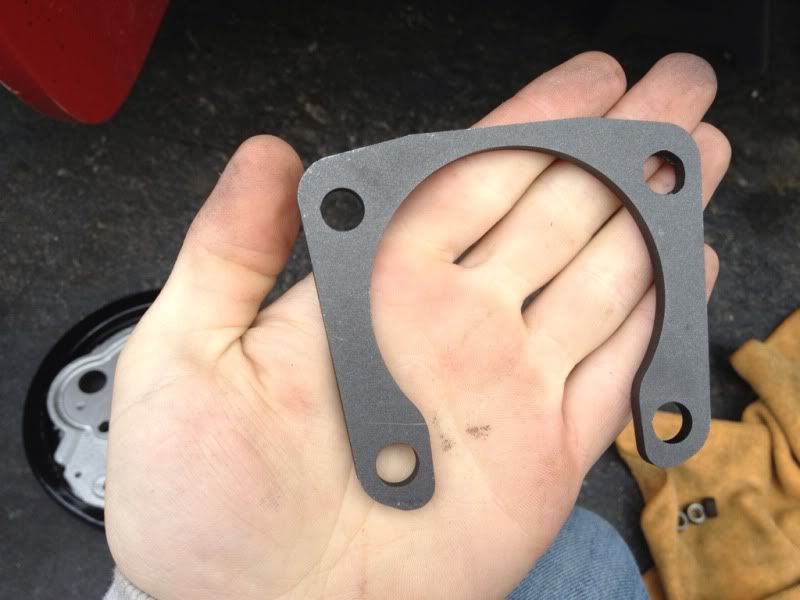
Next you will want some spacers to properly locate the caliper to the center of the rotor, most seem to be getting right around 3/16" I got mine from BRP hot rods, they are pre cut and cheap...
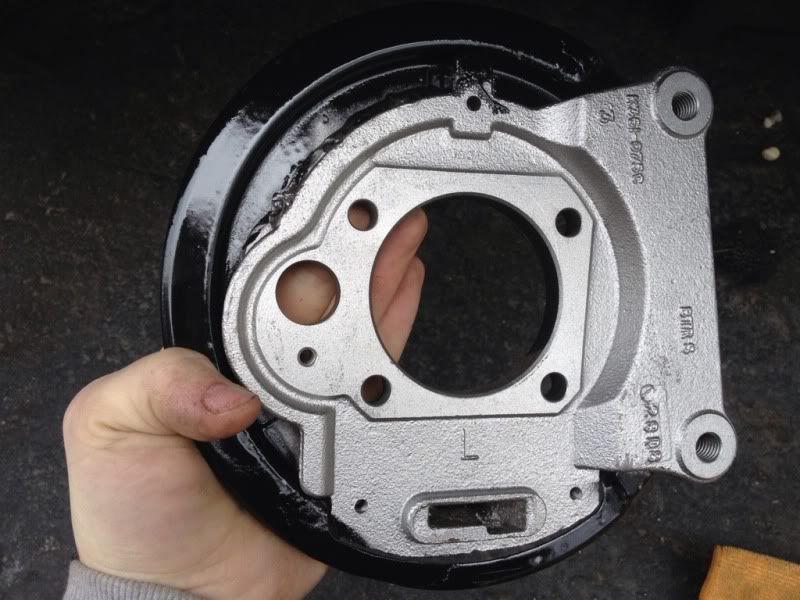
after the spacer comes the 4th gen backing plate:

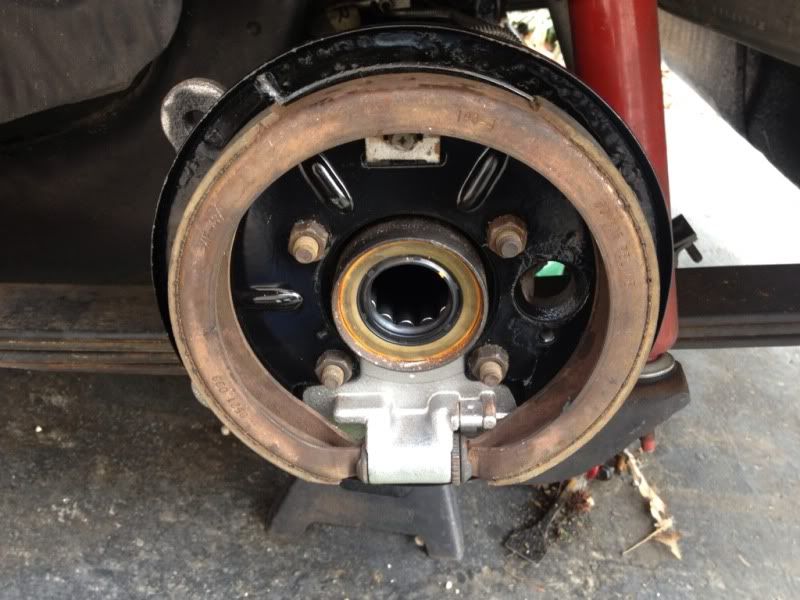
Now is a good time to install the parking brake internals:
Then axle, which I do not have a pic of...
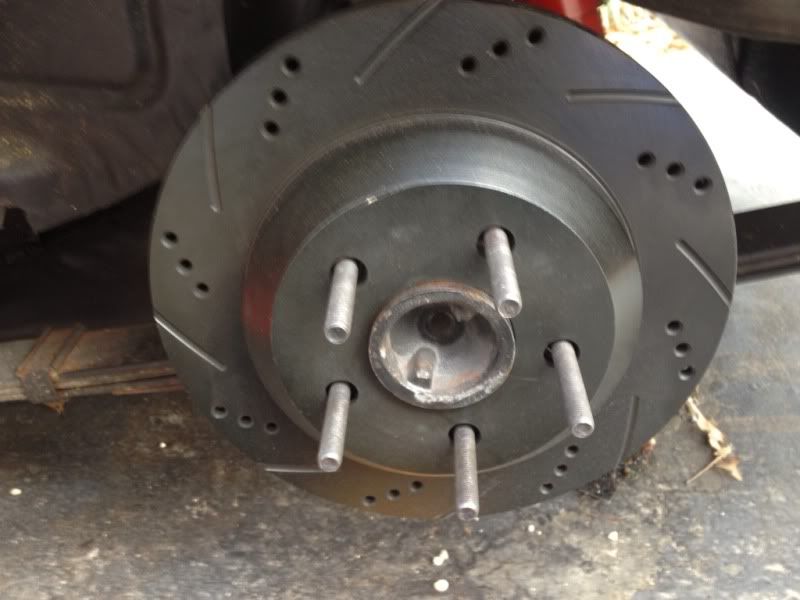
Then rotor:
Then caliper:

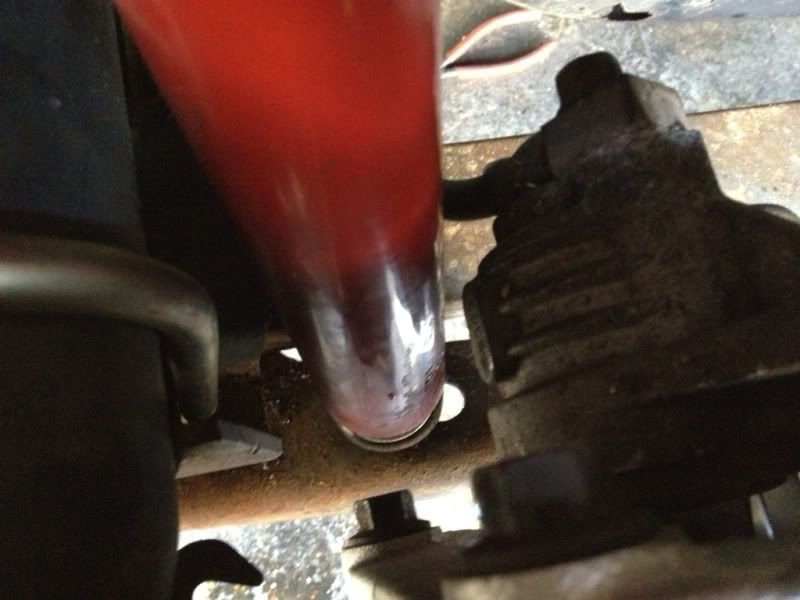
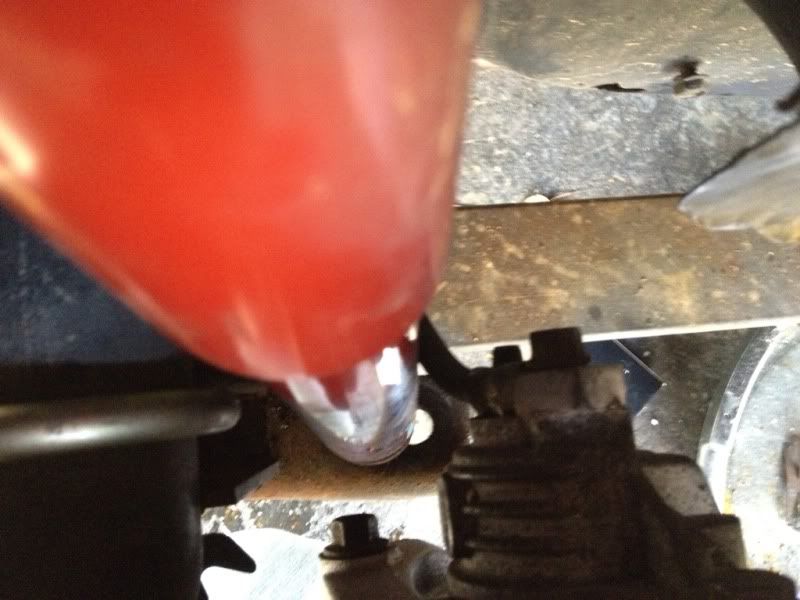
Then you are done! Repeat the same steps for the passenger side, but if you want to use the L and R 4th gen side, you will need to move the shock just a little.... here is a good pic for reference...
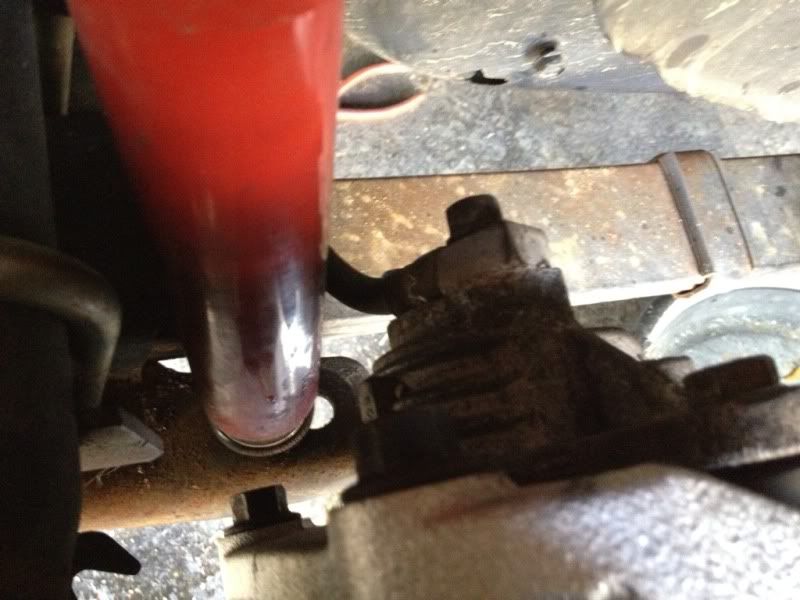
and for anybody worried that the caliper might ever possibly come in contact with the shock.. here is the caliper at extremes...
Ok, for those of us that want 4 wheel disc, dont care for the factory discs, and want better braking here is my DIY for some 4th gen brakes...
First you need everything stripped down, backing plates and all will be removed it will look like this :
Next you will want some spacers to properly locate the caliper to the center of the rotor, most seem to be getting right around 3/16" I got mine from BRP hot rods, they are pre cut and cheap...
after the spacer comes the 4th gen backing plate:
Now is a good time to install the parking brake internals:
Then axle, which I do not have a pic of...
Then rotor:
Then caliper:
Then you are done! Repeat the same steps for the passenger side, but if you want to use the L and R 4th gen side, you will need to move the shock just a little.... here is a good pic for reference...
and for anybody worried that the caliper might ever possibly come in contact with the shock.. here is the caliper at extremes...