MGB Roadster
 06-26-2013, 02:04 PM
#1

Now that the plan is a little more solid and I'm getting some actual work done, I will start a build thread here.
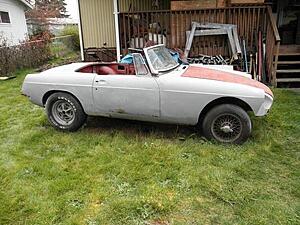
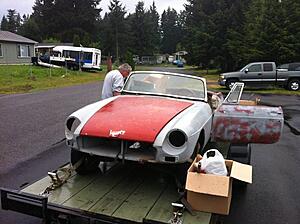
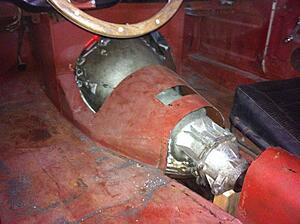
The car is a 1963 MGB roadster that is titled as a '67 by the great state of Washington for some reason. Picked it up on craigslist for $500. It has the firewall set-back and a trans tunnel from a Chrysler of some kind grafted in. A Chrysler 8-3/4" rear has been swapped onto the stock springs. This was a big plus at first, but as you will see in a minute, it is no longer relevant. Previous owner had a plan to stick a Chrysler 318 and automatic in the car and revised the steering shaft by adding a universal joint and a support on the inner fender.
The plan is:
6.0L LQ4 (has rod-bolts, head studs, mild cam, mls gaskets, etc)
Single 76mm or 70mm T4 turbo
TH400 transmission
4-link back-half
Ford 9" rear
Big tires
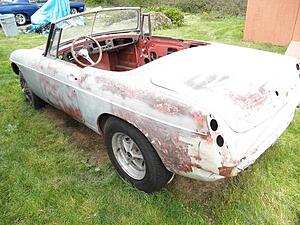
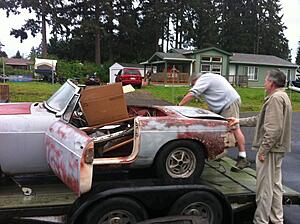
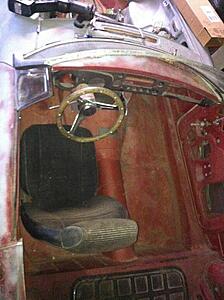
Here's how it looked when I picked it up.
And onto the trailer.
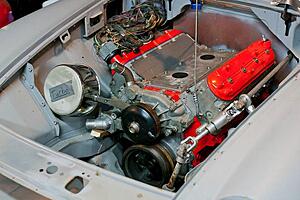
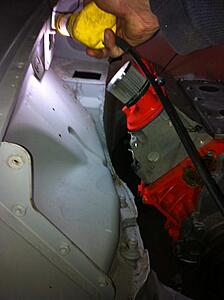
Did some test fitting of the engine.
My helper making engine noises.

The car is a 1963 MGB roadster that is titled as a '67 by the great state of Washington for some reason. Picked it up on craigslist for $500. It has the firewall set-back and a trans tunnel from a Chrysler of some kind grafted in. A Chrysler 8-3/4" rear has been swapped onto the stock springs. This was a big plus at first, but as you will see in a minute, it is no longer relevant. Previous owner had a plan to stick a Chrysler 318 and automatic in the car and revised the steering shaft by adding a universal joint and a support on the inner fender.
The plan is:
6.0L LQ4 (has rod-bolts, head studs, mild cam, mls gaskets, etc)
Single 76mm or 70mm T4 turbo
TH400 transmission
4-link back-half
Ford 9" rear
Big tires
Here's how it looked when I picked it up.


And onto the trailer.


Did some test fitting of the engine.

My helper making engine noises.

Last edited by 1970camaroRS; 06-26-2013 at 06:06 PM.


 06-26-2013, 02:06 PM
#3
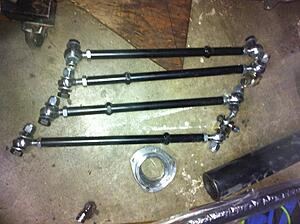
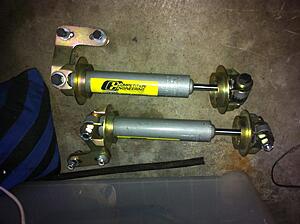
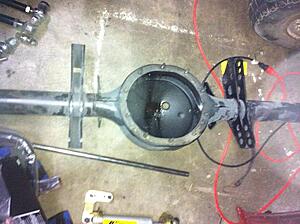
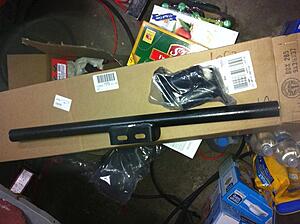
Gathered some parts. Picked up a Competition Engineering 24" wide 4-link back-half kit. It had been tacked in to a guy's truck but he ended up not using it. Came with a cut down 9" housing, centersection and new big-ends. Links and shocks are completely unused. Cost me $500.
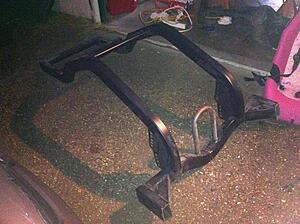
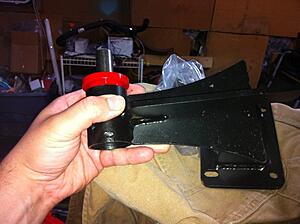
Also picked up these trans-dapt engine mounts and transmission crossmember.
Broke out the pad and pen and measuring tape and made me a couple of pretty pictures.
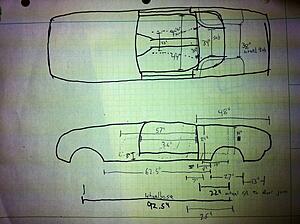
Interesting measurements: 92.5" front wheel centerline to rear wheel centerline (should have been 91"). 25" rear wheel center to the back of the seat.
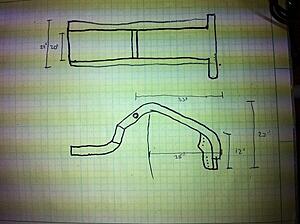
New subframe. 28" from front edge of frame to approximate axle centerline.
Placed the seat in the car and moved it forward until I barely fit. Had to do yoga to get my legs in and out, but the seating position was comfortable.
I marked the back edge of the seat (red/white pen) then I measured from the axle centerline to where the front of the subframe would be. (Black sharpie)
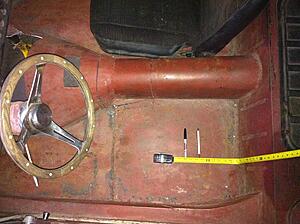
As you can see, I need to work about 2.5" out somewhere. But the good news is I think it will all be able to be worked out.


Also picked up these trans-dapt engine mounts and transmission crossmember.


Broke out the pad and pen and measuring tape and made me a couple of pretty pictures.

Interesting measurements: 92.5" front wheel centerline to rear wheel centerline (should have been 91"). 25" rear wheel center to the back of the seat.

New subframe. 28" from front edge of frame to approximate axle centerline.
Placed the seat in the car and moved it forward until I barely fit. Had to do yoga to get my legs in and out, but the seating position was comfortable.

I marked the back edge of the seat (red/white pen) then I measured from the axle centerline to where the front of the subframe would be. (Black sharpie)

As you can see, I need to work about 2.5" out somewhere. But the good news is I think it will all be able to be worked out.
Last edited by 1970camaroRS; 06-26-2013 at 06:05 PM.
06-26-2013, 02:07 PM
#4
Time to do this again. I'm sure I will be doing this more than once or twice again.
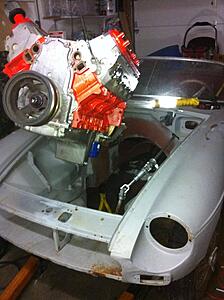
Here we go. It's somewhat level, centered and not rotated too much. Fits nicely! Plenty of room for activities.
Fit's much better in the trans tunnel now. Probably needs to come up just a tad more in the back. I will figure that out once I get a level on it.
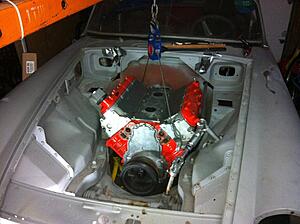
Driver's side exhaust clearance. Plenty of room.
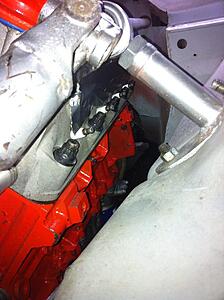
I think I can just route the driver's side exhaust forward and under the oil pan using an oval pipe and up the passenger side to merge.
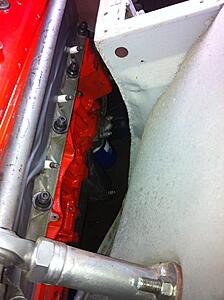
Lots of room on the passenger side for what I'm planning to do. Special note: a lot of this area can be cut up and notched for the exhaust.
That flat area close to the passenger footwell is where the down-pipe will be routed. I will cut a hole there and run a single 3" pipe down the fenderwell and under the car.
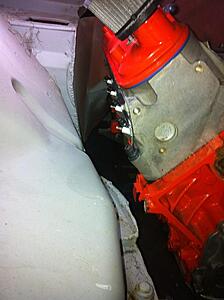
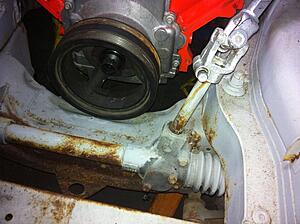
This is what the crank pulley looks like. I need to get a smaller diameter and shorter f-body of Corvette version along with the matching water pump. I will be very close to clearing the suspension crossmember/subframe altogether!
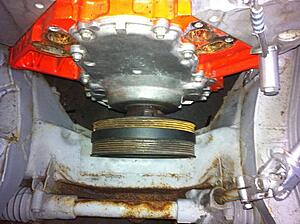
And here's the oilpan! It's a super deep 'muscle car swap' pan from GM. It's the H2 pan and is about 7.5" deep from the rail to the oil drain.
The best I could do to show you how far it sticks below the frame rail (this is actually lower than the crossmember).
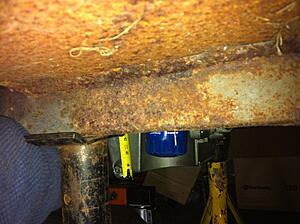
I'm probably going to use an f-body or Corvette pan which is about 5" deep which will suck up most of that 3".
So, there you have it. Not much more before I start to weld in the transmission crossmember and motor mounts. Some more cutting, a different crank pulley, pull out the level and start with the crossmember and mounts.

Here we go. It's somewhat level, centered and not rotated too much. Fits nicely! Plenty of room for activities.

Fit's much better in the trans tunnel now. Probably needs to come up just a tad more in the back. I will figure that out once I get a level on it.

Driver's side exhaust clearance. Plenty of room.

I think I can just route the driver's side exhaust forward and under the oil pan using an oval pipe and up the passenger side to merge.

Lots of room on the passenger side for what I'm planning to do. Special note: a lot of this area can be cut up and notched for the exhaust.

That flat area close to the passenger footwell is where the down-pipe will be routed. I will cut a hole there and run a single 3" pipe down the fenderwell and under the car.

This is what the crank pulley looks like. I need to get a smaller diameter and shorter f-body of Corvette version along with the matching water pump. I will be very close to clearing the suspension crossmember/subframe altogether!


And here's the oilpan! It's a super deep 'muscle car swap' pan from GM. It's the H2 pan and is about 7.5" deep from the rail to the oil drain.

The best I could do to show you how far it sticks below the frame rail (this is actually lower than the crossmember).

I'm probably going to use an f-body or Corvette pan which is about 5" deep which will suck up most of that 3".
So, there you have it. Not much more before I start to weld in the transmission crossmember and motor mounts. Some more cutting, a different crank pulley, pull out the level and start with the crossmember and mounts.
Last edited by 1970camaroRS; 06-26-2013 at 06:04 PM.
 06-26-2013, 06:15 PM
#9
You should stick that 5.3 into your '78. You don't have to do anything as drastic as what I have done.


 06-27-2013, 01:19 AM
#13
makes sense.
Regarding your pulley issue. Definitely go with a Corvette crank pulley, LS3 water pump, and Corvette accessories to keep everything tucked in to the block. If you're really short on space, check out the LS4 crank and pulley set up.
Regarding your pulley issue. Definitely go with a Corvette crank pulley, LS3 water pump, and Corvette accessories to keep everything tucked in to the block. If you're really short on space, check out the LS4 crank and pulley set up.
06-28-2013, 02:21 PM
#19
Unknown at this time. The stock front suspension is actually perfectly capable of what I'm going to ask of it, but it's in need of a rebuild and better brakes. The lever-arm shocks are less than desirable, but work just fine. I would like to use a coil-over type front just to tidy things up, but all of the options are fairly spendy, but adding a pair of regular gas shocks isn't a huge headache. As far as the brakes and hubs go, some people have had success using early Mustang hubs and rotors on the MGB spindle. 1st gen and early 2nd gen Camaro hubs work too with a little bearing and seal relocation. There's a lot of use of Toyota parts too. Lots of info here: http://forum.britishv8.org/read.php?2,20643
There's also a very nice after-market hub and brake direct bolt-in, but it's not a very cheap solution. http://www.classicconversionseng.com...Brake-Kits.htm
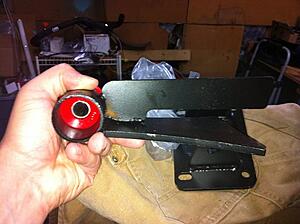
All I know is it will get new poly bushings, better brakes, fresh shocks and springs and 5-lug hubs. Just not sure how to get there yet.
There's also a very nice after-market hub and brake direct bolt-in, but it's not a very cheap solution. http://www.classicconversionseng.com...Brake-Kits.htm
All I know is it will get new poly bushings, better brakes, fresh shocks and springs and 5-lug hubs. Just not sure how to get there yet.