Procharger Build Pics - Perfect Big Red Placement w/ The Twins
 08-31-2013, 10:01 PM
#1
On The Tree
Thread Starter
iTrader: (12)
Join Date: Jun 2013
Location: Virginia - Where Rednecks and Presidents Come From
Posts: 112
Likes: 0
Received 0 Likes
on
0 Posts
Hey Everyone,
My very good friend and I just finished doing the Procharger install on my '00 SS. I did a couple things a little differently, and also performed some custom machine work along the way. Figured I'd share some details and pics in case anyone else was interested in going the same route.
Here are a couple pics of my J Bracket. It's a Truetech steel bracket I bought used off a member on here. I did some finishing touch machine work to it and also had it powdercoated red. I used all Type 18-8 Stainless hardware.
In the second pic, you can see my custom standoffs and billet pulleys that I turned out on a lathe. The standoffs are 303 Stainless Steel. At a HUGE 1-3/8 Diameter, they are the MAXIMUM size you can use for standoffs and still have clearance.
For the pulleys, I used 2026 Aluminum - which is superior in almost every way to the typical 6061 that most companies refer to as "aircraft-grade" aluminum. The tensioning idler has a bed diameter of 2.3". For the "Chevy Chad" "Poor Man's Belt-wrap Mod", I made a pulley with a 2.0" bed diameter.


Next up is my vacuum manifold for my bypass valve and boost gauge. It's made of a piece of 1" Aluminum Hex Stock, 2" Long. I used a 1/8" compression fitting for the gauge, a 1/4" compression fitting for the bypass, and two 3/8" barb fittings to hook it up in-line with my brake booster/intake hose.

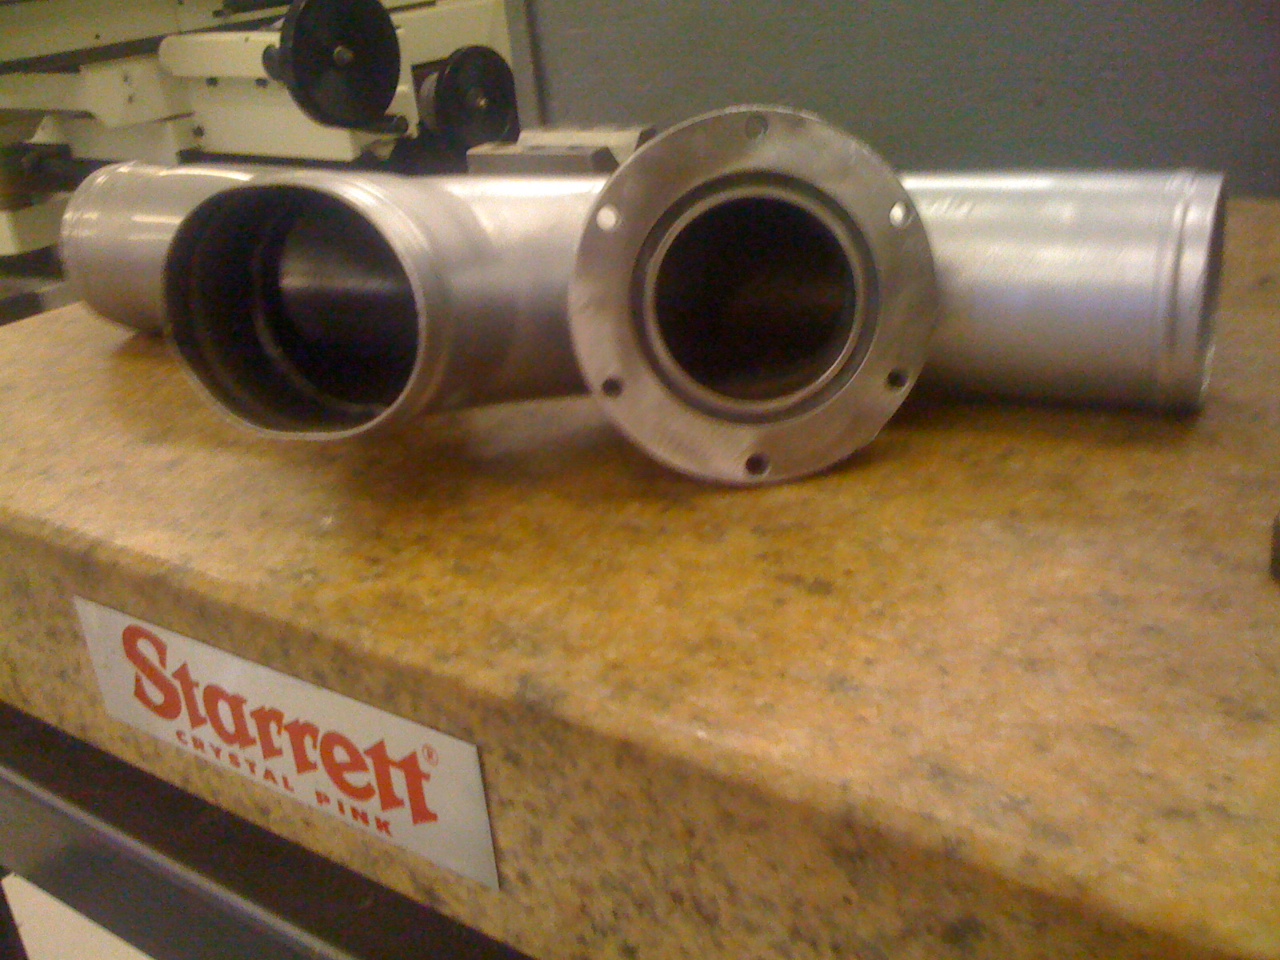
This is my driver's side J-Tube. Since I've elected to use a "Big Red" Open Race Bypass, I had no need for the Pro-Flo bypass bung. Normally, you would just plug this off, but since I'm also interested in "overboosting" and blowing off the excess I placed my "928 Motorsports" "Adjustable Boost Limiting Valve" here. It's calibrated to release pressure at 9psi. Please refer to this thread for info on the "Overboost/Blowoff" option:
https://ls1tech.com/forums/forced-in...te-setups.html
 NOTE: The valve DOES NOT come to you looking like this. I spent a bit of time deburring and polishing mine to make it look like this. When you buy one, it will still function as-is, but it looks like **** when it arrives from 928MS.
Finally...as I mentioned before, I've elected to go with the open race bypass. The only issue was that I wanted to mount it before the intercoolers for the loudest possible sound, and more importantly, to prevent heat-soaking the intercoolers with air that I'm not using. After some studying, I came up with this location as the best possible spot for accomplishing all my goals AND being mounted as highly as possible - out of the way of potential road hazards or a parking block. I don't have a picture of it mounted yet, but it's tucked up behind the radiator support, just below the fan. Note: If any of you also decide to mount it here...reference the picture and BE SURE that when you weld on the flange that you "clock" the bolt holes as far away from the centerline of the Y-tube as possible.

Last but CERTAINLY not least, being a noob to FI before I started this project, and with all the special processes and options I've added, I owe a HUGE debt of gratitude to the following people for helping me out along the way!
1. My bud, Josh Gallimore - The MAD SCIENTIST Mechanic. Without him, I doubt I could've ever afforded this install. Along with giving me "friend" prices on the labor, he also solved quite a few install problems along the way. Everything is neat and tidy and there isn't a wire or hose out of place. You're the man, Josh! THANKS, BUD!
2. Bob at "Brutespeed". The absolute go-to guy for F-Body Procharger knowledge. I'm sure I drove him crazy with questions, but he always answered them in great detail and was patient. THANKS BOB!
3. Martin at "Tick Performance". Again, another FI genius that helped me out with technical questions about my tuning needs.
4. Member "Chevy Chad"...for the "Poor Man's Belt Wrap" idea and thread. AWESOME IDEA! Thanks for sharing.
5. Member "Transampetews6" for making a long-time, seemingly impossible dream-mod a reality by giving me a steal of a deal on some Foose Nitrous wheels, and for going the extra mile (literally) in delivering them to his local UPS terminal.
6. Member "Packy". First for serving our country overseas, and second for helping me out by giving me a great deal on some much needed parts.
7. Thanks to all the members on here who have sold me quality parts at good prices, and to all those who provided invaluable advice and information.

My very good friend and I just finished doing the Procharger install on my '00 SS. I did a couple things a little differently, and also performed some custom machine work along the way. Figured I'd share some details and pics in case anyone else was interested in going the same route.
Here are a couple pics of my J Bracket. It's a Truetech steel bracket I bought used off a member on here. I did some finishing touch machine work to it and also had it powdercoated red. I used all Type 18-8 Stainless hardware.
In the second pic, you can see my custom standoffs and billet pulleys that I turned out on a lathe. The standoffs are 303 Stainless Steel. At a HUGE 1-3/8 Diameter, they are the MAXIMUM size you can use for standoffs and still have clearance.
For the pulleys, I used 2026 Aluminum - which is superior in almost every way to the typical 6061 that most companies refer to as "aircraft-grade" aluminum. The tensioning idler has a bed diameter of 2.3". For the "Chevy Chad" "Poor Man's Belt-wrap Mod", I made a pulley with a 2.0" bed diameter.
Next up is my vacuum manifold for my bypass valve and boost gauge. It's made of a piece of 1" Aluminum Hex Stock, 2" Long. I used a 1/8" compression fitting for the gauge, a 1/4" compression fitting for the bypass, and two 3/8" barb fittings to hook it up in-line with my brake booster/intake hose.
This is my driver's side J-Tube. Since I've elected to use a "Big Red" Open Race Bypass, I had no need for the Pro-Flo bypass bung. Normally, you would just plug this off, but since I'm also interested in "overboosting" and blowing off the excess I placed my "928 Motorsports" "Adjustable Boost Limiting Valve" here. It's calibrated to release pressure at 9psi. Please refer to this thread for info on the "Overboost/Blowoff" option:
https://ls1tech.com/forums/forced-in...te-setups.html
Finally...as I mentioned before, I've elected to go with the open race bypass. The only issue was that I wanted to mount it before the intercoolers for the loudest possible sound, and more importantly, to prevent heat-soaking the intercoolers with air that I'm not using. After some studying, I came up with this location as the best possible spot for accomplishing all my goals AND being mounted as highly as possible - out of the way of potential road hazards or a parking block. I don't have a picture of it mounted yet, but it's tucked up behind the radiator support, just below the fan. Note: If any of you also decide to mount it here...reference the picture and BE SURE that when you weld on the flange that you "clock" the bolt holes as far away from the centerline of the Y-tube as possible.
Last but CERTAINLY not least, being a noob to FI before I started this project, and with all the special processes and options I've added, I owe a HUGE debt of gratitude to the following people for helping me out along the way!
1. My bud, Josh Gallimore - The MAD SCIENTIST Mechanic. Without him, I doubt I could've ever afforded this install. Along with giving me "friend" prices on the labor, he also solved quite a few install problems along the way. Everything is neat and tidy and there isn't a wire or hose out of place. You're the man, Josh! THANKS, BUD!
2. Bob at "Brutespeed". The absolute go-to guy for F-Body Procharger knowledge. I'm sure I drove him crazy with questions, but he always answered them in great detail and was patient. THANKS BOB!
3. Martin at "Tick Performance". Again, another FI genius that helped me out with technical questions about my tuning needs.
4. Member "Chevy Chad"...for the "Poor Man's Belt Wrap" idea and thread. AWESOME IDEA! Thanks for sharing.
5. Member "Transampetews6" for making a long-time, seemingly impossible dream-mod a reality by giving me a steal of a deal on some Foose Nitrous wheels, and for going the extra mile (literally) in delivering them to his local UPS terminal.
6. Member "Packy". First for serving our country overseas, and second for helping me out by giving me a great deal on some much needed parts.
7. Thanks to all the members on here who have sold me quality parts at good prices, and to all those who provided invaluable advice and information.
Last edited by ss2000silverbullet; 08-31-2013 at 10:30 PM.


 09-01-2013, 03:31 AM
#3

Thanks Kris! Your car looks great! Bob
__________________
ATI ProCharger and Moser Sales 260 672-2076
PM's disabled, please e-mail me
E-mail: brutespeed@gmail.comob@brutespeed.com
https://brutespeed.com/ Link to website

ATI ProCharger and Moser Sales 260 672-2076
PM's disabled, please e-mail me
E-mail: brutespeed@gmail.comob@brutespeed.com
https://brutespeed.com/ Link to website
 09-01-2013, 09:07 PM
#7
On The Tree
Thread Starter
iTrader: (12)
Join Date: Jun 2013
Location: Virginia - Where Rednecks and Presidents Come From
Posts: 112
Likes: 0
Received 0 Likes
on
0 Posts
Conan...I forgot to give you some props, too! I derived inspiration for placing Big Red on the Y-Pipe from one of your posts. I put mine in a different spot than yours, but thanks for the idea! Who knows if I'd have come up with the placement idea had I not known it was Y-pipe mountable to begin with.
Also...more J-bracket and standoff pics are going to be a problem. HOPEFULLY I won't be taking that thing off for a VERY long time. I'd be glad to post the machining specs on the standoffs if you'd like.
Also...more J-bracket and standoff pics are going to be a problem. HOPEFULLY I won't be taking that thing off for a VERY long time. I'd be glad to post the machining specs on the standoffs if you'd like.
Trending Topics
09-01-2013, 09:16 PM
#8
On The Tree
Thread Starter
iTrader: (12)
Join Date: Jun 2013
Location: Virginia - Where Rednecks and Presidents Come From
Posts: 112
Likes: 0
Received 0 Likes
on
0 Posts

Dyno numbers coming soon. Tuning at Tick Performance scheduled for the end of next week!
 09-02-2013, 03:42 PM
#9
Conan...I forgot to give you some props, too! I derived inspiration for placing Big Red on the Y-Pipe from one of your posts. I put mine in a different spot than yours, but thanks for the idea! Who knows if I'd have come up with the placement idea had I not known it was Y-pipe mountable to begin with.
Also...more J-bracket and standoff pics are going to be a problem. HOPEFULLY I won't be taking that thing off for a VERY long time. I'd be glad to post the machining specs on the standoffs if you'd like.
Also...more J-bracket and standoff pics are going to be a problem. HOPEFULLY I won't be taking that thing off for a VERY long time. I'd be glad to post the machining specs on the standoffs if you'd like.

The placement of your by pass looks better than the way I had mine

If a very long time doesn't happen get the camera out next time you have the J bracket off.
09-02-2013, 09:31 PM
#10
On The Tree
Thread Starter
iTrader: (12)
Join Date: Jun 2013
Location: Virginia - Where Rednecks and Presidents Come From
Posts: 112
Likes: 0
Received 0 Likes
on
0 Posts
If a long time doesn't happen, you might see some wrench-rash on the J-bracket from me being REALLY pissed off!
 When I machined everything (standoffs, bearing spacers, pulley spacers, etc) I made sure the alignment was within .005" between all 4 pulleys. I also surface ground the J-Bracket to within .0001" parallelism face-to-face. So...here's to hoping!
Just in case you (or anyone else) wanted to know, here's the specs for the standoffs I made...
Material: 303 Stainless
OD: 1.375" (+.000/-.005)
OAL: 2.500" (+/-.002 ~ matched within .0005)
Endwork: Drill Thru .335 (8.5mm), Tap M10x1.5 thru, or half and half
(Make sure the thru hole is concentric to OD within .005 TIR)
Flats: .1875" Dp per side 4x @ 90* (making a 1" square wrench flat)
(Flats are 3/4" long, starting 3/16" from end)
 09-10-2013, 06:00 AM
#13
On The Tree
Thread Starter
iTrader: (12)
Join Date: Jun 2013
Location: Virginia - Where Rednecks and Presidents Come From
Posts: 112
Likes: 0
Received 0 Likes
on
0 Posts
At the start of my build, I was told by Procharger that the 3.4 should make 8psi on a stock engine. Johnathan @ Tick called them to inquire about any issues and now they say that you can only expect 8psi with the 3.1?? (I do have longtubes and no MAF though)
So...guess I'll be going 8-rib, or buying a larger crank pulley. Hell, maybe I'll just make one?!
Last edited by ss2000silverbullet; 09-10-2013 at 06:45 AM.
09-10-2013, 06:04 AM
#14
On The Tree
Thread Starter
iTrader: (12)
Join Date: Jun 2013
Location: Virginia - Where Rednecks and Presidents Come From
Posts: 112
Likes: 0
Received 0 Likes
on
0 Posts
Note to all readers going FI...DO NOT waste your time on the "Smartfire" LS-1 MAP Sensor!! It won't function properly with HP Tuners as they don't send the correct info to calibrate it. Also, the guy at Smartfire is slow and uninformative in answering technical questions!!
Save yourselves a lot of headaches and just get the Cobalt one!
Save yourselves a lot of headaches and just get the Cobalt one!
09-10-2013, 06:32 AM
#15
On The Tree
Thread Starter
iTrader: (12)
Join Date: Jun 2013
Location: Virginia - Where Rednecks and Presidents Come From
Posts: 112
Likes: 0
Received 0 Likes
on
0 Posts
ABSOLUTELY!!! HUGE Thanks go to Johnathan@Tick! He's THE man for your LSX tuning needs! Super-informative, super-thorough and EXTREMELY helpful in EVERY aspect!
Had problems with the "Smartfire" MAP sensor as detailed above, and he swapped it out with the Cobalt sensor.
After road tuning and a couple dyno pulls, he found fuel-supply issues to be corrected.
Now, he and the other guys at Tick are also taking care of getting my car through the shop and getting my Ractronix pump kit installed during this same trip!!
So...no final dyno numbers yet, but it's looking to be in the 470-480ish range when done. I was hoping to break the 500 mark, and easily would have if my boost numbers would have been as-predicted... BUT it'll come soon!
09-10-2013, 09:41 AM
#19
On The Tree
Thread Starter
iTrader: (12)
Join Date: Jun 2013
Location: Virginia - Where Rednecks and Presidents Come From
Posts: 112
Likes: 0
Received 0 Likes
on
0 Posts
Does the D1 make more boost at the same spun rpm as the P1? I've heard the P1 is more efficient down low, and takes less torque to spin it, but the D1 is better up high. What's the whole story of differences between the two?
