How-to: Fill spoiler/body holes in sheetmetal.
 09-09-2013, 10:34 AM
#1
Staging Lane
Thread Starter
iTrader: (1)
Join Date: May 2013
Location: Oklahoma
Posts: 60
Likes: 0
Received 0 Likes
on
0 Posts
Hey guys! I wasn't sure where to put this... but I hope this is an okay spot. I removed a spoiler from the car I'm doing an LS swap in when I was taking a welding class and took lots of pictures with the intention to help people get an idea on how to fill in spoiler and body holes. It won't do much good for you guys with fiberglass bodies, but any steel could use this treatment. I'm not certain if this is 100% the "right way" to do this, but this is what worked awesome for me.
First up... if you think this is gonna be a 1-evening thing, I'm laughing at you right now (or you are THE MAN, then I salute you). What's included here (for me, and I'm a slow noob, but still) was about 20-ish hours.
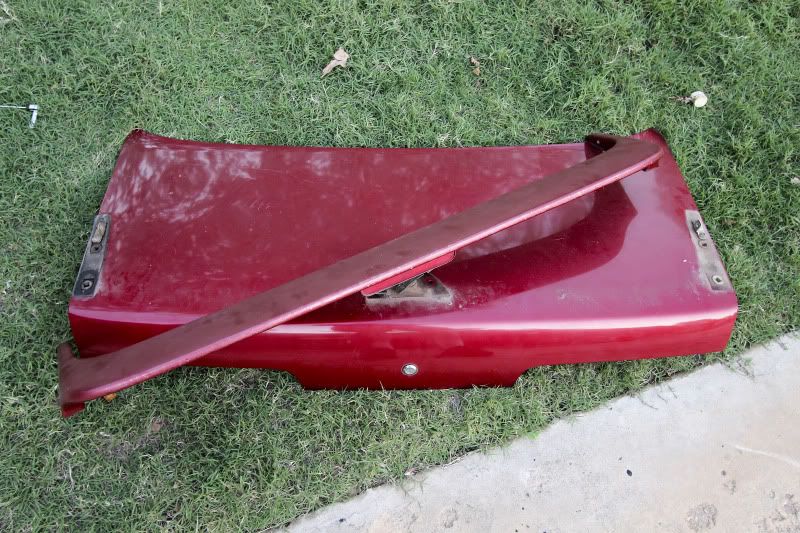
Here's the 'ole s13 coupe trunk with the OEM spoiler removed. This is gonna take a bit.
First up... get out a sander (pick your poison on what kind) and get something aggressive enough to start removing paint and 20 years worth of dirt and whatever else out of your way.
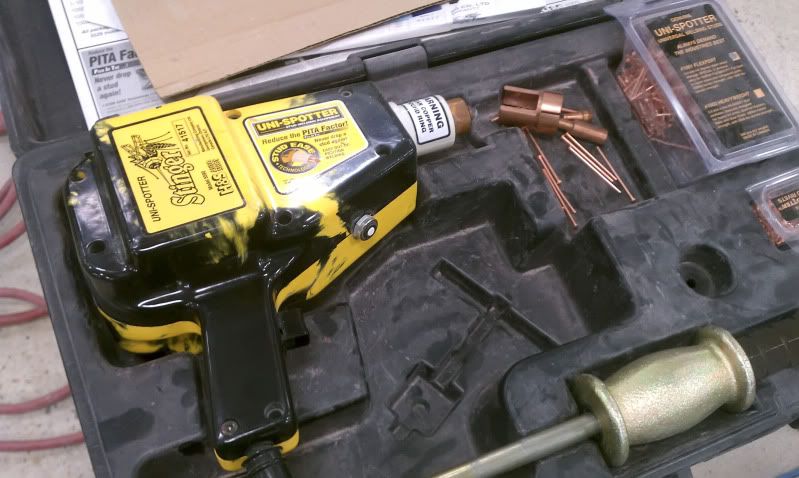
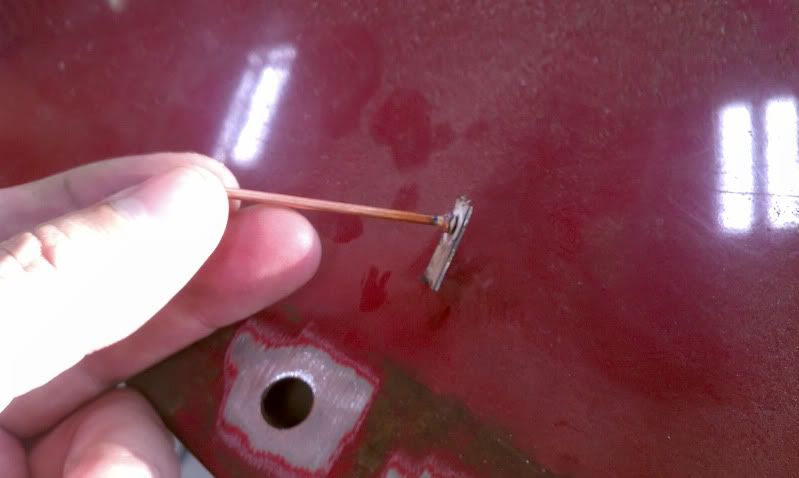
Next, grab a stud welder.

No... not that kind... this kind.
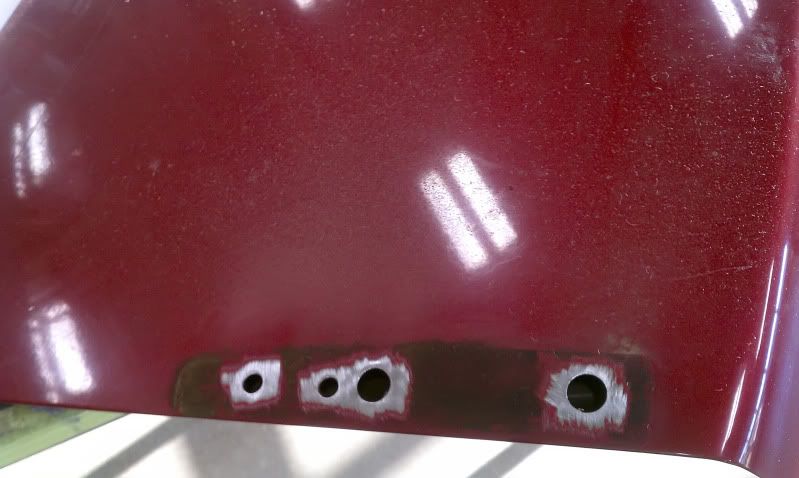
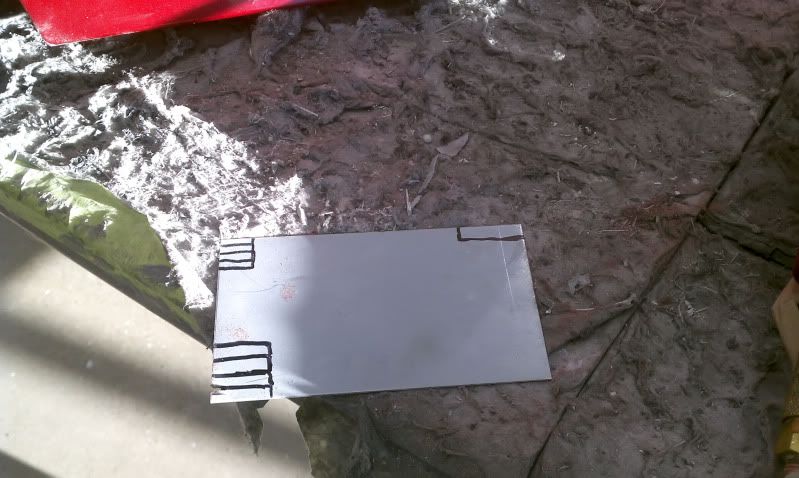
And some sheet metal. This is 1/16 or 1/8th gauge. Thin, but not too thin. Your goal is to match the sheetmetal to the thickness of the metal around the hole you want to fill. I measured the width of each hole, and marked that out on my metal in marker to give me a good idea of how thick I wanted the cuts.
Next... cut the small strips and then grab that stud welder and tack that *****'! Watch out... these will be warm for a bit...
Our main goal is to get the strips to just barely slide into the holes and cover as much as possible.

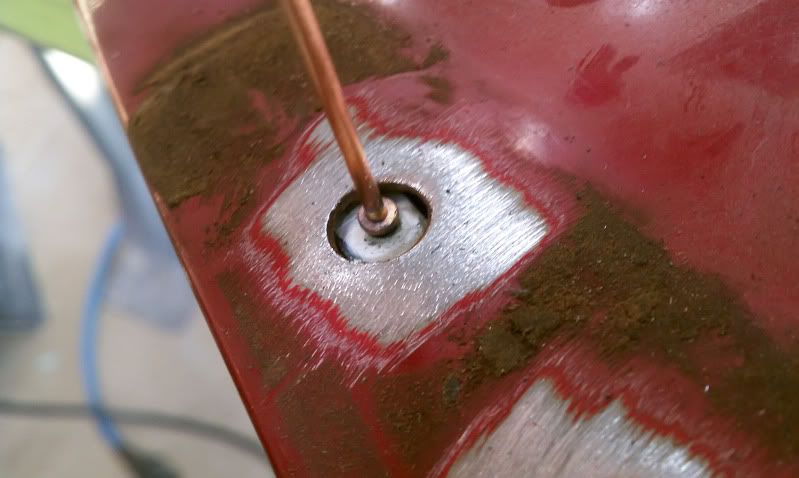
Now tac that in place. No big weld here... just a spot. Go ahead and move on to your next spot your filling, rinse and repeat the first steps. When you get to the actual welding, weld a spot on one hole, move to another one, small weld spot, move again. You do NOT want the metal to get hot... because it warps. Weld in a criss-cross pattern. Aka... one side, opposite side next, back and forth (with lots of time to cool between welds), kinda like when you're torquing wheels. Here's a picture of me part of the way through. As you can see, just small spot welds back and forth.
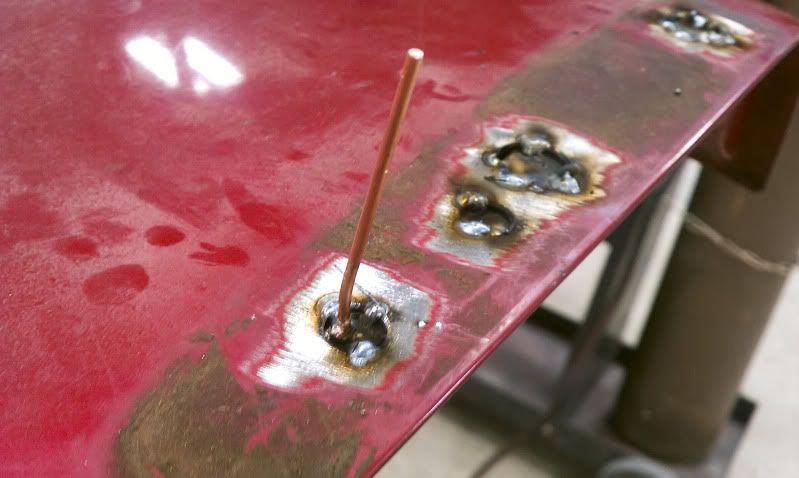
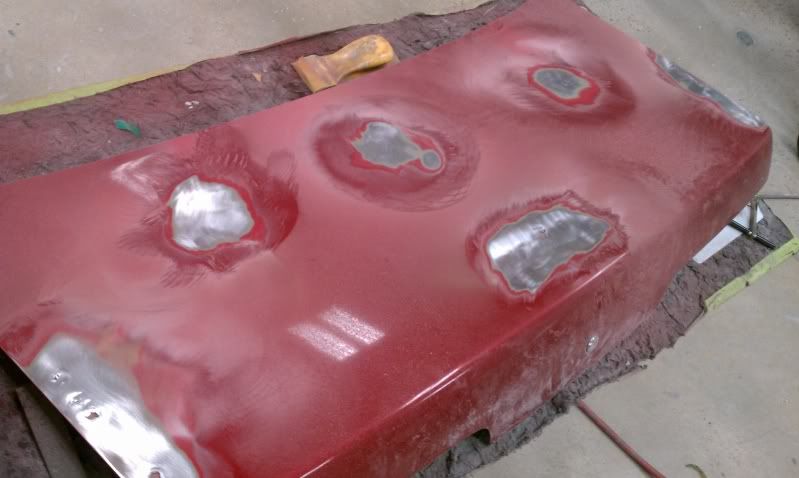
Eventually... you'll have welded all the way around the hole your filling. You don't need to fill in the center, we'll get to that later. You can remove the studs with a pair of wire-snips or whatever you want.
Now grind down the welds flat with the metal.
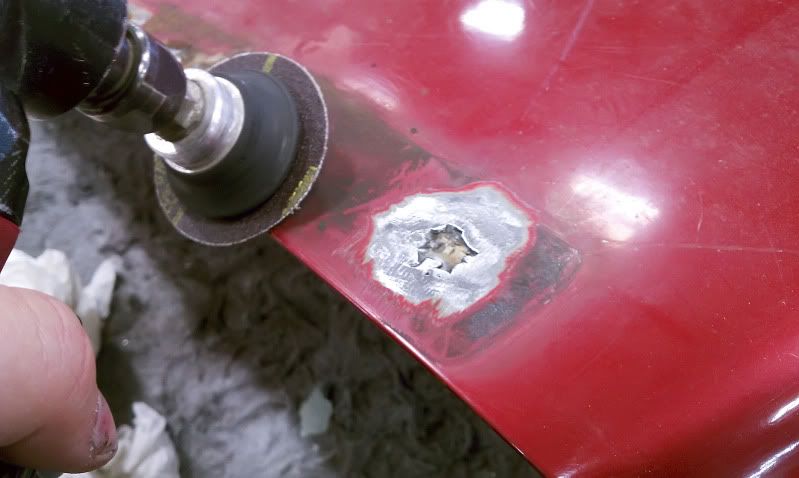
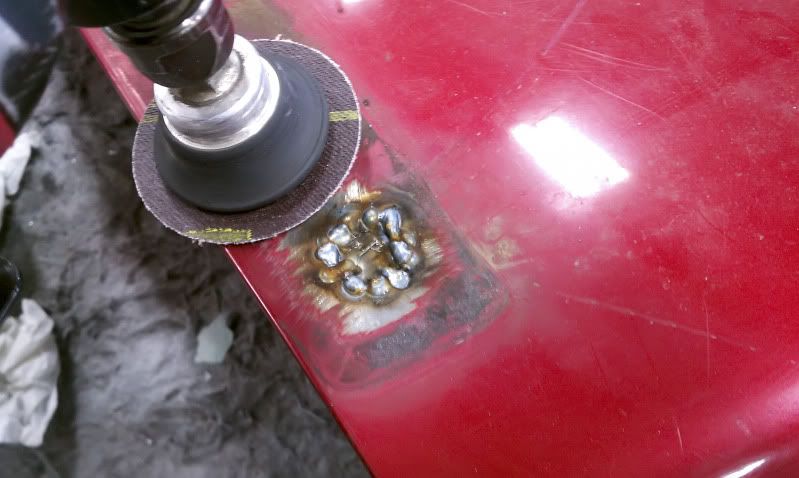
Next... I grabbed the buffer with a sanding pad and sanded off the paint all around the area I was going to apply body filler so it has something to stick too.

Here's the prepped result. Nice and clean. I hit a few other spots where I am going to do a little extra work, don't mind them.
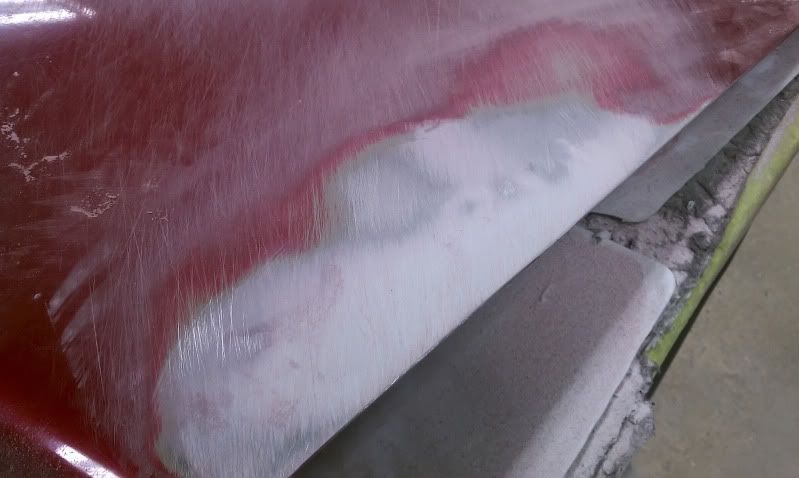
Next... mix up your body filler as per the instructions, and lay on a nice and thin layer.
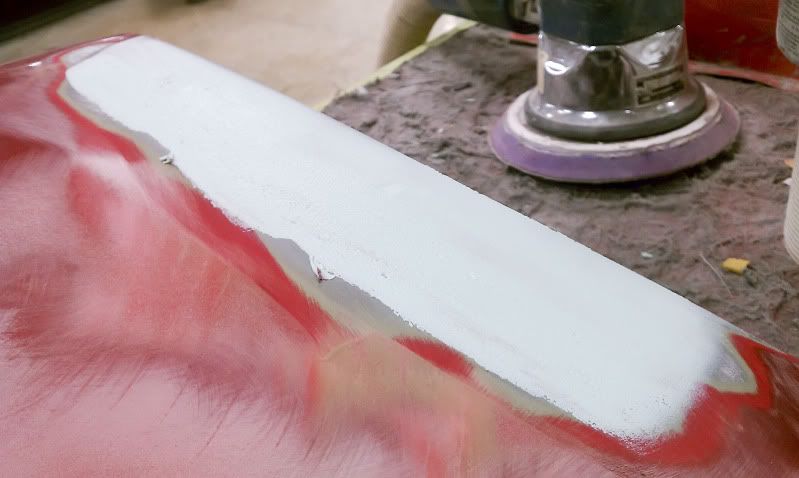
Let that dry... and sand it back down. Sand in this kind of a direction, and let the paper do the work. Too much pressure will put heat in the metal again and might warp it. Body work isn't a quick process!
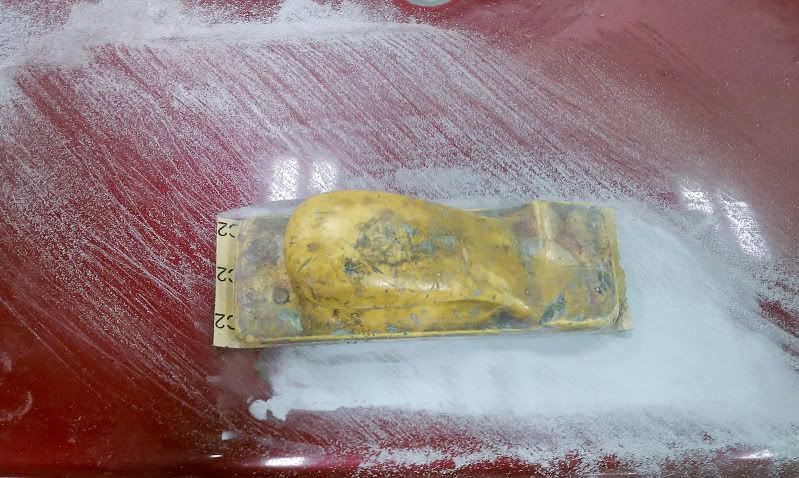
It'll look something like this when you're done. Shiny metal spots are high, filler spots are low. Ultimately you're going to have to go off of the feel of the metal against your hand (you can feel high and low spots), and that the edges of the filler have a good feather. If needed, add additional body filler and said again. I did this about 3 times before I was relatively happy.
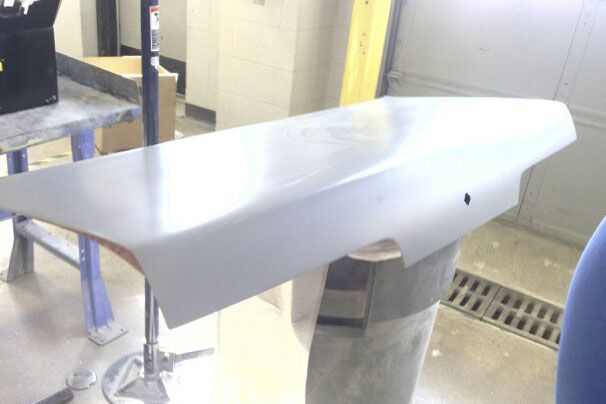
After that... it's all about normal paint prep and getting that ready. I'm no expert there. But if you keep after it, you'll have a nice and clean, no-hole piece!
First up... if you think this is gonna be a 1-evening thing, I'm laughing at you right now (or you are THE MAN, then I salute you). What's included here (for me, and I'm a slow noob, but still) was about 20-ish hours.
Here's the 'ole s13 coupe trunk with the OEM spoiler removed. This is gonna take a bit.
First up... get out a sander (pick your poison on what kind) and get something aggressive enough to start removing paint and 20 years worth of dirt and whatever else out of your way.
Next, grab a stud welder.
No... not that kind... this kind.
And some sheet metal. This is 1/16 or 1/8th gauge. Thin, but not too thin. Your goal is to match the sheetmetal to the thickness of the metal around the hole you want to fill. I measured the width of each hole, and marked that out on my metal in marker to give me a good idea of how thick I wanted the cuts.
Next... cut the small strips and then grab that stud welder and tack that *****'! Watch out... these will be warm for a bit...
Our main goal is to get the strips to just barely slide into the holes and cover as much as possible.
Now tac that in place. No big weld here... just a spot. Go ahead and move on to your next spot your filling, rinse and repeat the first steps. When you get to the actual welding, weld a spot on one hole, move to another one, small weld spot, move again. You do NOT want the metal to get hot... because it warps. Weld in a criss-cross pattern. Aka... one side, opposite side next, back and forth (with lots of time to cool between welds), kinda like when you're torquing wheels. Here's a picture of me part of the way through. As you can see, just small spot welds back and forth.
Eventually... you'll have welded all the way around the hole your filling. You don't need to fill in the center, we'll get to that later. You can remove the studs with a pair of wire-snips or whatever you want.
Now grind down the welds flat with the metal.
Next... I grabbed the buffer with a sanding pad and sanded off the paint all around the area I was going to apply body filler so it has something to stick too.
Here's the prepped result. Nice and clean. I hit a few other spots where I am going to do a little extra work, don't mind them.
Next... mix up your body filler as per the instructions, and lay on a nice and thin layer.
Let that dry... and sand it back down. Sand in this kind of a direction, and let the paper do the work. Too much pressure will put heat in the metal again and might warp it. Body work isn't a quick process!
It'll look something like this when you're done. Shiny metal spots are high, filler spots are low. Ultimately you're going to have to go off of the feel of the metal against your hand (you can feel high and low spots), and that the edges of the filler have a good feather. If needed, add additional body filler and said again. I did this about 3 times before I was relatively happy.
After that... it's all about normal paint prep and getting that ready. I'm no expert there. But if you keep after it, you'll have a nice and clean, no-hole piece!
 09-09-2013, 01:03 PM
#3
Staging Lane
Thread Starter
iTrader: (1)
Join Date: May 2013
Location: Oklahoma
Posts: 60
Likes: 0
Received 0 Likes
on
0 Posts

I only got to work on it in chunks... and I spent a lot of time making sure the metal was very flat and not tin-caning. Add in that it took 10 minutes each time for the body-filler to harden (and I did it 3 times to make sure it was smooth), it just isn't possible in that amount of time. That is... unless you're going for "good enough". Then sure. I can (technically) paint a whole car in about 30 minutes if I'm not trying to make it perfect. I did say I was a "slow noob".
09-09-2013, 04:17 PM
#4
TECH Apprentice
iTrader: (2)

Join Date: Apr 2006
Location: deland,fl
Posts: 322
Likes: 0
Received 0 Likes
on
0 Posts

i do this for a living.once you know how to do things they can be done pretty quick.
you'll see if you keep doing it.
regardless you got it done.just had to bust your ***** about the 20 hours
you'll see if you keep doing it.
regardless you got it done.just had to bust your ***** about the 20 hours


