Forced Induction Superchargers | Turbochargers | Intercoolers

Twin turbo upgrades

Thread Tools
 
Search this Thread
 
Old 02-04-2014, 08:09 PM
  #1  
11 Second Club
Thread Starter
iTrader: (43)
 
98Camarod's Avatar
 
Join Date: Aug 2006
Location: Summerville, SC
Posts: 5,364
Likes: 0
Received 2 Likes on 2 Posts

Default Twin turbo upgrades

Time for some winter changes.
-Custom turbo cam from Martin
-Better sized turbos, Turbonetics 6665's
-Install manual rack and pinion
-AFR 205's
-Viking rear DA shocks
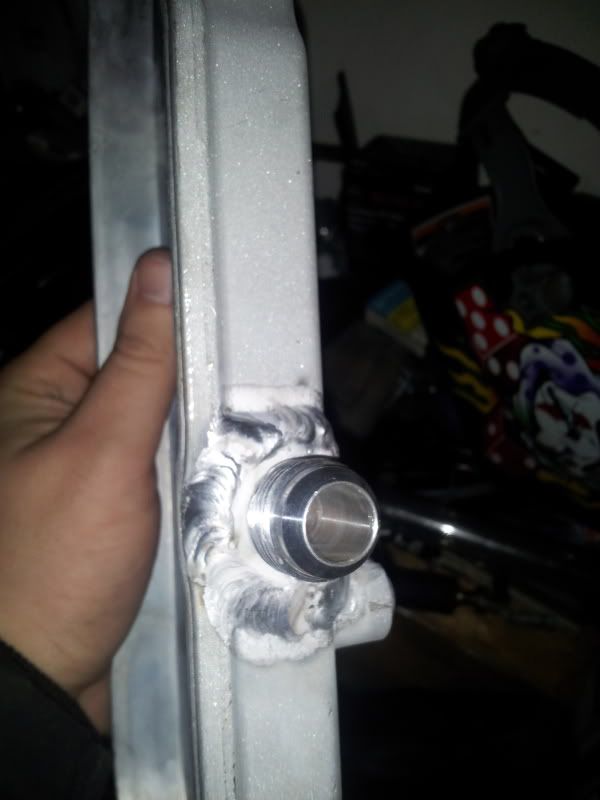
-10an fittings on valve covers for crankcase evac

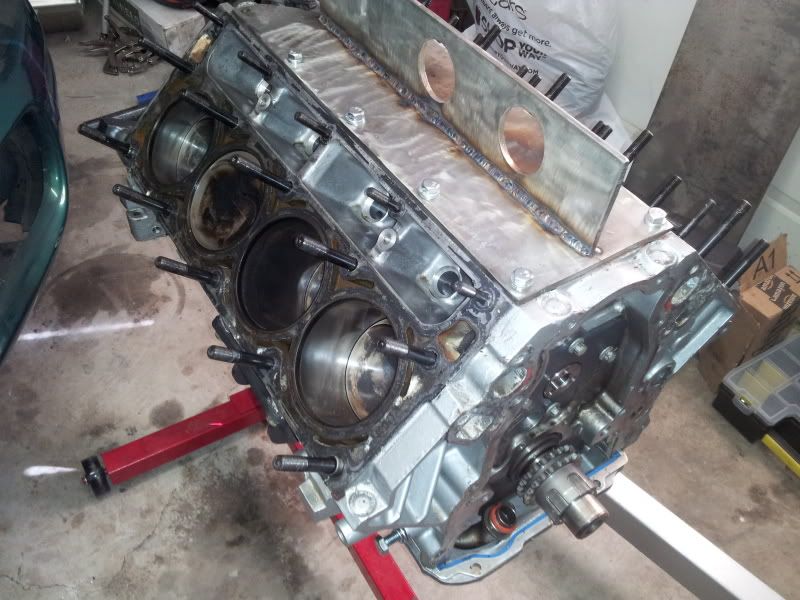
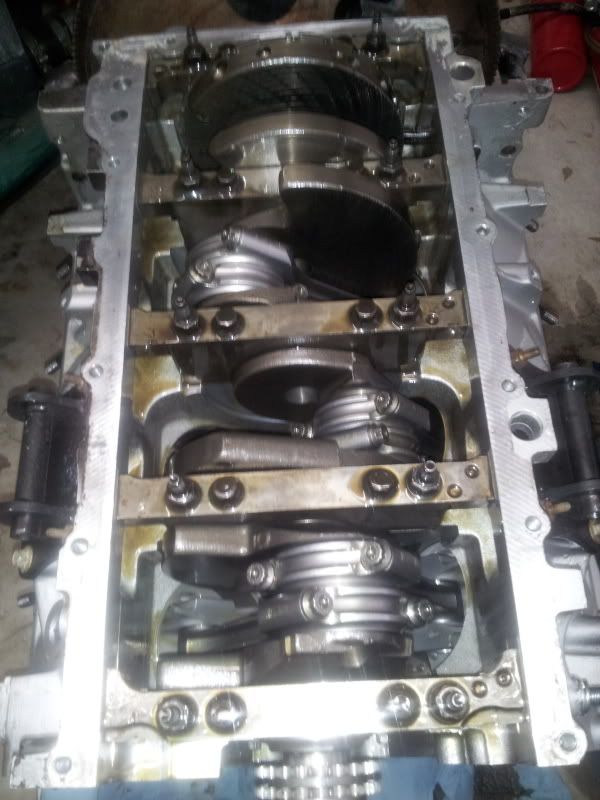
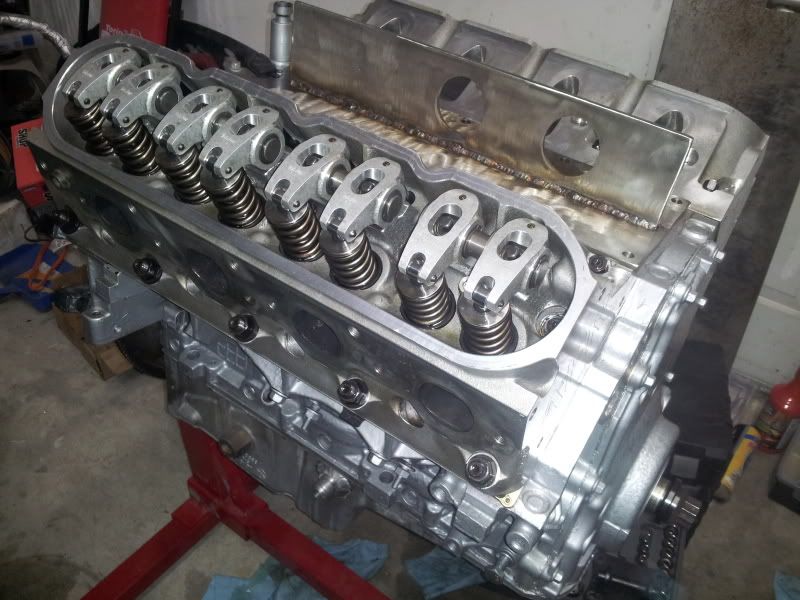
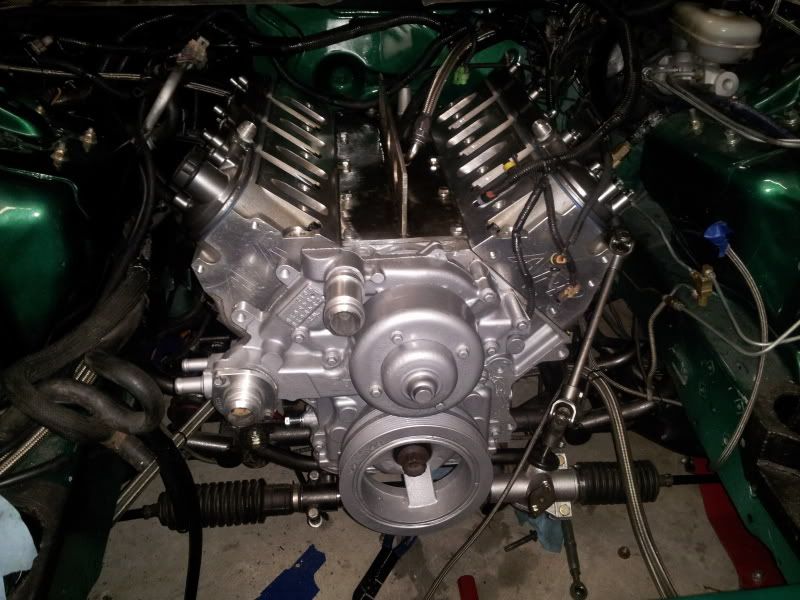
I took the heads off in the engine bay and ended up making a motor lift plate out of 1/4 stainless steel plate. That reminded me that I should buy a plasma cutter going through all the sawzall blades that I did. I installed the new cam, heads and yella terra rockers. I also got the old rack out and the new flaming river manual rack installed. I welded the -10 fittings on the valve covers and then powder coated them with summit racing silver vein powder.


Old 02-05-2014, 11:09 AM
  #2  
FormerVendor
iTrader: (3)
 
Sales@Tick's Avatar
 
Join Date: Feb 2012
Location: Mount Airy, NC
Posts: 7,480
Likes: 0
Received 15 Likes on 10 Posts
Default

Looking good!
Old 02-05-2014, 11:34 AM
  #3  
TECH Addict
iTrader: (11)
 
allout06's Avatar
 
Join Date: Nov 2010
Location: Kokomo, In
Posts: 2,107
Likes: 0
Received 1 Like on 1 Post
Default

looks good man. keep an eye on those yella terra's. seen a lot of em break. stockers with a trunion upgrade ftw!
Old 02-05-2014, 06:38 PM
  #4  
11 Second Club
Thread Starter
iTrader: (43)
 
98Camarod's Avatar
 
Join Date: Aug 2006
Location: Summerville, SC
Posts: 5,364
Likes: 0
Received 2 Likes on 2 Posts

Default

Originally Posted by allout06
looks good man. keep an eye on those yella terra's. seen a lot of em break. stockers with a trunion upgrade ftw!
From what I've been told is that with the bronze valve guides you have to run them to prevent excessive wear to the valve guides. I'm with you on the stock rockers with the trunion upgrade though.
Old 02-09-2014, 04:19 AM
  #5  
11 Second Club
Thread Starter
iTrader: (43)
 
98Camarod's Avatar
 
Join Date: Aug 2006
Location: Summerville, SC
Posts: 5,364
Likes: 0
Received 2 Likes on 2 Posts

Default

Got the motor back in. If anyone does decide to remove just the engine with solid mounts like I did, you have to take the mounts off the motor and mount the engine to the trans first. Then you can bolt the mounts up to the motor and then the k member. Hopefully get some more done today.

Old 02-09-2014, 10:32 AM
  #6  
11 Second Club
Thread Starter
iTrader: (43)
 
98Camarod's Avatar
 
Join Date: Aug 2006
Location: Summerville, SC
Posts: 5,364
Likes: 0
Received 2 Likes on 2 Posts

Default

Got the valley cover on, turbos mounted, turbo oil feed/drains hooked up

Old 02-09-2014, 11:17 AM
  #7  
TECH Resident
iTrader: (2)
 
Boo"SS"t's Avatar
 
Join Date: Mar 2005
Location: somewhere in Ohio
Posts: 785
Likes: 0
Received 1 Like on 1 Post

Default

Originally Posted by allout06
looks good man. keep an eye on those yella terra's. seen a lot of em break. stockers with a trunion upgrade ftw!
I agree, I've seen and heard way too many failures on those aluminum rockers where the pushrod went thru the cup or a chunk of that area just broke-off. I would definately go with a chromemoly steel in a forced induction application.
Old 02-11-2014, 06:46 PM
  #8  
11 Second Club
Thread Starter
iTrader: (43)
 
98Camarod's Avatar
 
Join Date: Aug 2006
Location: Summerville, SC
Posts: 5,364
Likes: 0
Received 2 Likes on 2 Posts

Default

I got some more done today and finally got a picture of the Viking DA rear shocks from MWC


Old 02-14-2014, 07:10 PM
  #9  
11 Second Club
Thread Starter
iTrader: (43)
 
98Camarod's Avatar
 
Join Date: Aug 2006
Location: Summerville, SC
Posts: 5,364
Likes: 0
Received 2 Likes on 2 Posts

Default

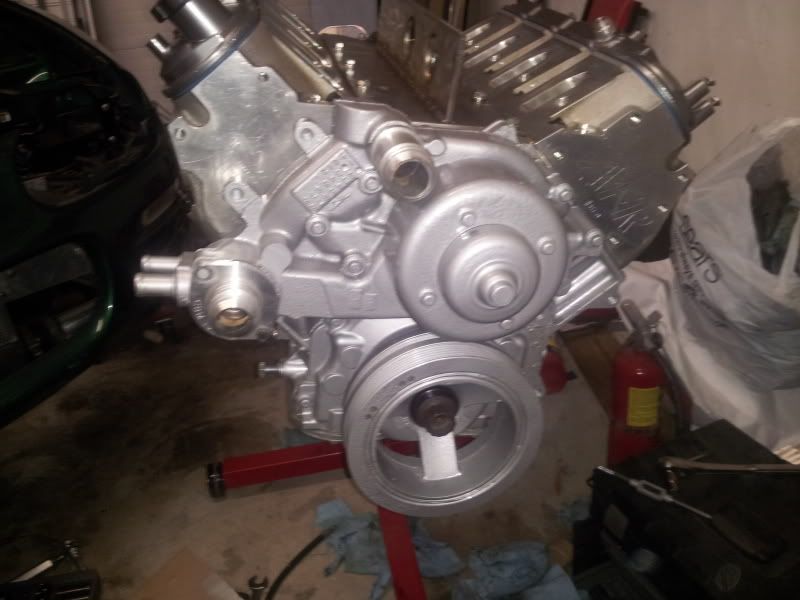
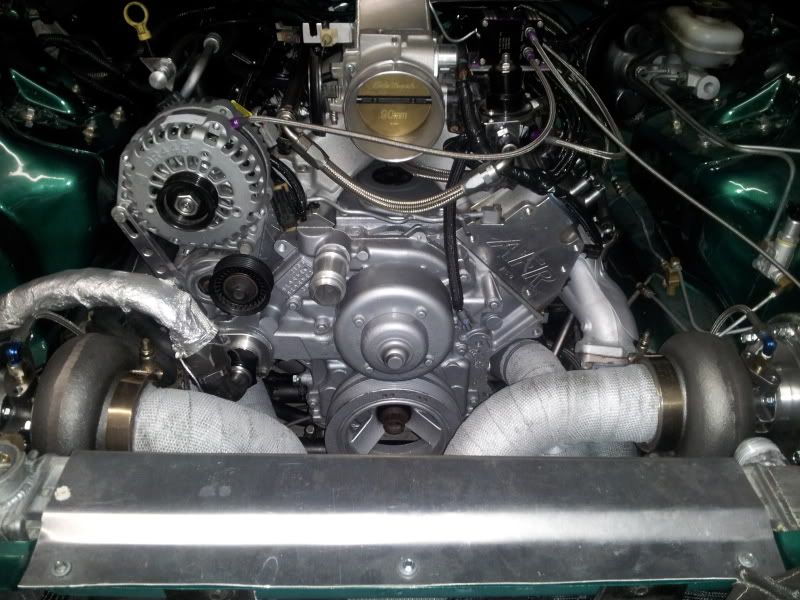
I got some more done. Got the radiator in and fixed the welds on the radiator, bolted up the torque converter, reinstalled the starter, and pressure tested the radiator. I'm waiting on a tensioner pulley to mount in place of the idler and 10an fittings to get it buttoned up in the engine bay.


Old 02-14-2014, 10:48 PM
  #10  
TECH Regular
 
00Wildcat's Avatar
 
Join Date: Apr 2008
Posts: 456
Likes: 0
Received 0 Likes on 0 Posts

Default

There appears to be a crack
Old 02-14-2014, 11:07 PM
  #11  
TECH Resident
iTrader: (24)
 
sschoeffler's Avatar
 
Join Date: Jul 2006
Location: Oklahoma!
Posts: 761
Likes: 0
Received 4 Likes on 4 Posts

Default

Is that valve cover going to seal? It looks like the gasket mating surface got heat warped pretty bad.
Old 02-15-2014, 04:59 AM
  #12  
11 Second Club
Thread Starter
iTrader: (43)
 
98Camarod's Avatar
 
Join Date: Aug 2006
Location: Summerville, SC
Posts: 5,364
Likes: 0
Received 2 Likes on 2 Posts

Default

Originally Posted by 00Wildcat
There appears to be a crack
If you're talking about on the left side of the radiator fitting, that's just a camera trick. I saw that too and went back and there isn't anything there.

Originally Posted by sschoeffler
Is that valve cover going to seal? It looks like the gasket mating surface got heat warped pretty bad.
That's why I posted the pic straight from the bottom. The placement of the fitting is in the radius, so any camera angle makes it appear warped. I checked them with a straight edge and they are both straight.

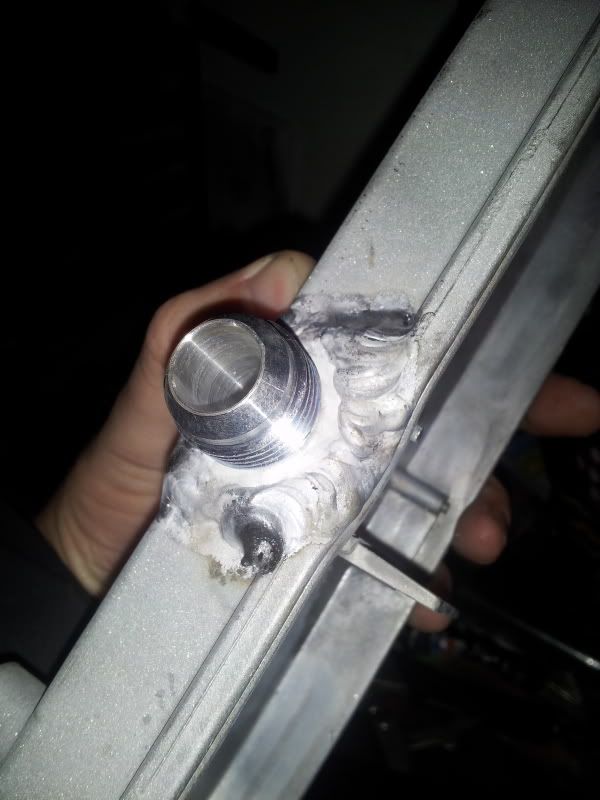
I'm not great at welding, but I can do it myself. The aluminum would have turned out better if I could crank up the heat, but since I'm having to use the dryer plug in the rental house instead of a dedicated breaker. It is what it is. 115 amps for about 20 seconds, anything longer than that pops it.
Old 02-15-2014, 05:17 AM
  #13  
TECH Fanatic
iTrader: (23)
 
kainedogg's Avatar
 
Join Date: Mar 2006
Posts: 1,313
Received 5 Likes on 5 Posts

Default

Great build. Do you have anymore pics of the turbo piping from different angles. I like the fact you went with stock manifolds.
Old 02-15-2014, 05:23 AM
  #14  
11 Second Club
Thread Starter
iTrader: (43)
 
98Camarod's Avatar
 
Join Date: Aug 2006
Location: Summerville, SC
Posts: 5,364
Likes: 0
Received 2 Likes on 2 Posts

Default

I'll try and get some today
Old 02-15-2014, 08:17 AM
  #15  
10 Second Club
iTrader: (64)
 
dschmittie1's Avatar
 
Join Date: Aug 2005
Location: York, PA
Posts: 2,344
Likes: 0
Received 2 Likes on 2 Posts

Default

Looking good. Planning on just running the -10 lines to a catch can?

I have been debating doing something to mine like this.
Old 02-15-2014, 08:34 AM
  #16  
11 Second Club
Thread Starter
iTrader: (43)
 
98Camarod's Avatar
 
Join Date: Aug 2006
Location: Summerville, SC
Posts: 5,364
Likes: 0
Received 2 Likes on 2 Posts

Default

Originally Posted by dschmittie1
Looking good. Planning on just running the -10 lines to a catch can?

I have been debating doing something to mine like this.
No, I'm going to run them to the crankcase evac bungs in the exhaust. I've got a thread on the bullet to see where the best place to put them is.

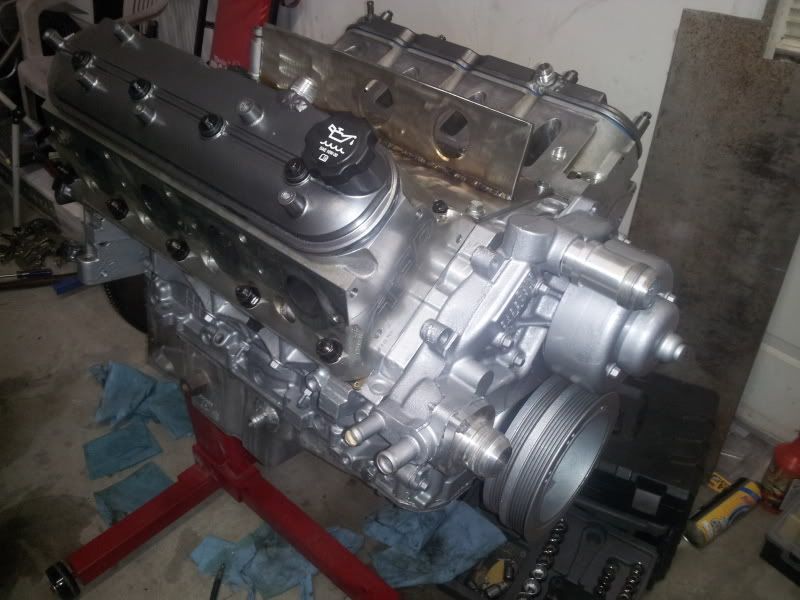
I got some more done. Got the cold pipes all buttoned up, nitrous hooked up, all my vacuum lines hooked up, and filled the motor with coolant and oil. I'm waiting on the 10 an 90*'s, a tensioner pulley so I can get a new belt, and I have to go get one more coolant crossover gasket today. I have to cut the passenger side wastegate dump so it doesn't hit the new rack.

I'm not too worried about the hoses being close to the turbo since the blanket is on there. You can rest your hand on this particular one after a run. I'm still going to get some heat shield wrap to throw on them just because.


Old 02-15-2014, 10:39 AM
  #17  
Launching!
iTrader: (3)
 
JoeMama's GTO's Avatar
 
Join Date: Mar 2007
Posts: 272
Received 12 Likes on 10 Posts

Default

Looks like a nice setup. Just curious as to why you went with 205 AFRs vs a head with bigger runners?
Old 02-18-2014, 07:58 PM
  #18  
11 Second Club
Thread Starter
iTrader: (43)
 
98Camarod's Avatar
 
Join Date: Aug 2006
Location: Summerville, SC
Posts: 5,364
Likes: 0
Received 2 Likes on 2 Posts

Default

Originally Posted by JoeMama's GTO
Looks like a nice setup. Just curious as to why you went with 205 AFRs vs a head with bigger runners?
Price. I got the heads, head studs, YT rockers, and a set of pushrods for 1,000.


I picked up a vacuum pump from a local guy. I'm waiting on a few fittings, vacuum regulator, and the pulley. It's a GZ motorsports unit, VP104. I made the bracket for it to mount on the drivers side head.

Old 02-18-2014, 09:07 PM
  #19  
TECH Fanatic
iTrader: (23)
 
kainedogg's Avatar
 
Join Date: Mar 2006
Posts: 1,313
Received 5 Likes on 5 Posts

Default

I like the position of the turbos. Don't know how you got both down pipes to fit & run under the manifolds. What flange did you use to mate the manifold to the turbos?
Old 02-19-2014, 05:35 AM
  #20  
11 Second Club
Thread Starter
iTrader: (43)
 
98Camarod's Avatar
 
Join Date: Aug 2006
Location: Summerville, SC
Posts: 5,364
Likes: 0
Received 2 Likes on 2 Posts

Default

Originally Posted by kainedogg
I like the position of the turbos. Don't know how you got both down pipes to fit & run under the manifolds. What flange did you use to mate the manifold to the turbos?
truck manifold flange. The frame had to be cut and reinforced with tubing on both sides.


Quick Reply: Twin turbo upgrades


All times are GMT -5. The time now is 08:59 AM.