
Installed my motor mounts. (summary inside)
 03-01-2006, 12:51 AM
#1


Just got inside from installing the motor mount. My factory motor mount on the 2000 SS was ripped to shreds. I ordered up some Prothane poly urethane mounts. I just installed the drivers side and it seemed to cure the problem. I did everything in my garage w/ the car on jackstands. I had a buddy helping and the total time from start to finish was exactly 4 hours. I had heard lots of rumors how people took off the headers and steering shafts and all sorts of stuff. that's not even nesseccary. here's the basics of what we did:
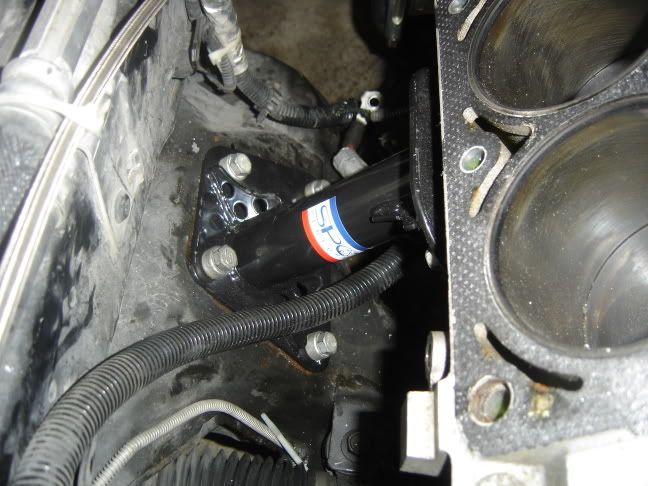
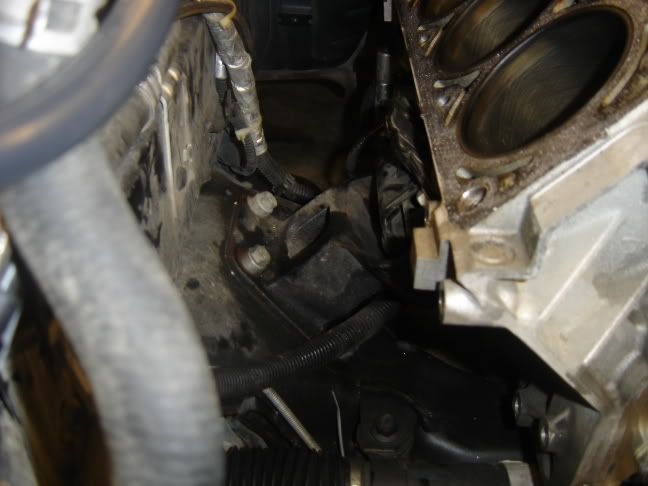
got the car up on jackstands. first thing we seen in the way was the alternator. removed serpentine belt. unhooked battery cable. unbolted the alternator and the bracket. took off the wire and plug on the back of it. put the alternator aside. that pretty much freed up alot of space to work with. then i took a floorjack w/ a small piece of wood on it under the rear of the oil pan. put light pressure on it to support the motor while unbolting the mount. there is 4 13mm bolts holding the mount to the block. we were then able to reach all 4. it took some time and had to use a swivel and extentions on a ratchet, also used a ratcheting closed end wrench on one. (the car does have SLP long tube headers, which did not have much affect on this install) once all 4 of the mount bolts were loosened we removed the large through bolt that goes through the center of the mount. then finished removing the 4 mount to engine block bolts. the mount then slips out of place. drilled all the factory rivets out w/ a 3/8" drill bit. heated the metal shell up w/ a torch, slowly pulled the 2 halves apart. the factory bonding will break free once heated. basically you re-assemble the mount using the new poly mount and the old metal shell. it's all bolted back together w/ new nuts and bolts that come with the mounts. as pictured below.

then you just re-install it all the way it came off. this is where we ran into the time consuming problem. one of the 4 13mm bolts that hold it to the block would not thread in straight. we were afraid it was going to cross-thread into the block. it litterally took 40mins of just messing with the one bolt. finally it went together smoothly and then just slapped the alternator on and belt. started right up. I immediately notice how smooth the engine was at idle. before w/ the mount that was ripped in 1/2 the motor would rock back and forth and almost hit the headers on the steering shaft. took it for a test drive, the car drives smoother and at full throttle shifting it dosen't seem like the motor is gonna fall out anymore! lol. just the driverside seemed to cure all problems i had and i see no reason to ever replace the passenger side mount on my car. i would assume all the TQ is on the driverside mount anyway, with the motor try'n to pull the drivers side upwards at full throttle.
well i'm tired need some sleep. hopefully this will help someone out installing new mounts. hopefully you can understand my tired ramblings. i'm off to bed.
got the car up on jackstands. first thing we seen in the way was the alternator. removed serpentine belt. unhooked battery cable. unbolted the alternator and the bracket. took off the wire and plug on the back of it. put the alternator aside. that pretty much freed up alot of space to work with. then i took a floorjack w/ a small piece of wood on it under the rear of the oil pan. put light pressure on it to support the motor while unbolting the mount. there is 4 13mm bolts holding the mount to the block. we were then able to reach all 4. it took some time and had to use a swivel and extentions on a ratchet, also used a ratcheting closed end wrench on one. (the car does have SLP long tube headers, which did not have much affect on this install) once all 4 of the mount bolts were loosened we removed the large through bolt that goes through the center of the mount. then finished removing the 4 mount to engine block bolts. the mount then slips out of place. drilled all the factory rivets out w/ a 3/8" drill bit. heated the metal shell up w/ a torch, slowly pulled the 2 halves apart. the factory bonding will break free once heated. basically you re-assemble the mount using the new poly mount and the old metal shell. it's all bolted back together w/ new nuts and bolts that come with the mounts. as pictured below.
then you just re-install it all the way it came off. this is where we ran into the time consuming problem. one of the 4 13mm bolts that hold it to the block would not thread in straight. we were afraid it was going to cross-thread into the block. it litterally took 40mins of just messing with the one bolt. finally it went together smoothly and then just slapped the alternator on and belt. started right up. I immediately notice how smooth the engine was at idle. before w/ the mount that was ripped in 1/2 the motor would rock back and forth and almost hit the headers on the steering shaft. took it for a test drive, the car drives smoother and at full throttle shifting it dosen't seem like the motor is gonna fall out anymore! lol. just the driverside seemed to cure all problems i had and i see no reason to ever replace the passenger side mount on my car. i would assume all the TQ is on the driverside mount anyway, with the motor try'n to pull the drivers side upwards at full throttle.
well i'm tired need some sleep. hopefully this will help someone out installing new mounts. hopefully you can understand my tired ramblings. i'm off to bed.
 03-01-2006, 12:58 AM
#2
FormerVendor
iTrader: (32)
Join Date: Jul 2003
Location: Lexington, KY
Posts: 3,654
Likes: 0
Received 0 Likes
on
0 Posts

I'm thinking of getting some Prothane poly-mounts myself. Dumbass me did not switch them while I was doing my enigne swap  . Now I have to do it with the engine in the car.
. Now I have to do it with the engine in the car.
03-01-2006, 01:18 PM
#4
I'm in the middle of swapping mine. I got the new mount in the brackets and bolted together, but I'm worried about the vibrations loosening the nuts (I don't have the teflon insert nuts). So I might run a tack weld along the edge for safety sake. I won't be changing them again anyway.
03-01-2006, 01:26 PM
#5
Originally Posted by V-10 Killer
I'm in the middle of swapping mine. I got the new mount in the brackets and bolted together, but I'm worried about the vibrations loosening the nuts (I don't have the teflon insert nuts). So I might run a tack weld along the edge for safety sake. I won't be changing them again anyway.

Trending Topics
03-01-2006, 02:31 PM
#8
Originally Posted by Katech
What brand of engine mounts are you guys using? Energy doesn't make them and I'm looking for some.
Thanks
Thanks
Tell you what. I'll ship mine to you next day if you'll send me a 427 in return
03-01-2006, 02:34 PM
#9
10 Second Club
iTrader: (35)

Join Date: Feb 2005
Location: Indiana boy
Posts: 4,174
Likes: 0
Received 0 Likes
on
0 Posts
I just installed solid mnts and I also bought the poly ones in case I change my mind later. If not I'll sell them. they are energy suspention I think. They were only 50 bucks. The solids are 170.00 I think. Here is a pic of them.

03-01-2006, 04:08 PM
#10
Originally Posted by JRracing
I just installed solid mnts and I also bought the poly ones in case I change my mind later. If not I'll sell them. they are energy suspention I think. They were only 50 bucks. The solids are 170.00 I think. Here is a pic of them.
EDIT:
I found the prothane ones. Thanks guys.
Last edited by Katech_Jason; 03-01-2006 at 04:18 PM.
 03-01-2006, 04:44 PM
#12
ya, if i hadn't ran into that bolt problem i could have had it done in 3 hours. the car drives great. GM should have made the motor and trans mounts in the car poly from the start. i dont know how people drive these cars w/ stock mounts, much less race them w/ the stock mounts.
 03-01-2006, 08:59 PM
#14
TECH Apprentice
iTrader: (28)

Join Date: Feb 2006
Location: north, ms
Posts: 398
Likes: 0
Received 0 Likes
on
0 Posts
I just installed the prothane motor mounts, passenger and drivers side along with poly trans mount. I installed pacesetter headers and ory pipe and new plugs while I was at it. The total time to install all those parts for me was about 17 hours with a few breaks in there. I removed as little as possible. These cars are not really meant to be worked on with the motor in the car. I have the scars all over my hands and arms to prove that. I have an exhaust leak coming from the ory, guess I`m gonna have to fire up the mig and weld it up. I noticed a definate improvement with the mounts as soon I turned the key and the starter turned over. I have some vibration in the driveline as well now though. Gotta try and fix that. It was on an 01 ws.6 a4 t/a
03-05-2006, 03:49 PM
#15
12 Second Club
iTrader: (2)
Join Date: Jan 2004
Location: Palos Hills, IL
Posts: 3,321
Likes: 0
Received 0 Likes
on
0 Posts
According to the directions Provided by Prothane (which i just recently found haha) It says that the mount should be facing the other way in the "clamshell" . The tabs are to be on the bottom underneither the frame mounts. I also found out why it is easy to crossthread the bolt into the block, its a very awkward spot. AND FOR THE LOVE OF GOD WHATEVER YOU GUYS DO HAVE AN EXTRA SET OF HANDS AROUND! took 1:30 to get one mount on!
03-05-2006, 04:41 PM
#16
my X pipe hits off my slp subframes, I think with this write up it gave me enough courage to go buy them and slap them in there. then its window motors next.  although I've done them twice on my friends car, still don't like doing it
although I've done them twice on my friends car, still don't like doing it
04-03-2006, 09:40 PM
#17
On The Tree
iTrader: (9)

Join Date: Jul 2002
Location: Michigan
Posts: 114
Likes: 0
Received 0 Likes
on
0 Posts
[QUOTE=StangEaterSS]Just got inside from installing the motor mount. My factory motor mount on the 2000 SS was ripped to shreds. I ordered up some Prothane poly urethane mounts. I just installed the drivers side and it seemed to cure the problem. I did everything in my garage w/ the car on jackstands. I had a buddy helping and the total time from start to finish was exactly 4 hours. I had heard lots of rumors how people took off the headers and steering shafts and all sorts of stuff. that's not even nesseccary. here's the basics of what we did:
got the car up on jackstands. first thing we seen in the way was the alternator. removed serpentine belt. unhooked battery cable. unbolted the alternator and the bracket. took off the wire and plug on the back of it. put the alternator aside. that pretty much freed up alot of space to work with. then i took a floorjack w/ a small piece of wood on it under the rear of the oil pan. put light pressure on it to support the motor while unbolting the mount. there is 4 13mm bolts holding the mount to the block. we were then able to reach all 4. it took some time and had to use a swivel and extentions on a ratchet, also used a ratcheting closed end wrench on one. (the car does have SLP long tube headers, which did not have much affect on this install) once all 4 of the mount bolts were loosened we removed the large through bolt that goes through the center of the mount. then finished removing the 4 mount to engine block bolts. the mount then slips out of place.[QUOTE=StangEaterSS]
"the mount then slips out of place" WTF am I doing wrong!!?????? I'm attempting to do my prothane mounts and have all 4 mount-engine bolts out, center through bolt out, jack under oilpan, and the damn clamshell is wedged between the k-member mount and the block!! I can wiggle it up and down with my hand but it doesn't have clearance to move up and out!!??? I've tried prying it up and it won't budge past the through bolt mounting point of the k-member mount. Maybe tomorrow I'll loosen up the other sides bolts and see if the engine will raise anymore. I don't want to put too much stress on the oilpan though. Any ideas what I'm doing wrong?