Smoothing side markers - removing DOT lettering.
 12-04-2006, 02:29 AM
#1
Staging Lane
Thread Starter
iTrader: (2)
Join Date: Mar 2006
Posts: 68
Likes: 0
Received 0 Likes
on
0 Posts
I'd like to remove the small lettering on the side markers making them smooth without leaving any noticable scuffs. I've seen it done to cars before tint or VHT is applied. I've heard that using a dremel is the best way to go but what head do I use? I gave it shot with an old set of markers and although it was fairly smooth to the touch, it didn't look very good. Can anyone with a little experience share some info on techniques and what part# attachment I should use?
Thanks!
Thanks!

 12-04-2006, 12:27 PM
#3
Staging Lane
Thread Starter
iTrader: (2)
Join Date: Mar 2006
Posts: 68
Likes: 0
Received 0 Likes
on
0 Posts
So no dremel huh?
I have 1000, 1500, and 2000 grit automtive sandpaper. Do you know which grits you used?
Did you sand the entire surface evenly or did you just focus on the lettering?
I have 1000, 1500, and 2000 grit automtive sandpaper. Do you know which grits you used?
Did you sand the entire surface evenly or did you just focus on the lettering?
Last edited by psygkosis; 12-04-2006 at 12:28 PM. Reason: spelling....
12-04-2006, 02:47 PM
#6
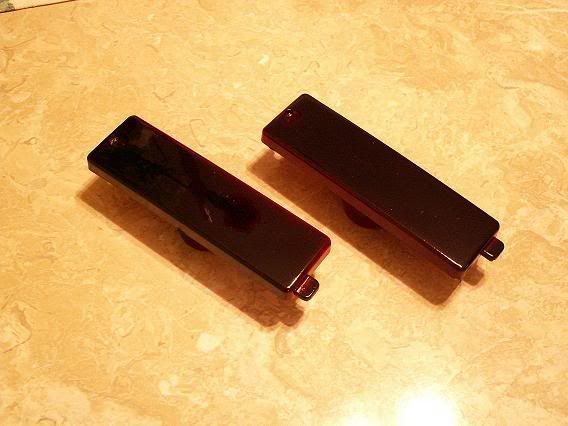
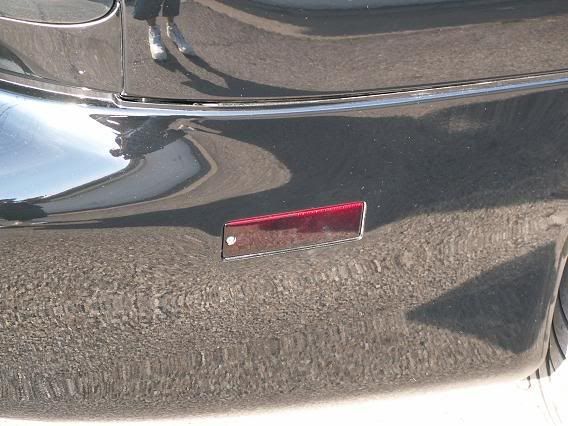
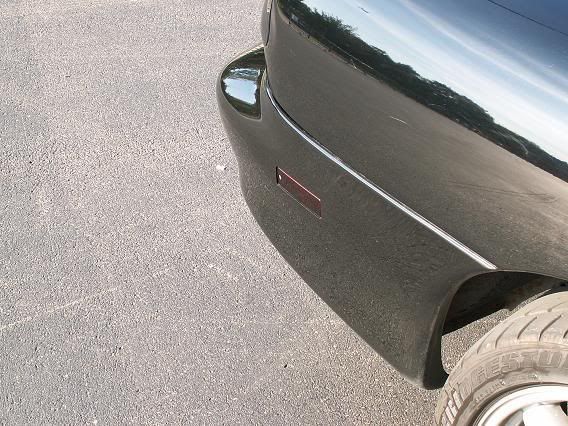
I did mine, hard to photograph though . . . No VHT, just buffed them back to a high shine. Sanded them with my B&D "Mouse" sander. I think I started with 220 grit and worked all the way down to 1200 wet. Then high speed buff.
You can see the shine here:

I did my side markers, the front turnsignals, and my tail lights.
You can see the shine here:
I did my side markers, the front turnsignals, and my tail lights.
Trending Topics
12-04-2006, 04:27 PM
#8
12 Second Club
iTrader: (18)
Join Date: Jul 2004
Location: Nor Cal
Posts: 1,255
Likes: 0
Received 0 Likes
on
0 Posts

Originally Posted by Nine Ball
Do them by hand. A slip of the Dremel would leave a nice gouge in that soft plastic.
12-04-2006, 04:56 PM
#9
Originally Posted by 01ls1lover
Ya carefull with those dremels.. I was doing my headlight and got a piece of metal in my eye.. It sucked. Went a week then couldnt go anymore hed to go get it taken out with some needle thing. Wear eyepro kids!
12-04-2006, 06:00 PM
#10
Staging Lane
Thread Starter
iTrader: (2)
Join Date: Mar 2006
Posts: 68
Likes: 0
Received 0 Likes
on
0 Posts
Great info, exactly what I was looking for! Xsta z 28, yours look awesome! That's what I'm going for. I appreciate all the feedback folks. I'm going to practice on my old ones first, then order some replacements for my final project. I intend to apply a thin straight line, maybe 1/4 inch wide, horizontally across the length of the marker with vht niteshade or black paint. It will give it the look of two seperate markers similar to the 2nd gens. Haven't decided on paint or vht yet. That will depend on the results from my practice run.
12-15-2006, 01:44 PM
#11
TECH Addict
iTrader: (19)
Join Date: Mar 2006
Location: Owings, Md
Posts: 2,157
Likes: 0
Received 0 Likes
on
0 Posts
Originally Posted by 01ls1lover
Ya carefull with those dremels.. I was doing my headlight and got a piece of metal in my eye.. It sucked. Went a week then couldnt go anymore hed to go get it taken out with some needle thing. Wear eyepro kids!
The second time i got a piece in my eye i had it removed the very next day. No more playing around with that crap. It sucks
Oh, and yes, use sandpaper then buff it, not a dremel
 Damn! You guys need to wear better eye protection! Assuming, of course, you're wearing it in the first place.
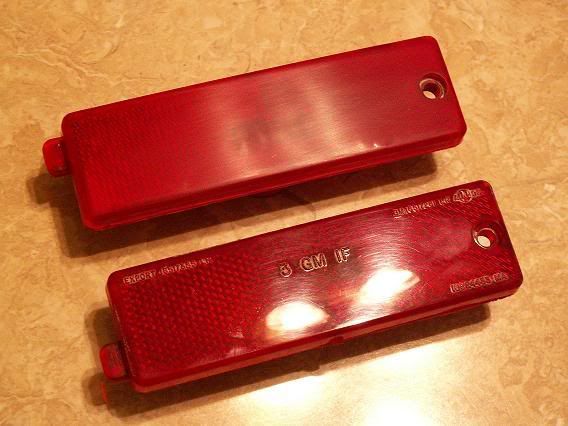
 12-15-2006, 04:28 PM
#14
TECH Regular
So it looks like when you take the letters off it makes the peice seem lighter.. as in color shade? Do yall think it will stick out like a sore thumb on my car. see sig for car pic.
-bryan
-bryan
12-15-2006, 05:29 PM
#16
TECH Fanatic
iTrader: (13)
Join Date: Aug 2006
Location: Chicago, IL
Posts: 1,173
Likes: 0
Received 0 Likes
on
0 Posts
Originally Posted by bmccrary
So it looks like when you take the letters off it makes the peice seem lighter.. as in color shade? Do yall think it will stick out like a sore thumb on my car. see sig for car pic.
-bryan
-bryan
12-15-2006, 05:39 PM
#17
TECH Regular
iTrader: (1)
Join Date: May 2006
Location: Chantilly, VA
Posts: 430
Likes: 0
Received 0 Likes
on
0 Posts
2 very simple questions but I was just wondering how yall do it:
1-how exactly do you wet sand the markers...like step by step?
2-when you refer to buff it back to a shine what process/materials do you use?
Sorry if those seem like stupid questions but I want as much info as possible to get the best result from the finished product.
Thanks,
Jason
1-how exactly do you wet sand the markers...like step by step?
2-when you refer to buff it back to a shine what process/materials do you use?
Sorry if those seem like stupid questions but I want as much info as possible to get the best result from the finished product.
Thanks,
Jason
12-15-2006, 06:20 PM
#18
TECH Senior Member
iTrader: (4)
Join Date: Dec 2003
Location: Arlington TX
Posts: 5,276
Likes: 0
Received 0 Likes
on
0 Posts
I did mine last year and they came out great. Just take some sand paper and wetsand the letters off. It doesn't take much time at all. I spent maybe 30 on all of them and polishing them up didn't take long and they look better than new.
To aswer F-117:
1. Get some 2000 grit paper and get a spray bottle. In the spray bottle put some water and a little bit of soap. Spray the paper and the marker lens. Keep the lens wet while you sand the letters. It's real simple
2. To buff the markers back up use some plastic polish. You can just about find it at any autoparts store. At the time I did mine I didn't have any plastic polish so I used my Mother's billet polish, worked just as good too.
12-15-2006, 06:26 PM
#19
TECH Regular
iTrader: (1)
Join Date: May 2006
Location: Chantilly, VA
Posts: 430
Likes: 0
Received 0 Likes
on
0 Posts
Thanks for the info!
Also, does anyone reccomend wet sanding after applying the nite shades? So far they are tinted and clear coated and I didnt know if I should wet sand the clear coat to get it super smooth then buff...Is that anyones reccomendation?
Thanks,
Jason
Also, does anyone reccomend wet sanding after applying the nite shades? So far they are tinted and clear coated and I didnt know if I should wet sand the clear coat to get it super smooth then buff...Is that anyones reccomendation?
Thanks,
Jason


