Need some expertise from some experienced polishing people
 01-22-2007, 05:43 PM
#1
TECH Fanatic
Thread Starter
iTrader: (18)
Join Date: Aug 2003
Location: Tulsa, OK
Posts: 1,268
Likes: 0
Received 0 Likes
on
0 Posts

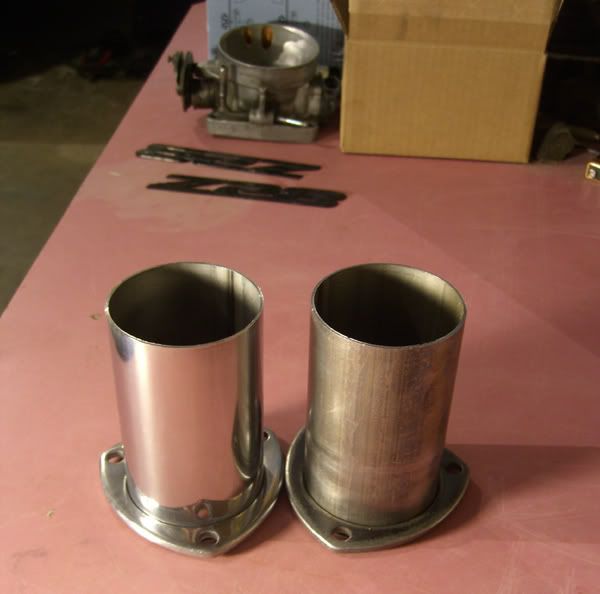
This is the point I am at pictured below. I have used 400 grit and 1000 grit to wet sand with followed up with Mother's rubbing compound. I would like to be able to remove all the fine little scratches but have reached the extent of my polishing knowledge. What if anything can I do to get a little bit better finish and get rid of the fine little scratches.
TIA
Preston

TIA
Preston
 01-22-2007, 05:50 PM
#2
On The Tree
iTrader: (2)
Join Date: May 2006
Location: Byron, Illinois
Posts: 148
Likes: 0
Received 0 Likes
on
0 Posts
I ordered a stainless polishing kit from Caswell Plating. Have yet to try it since its cold as ***** outside, but soon I will be fully polishing my new GMMG. Do a search for them. Im hoping it is worth the money.
01-22-2007, 06:05 PM
#3
TECH Enthusiast
Join Date: Feb 2003
Location: Michigan (Holland/Grand Rapids)
Posts: 614
Likes: 0
Received 0 Likes
on
0 Posts
Mothers is good for aluminunm but you are going to need something more aggressive to polish stainless steel. You need some "buffs" attached to a drill and some buffing rouge (compound) to really make it shine. I got al of my supplies from Menards in the hand tool section but you may also try the Eastwood Company as they have all you will ever need for polishing.
I used this method to polish the Corsa Sport exhaust on my Silverado SS. You can see the difference of the polished tips and adjacent connecting y-pipe (what I did) vs the rest of the exhaust tubing to see what I started with. I even hit the clamp with the buffing wheels. I spent a total of 5 min on the muffler so it isn't as nice as the tip but good enough for a daily drive that sees snow.


Here are some tips from the Eastwood Site to read up on and some links to check out.
Good Luck, Greg
Eastwood polishing tips Click Here!!
Eastwood surface prep tips Click Here!!
I used this method to polish the Corsa Sport exhaust on my Silverado SS. You can see the difference of the polished tips and adjacent connecting y-pipe (what I did) vs the rest of the exhaust tubing to see what I started with. I even hit the clamp with the buffing wheels. I spent a total of 5 min on the muffler so it isn't as nice as the tip but good enough for a daily drive that sees snow.
Here are some tips from the Eastwood Site to read up on and some links to check out.
Good Luck, Greg
Eastwood polishing tips Click Here!!
Eastwood surface prep tips Click Here!!
Aluminum and other soft metal surfaces need to have a surface as smooth or Aluminum and other soft metal surfaces need to have a surface as smooth or smoother than what a 220 grit abrasive would yield. Stainless Steel and other hard metals should be brought to a 400-600 grit or finer finish before using the buffing wheels and compounds. Using buffing wheels and compounds on surfaces rougher than recommended will result in an uneven surface.
BUFFING INSTRUCTIONS
Choose the Right Wheel and Compound for the Job
Use the chart below to make your selection. The condition of the piece on which you are working will determine whether or not all three buffing steps will be necessary. A felt bob, facer, mushroom, goblet, or mini buff can be substituted as necessary to buff deeply recessed areas.
Buffing Wheel and Compound Selection Chart
Materials Steel, Iron Stainless, or Other Hard Materials Soft Metals, Brass, Copper, Aluminum Die-cast, Zinc Chrome Nickel Plate Solid and Plated Gold Silver Plastics
Step 1 - Rough Compound, Buff Emery, Treated/ Untreated Sisal Tripoli, Treated/ Untreated Spiral/Ventilated N/A N/A Plastic Loose/String
Step 2 - Intermediate Compound, Buff Stainless Treated/Untreated Spiral/Ventilated N/A Stainless* Treated/Untreated Spiral/Ventilated N/A N/A
Step 3 - Final Compound, Buff White Rouge Loose Section White Rouge Loose Section White Rouge Loose Section Jeweler's Rouge* Flannel Plastic Flannel String
Recommended RPM for 4-10" Wheels 3600 3600 3600 1800-3600 1800
NOTE: Condition of the workpiece dictates the steps necessary. Some pieces may only NOTE: Condition of the workpiece dictates the steps necessary. Some pieces may only require final finishing (Step 3).
*Use caution to prevent buffing through plating.
BUFFING INSTRUCTIONS, CONT.
Buffing Wheel and Motor Selection
For successful buffing, it is important that the motor and buffing wheel you use are matched. If your motor is not powerful enough for the wheel you are using, the motor will not be able to maintain proper speed. If the motor turns too fast, excess heat will build up and the work piece might become permanently discolored. Use the chart above to choose the right motor/wheel combination. Different wheel thicknesses can be achieved by stacking buffs together.
Mounting the Buffing Wheel
Attach the buffing wheel to the buffing motor spindle, Attach the buffing wheel to the buffing motor spindle, making sure that it is mounted securely between the flange washers. When mounted properly, the top of the wheel should spin toward you and down when the buffing motor is running. NOTE: Wheel stitching orientation is of no consequence to wheel performance or durability.
Applying Compound to the Buffing Wheel
With the buffing wheel attached and the motor running, gently touch the appropriate tube of compound to the face of the wheel for one to two seconds. Apply the compound slightly below the centerline of the wheel. (See illustration at right)
NOTE: It is normal for the compound to appear to be dried out. The compound consists of a graded abrasive in a hard wax binder. The heat from contacting the spinning buffing wheel surface will melt the binder and the wheel will pick up the compound.
01-22-2007, 07:52 PM
#6
TECH Fanatic
Thread Starter
iTrader: (18)
Join Date: Aug 2003
Location: Tulsa, OK
Posts: 1,268
Likes: 0
Received 0 Likes
on
0 Posts
Originally Posted by XtinctZ28
The first thing you need to do is cut down on what all you have to polish, so just save yourself some time and send me those wheels! 

I was waiting for someone to say that, I should have guessed it would be you

Trending Topics
01-23-2007, 11:11 AM
#8
TECH Regular
iTrader: (1)
Join Date: Dec 2004
Location: Toms River, NJ
Posts: 404
Likes: 0
Received 0 Likes
on
0 Posts
Originally Posted by SS LS1
You need some "buffs" attached to a drill and some buffing rouge (compound) to really make it shine. I got al of my supplies from Menards in the hand tool section but you may also try the Eastwood Company as they have all you will ever need for polishing.
Eastwood is your best source for supplies and info (although I picked up my stuff at Sears and the rest at swap meets).
If you have an air tool that will work better than a drill.
I did this header reducer in bout 15 minutes after the initial hand-sanding.
 01-23-2007, 01:45 PM
#9
TECH Fanatic
Thread Starter
iTrader: (18)
Join Date: Aug 2003
Location: Tulsa, OK
Posts: 1,268
Likes: 0
Received 0 Likes
on
0 Posts
I don't have access to an air compressor, so a drill is my only option. Will a drill produce the same results, just take longer, or will the results not be as good as an air compressor?
Looks real good btw Snuffles
Looks real good btw Snuffles
01-23-2007, 04:31 PM
#13
TECH Regular
iTrader: (1)
Join Date: Dec 2004
Location: Toms River, NJ
Posts: 404
Likes: 0
Received 0 Likes
on
0 Posts
Originally Posted by Y2K Pewter SS
I don't have access to an air compressor, so a drill is my only option. Will a drill produce the same results, just take longer, or will the results not be as good as an air compressor?
As already said, stick with an electric drill, most battery powered ones are weak and run out of juice.
Two words of caution if you're using a drill:
Keep an eye on how hot your drill gets. The motors crap out easily from constantly turning.
(Stupid Makita
 )
)Next is don't apply to much side pressure on the drill, they don't like that either.
Originally Posted by Trust
I have those same jack-stands.
