Auto to manual write up
 07-19-2007, 05:18 PM
#1
Staging Lane
Thread Starter
iTrader: (10)

Join Date: Jan 2007
Posts: 60
Likes: 0
Received 0 Likes
on
0 Posts

ok well i just finished my conversion and i decided that ill atempt a write up on it. I did not plan on doing a write up so i dont have as many pictures as i would like but i will try my best at making this write up better than any of the others out there. overall it wasnt very hard, but it wasnt very easy either. Just plan ahead, what could go wrong, probably will.
Now i did this on ym v6 but pretty much the whole process is exsactly the same
parts needed:
tranny /w bellhousing
clutch flywheel preasure plate
clutch master cylinder /w clutch reservior
slave cylinder /w throw out bearing
pilot bearing
shifter
shift ****
center console insert
leather shift boot
lower shift boot
vss if tranny doesnt come with one
manual torque arm bracket/mount
manual cross member
clutch pedal assm
new pcm or a pcm reflash
lots of new bolts
reverse lights switch /w leads
clutch safty switch /w pigtail leads
rec new tranny mount
wire connectors
small amount of extra wire
more pictures to come when i get my camera back from my stupid sister.
1. First of course you will need to get the car up on jacks, the higher the better. Also disconnect the battery just in case.
2. Once the car is jacked up you will need to take off the torque arm, followed by the driveshaft.
To remove the torque arm there are (2) 22mm head long bolts with 22mm nuts on each end located on the rearend. after removing these, remove the torque arm bracket attached to the trans.(these are 15mm bolts) Just follow the torque arm to where it connects to the tans and you will see it, Should remove with 2-3 bolts. Next there are (4) 7/16 bolts attaching the driveshaft to the rear end. Remove these and the driveshaft should pull out from the trans.
3. Next you will need to remove the actual trans from the engine, this is the fun part. Start inside the car and remove the center console. Put the car in first, there is a staple holding the shift **** on. Take a small flat head screw driver and take it out and remove the ****. Next there are 2 7mm bolts under the coin holder in the arm rest. Take those off and the shifter plate will come off. Then there are about 8 10mm bolts holding the center console in place. 2 are in the bottom of the armrest, 2 are on either side of the console (one by the cupholder and oppisite side of it), and the rest are located next to or on the shifter assm. Once the center console is off unbolt the shifter and you can either cut the shifter cable and brake release cable or find where they are connected and disconnect them. I choose to cut them and then i removed the shifter assm.
Remove all the bolts you can from the underside of the bellhousing. They are 18mm i belive. When you get to the the bolts that are too hard to reach you will need to unbolt the cross member from the car. It is located in the back and bottom of the trans. Place a jack under this so when you unbolt it the trans will not fall. There are 4 bolts each are 14mm i believe.
When you unbolt the crossmember onto the jack, you will need to slightly lower the jack. When you do this the trans will tilt back allowing you to get to the higher up bolts. The best way to get these bolts off is by using a 4 foot long extension and getting the bolts out from behind the trans.
There should also be 2 trans mounts on either side of the trans connecting the trans to the engine. For some reason my car did not have these.
When all the bolts are removed it is time to pry the tranns away from the engine. The easiest way to do this i found is get a type of crowbar and stick it between the engine and the trans and push very hard. But be very careful once the trans is pushed far enough away, the trans will fall out and you DON'T want it to fall on you (ITS HEAVY!!!) Also make sure all the connectors are off of the trans before letting it fall.

4. Once the trans is removed you are left with the torque converter.
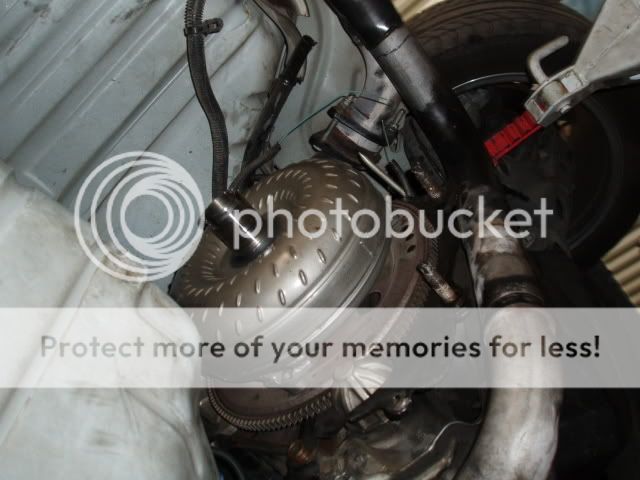
there are 3 bolts holding this on if i remember correctly. But to get to the bolts you need to remove the inspection plate first. There should be at least 1very small bolt holding it in place, and then it should pull out (with some forcefull hands ) dont worry about bending it or even cutting it, you wont be using it again.
Once the inspection plate is out you can reach the bolts holding the torque converter to the flex plate. you will need to stick a screwdriver or something into the flex plate so it will not rotate when taking the bolts off. Every time you take a bolt off, you will need to rotate the torque converter to get to the next bolt. Once the verter is off, then you can unbolt the flex plate, there should be 8 bolts.
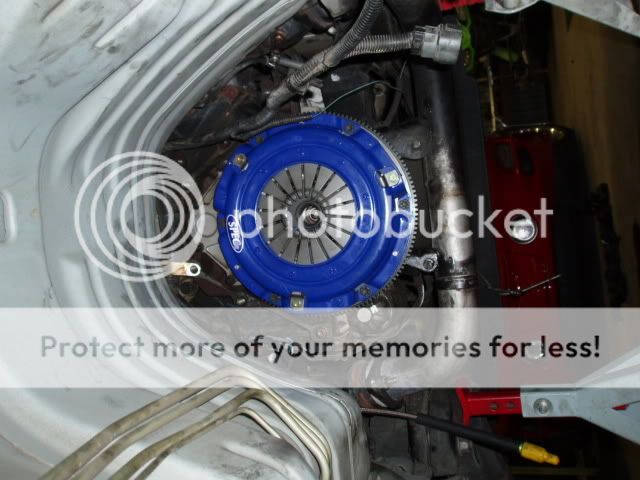
5. Once the flexplate is off you can put in your pilot bearing. Get it in there as far as you can, it should be very close to flush. After that, on goes your flywheel. Make sure it lines up right and you get all the bolts very tight. You cant use the same bolts you took out, so find new flywheel to crank bolts.
Put on the clutch disk and use the alignment tool to make sure it stays aligned.
Then put on the pressure plate and try and torque the bolts in a star pattern.
6.Once all the clutch stuff is in, it's time for the clutch hydraulics (yay!)
start by removing the panel under the steering wheel
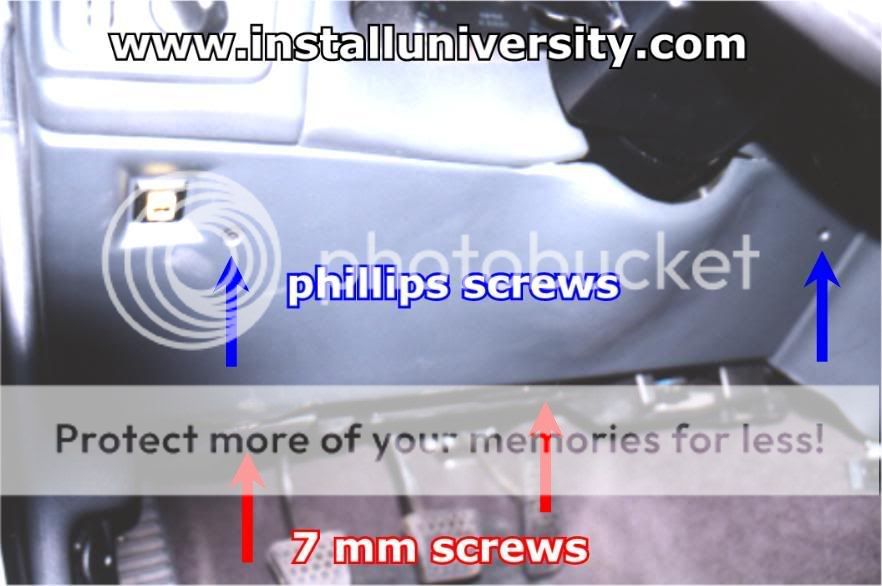
Then you can remove the brake pedal. Now this might sound easy but think again. I HIGHLY reccomend removing the drivers seat for more room. To remove the pedals there are a total of 5 bolts. 2 on either side of the steering column and one above pedal right behind all the wire connectors that attach to the brake pedal. There are 2 push type connectors attached to the pedal, brake light switch and cruise control disengage switch. Disconnect these and unscrew them. Then the brake pedal should come out.
put the brake sensor switches back onto the new pedal assem and put the new pedals in. Make sure the sensors are screwed in the right amount, or the brake lights wont come on.
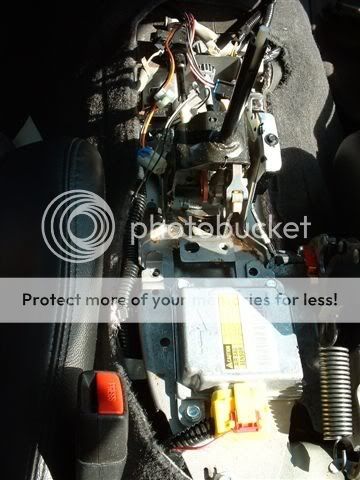
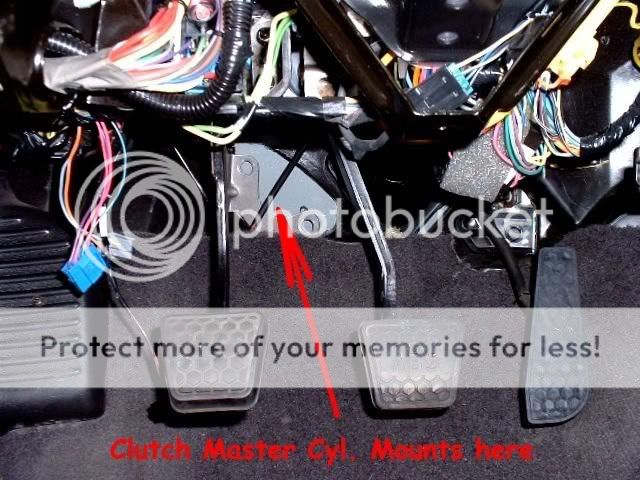
7. next you need to mount the clutch master cylinder it goes right here...
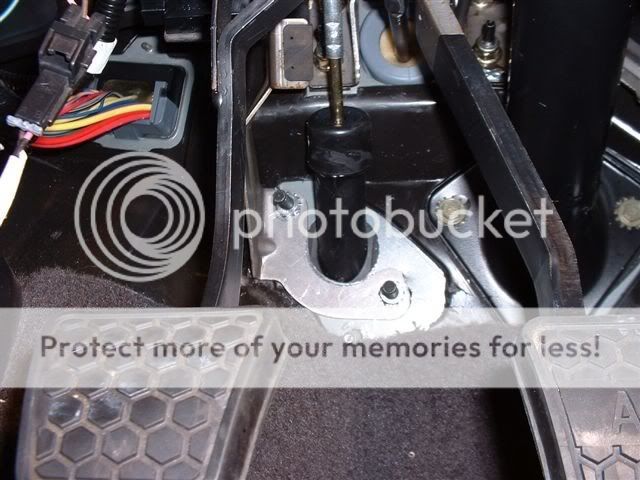
you will need to drill 2 holes and a bigger hole in the middle, i reccomend using a hole saw to do this.
it may take some some forcefull thinking to get the master cylinder in there.
and this is where the clutch reservior mounts
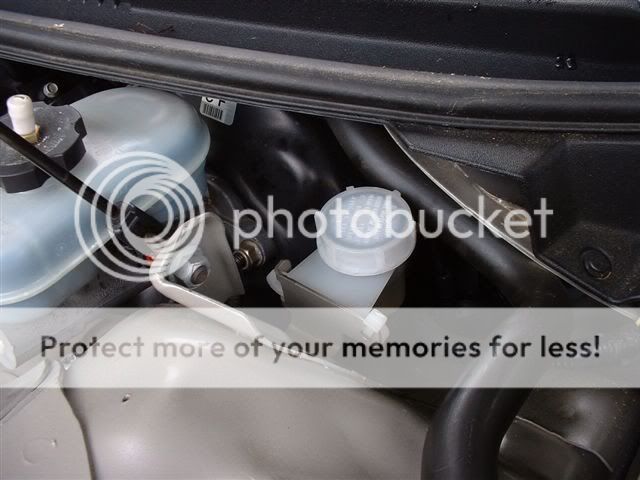
lead the steal braided line down to the back of the engine where the trans will be later.
8. Next you will need to cut a hole for the shifter, mine is a little long but it doesn't really matter if you are off by too much. don't start as far back as i did. some trimming might need to be done later so don't worry about getting it perfect.
9. time to put the manual tranny in now. but before you put it in, bolt on the slave cylinder, you will need to remove the bellhousing from the trans in order to get in on. now the trans should bolt back on the same way it came off but, you may need to improvise a little. Make sure you put on your new torque arm bracket before putting the trans in. once the new trans is in put the torque arm back on as well as the driveshaft.
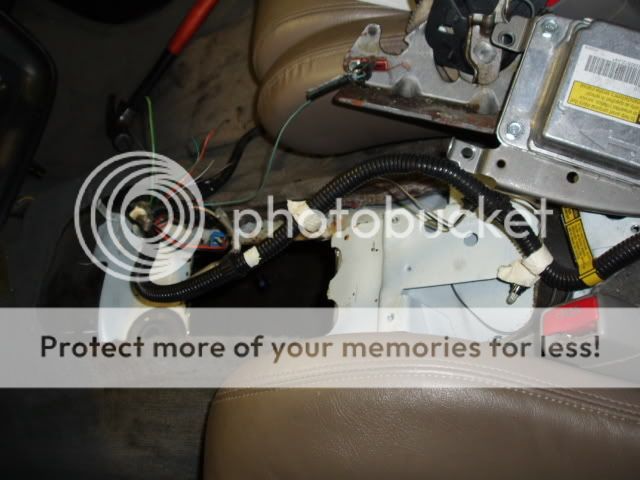
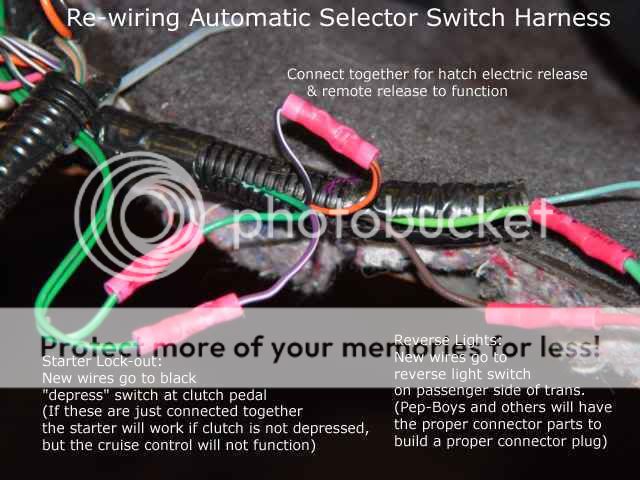
10. you're not done yet, time for the wiring. There are basically 3 things you need to wire, they are.....
you may need extensions to reach the trans and the clutch saftey switch.
Hook up all the connections to the trans and make sure you connect the master cylinder line to the slave cylinder. Then add brake fluid to the clutch reservoir and bleed the clutch.
11. now add tranny fluid to the trans, you need 3.4 quarts of atf. You can add it through where the shifter mounts. Then attach the shifter use some silicone rtv to seal it. The shifter bolts are 13mm heads and there are 4 of them. followed by the lower shift boot i used self tapping screws to keep it in place. You should be able to start the car now. Start it and make sure it works. Put it in first and see if the tires rotate. Then put it in reverse and see if the reverse lights come on. Then i put the center console back together
12 before taking it off the stands get under the car and listen for any abnormal sounds, like knocking or scraping. If all sounds good, take the car off the stands and take it for a test drive. MAKE SURE YOU GET A METAL RETAINER SO THAT YOUR MASTER CYLINDER ROD DOES NOT POP OFF YOUR CLUTCH PEDAL.
The car is ok to drive but you will need to get your pcm reflashed soon, so don't plane on going around racing just yet.
Hope this helps everyone, and be careful if you attempt this conversion.
If you have any questions, ask away, i will be happy to answer
meatyshells
Now i did this on ym v6 but pretty much the whole process is exsactly the same
parts needed:
tranny /w bellhousing
clutch flywheel preasure plate
clutch master cylinder /w clutch reservior
slave cylinder /w throw out bearing
pilot bearing
shifter
shift ****
center console insert
leather shift boot
lower shift boot
vss if tranny doesnt come with one
manual torque arm bracket/mount
manual cross member
clutch pedal assm
new pcm or a pcm reflash
lots of new bolts
reverse lights switch /w leads
clutch safty switch /w pigtail leads
rec new tranny mount
wire connectors
small amount of extra wire
more pictures to come when i get my camera back from my stupid sister.
1. First of course you will need to get the car up on jacks, the higher the better. Also disconnect the battery just in case.
2. Once the car is jacked up you will need to take off the torque arm, followed by the driveshaft.
To remove the torque arm there are (2) 22mm head long bolts with 22mm nuts on each end located on the rearend. after removing these, remove the torque arm bracket attached to the trans.(these are 15mm bolts) Just follow the torque arm to where it connects to the tans and you will see it, Should remove with 2-3 bolts. Next there are (4) 7/16 bolts attaching the driveshaft to the rear end. Remove these and the driveshaft should pull out from the trans.
3. Next you will need to remove the actual trans from the engine, this is the fun part. Start inside the car and remove the center console. Put the car in first, there is a staple holding the shift **** on. Take a small flat head screw driver and take it out and remove the ****. Next there are 2 7mm bolts under the coin holder in the arm rest. Take those off and the shifter plate will come off. Then there are about 8 10mm bolts holding the center console in place. 2 are in the bottom of the armrest, 2 are on either side of the console (one by the cupholder and oppisite side of it), and the rest are located next to or on the shifter assm. Once the center console is off unbolt the shifter and you can either cut the shifter cable and brake release cable or find where they are connected and disconnect them. I choose to cut them and then i removed the shifter assm.
Remove all the bolts you can from the underside of the bellhousing. They are 18mm i belive. When you get to the the bolts that are too hard to reach you will need to unbolt the cross member from the car. It is located in the back and bottom of the trans. Place a jack under this so when you unbolt it the trans will not fall. There are 4 bolts each are 14mm i believe.
When you unbolt the crossmember onto the jack, you will need to slightly lower the jack. When you do this the trans will tilt back allowing you to get to the higher up bolts. The best way to get these bolts off is by using a 4 foot long extension and getting the bolts out from behind the trans.
There should also be 2 trans mounts on either side of the trans connecting the trans to the engine. For some reason my car did not have these.
When all the bolts are removed it is time to pry the tranns away from the engine. The easiest way to do this i found is get a type of crowbar and stick it between the engine and the trans and push very hard. But be very careful once the trans is pushed far enough away, the trans will fall out and you DON'T want it to fall on you (ITS HEAVY!!!) Also make sure all the connectors are off of the trans before letting it fall.
4. Once the trans is removed you are left with the torque converter.
there are 3 bolts holding this on if i remember correctly. But to get to the bolts you need to remove the inspection plate first. There should be at least 1very small bolt holding it in place, and then it should pull out (with some forcefull hands
) dont worry about bending it or even cutting it, you wont be using it again.Once the inspection plate is out you can reach the bolts holding the torque converter to the flex plate. you will need to stick a screwdriver or something into the flex plate so it will not rotate when taking the bolts off. Every time you take a bolt off, you will need to rotate the torque converter to get to the next bolt. Once the verter is off, then you can unbolt the flex plate, there should be 8 bolts.
5. Once the flexplate is off you can put in your pilot bearing. Get it in there as far as you can, it should be very close to flush. After that, on goes your flywheel. Make sure it lines up right and you get all the bolts very tight. You cant use the same bolts you took out, so find new flywheel to crank bolts.
Put on the clutch disk and use the alignment tool to make sure it stays aligned.
Then put on the pressure plate and try and torque the bolts in a star pattern.
6.Once all the clutch stuff is in, it's time for the clutch hydraulics (yay!)
start by removing the panel under the steering wheel
Then you can remove the brake pedal. Now this might sound easy but think again. I HIGHLY reccomend removing the drivers seat for more room. To remove the pedals there are a total of 5 bolts. 2 on either side of the steering column and one above pedal right behind all the wire connectors that attach to the brake pedal. There are 2 push type connectors attached to the pedal, brake light switch and cruise control disengage switch. Disconnect these and unscrew them. Then the brake pedal should come out.
put the brake sensor switches back onto the new pedal assem and put the new pedals in. Make sure the sensors are screwed in the right amount, or the brake lights wont come on.
7. next you need to mount the clutch master cylinder it goes right here...
you will need to drill 2 holes and a bigger hole in the middle, i reccomend using a hole saw to do this.
it may take some some forcefull thinking to get the master cylinder in there.
and this is where the clutch reservior mounts
lead the steal braided line down to the back of the engine where the trans will be later.
8. Next you will need to cut a hole for the shifter, mine is a little long but it doesn't really matter if you are off by too much. don't start as far back as i did. some trimming might need to be done later so don't worry about getting it perfect.
9. time to put the manual tranny in now. but before you put it in, bolt on the slave cylinder, you will need to remove the bellhousing from the trans in order to get in on. now the trans should bolt back on the same way it came off but, you may need to improvise a little. Make sure you put on your new torque arm bracket before putting the trans in. once the new trans is in put the torque arm back on as well as the driveshaft.
10. you're not done yet, time for the wiring. There are basically 3 things you need to wire, they are.....
you may need extensions to reach the trans and the clutch saftey switch.
Hook up all the connections to the trans and make sure you connect the master cylinder line to the slave cylinder. Then add brake fluid to the clutch reservoir and bleed the clutch.
11. now add tranny fluid to the trans, you need 3.4 quarts of atf. You can add it through where the shifter mounts. Then attach the shifter use some silicone rtv to seal it. The shifter bolts are 13mm heads and there are 4 of them. followed by the lower shift boot i used self tapping screws to keep it in place. You should be able to start the car now. Start it and make sure it works. Put it in first and see if the tires rotate. Then put it in reverse and see if the reverse lights come on. Then i put the center console back together
12 before taking it off the stands get under the car and listen for any abnormal sounds, like knocking or scraping. If all sounds good, take the car off the stands and take it for a test drive. MAKE SURE YOU GET A METAL RETAINER SO THAT YOUR MASTER CYLINDER ROD DOES NOT POP OFF YOUR CLUTCH PEDAL.
The car is ok to drive but you will need to get your pcm reflashed soon, so don't plane on going around racing just yet.
Hope this helps everyone, and be careful if you attempt this conversion.
If you have any questions, ask away, i will be happy to answer
meatyshells
Last edited by meatyshells; 05-11-2008 at 01:23 AM.
 06-01-2010, 04:05 PM
#2
12 Second Club
iTrader: (5)

Join Date: Aug 2005
Location: Chesapeake,va and Charlotte,NC
Posts: 1,231
Likes: 0
Received 0 Likes
on
0 Posts
great writeup. did you add up about how much it cost you total?
ive been thinking about doing this lately manuals are just so much more fun to drive
ive been thinking about doing this lately manuals are just so much more fun to drive
06-01-2010, 06:16 PM
#3
On The Tree
iTrader: (9)
Join Date: Jan 2009
Location: Mechanicsburg PA
Posts: 175
Likes: 0
Received 0 Likes
on
0 Posts
Nice write-up!
For anyone attempting this the Tick Adjustable Master Cylinder did not fit on my swap unfortunately due to lack of space. Not sure if my car is just odd but just keep that in mind if you plan on going with it. Also, a tranny jack helps out A LOT!!!
OP, did you wire up the reverse lockout switch?
For anyone attempting this the Tick Adjustable Master Cylinder did not fit on my swap unfortunately due to lack of space. Not sure if my car is just odd but just keep that in mind if you plan on going with it. Also, a tranny jack helps out A LOT!!!
OP, did you wire up the reverse lockout switch?
04-11-2012, 10:28 PM
#5

You also need to add a support back plate that goes betwwen the firewall and the pedal assembly.The factory M6 cars have one and the A4 does not. Your firewall may crack if you do not have the plate.
04-11-2012, 11:07 PM
#6
TECH Apprentice
iTrader: (16)
Join Date: Jan 2011
Location: Central Ohio
Posts: 349
Likes: 0
Received 0 Likes
on
0 Posts
Nice write-up!
For anyone attempting this the Tick Adjustable Master Cylinder did not fit on my swap unfortunately due to lack of space. Not sure if my car is just odd but just keep that in mind if you plan on going with it. Also, a tranny jack helps out A LOT!!!
OP, did you wire up the reverse lockout switch?
For anyone attempting this the Tick Adjustable Master Cylinder did not fit on my swap unfortunately due to lack of space. Not sure if my car is just odd but just keep that in mind if you plan on going with it. Also, a tranny jack helps out A LOT!!!
OP, did you wire up the reverse lockout switch?
Also, with regard to the reverse lockout, I moved a wire to a different pin in the PCM to provide a complete circuit to power the solenoid. First, I found the red wire going to pin 61 on the red PCM connector, and moved that to pin 42 of the same connector (only 98's use these numbers. 99-02 models use a different pin number, and I can't remember what it is). The red wire you just re-pinned is one that eventually snakes its way down through the wiring harness and ends up in the big 20 pin connector for the auto trans. You will have to find out which red wire (there are two red wires in the 20 pin connector) it is on the 20 pin auto connector end, because you will need to use it. To find out which one it was, I snipped both red wires from the 20 pin connector, then tested each with a multimeter, hooking one lead from the multimeter to the red wire at the 20 pin connector end and the other lead from the multimeter to the wire I just repinned in the PCM to find which red wire completed the circuit. When I found the red wire that went to the PCM connector I just re-pinned, I used that wire to hook up the ground wire from the reverse lockout solenoid connector. When the car gets under 3mph, the PCM grounds out the reverse lockout solenoid, allowing the car to be shifted into reverse. Inside the solenoid, there is a little check ball that stays energized any other time, keeping you from being able to shift into reverse. The PCM uses the pin you had to move the wire to to create a circuit with the reverse lockout solenoid, energizing and grounding out the solenoid as it is commanded. I typed this late at night, so if it doesn't make sense, feel free to PM me.