
My Custom 1.5 DIN 7" Screen Install!
 09-01-2007, 08:06 PM
#1
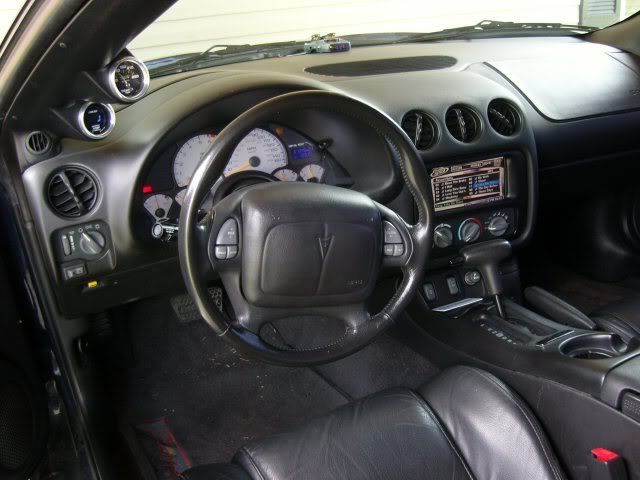
I know a lot of us have wanted a 7" in dash screen in our cars. I'm sure alto of people have researched that fact that it's impossible to fit a double DIN in dash without a custom bezel....and even at that Camaro's seem to have a better starting place than T/As. I've searched and searched, but only have come across a select few T/As that have been able to pull off anything different but a single DIN head unit....at least without relocating the A/C controls or modifying the bezel a good bit. None of these options I wanted, as my motivation was to do an install that will not relocate the A/C controls, not spend a ton of $$ and will not modify the bezel in height so it'll be stock looking appearance. I'm not sure if I pulled it off, but it was worth a shot...so here it goes...
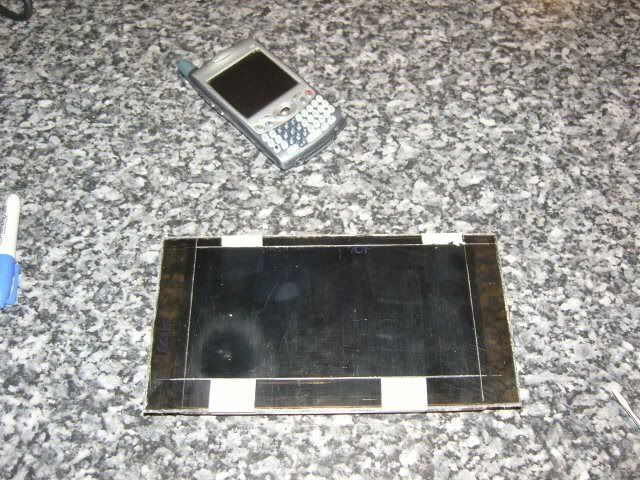
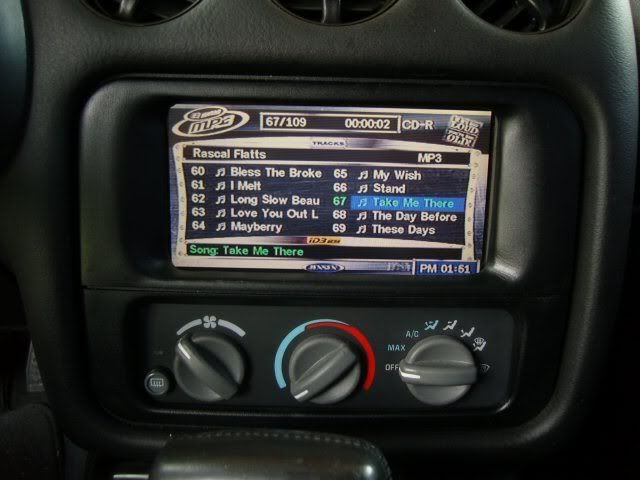
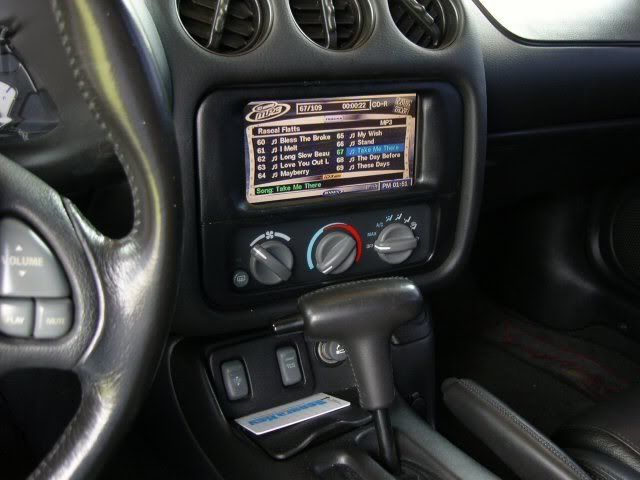
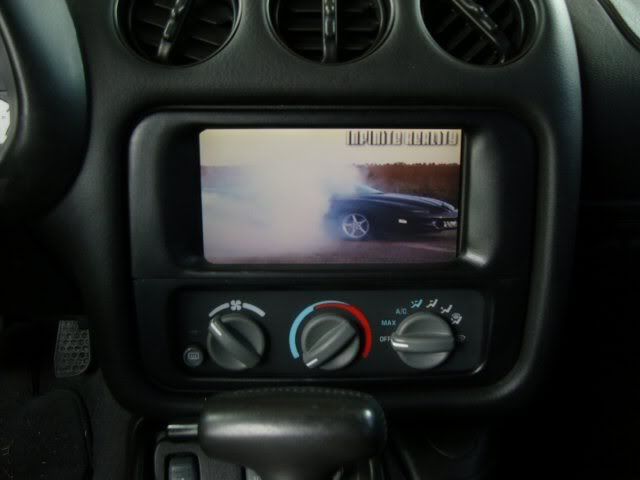
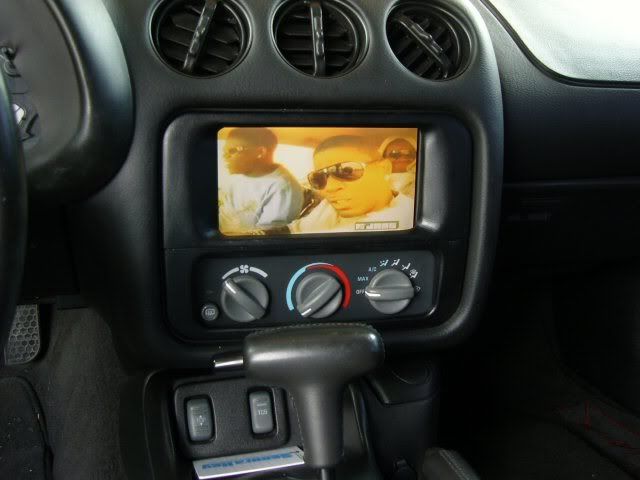
I started off with a Jensen VM9410 7" flip out screen head unit. Been running this HU for a couple of years now with no problems. Yeah I know, it's a Jensen but at the time it was one of the select few that would play MPG, AVI, etc as well as MP3, WMA and of course DVDs. My love for the head unit is the fact I love the menu screen when an MP3 CD is inside of it (which is 99% of the time). It's so easy to use the steering wheel controls to go through each folder and find what song of 200 of them I'm looking for. I've seen some cheap double DIN units out for sale now, but none of them show how the MP3 displays is setup and I know what I have now, don't have the cash to dump on a new head unit but still wanted to do something different. First off I relocated my HU underneath my driver's seat. For this all I did was extend the aftermarket harness about 5'-6' and also extended my PAC (steering wheel controls) and ran them under the console and down between the seat and console in some heat shrink tubing so they all stayed together and is unnoticeable IF someone could actually see between them. With this I also ran a video RCA for the new 7" monitor hook-up. For my RCAs I just pulled them back to the middle of the door sill, ran them under the carpet and came out of a factory hole in the carpet...all 4 pairs of them. Once that was done, I removed my HU and place under my seat. I zip-tied the IR sensor to the top of the HU so I now ALWAYS have steering wheel controls with ZERO interference. None of the wires can be seen anywhere.
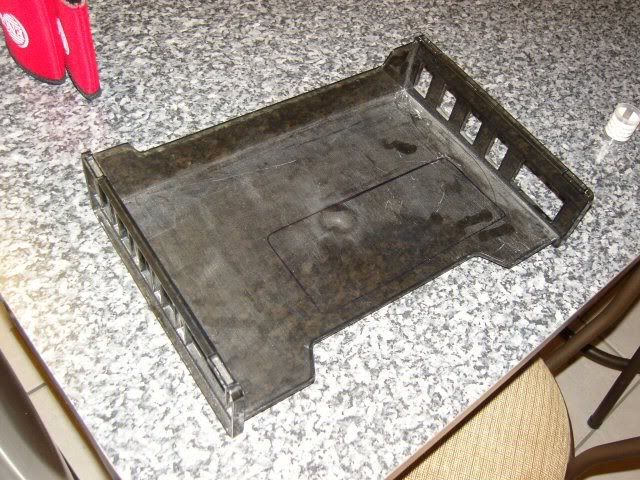
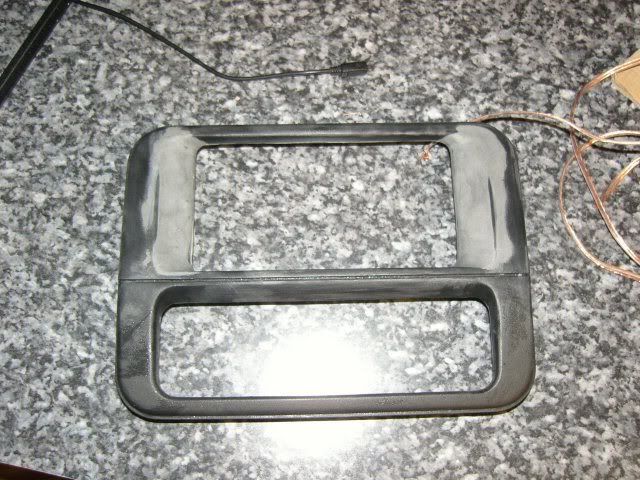
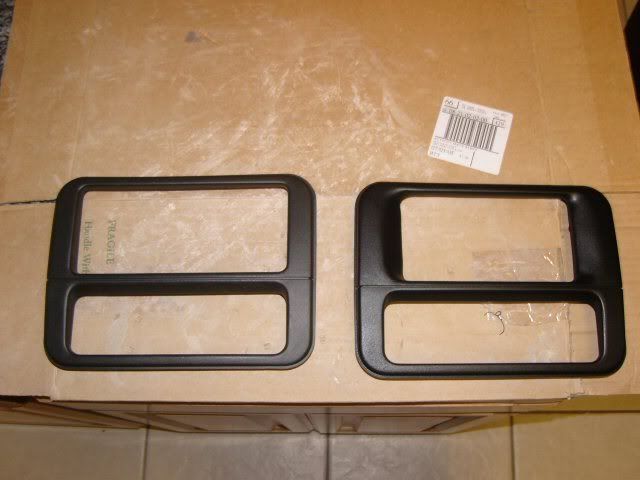
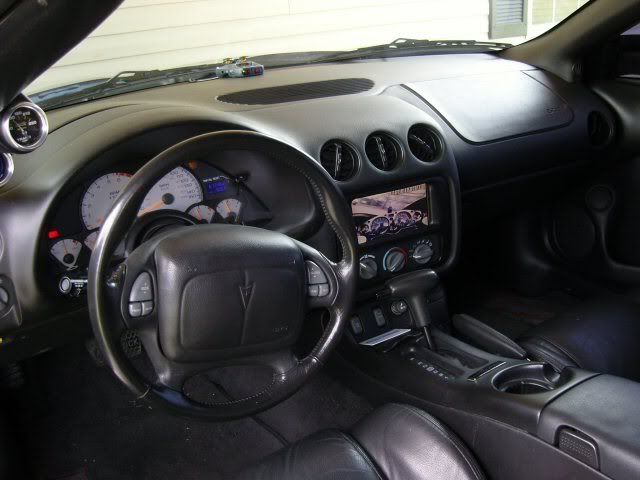
Now the fun part, making a new bezel. I bought a used one off eBay (no down time on the car) and like I said I wasn't going to modify the height of it to keep it as stock-looking as possible. As I looked around for something plastic to use, I found a paper tray that they were throwing away at work as the plastic to make my initial shape. I cut a back panel out of it with an opening in the middle fit my 7" monitor. I used more of the paper holder and cut the pieces to fill in the sides, placed them where I wanted and used Plastic Epoxy from Wal-Mart to make sure all was glued together. By using the back panel and the sides with the epoxy, I now have a REALLY strong base to start molding/filling it.
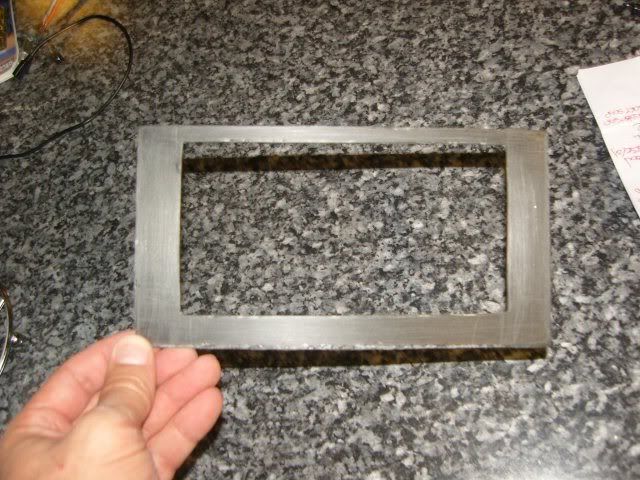
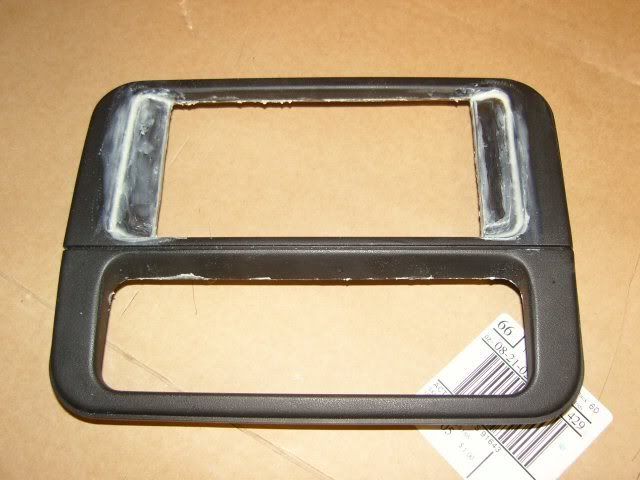
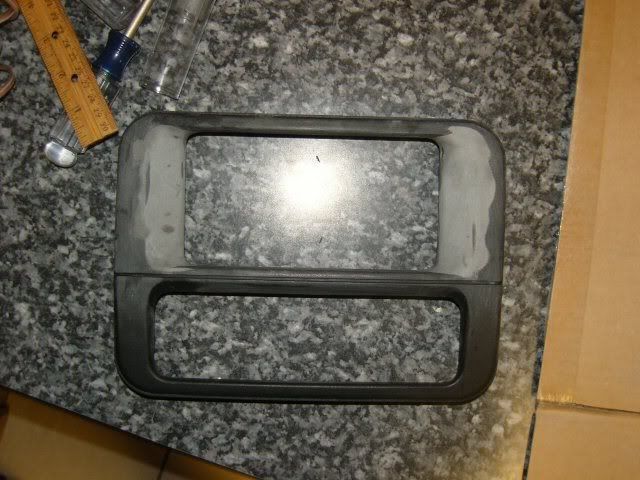
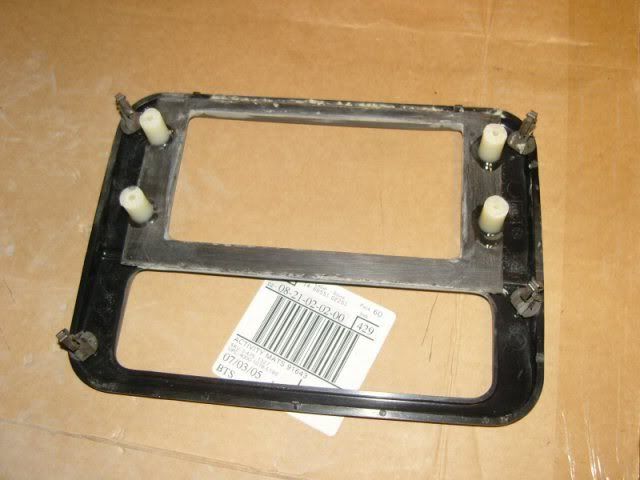
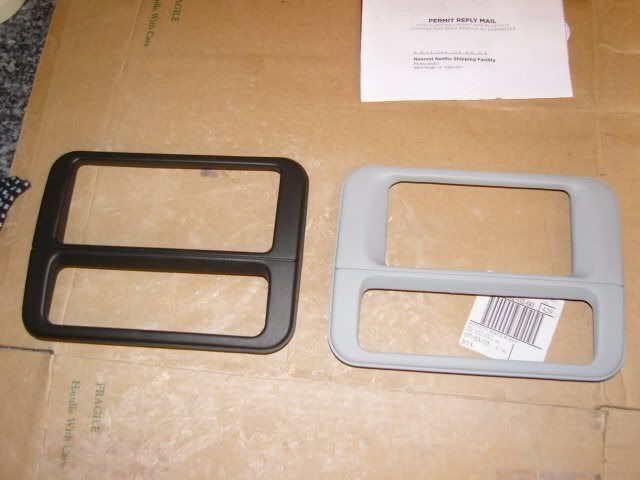
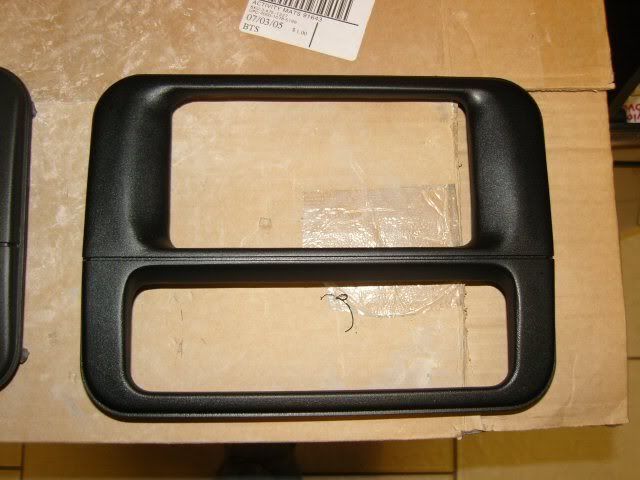
To fill the sides of it I used some Loc-Tite brand epoxy putty (from Wal-Mart). It's the stuff that comes in a tube and you just pinch of a piece of it and kneed it together with your hand and have about a 5min working time to place it where you want. After doing this once, sanding it (pretty easy to sand, not much harder than Bondo) and doing it again I now had it shaped how I imagined it'd look. After it drying completely, I used Bondo to fill any imperfections and the slight high/low spots (sorry no pictures after this, I forgot). I sanded that down and used high fill primer the ever so minor spots, sanded that down and painted. I came out really good and matched the stock bezel about 90% correct considering I used $0.96 rattle can semi-gloss black spray paint. I�m not done or satisfied completely with it and next week I�ll sand it down a little more and try again to find some interior trim paint to match it just right. No biggie. The screen is just a hair off aligning it left-to-right so I�ll adjust that too. You ask how I mounted the 7� monitor to the new bezel? I bought 4 nylon spacers, epoxied them to the back of it. I cut out another piece of the paper tray, drilled 4 holes and used that to hold it in place. Works perfect!! Another thing, I was hoping I wouldn�t have to modified my dash itself but to fit a 7� screen in height I had to trim a little bit off the top of the inside of the dash so the monitor would slide inside with no problems. You can�t tell I did this, even when the screen is removed and everything can be put back to stock if I wanted.
Cost: $50 Pyle visor monitor, $10 used bezel, $15 in epoxy/primer/paint. Like I said, I wanted it to be a cheap mod to entertain me, yet something no one has done without a lot of time invested...Actually I don't think anyone has ever fit a screen in a 1.5DIN place... Time I invested? Maybe 5 hours from cutting, epoxy, sanding & painting. Why did I do this? Just because I thought it could be done and mainly I wanted a little practice in making my own bezel because within the next year I�ll sell this setup and do it all again to fit a 7� VGA LCD in my dash with a carputer with Streetdeck software for MP3, video, navigation, Bluetooth, etc.
Since , here you go!!


I started off with a Jensen VM9410 7" flip out screen head unit. Been running this HU for a couple of years now with no problems. Yeah I know, it's a Jensen but at the time it was one of the select few that would play MPG, AVI, etc as well as MP3, WMA and of course DVDs. My love for the head unit is the fact I love the menu screen when an MP3 CD is inside of it (which is 99% of the time). It's so easy to use the steering wheel controls to go through each folder and find what song of 200 of them I'm looking for. I've seen some cheap double DIN units out for sale now, but none of them show how the MP3 displays is setup and I know what I have now, don't have the cash to dump on a new head unit but still wanted to do something different. First off I relocated my HU underneath my driver's seat. For this all I did was extend the aftermarket harness about 5'-6' and also extended my PAC (steering wheel controls) and ran them under the console and down between the seat and console in some heat shrink tubing so they all stayed together and is unnoticeable IF someone could actually see between them. With this I also ran a video RCA for the new 7" monitor hook-up. For my RCAs I just pulled them back to the middle of the door sill, ran them under the carpet and came out of a factory hole in the carpet...all 4 pairs of them. Once that was done, I removed my HU and place under my seat. I zip-tied the IR sensor to the top of the HU so I now ALWAYS have steering wheel controls with ZERO interference. None of the wires can be seen anywhere.
Now the fun part, making a new bezel. I bought a used one off eBay (no down time on the car) and like I said I wasn't going to modify the height of it to keep it as stock-looking as possible. As I looked around for something plastic to use, I found a paper tray that they were throwing away at work as the plastic to make my initial shape. I cut a back panel out of it with an opening in the middle fit my 7" monitor. I used more of the paper holder and cut the pieces to fill in the sides, placed them where I wanted and used Plastic Epoxy from Wal-Mart to make sure all was glued together. By using the back panel and the sides with the epoxy, I now have a REALLY strong base to start molding/filling it.
To fill the sides of it I used some Loc-Tite brand epoxy putty (from Wal-Mart). It's the stuff that comes in a tube and you just pinch of a piece of it and kneed it together with your hand and have about a 5min working time to place it where you want. After doing this once, sanding it (pretty easy to sand, not much harder than Bondo) and doing it again I now had it shaped how I imagined it'd look. After it drying completely, I used Bondo to fill any imperfections and the slight high/low spots (sorry no pictures after this, I forgot). I sanded that down and used high fill primer the ever so minor spots, sanded that down and painted. I came out really good and matched the stock bezel about 90% correct considering I used $0.96 rattle can semi-gloss black spray paint. I�m not done or satisfied completely with it and next week I�ll sand it down a little more and try again to find some interior trim paint to match it just right. No biggie. The screen is just a hair off aligning it left-to-right so I�ll adjust that too. You ask how I mounted the 7� monitor to the new bezel? I bought 4 nylon spacers, epoxied them to the back of it. I cut out another piece of the paper tray, drilled 4 holes and used that to hold it in place. Works perfect!! Another thing, I was hoping I wouldn�t have to modified my dash itself but to fit a 7� screen in height I had to trim a little bit off the top of the inside of the dash so the monitor would slide inside with no problems. You can�t tell I did this, even when the screen is removed and everything can be put back to stock if I wanted.
Cost: $50 Pyle visor monitor, $10 used bezel, $15 in epoxy/primer/paint. Like I said, I wanted it to be a cheap mod to entertain me, yet something no one has done without a lot of time invested...Actually I don't think anyone has ever fit a screen in a 1.5DIN place... Time I invested? Maybe 5 hours from cutting, epoxy, sanding & painting. Why did I do this? Just because I thought it could be done and mainly I wanted a little practice in making my own bezel because within the next year I�ll sell this setup and do it all again to fit a 7� VGA LCD in my dash with a carputer with Streetdeck software for MP3, video, navigation, Bluetooth, etc.
Since
, here you go!! 


Trending Topics

 09-02-2007, 12:07 AM
#13
TECH Fanatic
iTrader: (3)
Join Date: Aug 2004
Location: holding down the couch
Posts: 1,458
Received 0 Likes
on
0 Posts

Nice *** job! I've also bought a bezel off ebay and am going to spend some time this winter trying to make it look as good as possible. I've been checking out Jensen as well as Dual since they both offer most of the features the higher end models do, at least as far as the ones I'll use most.

 09-02-2007, 09:47 AM
#17
On The Tree
iTrader: (1)

Join Date: Sep 2004
Location: Tennessee
Posts: 142
Likes: 0
Received 0 Likes
on
0 Posts
Originally Posted by Screamin_99
wow, you matched the color up great! one question how did you give it that textured look?
Looks great man.
09-02-2007, 09:54 AM
#18
Thanks for the props! This was my first try at anything like this. I've messed with Bondo once before with my FRCs, but other than that just had it planned out in my head and did some research and a couple of measurements. Honestly it wasn't that hard to do, hardest was probably the sanding, lol.
I was kinda amazed how well the cheap paint did match. To get a texture with the paint, I did 2 normal coats of it and on the 3rd coat I stood back 2'-3' and just let the overspray get on it. I knew that would give it a textured look from doing my FRCs. I surely didn't want to sand those down smooth so I tried that and it worked nicely!
As for the controls of the DVD player, all is done through the steering wheel controls. Only thing I ever touched on the player itself when it was in the dash was the volume here and there. I can go through each folder and to each song and pause the music and the volume through the steering wheel. If it wasn't for the steering wheel controls this wouldn't have been possible.
09-02-2007, 09:56 AM
#19
Oh yeah and go to
http://www.mp3car.com/vbulletin/fabrication/
for info on how to build a custom bezel. Man, some of those people on there are 1000x better than I am. Mine was simple compared to what they can do!
http://www.mp3car.com/vbulletin/fabrication/
for info on how to build a custom bezel. Man, some of those people on there are 1000x better than I am. Mine was simple compared to what they can do!