
Help me decipher my wiring harness (Lots of pics)
 05-09-2008, 05:33 PM
#1
Well I finally got a fire under my *** and decided to pull out the wiring harness and get it ready for install. This all came out of a 98 T/A, and is going into my 1980 Jeep CJ5 w/ a manual tranny (No wires going to tranny or transfercase)
My only goal for right now is to get the motor running. I will go through the rest of the wires later on to work out some details. Lights, gauges, blah blah blah. It separated itself into 3 main parts:

What I believe to be the body harness:

What I believe to be the interior / dash harness:

And the motor harness: (didn't get a picture of it but this part also has the computer plugs)

Am I at least correct in my assumptions?
Now, for the hard questions....
WTF does all of this junk plug into? Obviously the motor harness will be somewhat self explanatory, but the other two I have no idea. If you can ID a plug please quote the picture and name it for me
Do I need the interior harness? Or is this only if it's going back into another Trans Am?
The Body harness, how much of this do I need? I see a few pieces of it have lightbulb sockets and plugs on it, so I'm pretty positive I'll just tape those off and save them for later.
Thanks for the help, I'm uploading more pics as I type this and will post them in a second.
My only goal for right now is to get the motor running. I will go through the rest of the wires later on to work out some details. Lights, gauges, blah blah blah. It separated itself into 3 main parts:
What I believe to be the body harness:
What I believe to be the interior / dash harness:
And the motor harness: (didn't get a picture of it but this part also has the computer plugs)
Am I at least correct in my assumptions?
Now, for the hard questions....
WTF does all of this junk plug into? Obviously the motor harness will be somewhat self explanatory, but the other two I have no idea. If you can ID a plug please quote the picture and name it for me
Do I need the interior harness? Or is this only if it's going back into another Trans Am?
The Body harness, how much of this do I need? I see a few pieces of it have lightbulb sockets and plugs on it, so I'm pretty positive I'll just tape those off and save them for later.
Thanks for the help, I'm uploading more pics as I type this and will post them in a second.
Last edited by Grewe02; 05-09-2008 at 05:50 PM.


 05-10-2008, 12:12 AM
#5

Only harness You will need is the Engine Harness.
There will be three connectors near the PCM, these will be C100, C101, C105
Three more connectors will be after the grommet, C210, C220, C230
1998 Camaro LS1 Engines Harness Connectors
In-Line Connector C100 (10 cavities, Black) Engine to forward lamp harness, in the engine compartment, above the right wheelhouse
In-Line Connector C101 (10 cavities, Gray) Engine to forward lamp harness, in the engine compartment, above the right wheelhouse
In-Line Connector C105 (8 cavities, Black) Engine to forward lamp harness, in the engine compartment, above the right wheelhouse
In-Line Connector C210 (8 cavities, White) instrument panel to engine harness, under the right side of the instrument panel, behind the knee bolster
In-Line Connector C220 (10 cavities, White) Instrument panel to engine harness, under the right side of the instrument panel, behind the knee bolster
In-Line Connector C230 (10 cavities, Blue) Instrument panel to engine harness, under the right side of the instrument panel, behind the knee bolster
C100
Pin A Pink - 12v+ Key to Fuel Injectors
Pin H Dk Blue - High Speed Fan Relay Control
Pin J Dk Green - Low Speed Fan Relay Control
Thats all you need from C100
C101
Pin B Pink - 12v+ Key to ????? Ignition Coils Maybe?
Pin D Green/Wht - Fuel Pump Relay Control
Pin E Pink - 12v+ Key to ......
Pin G Orange - 12v+ Battery Feed to PCM
Thats its for C101
C105
Pin B Pink - 12v+ Key to .......
Pin E Tan - Serial Data - to OBD Port Pin 2
Pin G Wht - Tach Signal
Thats it for C105
C210
Don't need any of these..these were all for fuel level sensor, tank pressure sensor and evap vent solenoids.
C220
Pin A Red - Alternator Turn On
C230
Pin B Brn/Wht - Check Engine Light Control
Pin D White - TACH Signal ..same as C105 Pin G
for more info http://www.lt1swap.com/ls1_wiring_ha...connectors.htm
05-10-2008, 12:27 AM
#6
Staging Lane
iTrader: (7)
Join Date: Nov 2004
Location: Edmond, OK
Posts: 87
Likes: 0
Received 0 Likes
on
0 Posts

In your first picture under 'dash harness' That little opaque looking box is an after market motion sensor for an alarm. Not needed for making the car run at all.
05-10-2008, 02:30 AM
#7
Thanks for the link, busta. I'll dig through that a little farther tomorrow morning.
So I don't need any of the body harness? I mean stuff like the fuse / relay boxes and the power distribution block. How should I wire those into the Jeep?
So I don't need any of the body harness? I mean stuff like the fuse / relay boxes and the power distribution block. How should I wire those into the Jeep?
Trending Topics
05-10-2008, 10:26 AM
#8
Well if it was me here is what I would do. By now most of the original jeep wiring is probably getting to the point of being pretty iffy by now since its 28 years old. I have done this a bunch before so it is not a big deal for me. I would completely gut all of the oem jeep wiring and then simply wire in the interior and exterior f-body harness. You jeep uses a gm steering column which will in turn have a gm ignition switch and the f-body harness will plug straight into it. The brake switches etc will slip right into your oem jeep pedal assembly since this was also copied from gm. You can make a block off plate where your oem fuseblock was mounted and the firewall pass through is. You can then re-cut the hole in the block off plate to fit the f-body pass thru connector on the drivers side. On the passenger side you can drill a hole to pass the engine harness connections through. Other than that you just re plug all of the matching plugs together, and then tape off delete what you do not need.
05-10-2008, 11:02 AM
#9
Honestly I was thinking about doing that... But I'm pretty anxious to get this thing running right now. It's not going to have any working gauges for awhile, either. So maybe when I install gauges and all that junk I'll install the interior harness at the same time.
05-13-2008, 08:52 PM
#10
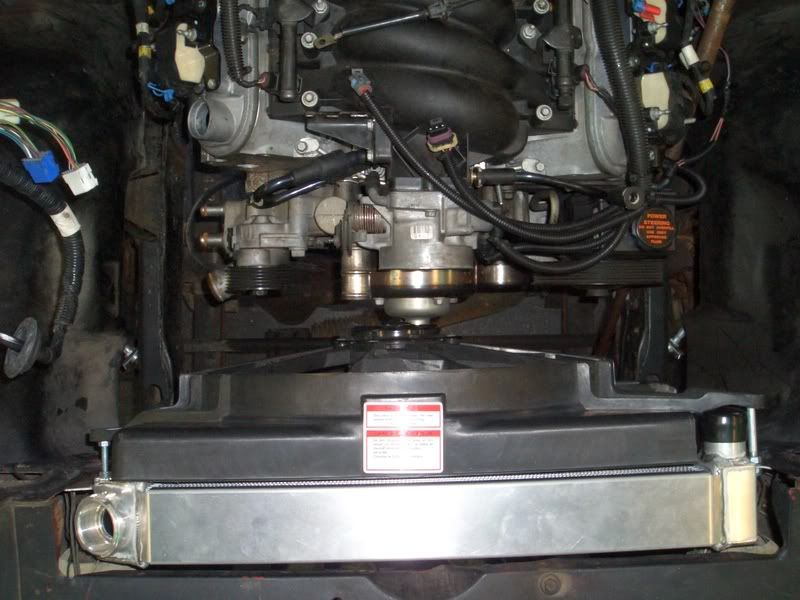
Got a bit of it in today. Took the motor harness to the shop and plugged in everything I could figure out.
Few questions... WTF are these for?
There was another plug exactly like this and another one with only 2 connectors on it. They were both behind the intake and are now plugged in leaving this one all alone

Is this even the correct spot for this plug? It doesn't clip on any certain way, I just slid the plug over the 3 prongs sticking out of the block.

And I'm going to guess that the two plugs on top of the intake are for the MAF?
Few questions... WTF are these for?
There was another plug exactly like this and another one with only 2 connectors on it. They were both behind the intake and are now plugged in leaving this one all alone
Is this even the correct spot for this plug? It doesn't clip on any certain way, I just slid the plug over the 3 prongs sticking out of the block.
And I'm going to guess that the two plugs on top of the intake are for the MAF?
Last edited by Grewe02; 05-13-2008 at 09:17 PM.
05-14-2008, 12:18 PM
#11
back of intake you should have a CAM sensor and a MAP sensor....not sure on wire color, but 2000 up colors are....
CAM sensor should have 3 wires, brn/wht, pnk/blk, and red
MAP sensor also has 3 wires, orn/blk, lt grn and gray
Sensor in the head is broken, that why prongs are sticking out, this is coolant temp sensor.
Yes, two pictued at front of intake are MAF and AIR intake temp sensor.
good luck.
CAM sensor should have 3 wires, brn/wht, pnk/blk, and red
MAP sensor also has 3 wires, orn/blk, lt grn and gray
Sensor in the head is broken, that why prongs are sticking out, this is coolant temp sensor.
Yes, two pictued at front of intake are MAF and AIR intake temp sensor.
good luck.
07-14-2008, 11:28 AM
#12
On The Tree
iTrader: (4)
Join Date: Mar 2007
Location: San Antonio, TX
Posts: 104
Likes: 0
Received 0 Likes
on
0 Posts
There will be three connectors near the PCM, these will be C100, C101, C105
Three more connectors will be after the grommet, C210, C220, C230
1998 Camaro LS1 Engines Harness Connectors
In-Line Connector C100 (10 cavities, Black) Engine to forward lamp harness, in the engine compartment, above the right wheelhouse
In-Line Connector C101 (10 cavities, Gray) Engine to forward lamp harness, in the engine compartment, above the right wheelhouse
In-Line Connector C105 (8 cavities, Black) Engine to forward lamp harness, in the engine compartment, above the right wheelhouse
In-Line Connector C210 (8 cavities, White) instrument panel to engine harness, under the right side of the instrument panel, behind the knee bolster
In-Line Connector C220 (10 cavities, White) Instrument panel to engine harness, under the right side of the instrument panel, behind the knee bolster
In-Line Connector C230 (10 cavities, Blue) Instrument panel to engine harness, under the right side of the instrument panel, behind the knee bolster
C100
Pin A Pink - 12v+ Key to Fuel Injectors
Pin H Dk Blue - High Speed Fan Relay Control
Pin J Dk Green - Low Speed Fan Relay Control
Thats all you need from C100
C101
Pin B Pink - 12v+ Key to ????? Ignition Coils Maybe?
Pin D Green/Wht - Fuel Pump Relay Control
Pin E Pink - 12v+ Key to ......
Pin G Orange - 12v+ Battery Feed to PCM
Thats its for C101
C105
Pin B Pink - 12v+ Key to .......
Pin E Tan - Serial Data - to OBD Port Pin 2
Pin G Wht - Tach Signal
Thats it for C105
C210
Don't need any of these..these were all for fuel level sensor, tank pressure sensor and evap vent solenoids.
C220
Pin A Red - Alternator Turn On
C230
Pin B Brn/Wht - Check Engine Light Control
Pin D White - TACH Signal ..same as C105 Pin G
07-15-2008, 05:08 AM
#14

Got a bit of it in today. Took the motor harness to the shop and plugged in everything I could figure out.
Few questions... WTF are these for?
There was another plug exactly like this and another one with only 2 connectors on it. They were both behind the intake and are now plugged in leaving this one all alone
Is this even the correct spot for this plug? It doesn't clip on any certain way, I just slid the plug over the 3 prongs sticking out of the block.
And I'm going to guess that the two plugs on top of the intake are for the MAF?
08-06-2008, 11:57 PM
#15
TECH Regular
iTrader: (2)

Join Date: Oct 2004
Location: Struble, IA
Posts: 443
Likes: 0
Received 0 Likes
on
0 Posts
Grewe02, where did you go? I'm working on a 98 as well, which it seems like not a lot of people do. I'm getting my harness finished up, and have a few of the BCM questions too. The purple sealed plug for the back of the engine is one I had a question about too. I think the plug in might be a little lower under the manifold if I remember back to unplugging it all. I will be working a bit on it tomorrow too. I will report back to you tomorrow night.
Last edited by loweredd; 08-07-2008 at 12:16 AM.
08-07-2008, 01:35 PM
#17
TECH Regular
iTrader: (2)
Join Date: Oct 2004
Location: Struble, IA
Posts: 443
Likes: 0
Received 0 Likes
on
0 Posts
Hey buddy! I found it for both of us!!!
I had this one on mine, couldn't figure out what it went to either. I was feeling around alot at the back of the intake, and couldn't find anything. BUT, if you feel just to the passenger side at the base of the tall oil pressure sensor, there is the
CAMSHAFT POSISTION SENSOR.


I had this one on mine, couldn't figure out what it went to either. I was feeling around alot at the back of the intake, and couldn't find anything. BUT, if you feel just to the passenger side at the base of the tall oil pressure sensor, there is the
CAMSHAFT POSISTION SENSOR.
08-07-2008, 01:41 PM
#18
That looks like the correct placement, but there should be a 1/2" long plastic "protective" shroud around that temperature sensor, and that's what the plug would clip on to. The plastic protector likely got hit and snapped off, that's what happened to me.
