
"Rebuilding" FAST LSX 90mm INTAKE
 06-30-2008, 08:02 AM
#1

Hey all.
I have a FAST 90mm intake. I ordered new seals for the whole thing, because i want to clean it out and make sure its sealing properly. I noticed some moisture (from oil ingestion) on the seals, suggesting they might be leaking a bit. Im talking about the seal that goes between the shells on the inside.
Has anyone rebuilt one of these things? The gasket is actually just a long string of gasket material. Im guessing I need to cut it into sections and lay it in, just like it is now. But what about where the ends meet. I see some sort of rubber glue type material in there.... Also...does the seal that I got go under the "inner" baffle section as well?
There are NO instructions that I can find on replacing that gasket. I have an email into to FAST about it, but Ive never dealt with their customer service, so I dont know what to expect as far as return time on that...
Maybe Ill snap pictures and do a small write up on how to replace all the seals once I figure out how....since a search didnt turn up anything for me.
Thanks in advance for anyone that has info about this thing....
J.
 06-30-2008, 08:35 AM
#3
Well...Ive given serious thought to just sealing the whole thing up with RTV of some sort... Im running a breather now, so oil in the intake shouldnt be a problem anymore.
So TECHNICALLY...I should never have to take the intake apart again. If the general concensus is that I seal it up with some sort of RTV or the Right Stuff, then maybe Ill do it. I ordered the stinking gasket though, so Ide kinda like to use it. I was hoping they had nice formed gaskets to go in there, so I was alittle surprised when I got a shoe string for a gasket. haha.
J.
 06-30-2008, 09:13 AM
#5
Send it to fast??? Why? Ide probably use a sealant before I sent it away.
It doesnt seem like brain surgery...Im confident that I can do it without any info...but Ide like the info to be sure/safe. Im going through with it regardless of the feedback I get from FAST or anywhere else.
There HAS to be someone out there that's rebuilt one. Otherwise they wouldnt have the gasket available on sites like thunder racing.
J.
06-30-2008, 10:28 AM
#7
Ive had mine apart before, and reused the gaskets with what seemed to be no issues. however, I can see alittle oil getting past the seals in a few spots... The oil that was ingested into the intake. So Im thinking air might be finding its way out too. At this point, with the car in pieces, and the intake off, I figured it would be a good idea to just replace them. If I knew it was going to come as a string, I probably wouldnt have bothered ordering it.
J.
J.
Trending Topics
07-01-2008, 05:43 PM
#8
Well, havent heard from F.A.S.T. yet. Sweet!!! Im going to give them a call tomorrow and see if they can tell me anything. Ide like to put the intake back together tomorrow..so hopefully I come up with something.
J.
EDIT: Spoke with FAST... Sounds like Im just gonna cut the new rope seal into the same lengths I take out, and dab alittle silicone (probably copper RTV) where the seals meet up, and anywhere else there was already some glue. And if I see a spot that looks shady, Ill probably use some there too.
Now if I can just figure out how to get the top shell nice and clean. Ive been toying with painting it...but dont think I feel like going through all that right now. I just want it running.
Last edited by ghettocruiser; 07-02-2008 at 11:59 AM.
07-03-2008, 07:07 AM
#9
Eh...just in case anyone comes across this and wants to know an outcome. I figured Ide close the thread out with a couple pictures.
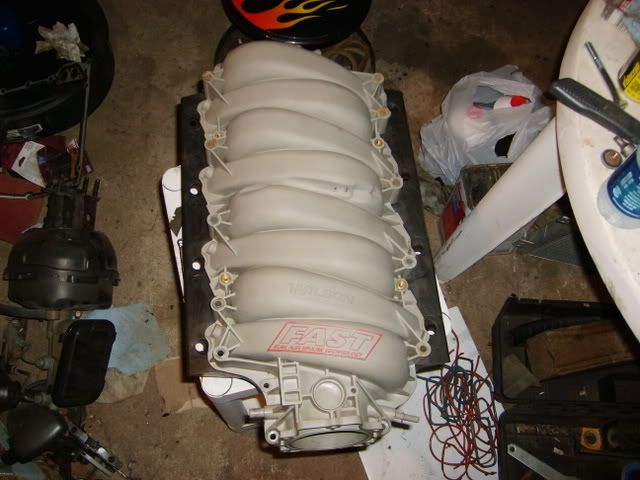
Cleaned up.
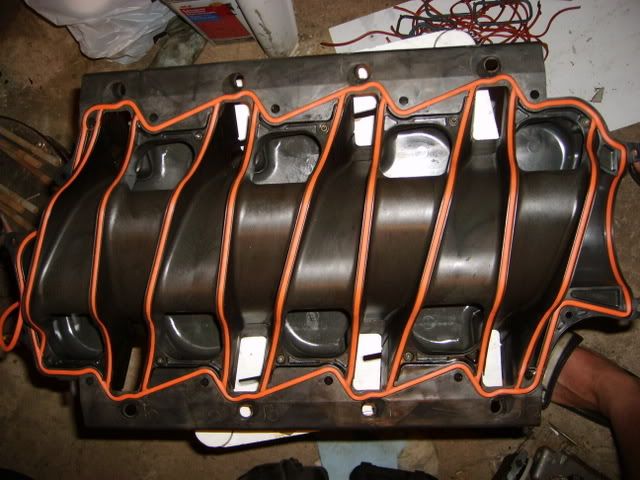
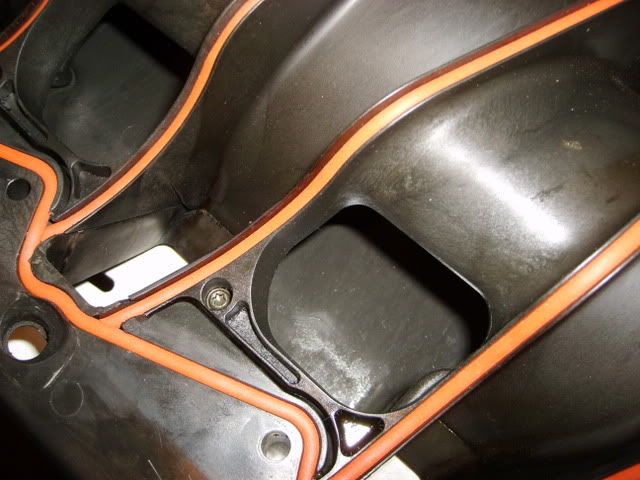
All these pictures are just mock up of the rope gasket. No sealant was in place yet..

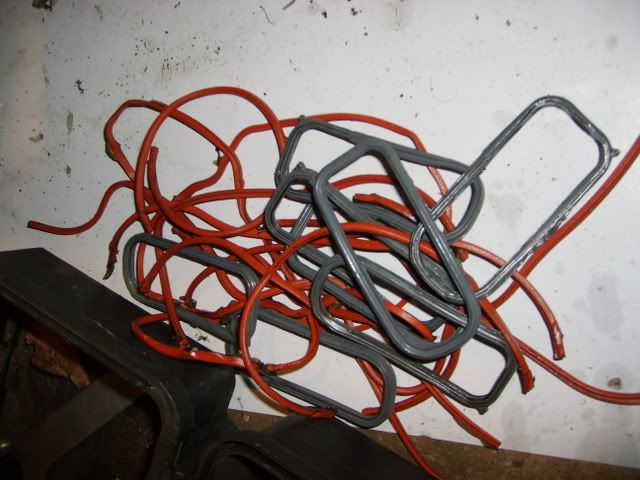
What I pulled out... Oily, flattened junk.
To install that rope seal, all I did was start laying the crosspieces in, and cutting them so that they would be close to the perimeter seal and make a tight joint. I did it all dry, then went back and added some permatex. I lifted the ends, and put a decent dab of it at each end of the "cross" pieces. Then I laid in the perimeter seal. Lastly, I put just a tiny dab on the top of each joint. So when the upper shell comes down, it would just push all of that together and seal her up.
The upper shell was pretty tough to get back down onto the base. Before, it would just fall into place and lay flat. That to mean suggests that its already sealing better than before. The new intake port gaskets were nice too (all gaskets from F.A.S.T.). I actually had to finish pulling the shells together with the mounting bolts. But it sat down nicely without much trouble. I feel like its definietly sealed better than it was before.
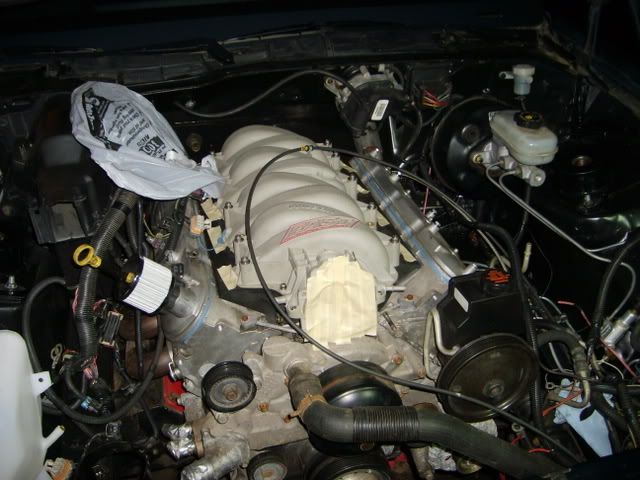
And FINALLY back on the motor.
J.
Cleaned up.
All these pictures are just mock up of the rope gasket. No sealant was in place yet..
What I pulled out... Oily, flattened junk.
To install that rope seal, all I did was start laying the crosspieces in, and cutting them so that they would be close to the perimeter seal and make a tight joint. I did it all dry, then went back and added some permatex. I lifted the ends, and put a decent dab of it at each end of the "cross" pieces. Then I laid in the perimeter seal. Lastly, I put just a tiny dab on the top of each joint. So when the upper shell comes down, it would just push all of that together and seal her up.
The upper shell was pretty tough to get back down onto the base. Before, it would just fall into place and lay flat. That to mean suggests that its already sealing better than before. The new intake port gaskets were nice too (all gaskets from F.A.S.T.). I actually had to finish pulling the shells together with the mounting bolts. But it sat down nicely without much trouble. I feel like its definietly sealed better than it was before.
And FINALLY back on the motor.
J.
07-27-2008, 04:10 PM
#10
Launching!
iTrader: (1)
Join Date: Aug 2004
Location: South Florida aka North Cuba
Posts: 205
Likes: 0
Received 0 Likes
on
0 Posts

hey man,
I was wondering the same thing last week when I got my seals in the mail.. I dropped a WTF is that....30 bucks shouldn't be a damn shoe string of rubber.
But yours looked really good the way you had it installed on there. Good luck with it, I'm doing mine as we speak. RTV to the rescue
Dave
I was wondering the same thing last week when I got my seals in the mail.. I dropped a WTF is that....30 bucks shouldn't be a damn shoe string of rubber.
But yours looked really good the way you had it installed on there. Good luck with it, I'm doing mine as we speak. RTV to the rescue
Dave

 04-01-2014, 08:04 AM
#14
Do exactly as ghettocruiser posted up, this is the same way that I did it years ago and have had no problems at all. There is enough rope to do it, probly 6" of extra. Just make sure that you have a sharp razor blade. It takes a little bit of time, but is actually a very easy job.
 12-31-2014, 11:00 AM
#16
On The Tree

Join Date: Sep 2012
Location: New Taxes York
Posts: 134
Likes: 0
Received 0 Likes
on
0 Posts
Hey all...
Putting a never-built F.A.S.T. 90 together and have a question... I got this intake before it went to F.A.S.T. so it was never completed.
I have the seals and hardware but I'm not sure if there was anything sealing the inner runner section to the base. Does it just lay in place and the rope seal gets installed on top before the upper section is bolted on?
Thanks! I'm painting it this week but wanted to know before final assembly.
Last edited by HwyStarJoe; 12-31-2014 at 12:23 PM.
