HELP - Installed HO Alternator 02 Camaro
 07-01-2008, 11:30 PM
#1
Teching In
Thread Starter

Join Date: Jan 2006
Posts: 31
Likes: 0
Received 0 Likes
on
0 Posts
Hi everyone - I just installed a HO Alternator - Alterstart 275 amps on my 02 camaro. I finally got everything installed - but afew items.
Both power steering hoses are touching the alternator.
The rubber one - going down from the power steering box in the front - is completely hugging the alternator from front to back - By hugging - I mean it's touching and there's no room inbetween the two. I pretty much had to push the alternator in there to fit.
The second power steering hose from the rack and pinion - it's touching too - but this hose has it's metal part touching the alternator.
First off - it this good? Won't the heat and engine movement cause problems?
Has anyone else had this problem when installing these alternators? I read numerous posts from people who installed them and no mention of this.
If I have to fix this - any ideals? I was thinking of removing both lines from the rack and pinion and add another piece of metal line about 1 or 2 inches long and re-bleed the power steering. any comments or ideals?
I will post pics tomorrow when I get to work - I left my usb wire there.
 07-02-2008, 02:14 PM
#2
Do your directions say anything about possibly needing to clock the alt front and back case halfs? When I installed my large case powermaster 200amp alt I ran into the same problem, then I finally read the entire instruction sheet thats when I came across the part about possibly needing to clocking the alt case halfs.
The rubber hose that rubs you could put some flex loom over it, or use some 3/8" fuel and oil hose with a 3/8" double barbed brass fitting so you could move the hose away from the alt.
With the hard line on the rack I carefully bent it 1/4" away from the alt.
This was after I clocked the alt., it was worse before!
Also I had to remove the factory rear alt mount bracket.
If you remove the swaybar its a lot easier getting the alt up in/out of there.
I did this last year and I've had no problems.
Hope this helps you !
07-02-2008, 02:27 PM
#3
Teching In
Thread Starter
Join Date: Jan 2006
Posts: 31
Likes: 0
Received 0 Likes
on
0 Posts
Hi 99Bluz28 and thanks for the reply.
I didn't get any instructions on installing it, except for the larger power wire - if you still have them - could you post the link or take a pic of it? The only other instructions I had was from the service manual.
Also - what do you mean by 'clock the alt front and back case halfs'?
This is what I did to install it - remove the old one exactly like the manual said. Upon the new alt - I had to push and wiggle it thur the sway bar and the fans. Once there - I couldn't mount it to the bracket - so I removed the bracket with the pulley - attached it to the alt while it rested on the sway bar and then mounted the whole unit back. Funny thing here was I had to attach the bolt which held the bracket and pully first otherwise it wouldn't catch if the other 2 bolts were on.
I will try to post some pics within the hour.
Thanks for your help.
Last edited by johnny402; 07-02-2008 at 02:38 PM.
07-02-2008, 03:06 PM
#4
IMO, contact Alterstart and ask them first about clocking one of their alternators!
Then visually check to see if clocking your alt will give you more clearance, if it will then proceed with clocking alternator, per alterstart instructions.
Clocking Alternator :for powermaster alt.
This is straight from powermaster.
GENERAL CLOCKING INSTRUCTIONS
Some vehicle applications may require the rear housing of the alternator to be �re-clocked� or turned
relative to the front housing. Powermaster ships all alternators clocked to fit most applications, however, it
may be necessary for the installer to re-clock the unit to accommodate rear brackets or to allow the factory
harness to reach.
Recommended Re-clocking instructions:
1. Remove the pulley using an impact wrench (rotate the nut in a counter-clockwise
direction to remove). Remove the nut, lock washer, pulley, fan, and the shaft spacer.
Stand the alternator up on the pulley shaft with the output post of the alternator toward
you.
2. Remove the four bolts that hold the two housings together.
3. Using a rubber mallet, tap the front housing downward while keeping the unit resting
on its pulley shaft. The steel stator ring between the housings will stay with the rear
housing. The shaft and rotor assembly should also stay with the rear housing. Note:
there is a second shaft spacer between the front housing and the rotor assembly.
Make certain that this spacer remains in place. DO NOT allow the pulley shaft to
come out of the rear housing as this may release the brushes.
4. Turn the front housing to the required position in relation to the rear housing.
5. Reinstall the housing bolts and tighten evenly. Do not over tighten.
6. Reinstall the spacer, fan, pulley, lock washer, and nut in that order.
7. Tighten nut with impact wrench until lock washer is completely closed and nut is tight.
07-02-2008, 03:21 PM
#5
Teching In
Thread Starter
Join Date: Jan 2006
Posts: 31
Likes: 0
Received 0 Likes
on
0 Posts
99Bluz28 - Thanks for the quick reply!
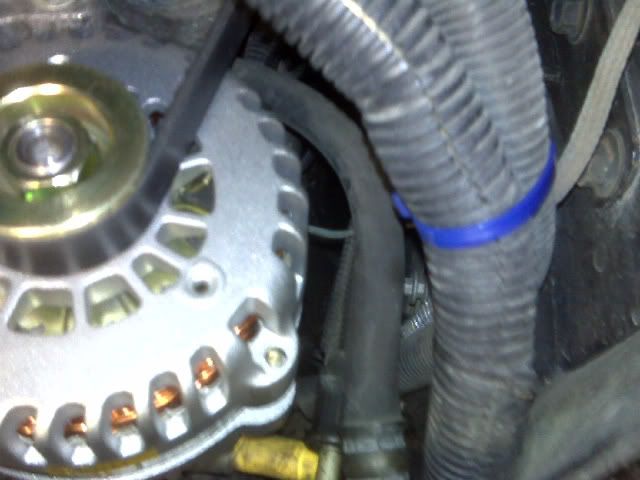
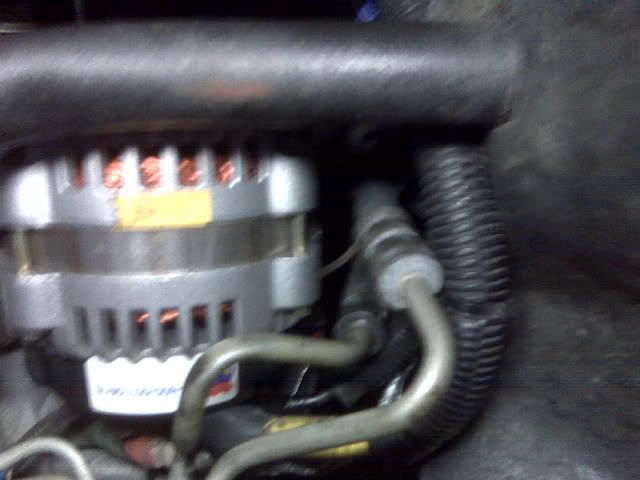
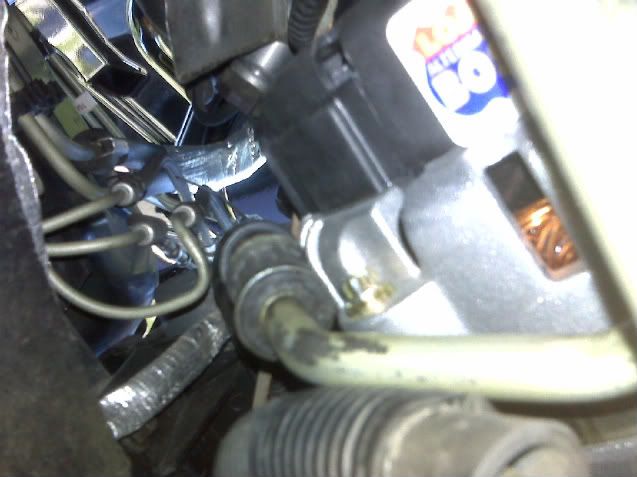
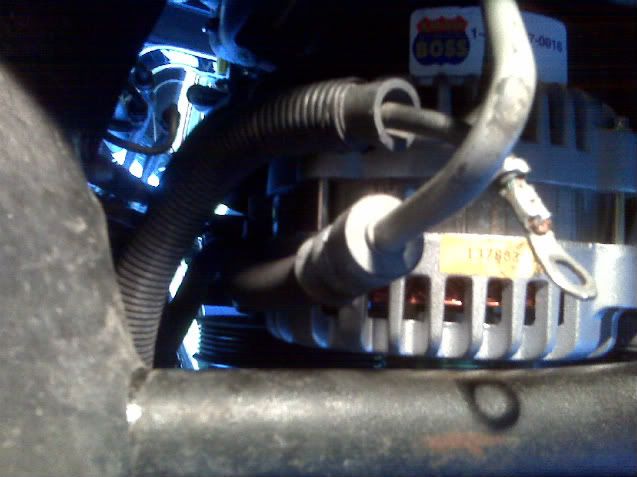
here are are some pics of my problem
These 2 pics contain the power steering hose from the power steering box in the front. This hose is touching completely - wrapped around the outside of the alternator
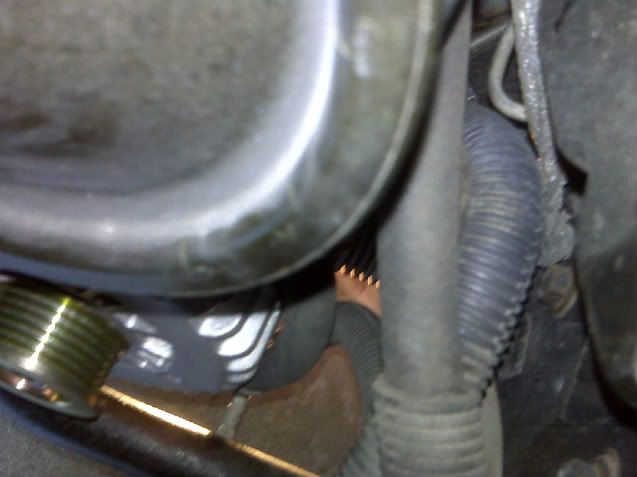
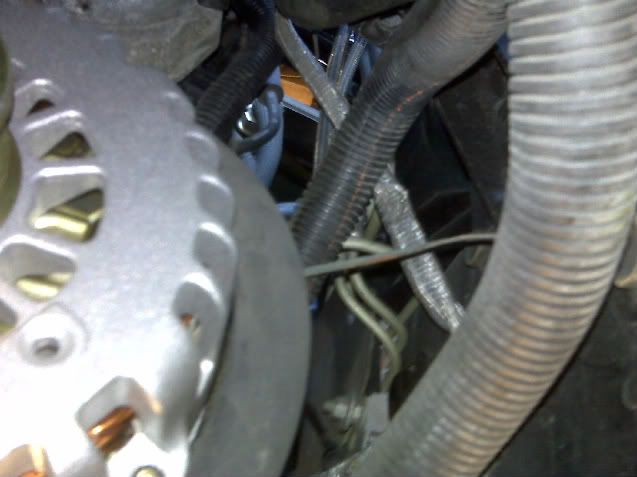
These 2 pics have the metal fitting of the other power steering hose touching the case.
here are are some pics of my problem
These 2 pics contain the power steering hose from the power steering box in the front. This hose is touching completely - wrapped around the outside of the alternator
These 2 pics have the metal fitting of the other power steering hose touching the case.
07-02-2008, 04:47 PM
#6
I forgot  ,I bent both of the hard lines, not just one, also what size is that larger cable 1/0 guage? If it's 4gauge that's too small,IMO. And you should also upgrade your battery to ground cable, along with the alt/eng to chassis ground cable.
Good Luck! And let me know how it turns out.
,I bent both of the hard lines, not just one, also what size is that larger cable 1/0 guage? If it's 4gauge that's too small,IMO. And you should also upgrade your battery to ground cable, along with the alt/eng to chassis ground cable.Good Luck! And let me know how it turns out.
Last edited by 99Bluz28; 07-02-2008 at 05:08 PM.
07-02-2008, 05:24 PM
#7
Teching In
Thread Starter
Join Date: Jan 2006
Posts: 31
Likes: 0
Received 0 Likes
on
0 Posts
99Bluz28 - again thanks for helping me out - I really appreicate it.
As for my wires - what is in the pics is the factory one - I have another 0/1 gauage wire hooked up to the alt - just that when I was working on the alt, it was in my way - so I placed it on the other side. Do you think hooking up 2 power wires (stock one and 0/1 gauge) from the alternator to the battery is a bad ideal? At the moment - I have both hook up - I have a yellow top in the front of the car - factory alt wire to the side post of the battery - 0/1 gauge to the top post. I've had this setup for about 4 years with the stock alt. Just that now with this 275 amp alt - I'm wondering if the factory wire from the alt to the battery might cause problems with these extra amperage running thur it? Well I'm pretty sure that current will flow via the least resistance - ie the 0 guage wire. Any thoughts on this?
I also have another battery in the back - a kinetik 2400 - they are separted via a relay. Cant remember if that relay is 200 or 300 amps.
I've also upgraded the battery to ground one - I just have to do the engine block to frame. When I get this mess fixed up - I'll work on that.
From the pics - do you think it's really bad? Was yours like this before you clock it?
Trending Topics
07-02-2008, 06:07 PM
#8
I could'nt even fully mount my alt until I clocked it.
My Alt looked about the same after I clocked it. Also if you don't bend/move the hardlines yourself, the engine will . Also those extra amps will just take the path of least resistance(1/0 guage) so you shouldn't have any problems with leaving the factory wire hooked-up. Or you could just run it(factory alt cable) up to the remote terminal, like I did.
Question, what kind of amplifier rms wattage are you pushing?
Last edited by 99Bluz28; 07-02-2008 at 06:13 PM.
07-03-2008, 01:09 AM
#9
Teching In
Thread Starter
Join Date: Jan 2006
Posts: 31
Likes: 0
Received 0 Likes
on
0 Posts
99Bluz28, thanks for all the info! I solved it, I used a crow bar to bend those lines and it went perfectly - better then expected. I was so scared to touch those lines - I really thought they would break - but they didn't - thanks!
As for amps - I'm not running that much - 1000 watts for 2 15's and another 1000 watts for everything else (3ways in the kicks, tweet in the a-pillar and 2way for the rearfill) - so 2000 rms watts total, class ab, older mcintosh amps. I did the whole 5.1 thing. I had 2 yellow tops with the stock alt for 4 years without problems. Just recently I had problems with battery duration when the car was off. I just assumed that the yellow top in the back was dying. I replaced it with the kinetik and found out it wasn't being fully charge - turns out the alt was weak. So I got the biggest one I could - I hated it when I was at the lights, ac on, music playing and the voltage is in the 12's.
Again - thanks for helping out!
07-03-2008, 01:32 AM
#10
No problem
The reason I asked about the rms wattage is I'm I'm pushing about 2200 rms( mmats d 3500.05 can do 3500rms but I got the gain adjusted down for my 2 10s) to my 2 IDMAX10s and 340rms total to my diamond audio hex components and JL rear coaxials . So if figured...lol....you were pushing like 5-6k ....lol.. I couldn't imagine you ever having a problem now!...lol
By-the-way for reference, whats the part# for that Alterstart HO 275 amp alt ?
Glad I could help
Last edited by 99Bluz28; 07-03-2008 at 01:37 AM.
07-03-2008, 10:48 PM
#11
Teching In
Thread Starter
Join Date: Jan 2006
Posts: 31
Likes: 0
Received 0 Likes
on
0 Posts
Haha - I couldn't take 5-6K of watts - Right now its alittle too much for me. I like your setup! Nice amps and speakers!
As for the alternator - the part number is 8237-275A SMS6. Not sure what SMS6 is, but that what the invoice has on it. Cost me $449. I thought it was a 2 year warrenty - but the invoice said 1 year. I'm going to call them tomorrow to ask about this.
Here's a pic of the test results for this alternator - it's only half a page. The full report is 3 pages. If you're curious about it - let me know and I'll post it.

Again thanks for all your help!
As for the alternator - the part number is 8237-275A SMS6. Not sure what SMS6 is, but that what the invoice has on it. Cost me $449. I thought it was a 2 year warrenty - but the invoice said 1 year. I'm going to call them tomorrow to ask about this.
Here's a pic of the test results for this alternator - it's only half a page. The full report is 3 pages. If you're curious about it - let me know and I'll post it.
Again thanks for all your help!
07-05-2008, 08:38 PM
#15

The alt pulley turns about 3 times to 1 revolution of the (stock)crank pulley, 3:1 ratio . To get the engine rpm divide the alternator rpm by 3.
Last edited by 99Bluz28; 07-05-2008 at 08:45 PM.
07-06-2008, 01:41 PM
#17
A lot of people just think it's engine rpm, without realizing it's alternator rpm.
Also it sounds like you've been lucky so far with having "zero issues", because the odds are in favor of you having issues. IMO
Last edited by 99Bluz28; 07-06-2008 at 01:57 PM.
07-18-2008, 12:21 PM
#18
Teching In
Thread Starter
Join Date: Jan 2006
Posts: 31
Likes: 0
Received 0 Likes
on
0 Posts
Just an update for this thread - I figured I upload afew pics of the bent pipes to allow for the alternator - just in case someone in the future decides to do the same thing - might be helpful for them