Wtf when it rains it pours
 09-11-2011, 09:26 PM
#1
TECH Enthusiast
Thread Starter
iTrader: (2)
Join Date: May 2009
Location: Mission,Tx
Posts: 733
Likes: 0
Received 0 Likes
on
0 Posts
Well like the title says . Last Saturday I took the day off (which I rarely do) to take the family to do zoo. Half a mile before I get there this lady rear ended us on the highway when exiting , thank god everyone was ok car was totaled ( my wife's car ) . Well we have been sharing my car and just yesterday the damn clicking sound when you turn on the A/C started and today the headlights stopped working. I checked fuses bought new bulbs and wont turn on. Anyone have any suggestions as to what else to check ? Thanks


 09-11-2011, 10:07 PM
#5
The Impala sure did get hit hard, it's good that all of you are ok.
The headlights are controlled by the BCM (body control module) so evidently it's bad.
Headlamps Malfunction
Circuit/System Description
The vehicle headlamps are controlled by the body control module (BCM) based on inputs from the headlamp switch and the turn signal/multifunction switch. The headlamp switch has four positions: Off, Auto, Park, and Headlamps. The default headlamp switch position is Auto, in which the BCM uses the ambient light sensor to determine when headlamps are needed. The Off portion of the headlamp switch is a momentary switch which overrides the automatic headlamps and will turn off the vehicle headlamps. When in the Off position, the headlamp switch grounds the headlamp switch headlamps off signal circuit, prompting the BCM to turn off the headlamps. The Park position of the headlamp switch will only illuminate the vehicle parking lamps. The Headlamp position of the headlamp switch will illuminate both the parking lamps, as well has the headlamps. With the headlamp switch in the Headlamp position, the headlamp switch headlamps on signal circuit is grounded, prompting the BCM to turn on the headlamps, regardless of other factors such as ambient light.
The headlamp high beams are controlled through the flash to pass switch and the headlamp dimmer switch, both located in the turn signal/multifunction switch. The flash to pass switch is a momentary type switch, designed to illuminate the high beams as long as the switch is held. With the switch closed, the flash to pass switch signal circuit is grounded, prompting the BCM to turn on the high beam lamps. The headlamp dimmer switch allows the operator to select between full time high or low beam operation. Unlike the flash to pass switch, it is not a momentary switch. When the headlamp dimmer switch is in the high beam position, the headlamp dimmer switch high beam signal circuit is grounded. This prompts the BCM to turn on the high beam lamps.
The BCM controls the headlamps based on the inputs explained above. When a low beam request is received, the BCM grounds the headlamp low beam relay control circuit. This energizes the coil in the LOW BEAM PCB relay, causing the relay switch to close. This then applies B+ to both low beam headlamps through the LT LO BEAM and RT LO BEAM fuses, illuminating the low beam headlamps. When a high beam request is received, the BCM grounds the headlamp high beam relay control circuit. This energizes the coil in the HIGH BEAM PCB relay, causing the relay switch to close. This then applies B+ to both high beam headlamps through the LT HI BEAM and RT HI BEAM fuses, illuminating the high beam headlamps.
09-11-2011, 10:12 PM
#6
TECH Resident
iTrader: (3)
Join Date: Feb 2009
Location: Houston, Tx
Posts: 933
Likes: 0
Received 0 Likes
on
0 Posts
Damn Chris!! Glad you guys are ok. I hate driving down there in the valley, the people there can't drive for ****!
Watch my video about your ac tick. If it helps cool, if you need more help with it then shoot me a text message and I'll help you out as much as I can.
http://www.youtube.com/watch?v=D_GZNbP4mwo
Watch my video about your ac tick. If it helps cool, if you need more help with it then shoot me a text message and I'll help you out as much as I can.
http://www.youtube.com/watch?v=D_GZNbP4mwo
09-11-2011, 11:33 PM
#7
TECH Enthusiast
Thread Starter
iTrader: (2)
Join Date: May 2009
Location: Mission,Tx
Posts: 733
Likes: 0
Received 0 Likes
on
0 Posts
Damn Chris!! Glad you guys are ok. I hate driving down there in the valley, the people there can't drive for ****!
Watch my video about your ac tick. If it helps cool, if you need more help with it then shoot me a text message and I'll help you out as much as I can.
http://www.youtube.com/watch?v=D_GZNbP4mwo
Watch my video about your ac tick. If it helps cool, if you need more help with it then shoot me a text message and I'll help you out as much as I can.
http://www.youtube.com/watch?v=D_GZNbP4mwo
 ,good thing I have full coverage . Thanks David for your help buddy I will text you if I have any questions on the AC tick fix.
 Trending Topics
09-11-2011, 11:58 PM
#8
The BCM is under the dash in your car. It tells you how to replace it below.
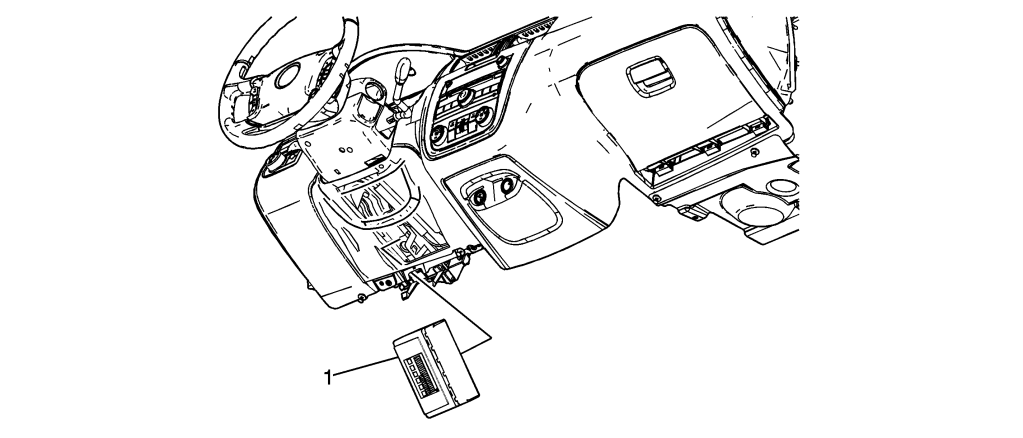
Preliminary Procedure
1. Remove the left closeout panel. Refer to Instrument Panel Insulator Panel Replacement - Left Side .
2. Program the body control module after replacement. Refer to Control Module References .
Module Assembly, Body Control Module (BCM)
Tip
Release the tabs on the BCM bracket and lift the module up and out.
09-12-2011, 12:08 AM
#9
TECH Enthusiast
Thread Starter
iTrader: (2)
Join Date: May 2009
Location: Mission,Tx
Posts: 733
Likes: 0
Received 0 Likes
on
0 Posts
The BCM is under the dash in your car. It tells you how to replace it below.
Preliminary Procedure
1. Remove the left closeout panel. Refer to Instrument Panel Insulator Panel Replacement - Left Side .
2. Program the body control module after replacement. Refer to Control Module References .
Module Assembly, Body Control Module (BCM)
Tip
Release the tabs on the BCM bracket and lift the module up and out.
09-12-2011, 04:04 PM
#10
TECH Enthusiast
Thread Starter
iTrader: (2)
Join Date: May 2009
Location: Mission,Tx
Posts: 733
Likes: 0
Received 0 Likes
on
0 Posts
Called the stealership today and price for BCM (Body Control Module) is 290 plus 130 to program. Fck that I'm going to have to use my car in the daylight for a least a week more till I gather up the funds.
09-12-2011, 09:30 PM
#12
TECH Enthusiast
Thread Starter
iTrader: (2)
Join Date: May 2009
Location: Mission,Tx
Posts: 733
Likes: 0
Received 0 Likes
on
0 Posts
Sorry for the stupid question but will the car be driveable when I install the other BCM before it is programmed. I will have to drive it 10 miles to get it programmed.Thanks
09-13-2011, 09:19 PM
#16
TECH Enthusiast
Thread Starter
iTrader: (2)
Join Date: May 2009
Location: Mission,Tx
Posts: 733
Likes: 0
Received 0 Likes
on
0 Posts
Well I put the used BCM and lights still didnt work. So I figured it needed to be programmed but had a doubt about that. So I went to the local auto parts and bought an electrical tester. Checked fuses and relays again everything checked ok. So I took out the light bulbs checked for power and tester turned on , so I was like wtf? I noticed that the bulb looked burned ( I had bought these new two days ago but noticed the package was already opened but since it was the last one I said fck it) then took of the next and bulb was burnt too. I think someone returned these with the burnt ones inside ( DAMN BASTARDS) So I went to return these and got some new ones , this time I checked they were sealed. Put them on and lights turned on. Im glad I went with my instinct to check everything again.
On a side note , when I installed the original BCM back check engine came on. I took it for a spin and noticed the tranny shifting soft instead of firm like how it was. Then after a while it started to shift firm again. Anyone have any ideas? Will I have to retune maybe ?Thanks
On a side note , when I installed the original BCM back check engine came on. I took it for a spin and noticed the tranny shifting soft instead of firm like how it was. Then after a while it started to shift firm again. Anyone have any ideas? Will I have to retune maybe ?Thanks
09-13-2011, 11:38 PM
#18
TECH Enthusiast
Thread Starter
iTrader: (2)
Join Date: May 2009
Location: Mission,Tx
Posts: 733
Likes: 0
Received 0 Likes
on
0 Posts
No I didnt, just disconnected the battery and switched the bcm twice. When I put the used BCM from the junkyard I got a whole bunch of messages, air bag service, oil change, tire pressures were not reading.
09-14-2011, 02:38 PM
#19
TECH Addict
iTrader: (15)
Join Date: Aug 2002
Location: 78�14′46″N 15�27′56″E
Posts: 2,419
Likes: 0
Received 5 Likes
on
5 Posts

If you disconnected your battery for any period of time, it's possible that the TCM memory was cleared and had to relearn your riving habits and conditions. These transmissions are adaptive and will take some to learn when the memory is cleared. This would explain your temporary soft-shift condition.
09-14-2011, 03:16 PM
#20
TECH Enthusiast
Thread Starter
iTrader: (2)
Join Date: May 2009
Location: Mission,Tx
Posts: 733
Likes: 0
Received 0 Likes
on
0 Posts
If you disconnected your battery for any period of time, it's possible that the TCM memory was cleared and had to relearn your riving habits and conditions. These transmissions are adaptive and will take some to learn when the memory is cleared. This would explain your temporary soft-shift condition.