The $12 LT1 balancer install tool
 04-19-2011, 11:29 PM
#1

This is purely a "help" for people looking to put the balancer back on correctly, and avoiding the dreaded stripped crank threads. This also saves you from buying a very expensive $150 balancer installer.
"Whats needed??"7/16 - 20 threaded rod grade 8 or higher such as B7.
As you have probably searched around your local Home Depot or Lowes or even AceHardware, you'll be hard pressed to find a bolt long enough in this size. What you actually need is a threaded rod.
"Why a threaded rod??"
Because is long and you can sink the rod all the way to the base of the crank threaded hole.. giving you more thrength to pull the balancer on
"Why not use the balancer bolt to pull it on??"Because if you try and install the balancer with the balancer bolt, you will only be able to get about 2-3 turns of the bolt before you hit the balancer. 2-3 threads is not enough because the force needed to pull the balancer on is strong, and you WILL strip those threads doing this.. dont do it.
Tools needed and where to get them
as stated above, you need a 7/16 -20 threaded rod.. meaning 7/16", 20 thread count, also known as "fine thread".

You can get this rod at www.mcmaster.com or use this link http://www.mcmaster.com/#92580a110/=byahla
cost is only $4.70 for a 3 foot rod. they only sell it in a 3 foot rod. The shipping was only $5.15 so for just under $10 you get a 3 foot rod. Shipping was pretty fast, I ordered it on Friday and it was here via UPS on Tuesday.
2nd, you need only 1, 7/16-20 nut, you can order it there or this actually can be easily found in your local hardware store or Home Depot.
3rd, several washers ranging in size from a small 7/16" all the way to a 3/4" washer. I used about 8 -10 washers.
Cost, i spent $3.28 for the nut and 6 washers, i already had a few at home.
Now that you have your rod, you can place you hub on the end of the crank and insert the rod and screw it all the way in till it stops. Or you can do what i did, and take a cutoff wheel and cut the rod in half, easier to manage but not needed.
Then, place all the washers you have starting with largest 1st against the hub, to smallest against the nut. The outside diameter of the nut is 11/16 and you need a box end wrench.
see picture below on how it should look
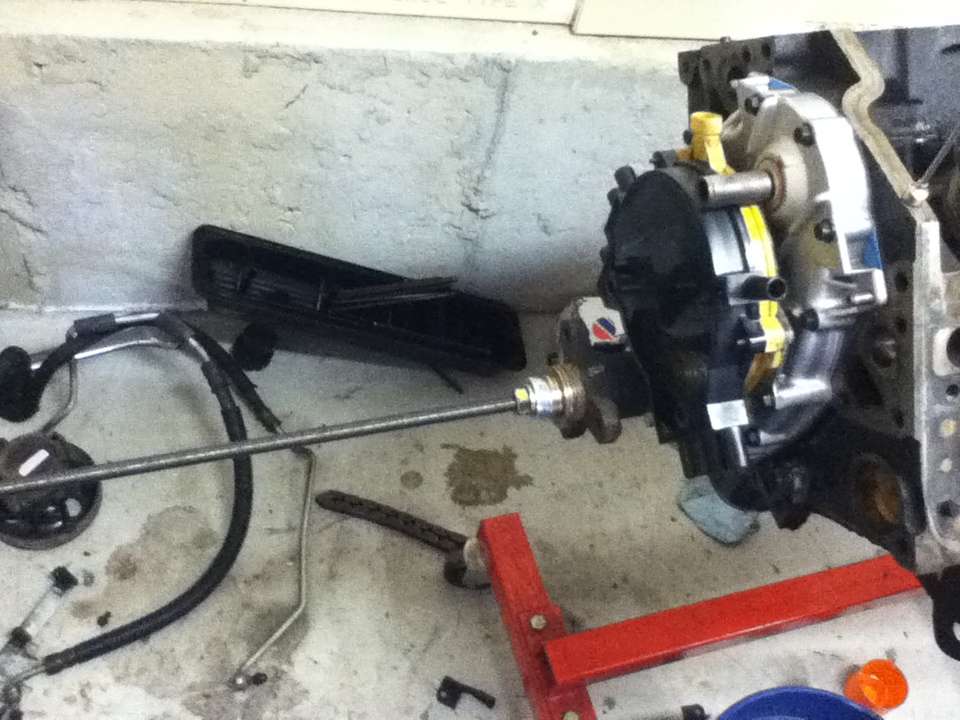
Now you have it set up to push the hub on from the very front, instead of having a short stubby rod and having to use a long 11/16 socket. This also saves you from having to get a certain size washer to fit into the hub.
Now that you have it set up, start turning the nut clockwise (towards the left), this will push the nut against the washers and starts to slowly push the hub onto crank.
about half way on. you should NOT have to use much force to turn the nut.

Upclose shot of the washers and nut
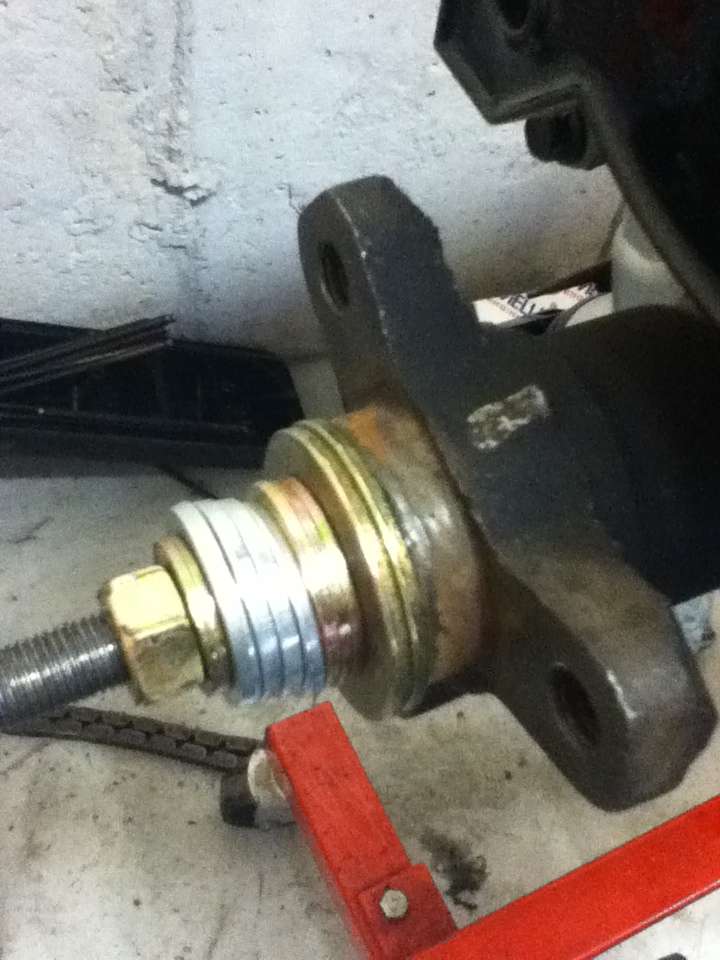
turn the nut until the hub comes to a complete stop. When you have to excert a lot more force than normal, your hub is probably seated now, to make sure, look at the hub and make sure the 1st line in the hub is now into the timing cover.
you're now done with the rod, back off the nut counter clockwise (turn left) and unscrew the rod, you should be able to do this by hand.
Now insert your crank bolt with its washer and torque to 74ftlbs.
Hope this helps.
***disclaimer*** this is purely made as a "help thread". Any damage you do to your vehicle is your responsibility and I am in no way liable for it. User take caution.
"Whats needed??"7/16 - 20 threaded rod grade 8 or higher such as B7.
As you have probably searched around your local Home Depot or Lowes or even AceHardware, you'll be hard pressed to find a bolt long enough in this size. What you actually need is a threaded rod.
"Why a threaded rod??"
Because is long and you can sink the rod all the way to the base of the crank threaded hole.. giving you more thrength to pull the balancer on
"Why not use the balancer bolt to pull it on??"Because if you try and install the balancer with the balancer bolt, you will only be able to get about 2-3 turns of the bolt before you hit the balancer. 2-3 threads is not enough because the force needed to pull the balancer on is strong, and you WILL strip those threads doing this.. dont do it.
Tools needed and where to get them
as stated above, you need a 7/16 -20 threaded rod.. meaning 7/16", 20 thread count, also known as "fine thread".
You can get this rod at www.mcmaster.com or use this link http://www.mcmaster.com/#92580a110/=byahla
cost is only $4.70 for a 3 foot rod. they only sell it in a 3 foot rod. The shipping was only $5.15 so for just under $10 you get a 3 foot rod. Shipping was pretty fast, I ordered it on Friday and it was here via UPS on Tuesday.
2nd, you need only 1, 7/16-20 nut, you can order it there or this actually can be easily found in your local hardware store or Home Depot.
3rd, several washers ranging in size from a small 7/16" all the way to a 3/4" washer. I used about 8 -10 washers.
Cost, i spent $3.28 for the nut and 6 washers, i already had a few at home.
Now that you have your rod, you can place you hub on the end of the crank and insert the rod and screw it all the way in till it stops. Or you can do what i did, and take a cutoff wheel and cut the rod in half, easier to manage but not needed.
Then, place all the washers you have starting with largest 1st against the hub, to smallest against the nut. The outside diameter of the nut is 11/16 and you need a box end wrench.
see picture below on how it should look
Now you have it set up to push the hub on from the very front, instead of having a short stubby rod and having to use a long 11/16 socket. This also saves you from having to get a certain size washer to fit into the hub.
Now that you have it set up, start turning the nut clockwise (towards the left), this will push the nut against the washers and starts to slowly push the hub onto crank.
about half way on. you should NOT have to use much force to turn the nut.
Upclose shot of the washers and nut
turn the nut until the hub comes to a complete stop. When you have to excert a lot more force than normal, your hub is probably seated now, to make sure, look at the hub and make sure the 1st line in the hub is now into the timing cover.
you're now done with the rod, back off the nut counter clockwise (turn left) and unscrew the rod, you should be able to do this by hand.
Now insert your crank bolt with its washer and torque to 74ftlbs.
Hope this helps.
***disclaimer*** this is purely made as a "help thread". Any damage you do to your vehicle is your responsibility and I am in no way liable for it. User take caution.

The following users liked this post:
kev3331 (05-16-2022)


Trending Topics
04-20-2011, 12:47 PM
#9
if you look at the hub while its off.. look at the end of it, you will notice a notched line that goes all around it, about 1/2" from the end of it.. this line is the one that sits into the cover gasket, once its there, the hub is pressed up against the crank fully, as you will notice you cant turn the nut anymore.. this is a seated hub.
12-02-2011, 01:25 AM
#13
I ordered a thrust ball bearing ( McMaster part number 60715K11) from mcmaster for 15.43 when I ordered the threaded rod. It has a .500 I.D. but it will work okay. Not to take anything away from the excellent work Mr. Green Goblin did, but I used a 7/16-20 coupling nut p/n 90977A190 that is 1 3/4 inches long to use as a pusher with a 5 pack of .200 thick hardened washers p/n 98099A032. All items from McMaster.
Last edited by guppymech; 12-02-2011 at 02:05 AM.
 12-03-2011, 01:22 AM
#16
On The Tree
iTrader: (4)

Join Date: May 2007
Location: Las Vegas, NV..but originally from Oregon!!
Posts: 172
Likes: 0
Received 0 Likes
on
0 Posts
Use a bearing if at all possible. I just stripped the threads out of my crank using this without a bearing. I'm not blaming the tool, I blame myself. but using a bearing is cheap insurance.
12-03-2011, 07:55 AM
#17
^ sounds like something else went on there. I used a single bolt and a couple washers to get mine back on. No threaded rod. Then when it got to a point i just put the stock bolt back in and tightened it down.
Id guess your threads were already messed up, or something was getting forced that shouldnt have been, like it was misaligned. Did you clean and apply oil to it? Its easy to tell when its going on right and when it isnt, to strip threads you'd have to ignore some signs of a problem.
Id guess your threads were already messed up, or something was getting forced that shouldnt have been, like it was misaligned. Did you clean and apply oil to it? Its easy to tell when its going on right and when it isnt, to strip threads you'd have to ignore some signs of a problem.