The story of my 94 Z

 08-22-2014, 09:39 PM
#122
On The Tree
Thread Starter
iTrader: (2)

Join Date: Dec 2008
Location: Edwardsville, IL
Posts: 181
Likes: 0
Received 0 Likes
on
0 Posts

So I walked out of work yesterday to find this...
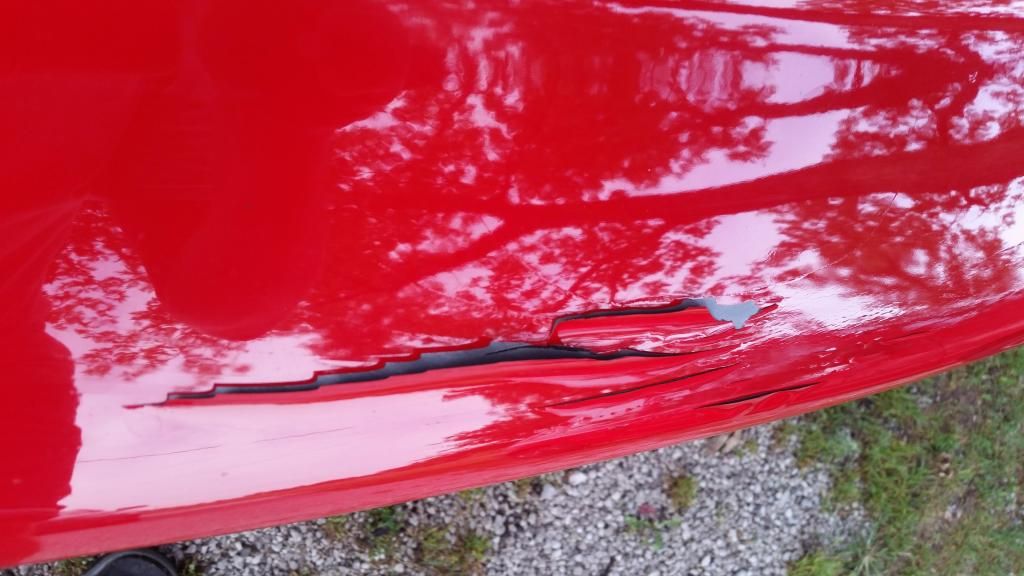
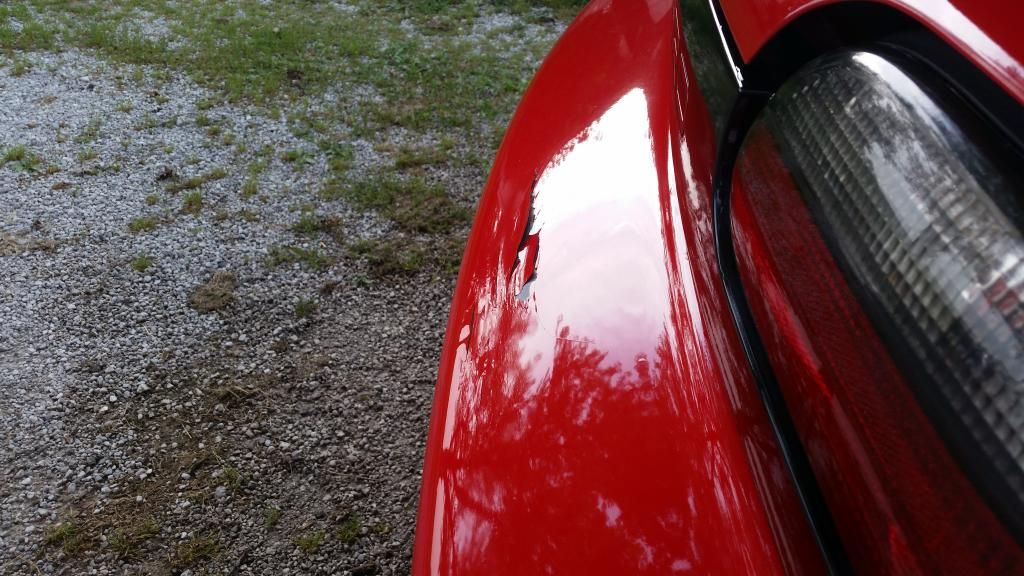
To what ever spineless pile of **** side swiped my rear bumper.. Karma is a bitch, and I hope she bites you HARD.


To what ever spineless pile of **** side swiped my rear bumper.. Karma is a bitch, and I hope she bites you HARD.
08-22-2014, 10:32 PM
#123

That is f'ing terrible, I hope they got rear ended yesterday and they have to total out their car. Knowing our luck it was some looser driving a piece of ****. Best of luck getting it fixed man, luckily it's just the bumper cover. I know you will have it looking like new again. Just really sucks it happen in the first place. I have a mint condition gm rear bumper I'd give to you... To bad you don't live near me.
 04-18-2016, 03:14 PM
#125
On The Tree
Thread Starter
iTrader: (2)
Join Date: Dec 2008
Location: Edwardsville, IL
Posts: 181
Likes: 0
Received 0 Likes
on
0 Posts
So it was brought to my attention the other day that I haven't updated this thread in a long time.. It's crazy how time flies & I can't believe I started working on this 4 years ago!
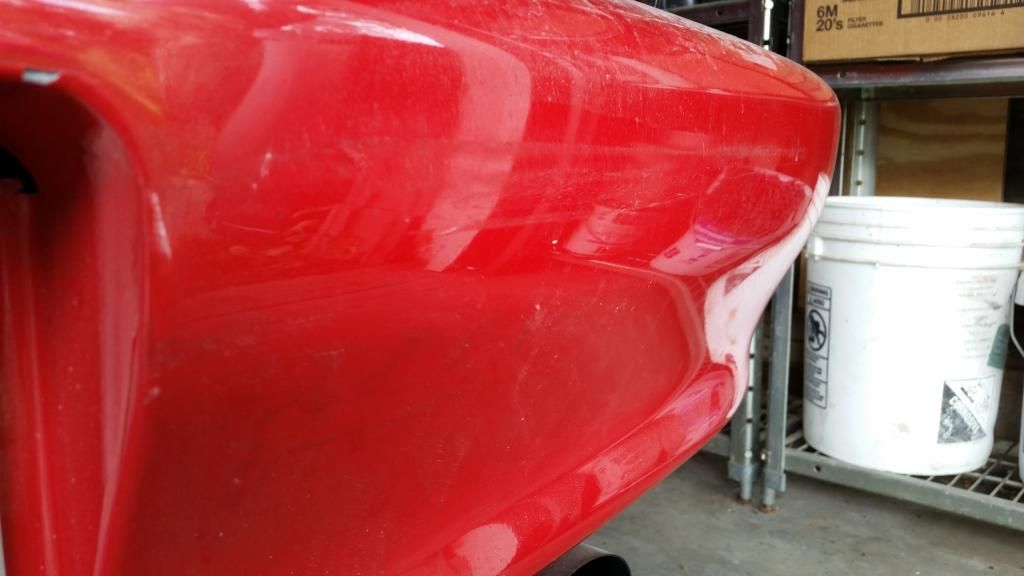
I did get the rear bumper fixed, but hardly drove the car at all last year. It needed front tires really bad, the brakes felt dangerous, and it was having an intermittent starting issue. Eventually it wouldn't start at all, and so it sat because I didn't have the motivation to get out there and work on it.
Late last fall I finally printed off shbox's optispark troubleshooting guide, and confirmed it was a dead opti. I went and replaced it with one off the spare motor after I disassembled it and cleaned up the rotor, contacts, and put some loctite on the screws.
Fast forward a little bit to this spring: I finally got new front tires - 275/40R17 Bridgestone Potenza RE760 Sport's, which I have yet to get mounted. I knew I would also need an alignment since my old tires were wore pretty unevenly.. so rather than paying for an alignment when I put the new tires on - then again when I finally got around to replacing the front shocks - I just decided to start taking stuff apart again.
Now I'm knee deep in a front end overhaul...
Here's the last time it will ever look like this!
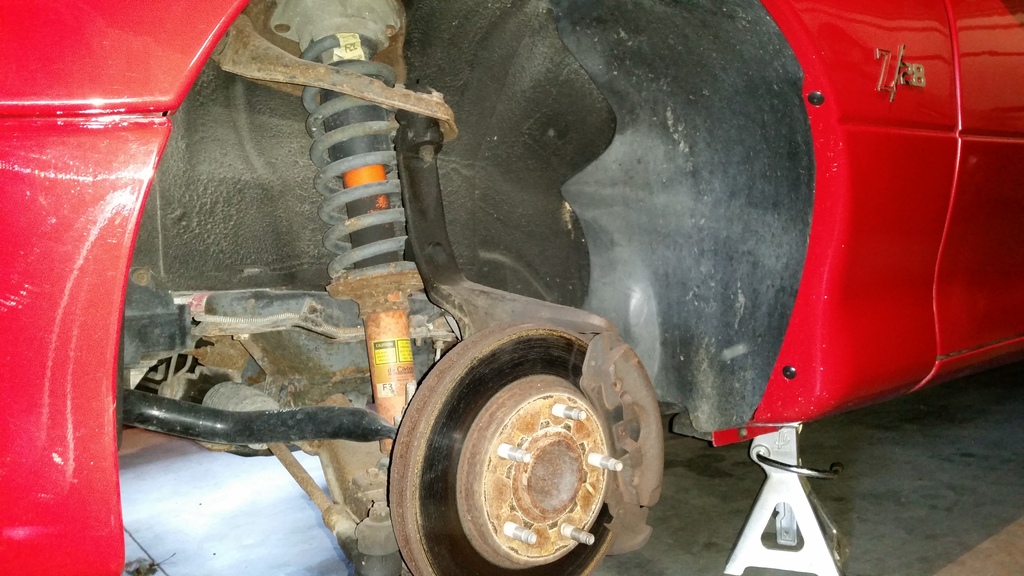
and all that stuff now out of the way
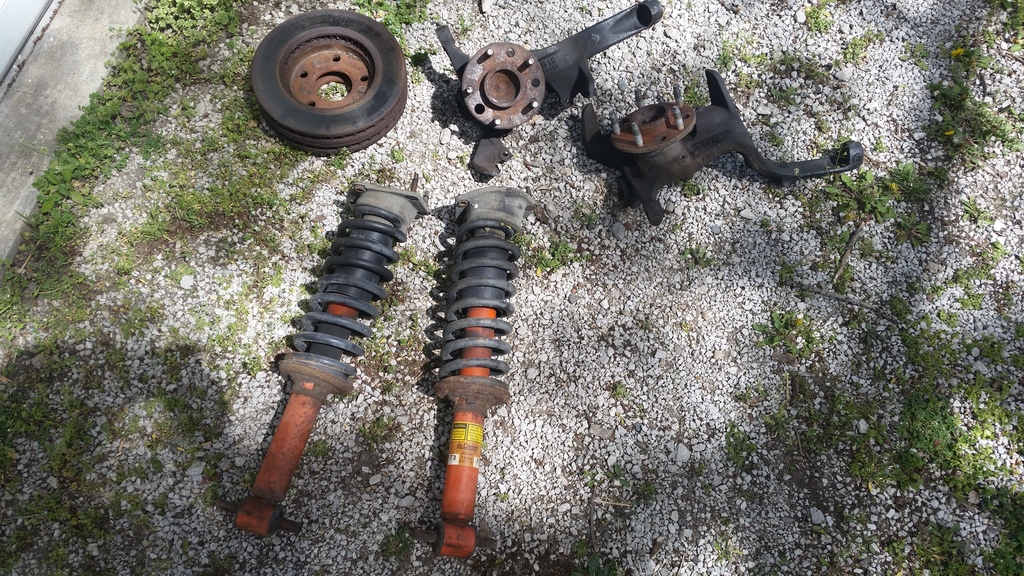
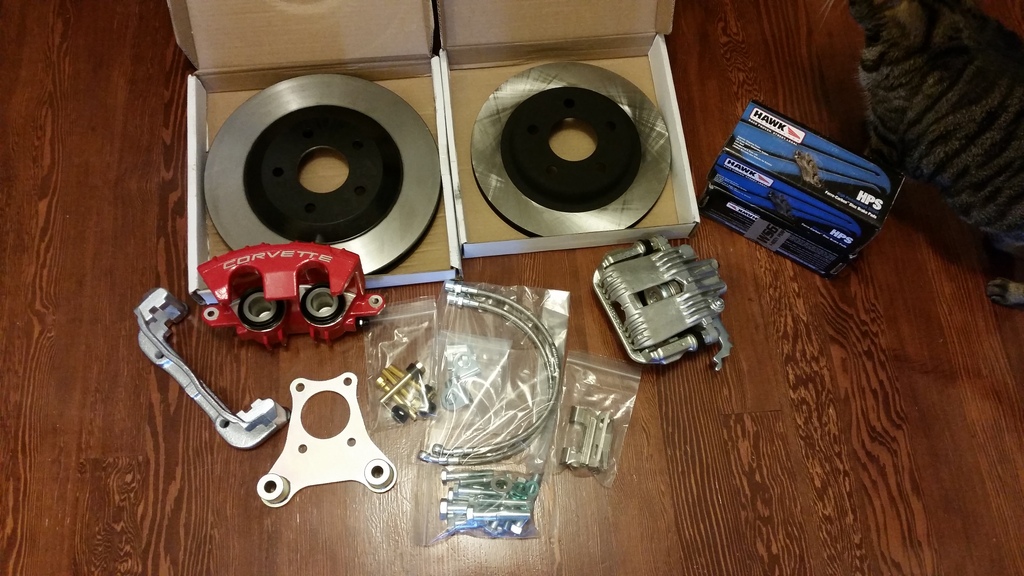
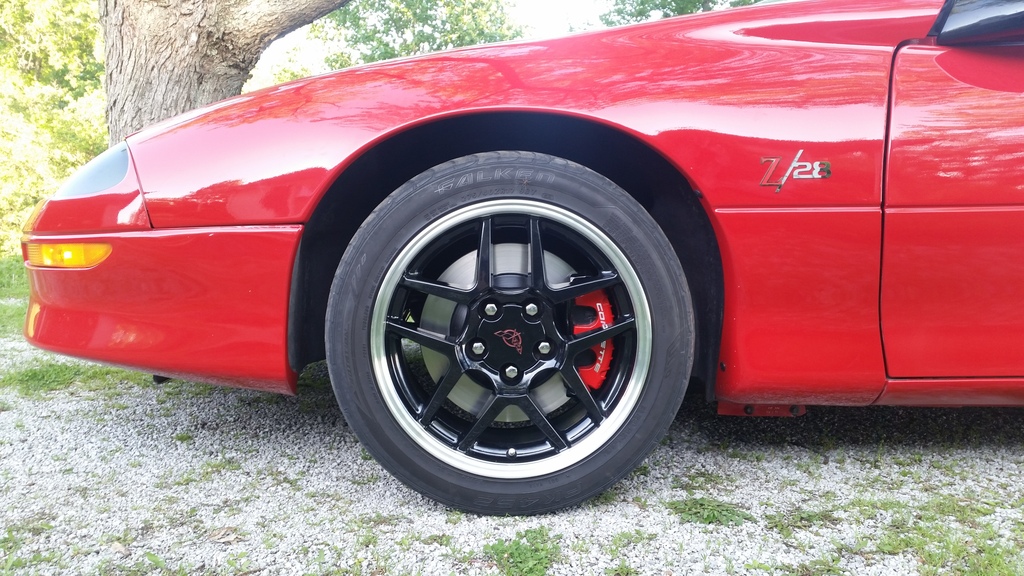
The plan is to clean up my stock springs and reinstall them on my Bilstein shocks. I am going to cut a little off of them, just so it doesn't sit so goofy-high. I don't really want to lower the car more than ~1/2", or I would just get Strano's. Since the brakes suck, an upgrade is in order. After much deliberation, I'm going with the C5 conversion. It should fit under my wheels without any grinding of the calipers or requiring spacers, and will look good too.
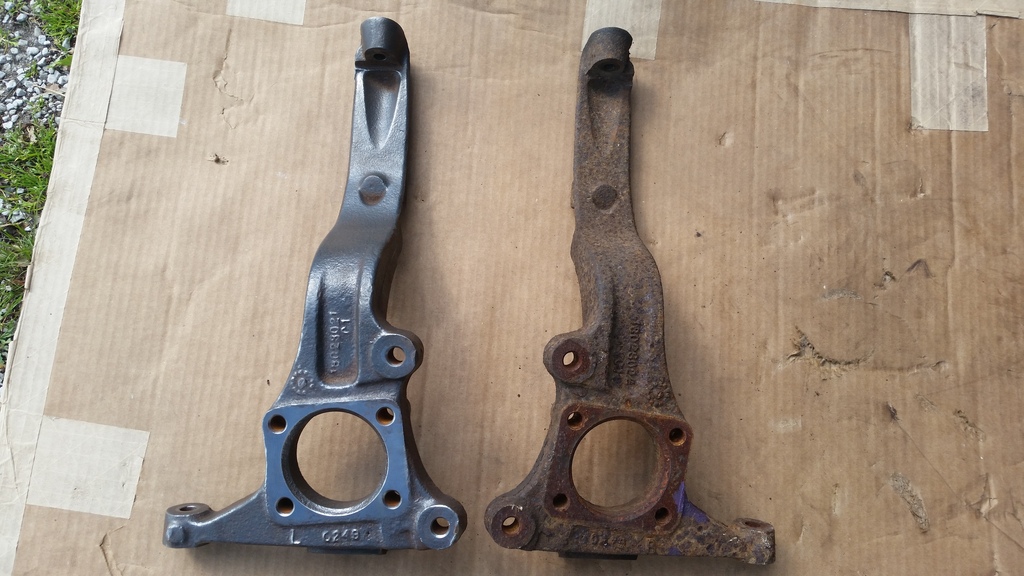
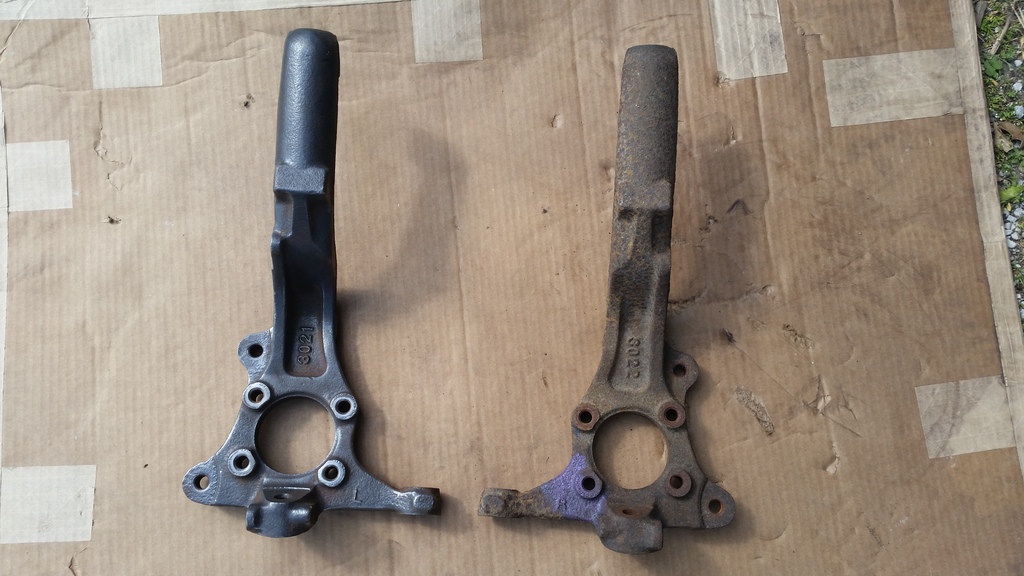
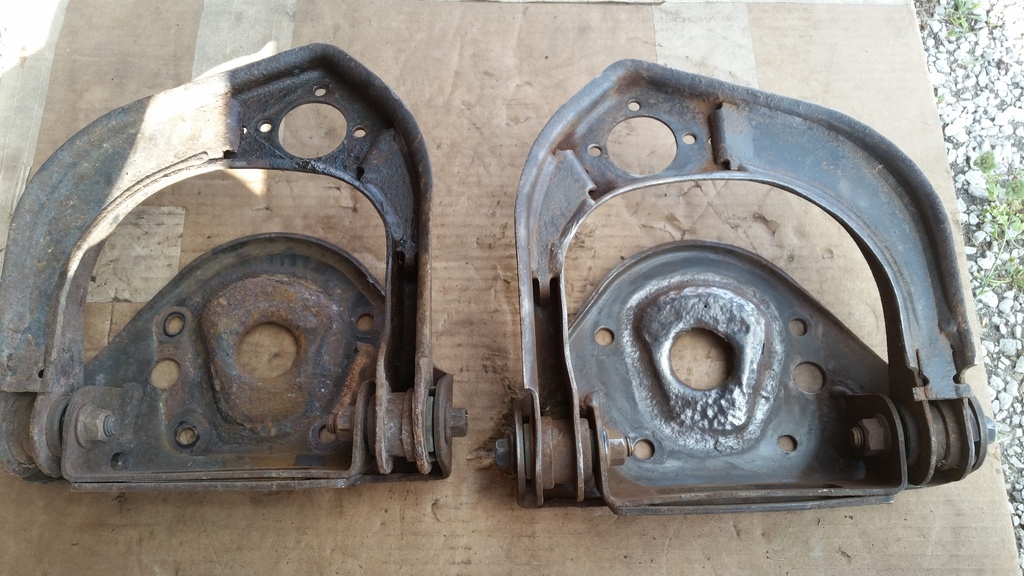
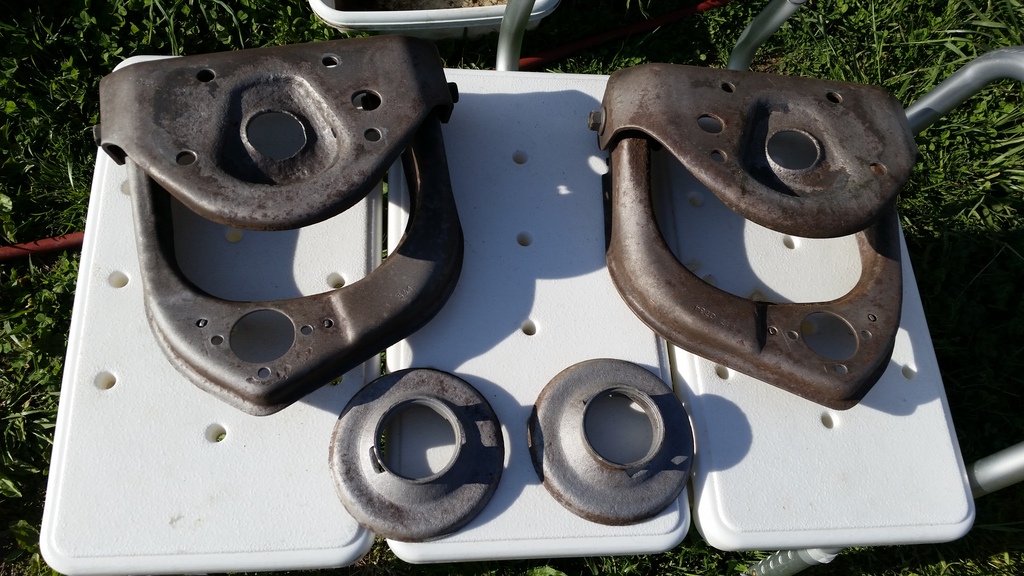
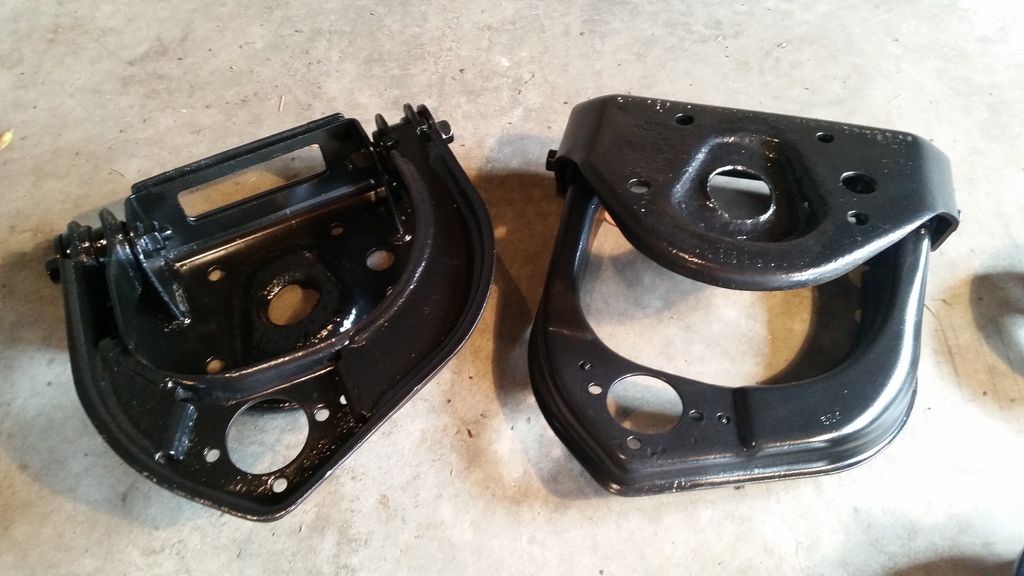
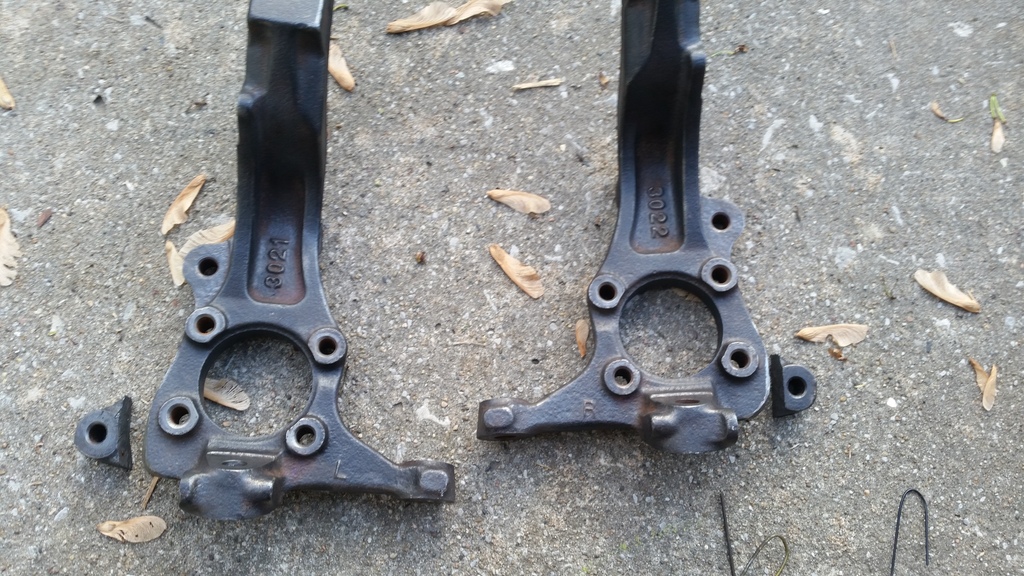
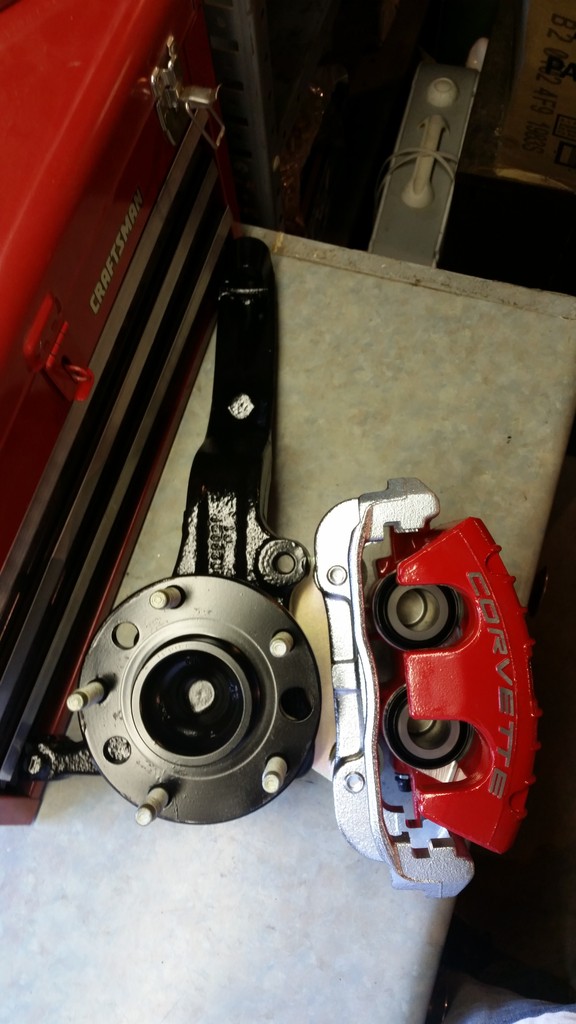
Here's some before/afters of my upper A-arms and an extra set of 98+ spindles that I had picked up at the junkyard awhile back. They came out pretty good for just using a wire cup on an angle grinder. I was considering getting out the sandblaster, but I probably won't worry about it.
I have new Timkin wheel bearing/hub assemblies and Moog shock mounts on the way. There's no play in the ball joints or tie rod ends, so they're just getting cleaned up & some new grease.
More to come as parts start coming in & I make a little more progress. Goal is to put some good miles on the car this year!
I did get the rear bumper fixed, but hardly drove the car at all last year. It needed front tires really bad, the brakes felt dangerous, and it was having an intermittent starting issue. Eventually it wouldn't start at all, and so it sat because I didn't have the motivation to get out there and work on it.
Late last fall I finally printed off shbox's optispark troubleshooting guide, and confirmed it was a dead opti. I went and replaced it with one off the spare motor after I disassembled it and cleaned up the rotor, contacts, and put some loctite on the screws.
Fast forward a little bit to this spring: I finally got new front tires - 275/40R17 Bridgestone Potenza RE760 Sport's, which I have yet to get mounted. I knew I would also need an alignment since my old tires were wore pretty unevenly.. so rather than paying for an alignment when I put the new tires on - then again when I finally got around to replacing the front shocks - I just decided to start taking stuff apart again.
Now I'm knee deep in a front end overhaul...
Here's the last time it will ever look like this!

and all that stuff now out of the way

The plan is to clean up my stock springs and reinstall them on my Bilstein shocks. I am going to cut a little off of them, just so it doesn't sit so goofy-high. I don't really want to lower the car more than ~1/2", or I would just get Strano's. Since the brakes suck, an upgrade is in order. After much deliberation, I'm going with the C5 conversion. It should fit under my wheels without any grinding of the calipers or requiring spacers, and will look good too.
Here's some before/afters of my upper A-arms and an extra set of 98+ spindles that I had picked up at the junkyard awhile back. They came out pretty good for just using a wire cup on an angle grinder. I was considering getting out the sandblaster, but I probably won't worry about it.


I have new Timkin wheel bearing/hub assemblies and Moog shock mounts on the way. There's no play in the ball joints or tie rod ends, so they're just getting cleaned up & some new grease.
More to come as parts start coming in & I make a little more progress. Goal is to put some good miles on the car this year!
04-24-2016, 08:42 PM
#126
On The Tree
Thread Starter
iTrader: (2)
Join Date: Dec 2008
Location: Edwardsville, IL
Posts: 181
Likes: 0
Received 0 Likes
on
0 Posts
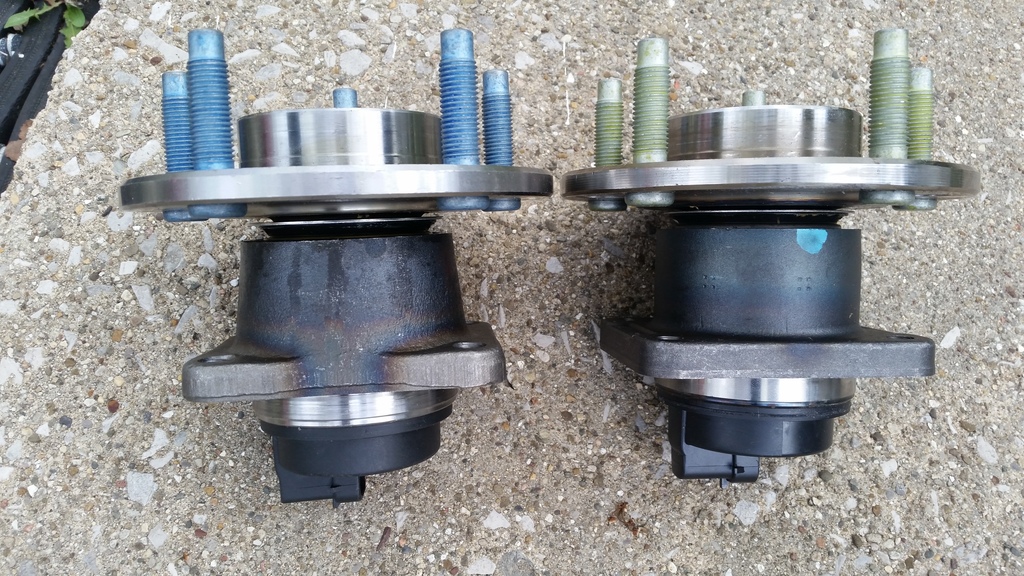
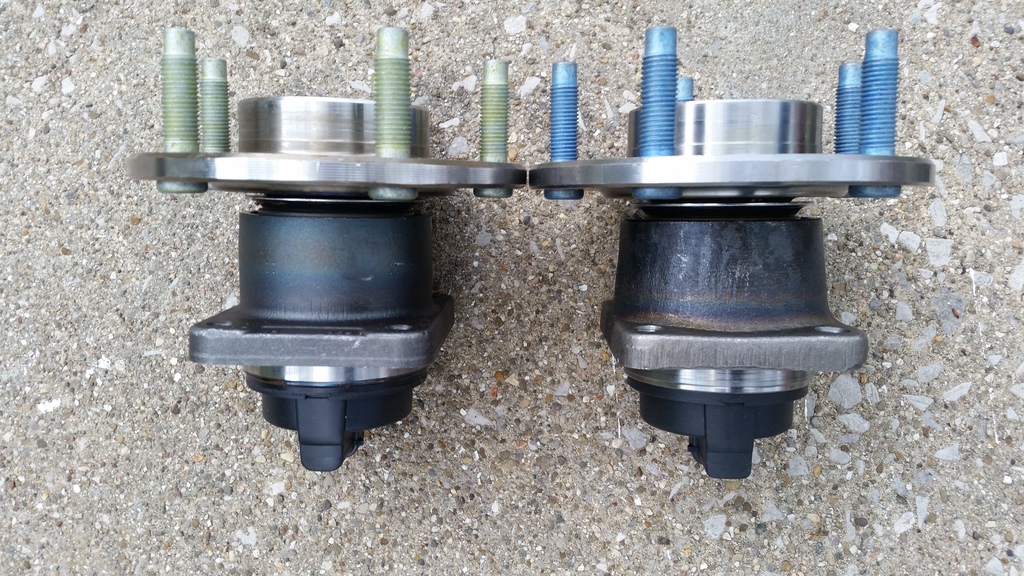
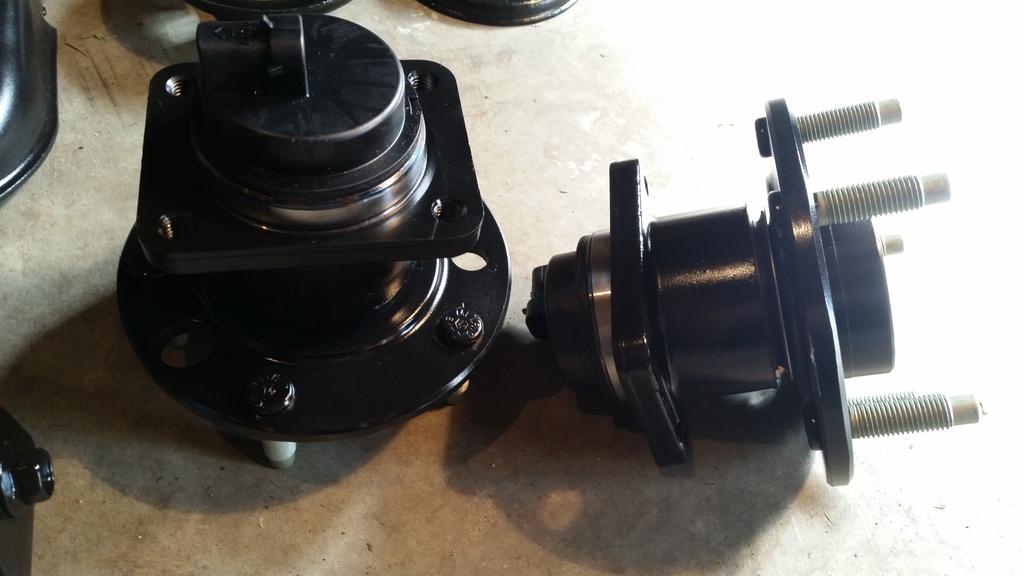
So on Thursday my new hubs came in from Autozone. As you can see, one looks great (green studs), the other looks like a cheap knockoff got put into a Timkin box (blue studs).. The iron casting was completely different, the hub itself was different, and not at all the same quality as the other one. They even felt different when you spun them. I was not about to pay the big money for Timkins and get stuck with a cheapo that might be toast in 5k miles..
I took them both back to the store, and after a little discussion, he put in an order for another one which I picked up on Friday. Thankfully it looked exactly like the other good one.
I took them both back to the store, and after a little discussion, he put in an order for another one which I picked up on Friday. Thankfully it looked exactly like the other good one.

 04-24-2016, 09:11 PM
#127
On The Tree
Thread Starter
iTrader: (2)
Join Date: Dec 2008
Location: Edwardsville, IL
Posts: 181
Likes: 0
Received 0 Likes
on
0 Posts
I feel like I got quite a bit accomplished this weekend. I fought for what felt like forever with the stock shock assemblies, trying to get everything separated. The nuts holding the top spring mount onto the shock were both just piles of rust, and they had to be cut off with my cutoff wheel. The first one came right apart after the nut was cut loose, the second was another story though. After removing the nut, the metal sleeve of the spring mount was still frozen to the shaft of the shock, no amount of prying was going to get it off. Finally we used a vise, a big punch and a 2 lb sledge to drive the shaft out of the sleeve.
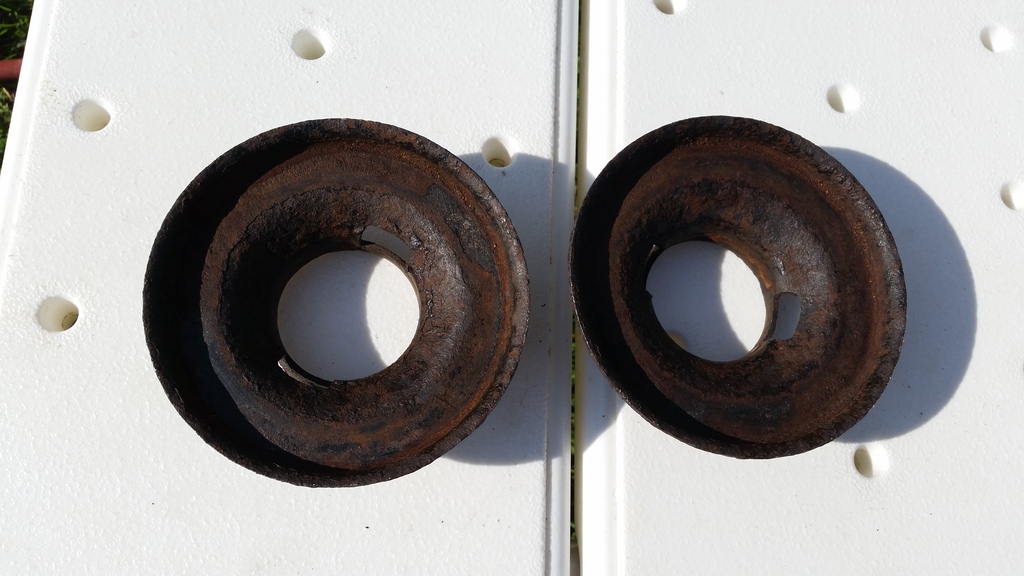
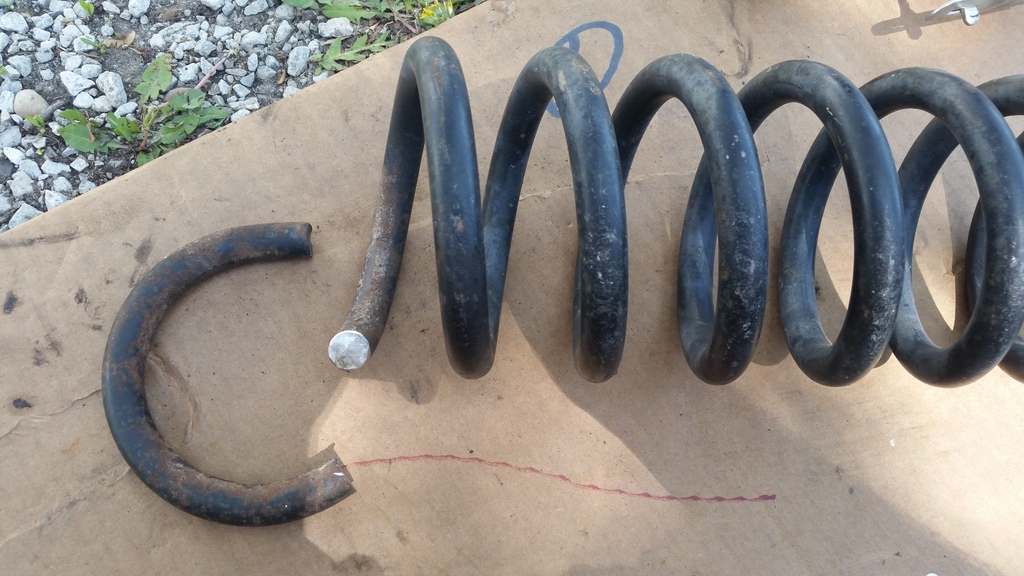
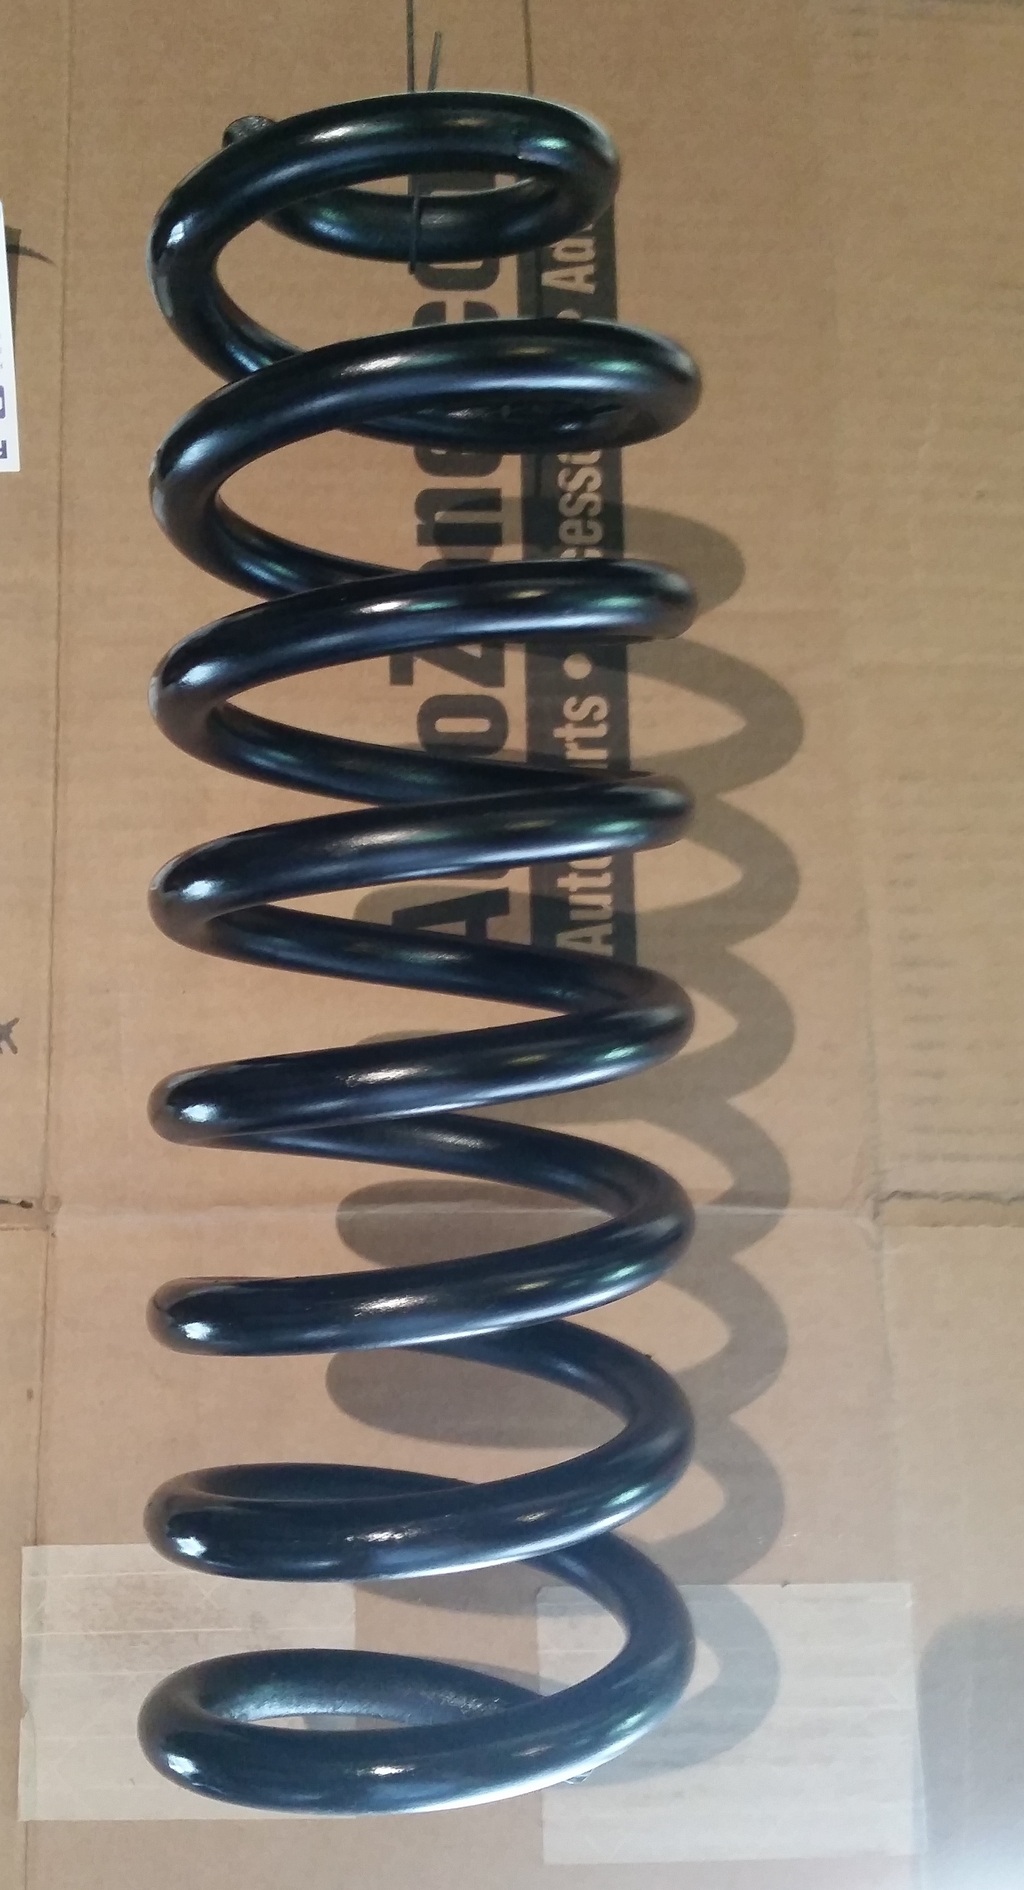
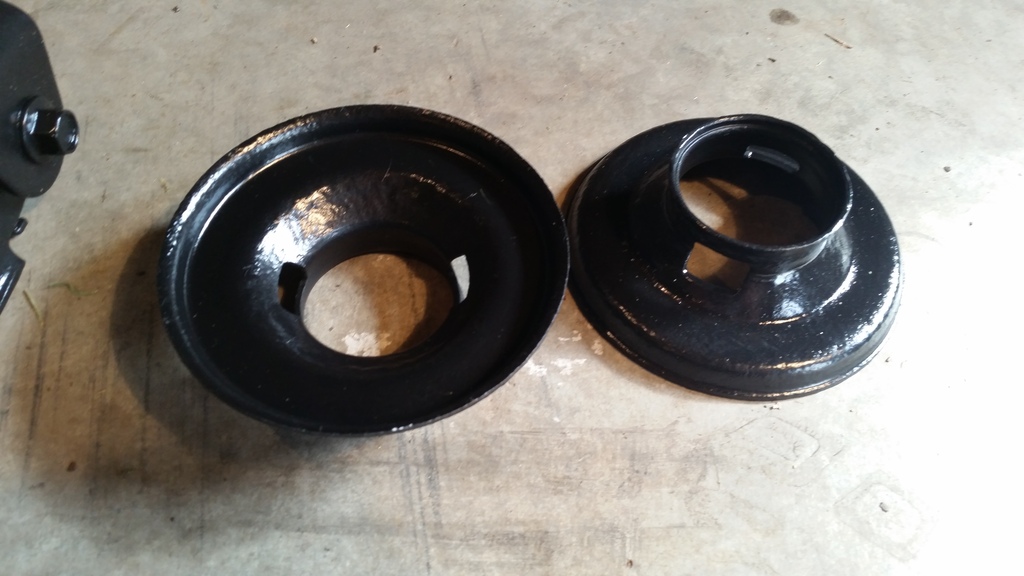
Now that the spring/shock assemblies were both taken apart, I could clean up the lower spring mounts and determine how much I wanted to cut off the stock springs. I ended up cutting half a coil +1.5" laterally. So if the end of the spring was at 12 o'clock, I made my cut around 7 o'clock. This decreased the height of the spring by about 1/2" - from 14.5" down to 14". I also did a little sand blasting on the spring mounts and the upper A-arms.
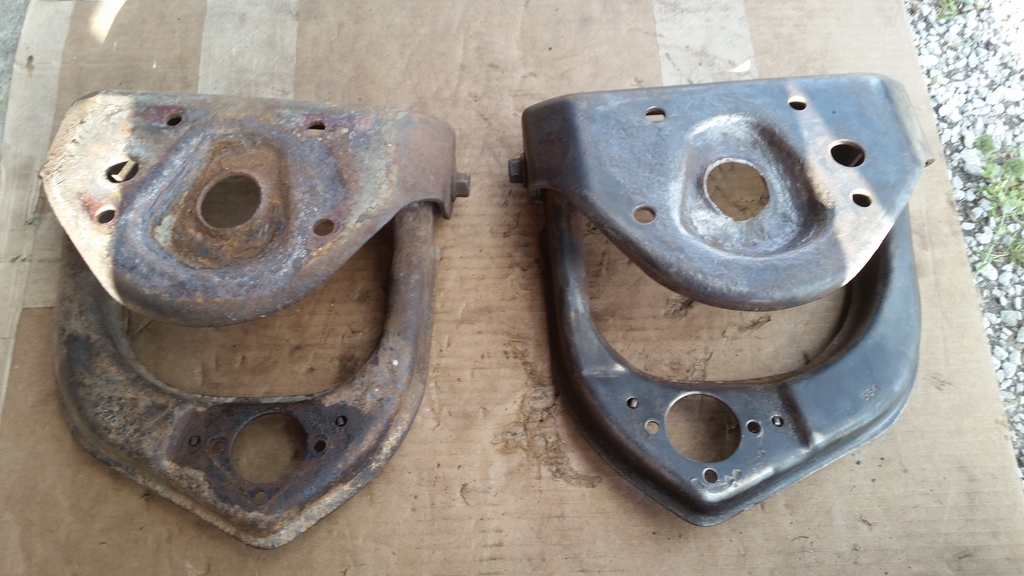
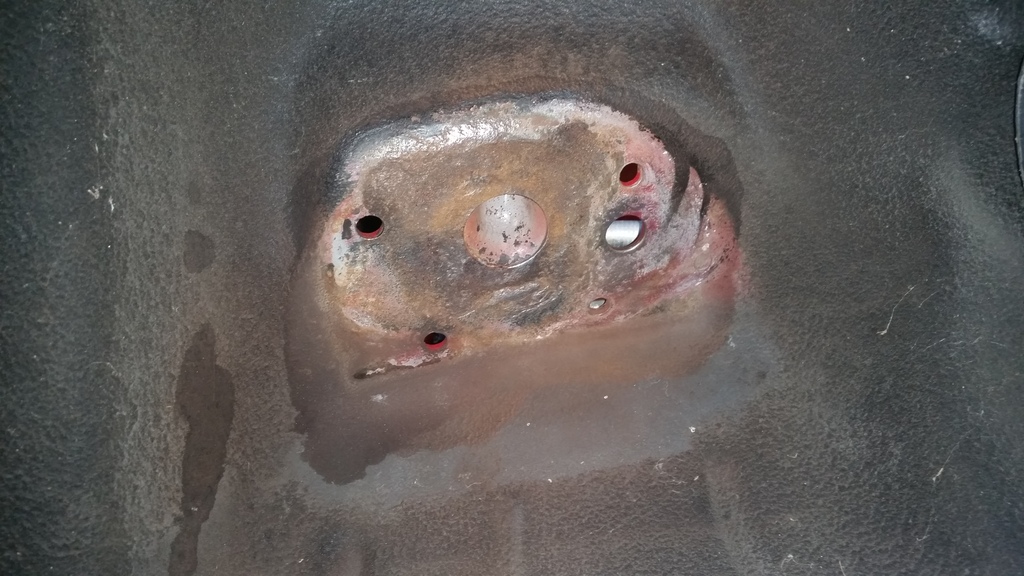
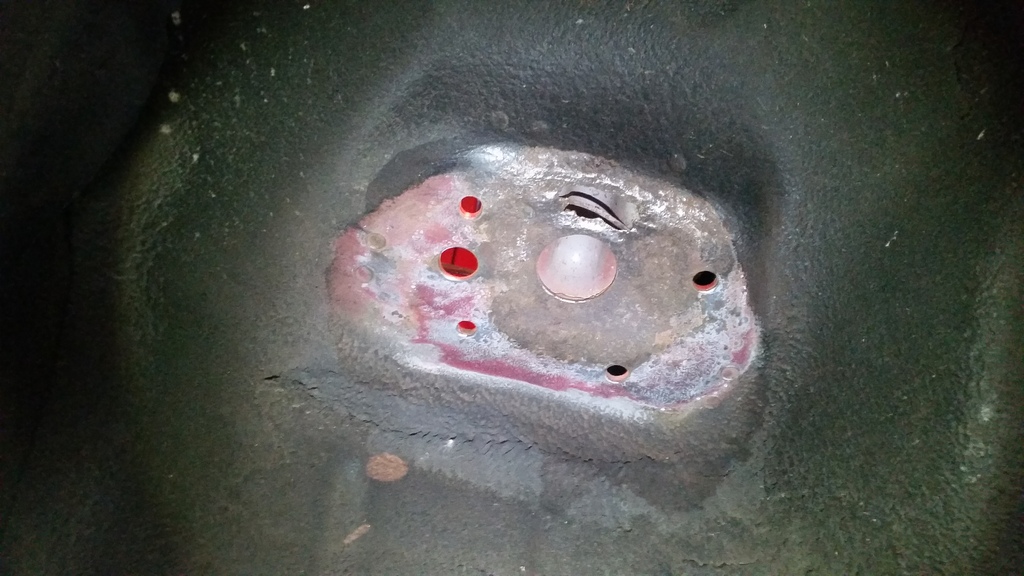
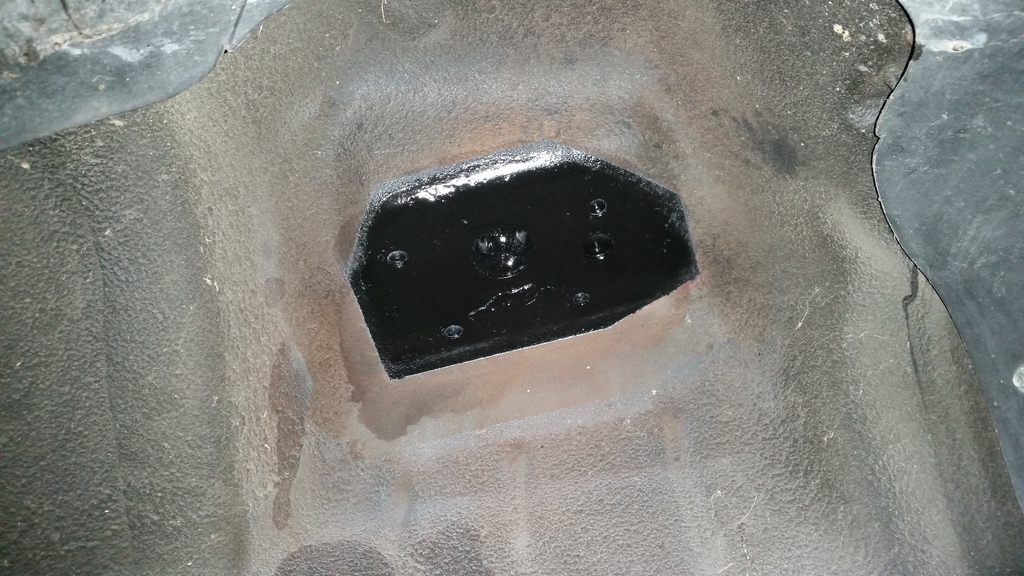
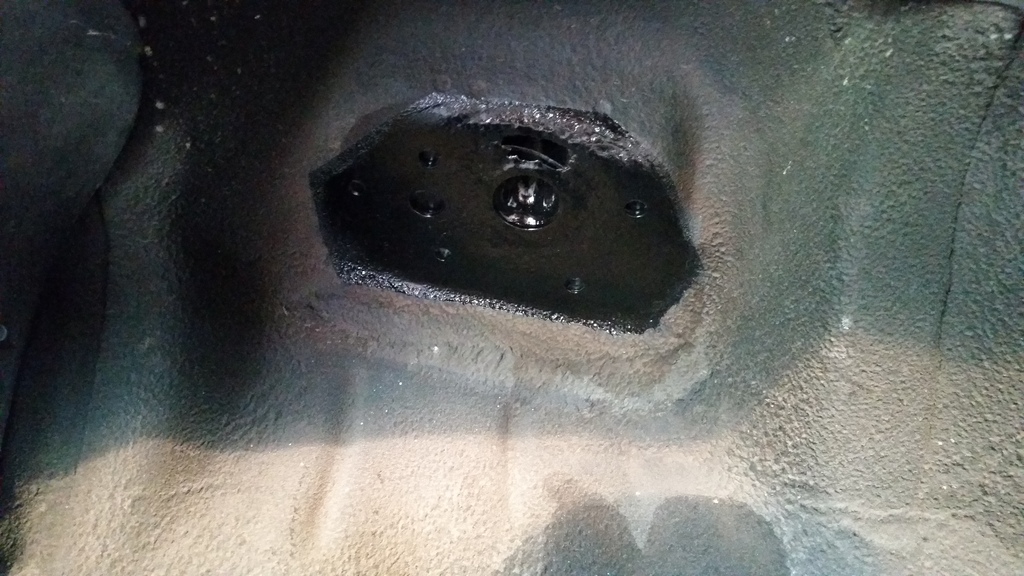
Here you can see the poor condition of the top underside of the wheel wells, where the upper A-arms are mounted. I knocked off the rust scale and then cleaned it up with the wire cup on an angle grinder.
Then I primed &or painted everything:
I believe I have everything ready to go to reassemble the shocks, but I'm going to wait a few days for the paint to fully cure. Should be ordering brake parts in the next couple days as well!
Now that the spring/shock assemblies were both taken apart, I could clean up the lower spring mounts and determine how much I wanted to cut off the stock springs. I ended up cutting half a coil +1.5" laterally. So if the end of the spring was at 12 o'clock, I made my cut around 7 o'clock. This decreased the height of the spring by about 1/2" - from 14.5" down to 14". I also did a little sand blasting on the spring mounts and the upper A-arms.


Here you can see the poor condition of the top underside of the wheel wells, where the upper A-arms are mounted. I knocked off the rust scale and then cleaned it up with the wire cup on an angle grinder.


Then I primed &or painted everything:


I believe I have everything ready to go to reassemble the shocks, but I'm going to wait a few days for the paint to fully cure. Should be ordering brake parts in the next couple days as well!
04-30-2016, 09:49 PM
#128
On The Tree
Thread Starter
iTrader: (2)
Join Date: Dec 2008
Location: Edwardsville, IL
Posts: 181
Likes: 0
Received 0 Likes
on
0 Posts
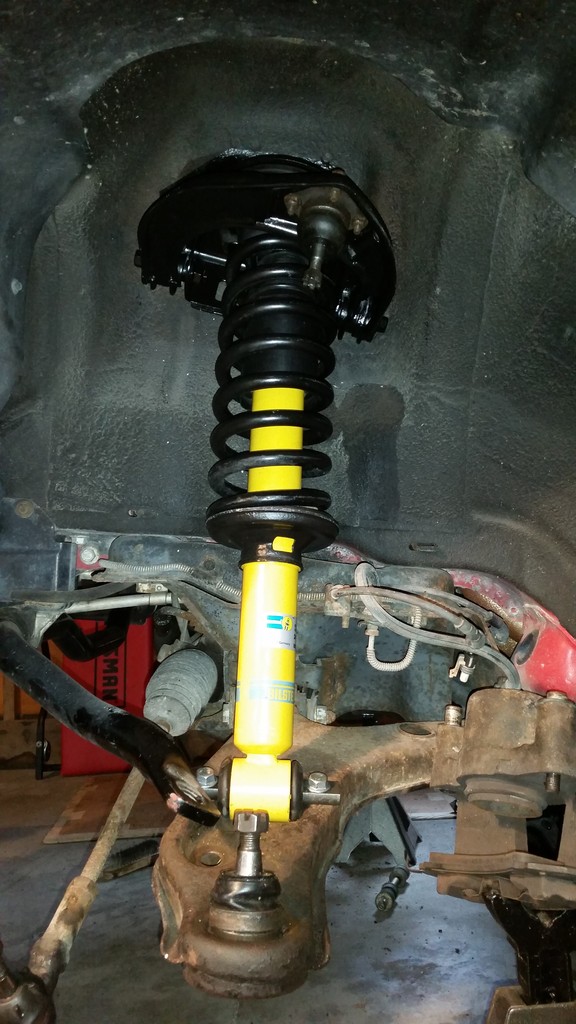
Another relatively productive day in the garage. I flushed all the old grease out of the lower ball joints, upper ball joints, and tie rod ends; put both the shock/spring assemblies together and installed in the car with all new bolts, and did a little amputation on the spindles and applied a coat of primer. Tomorrow I'll get some paint on them and they'll be ready to go back on the car. Then I'll just be waiting on my brake parts to arrive. To be honest, the spring/shock swap was not fun. It felt like something was fighting me every step of the way. Glad that it's over though. Hopefully the front end sits to my liking.


 05-04-2016, 08:38 AM
#130
On The Tree
Thread Starter
iTrader: (2)
Join Date: Dec 2008
Location: Edwardsville, IL
Posts: 181
Likes: 0
Received 0 Likes
on
0 Posts
Pics to come, but I've got the spindles painted and ready to go back on, and I should have loads of brake parts coming in throughout the week. If all goes well I may be able to drive it on Sunday.
 05-05-2016, 09:08 PM
#131
On The Tree
Thread Starter
iTrader: (2)
Join Date: Dec 2008
Location: Edwardsville, IL
Posts: 181
Likes: 0
Received 0 Likes
on
0 Posts
Everything is in besides the rear lines!
I've also realized that finishing up this weekend is probably not feasible. I am going to paint the rear calipers red, both caliper mounting brackets & the kore3 bracket gloss black - unless I hear back from this place I called today to get a price for powder coating.
Does anyone have any tips on removing the piston from the bore on the rear calipers? I don't think I can get it powder coated without removing it, since from what I understand there is a rubber seal in there too. I tried compressed air, but it only moves it a hair.
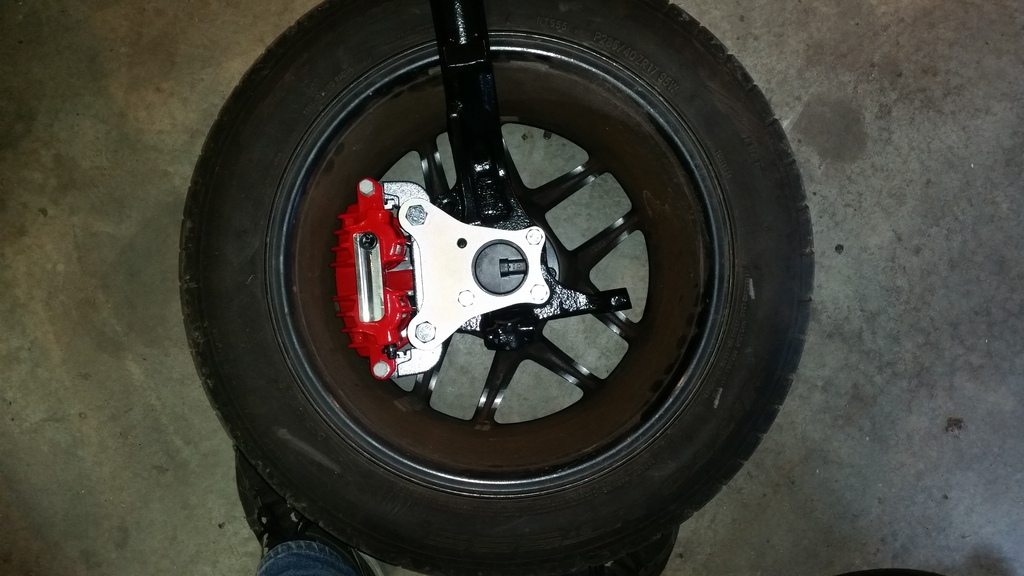
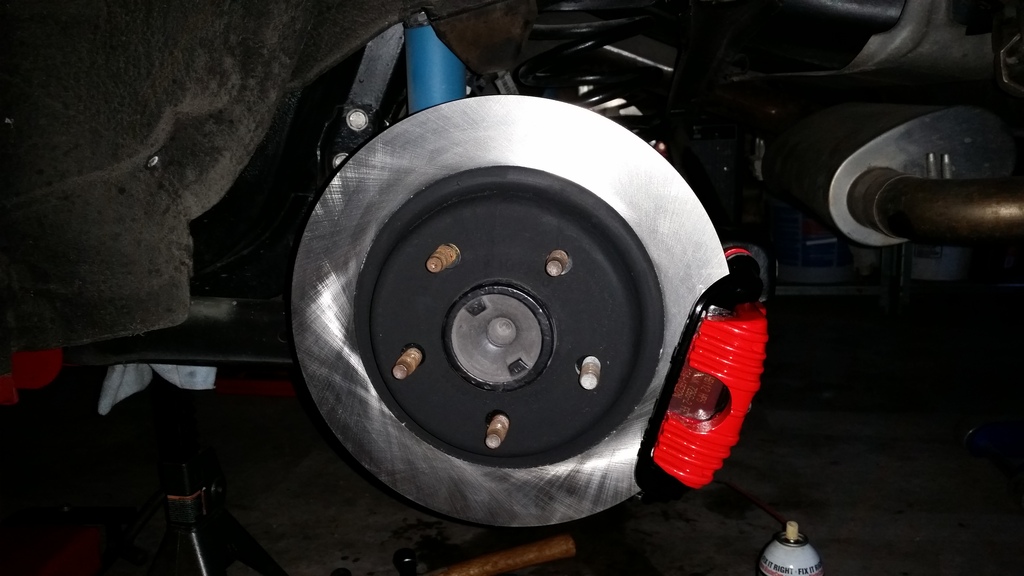
and a couple mock-up pics to make sure it all fits.
I got both the rears disassembled tonight too.
I've also realized that finishing up this weekend is probably not feasible. I am going to paint the rear calipers red, both caliper mounting brackets & the kore3 bracket gloss black - unless I hear back from this place I called today to get a price for powder coating.
Does anyone have any tips on removing the piston from the bore on the rear calipers? I don't think I can get it powder coated without removing it, since from what I understand there is a rubber seal in there too. I tried compressed air, but it only moves it a hair.

and a couple mock-up pics to make sure it all fits.


I got both the rears disassembled tonight too.


 05-08-2016, 09:38 AM
#134
On The Tree
Thread Starter
iTrader: (2)
Join Date: Dec 2008
Location: Edwardsville, IL
Posts: 181
Likes: 0
Received 0 Likes
on
0 Posts
Thanks guys.
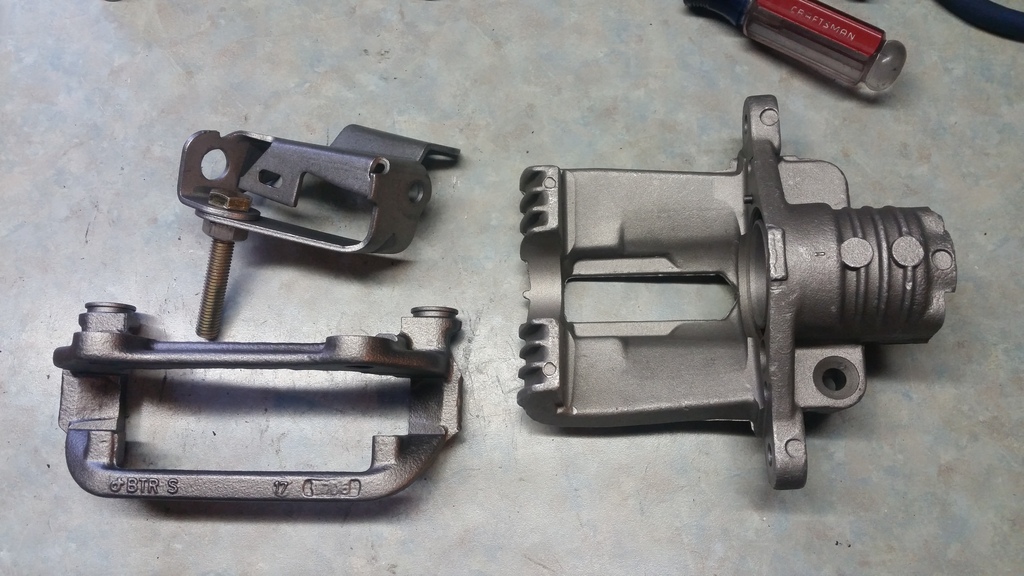
Not a whole lot to report. Car won't be driving this week though, hopefully by next Sunday. I ended up getting a hold of an old neighbor who does powder coating on the side, and dropped off my rear calipers and all the brackets at his house yesterday afternoon. I already had the calipers disassembled, and yesterday morning I went to work on smoothing out some of the casting marks. One of the calipers was much worse than the other.
Before
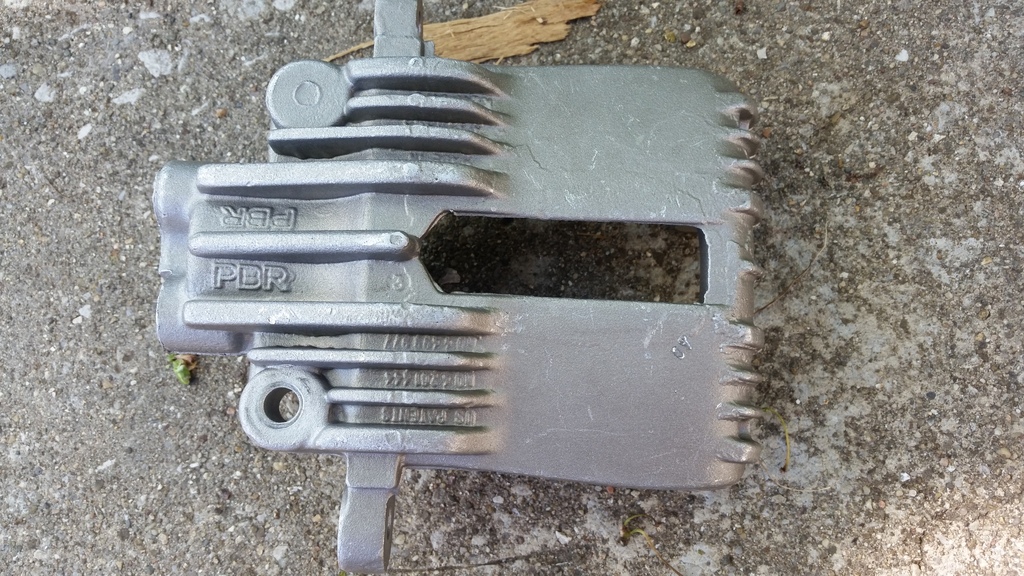

After
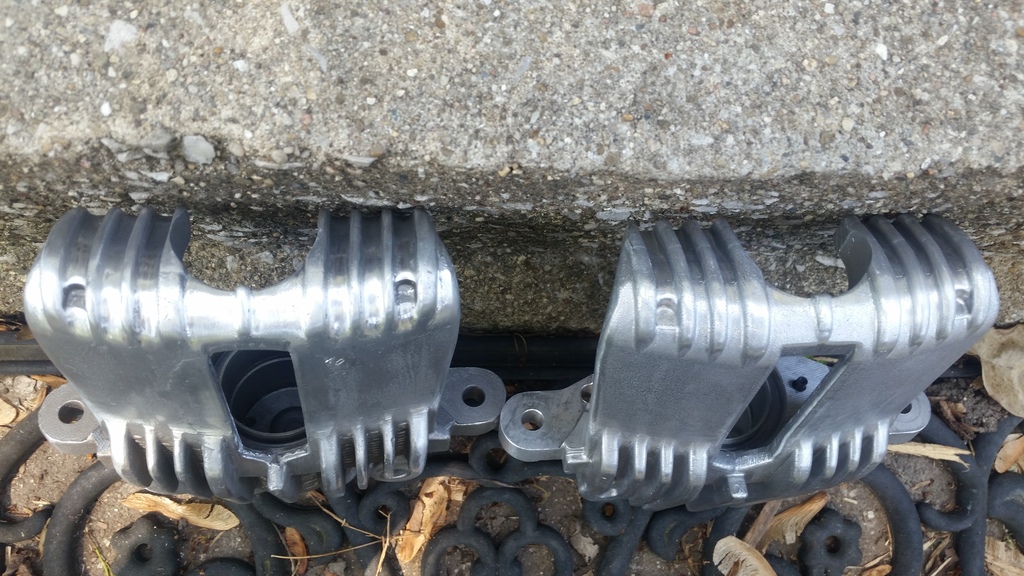
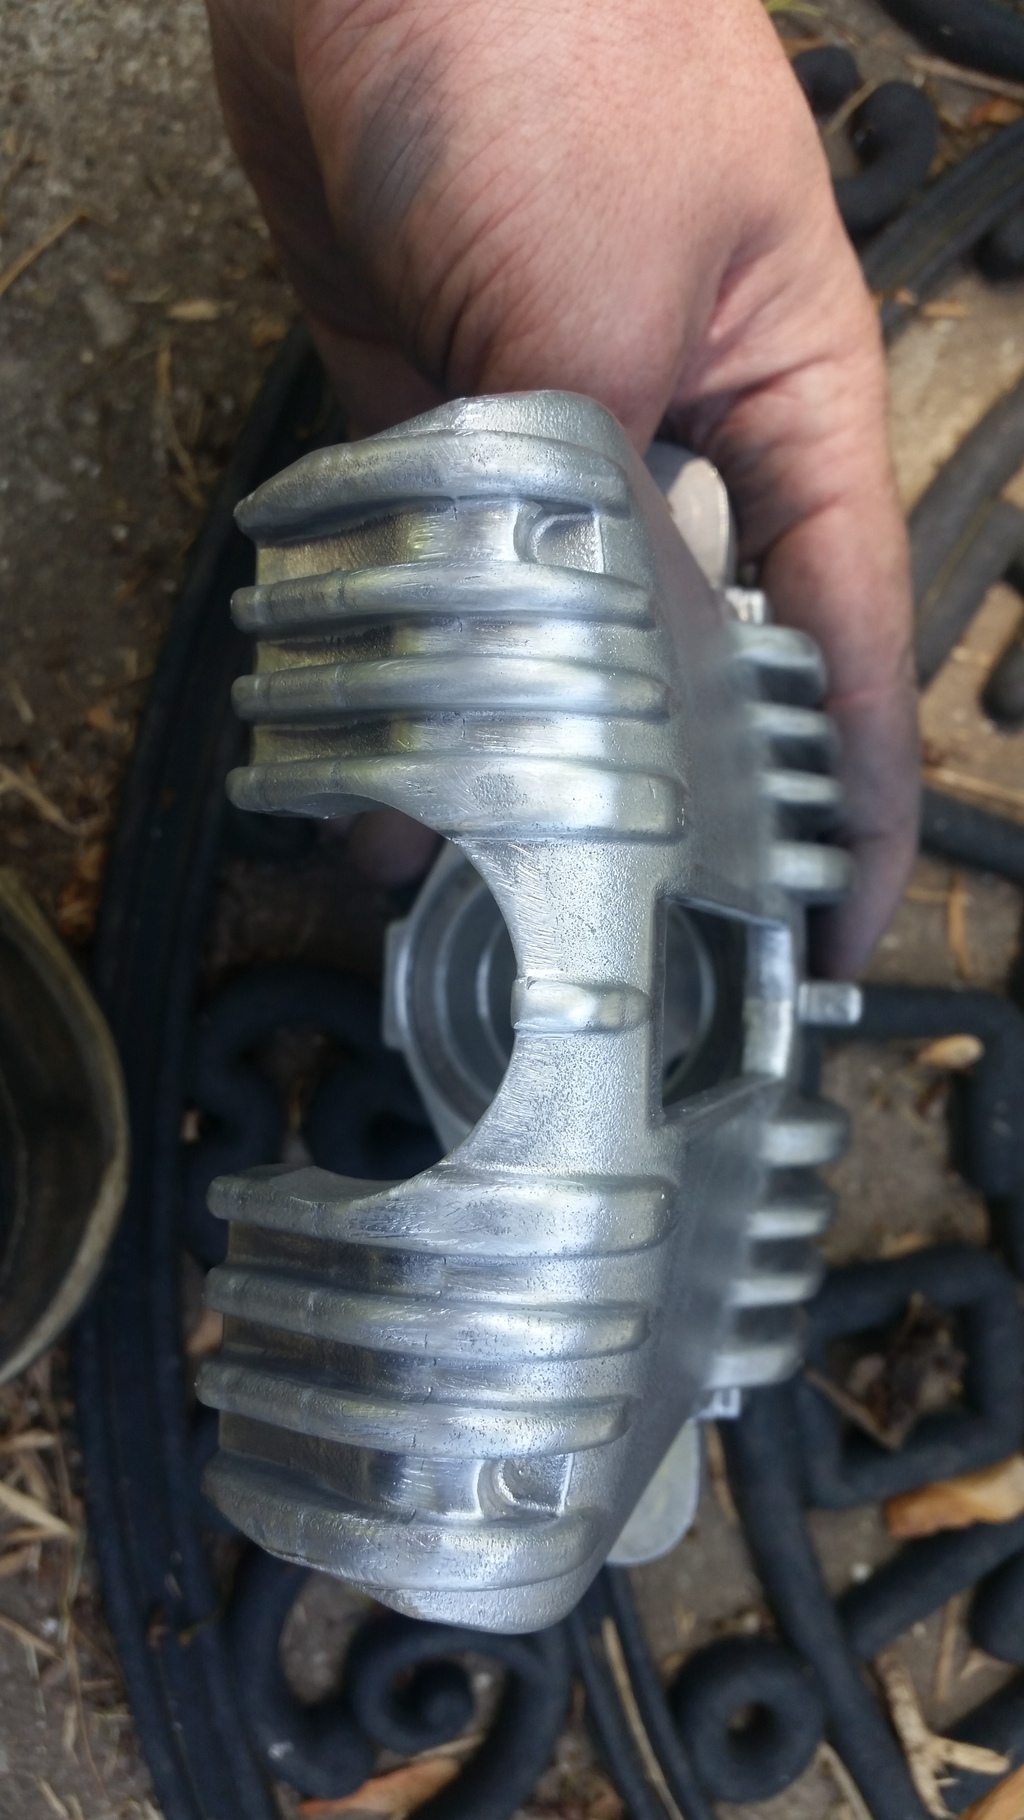
Neither of them are perfect, but they're much better than before.
My rear brake lines also came in the mail yesterday, so now I've got all the parts I need. In the coming week I should be able to get all the lines swapped and the spindles back in the car in preparation for the brake work.
05-15-2016, 09:15 PM
#135
On The Tree
Thread Starter
iTrader: (2)
Join Date: Dec 2008
Location: Edwardsville, IL
Posts: 181
Likes: 0
Received 0 Likes
on
0 Posts
Well, I didn't quite get everything finished today. I spent all day in the garage, and I'm close. The brake lines were giving me trouble, and assembling the calipers took longer than I was expecting. I still have the front left stainless line to put on, and the rear braided line from the body to rear end. Then bleed the brakes, tighten up the front sway bar end links and make sure all the joints are greased up. Then go bed in the brake pads and schedule an appointment to get the tires put on and get an alignment done.
I picked up all my parts from powder coating yesterday afternoon. The red isn't a perfect match, but I don't think it will be noticeable on the car. All in all, lookin' good..
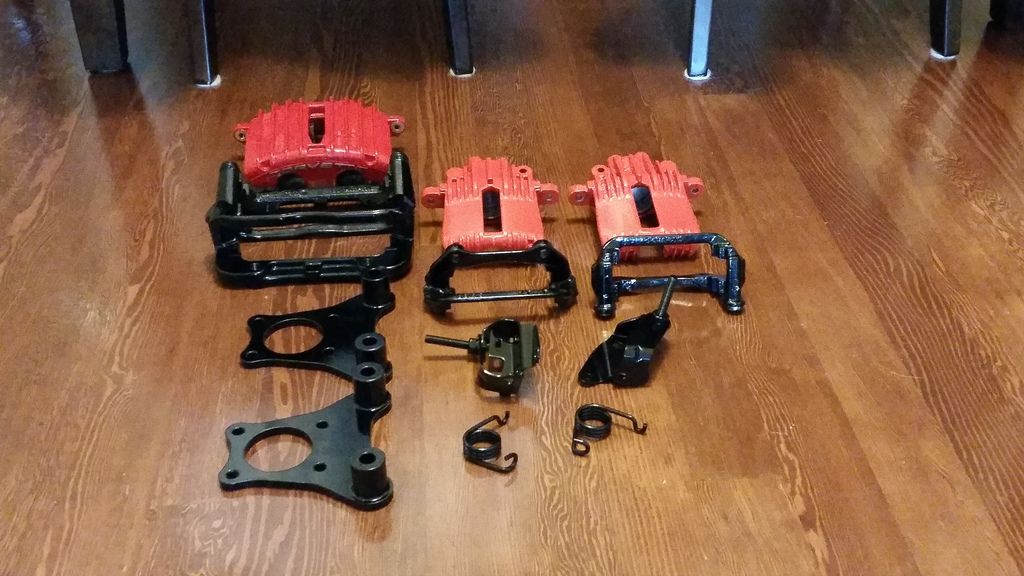
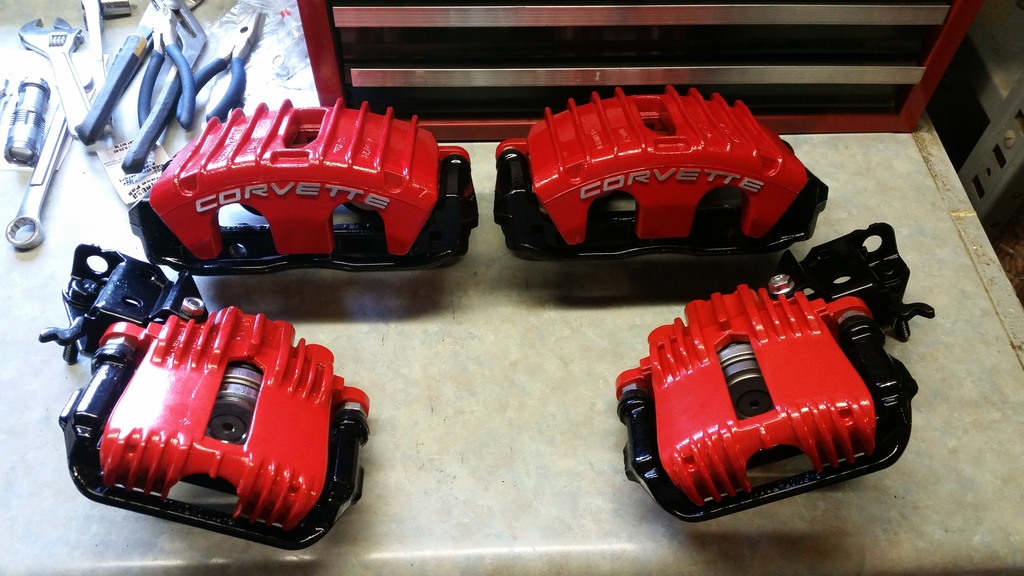
Calipers assembled:
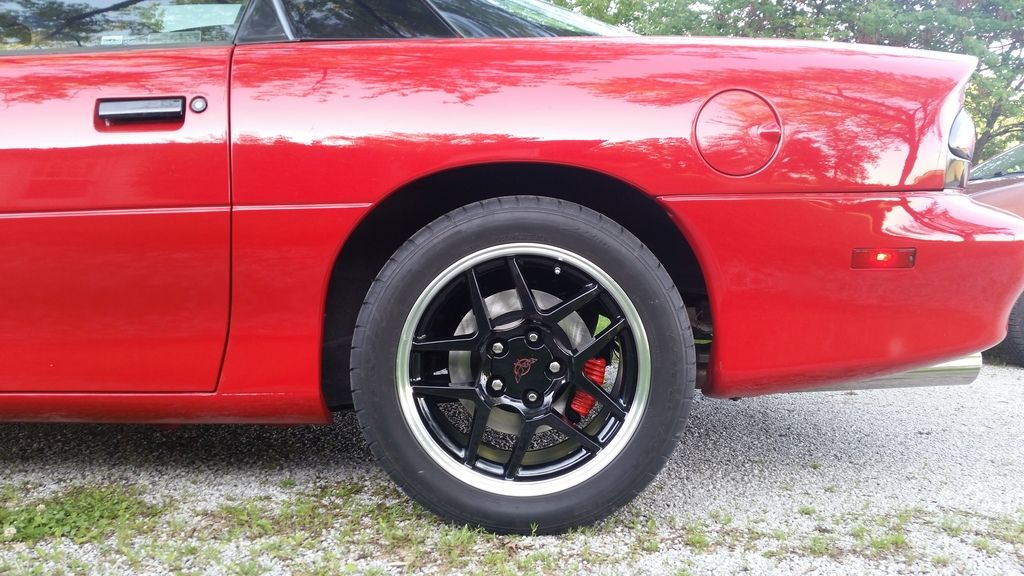
Obligatory front rotor size comparison:
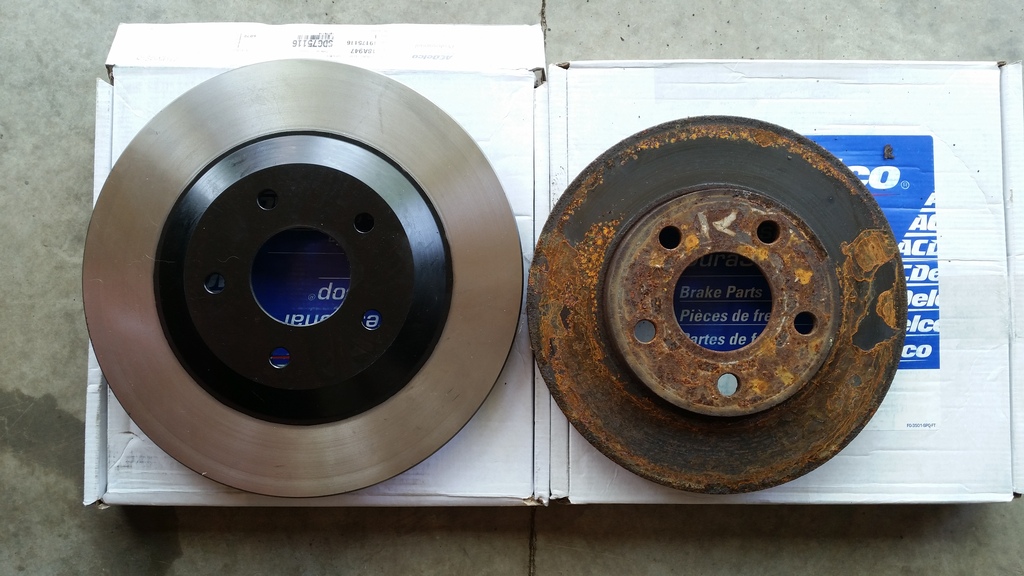
Front:
Rear:
I picked up all my parts from powder coating yesterday afternoon. The red isn't a perfect match, but I don't think it will be noticeable on the car. All in all, lookin' good..

Calipers assembled:

Obligatory front rotor size comparison:

Front:

Rear:
 05-23-2016, 10:03 PM
#136
On The Tree
Thread Starter
iTrader: (2)
Join Date: Dec 2008
Location: Edwardsville, IL
Posts: 181
Likes: 0
Received 0 Likes
on
0 Posts
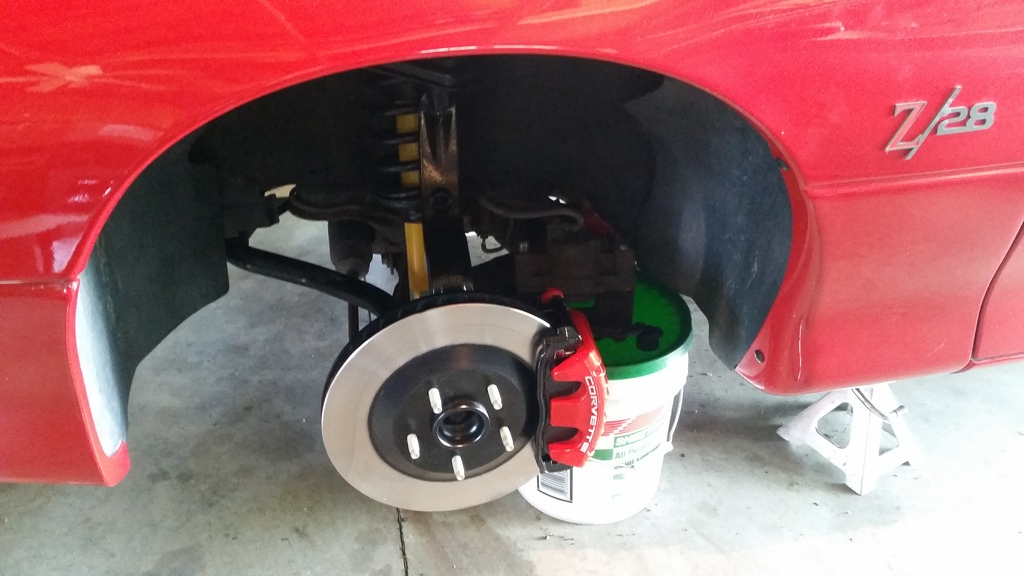
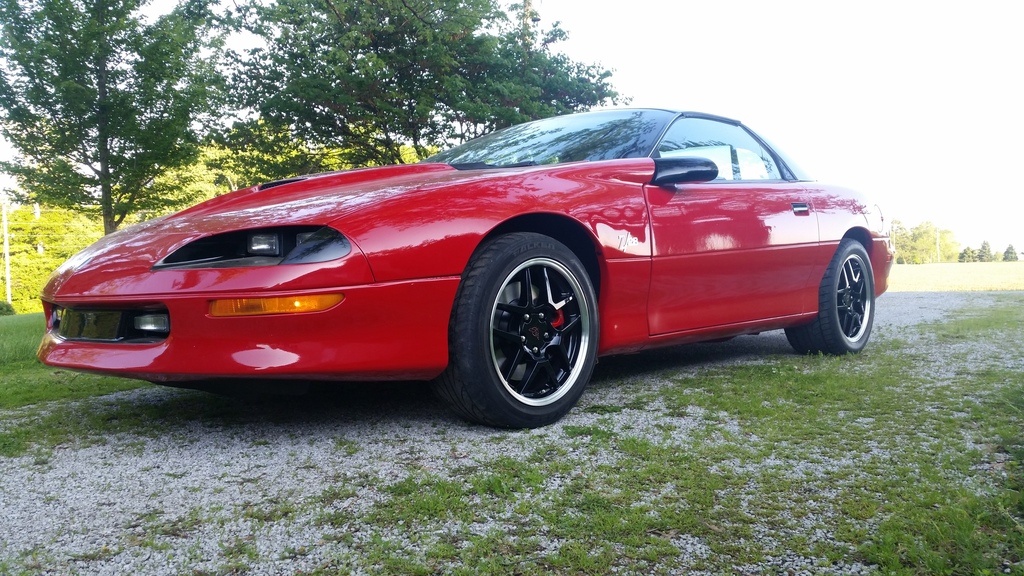
Got the tires put on and an alignment done Saturday morning. Overall I am happy with how everything turned out. The brake pedal is hard and it feels like I could stop on a dime. The fender gap is pretty close to being even all the way around, which is what I was going for. The front could be just a hair lower, but I'm not about to take it back off just to trim another inch off the spring.

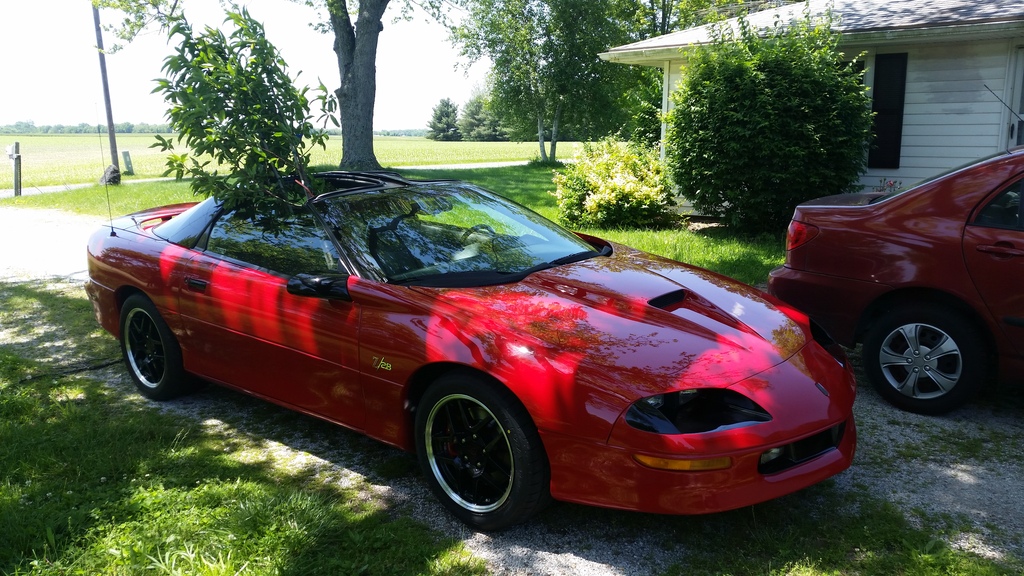
Who needs a truck when you've got towels and t-tops? (actually I would love an old truck) I got a lot of smiles & funny looks while driving these two peach trees home!
I'm glad the work is over for now, I've got a lot of other projects/things to move on to. As for the car, next on the agenda is getting the AC working again before temps start getting into the 90's.


Who needs a truck when you've got towels and t-tops? (actually I would love an old truck) I got a lot of smiles & funny looks while driving these two peach trees home!

I'm glad the work is over for now, I've got a lot of other projects/things to move on to. As for the car, next on the agenda is getting the AC working again before temps start getting into the 90's.
 05-31-2016, 12:21 PM
#139
TECH Fanatic

Amazing work.