Thoughts on Reverse Tilt Raptor Hood
 09-30-2009, 05:01 PM
#1

I'm not sure were I should post this. I guess paint and body section fits. So I have a 99 TA and a Raptor hood. I'm trying to figure out how to hinge it to tilt forward and still fit the actuators. My best idea so far is this:
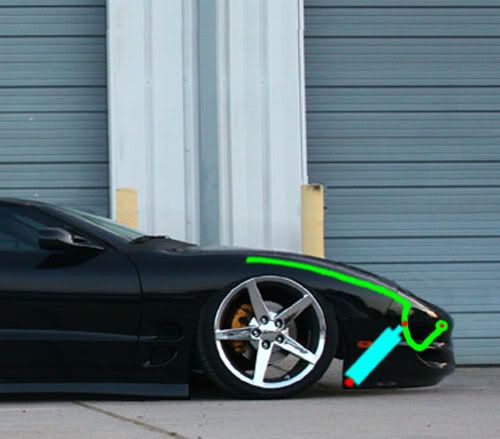
The green part is a steel tubing support structure. I'll be using a 6" stroke actuator which is 13" long closed and 19" extended. As you can see, I can't figure out how to open the hood more than this. A longer 9" stroke actuator is too long to fit.
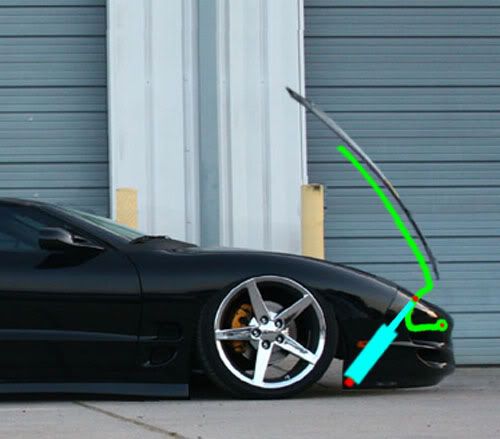
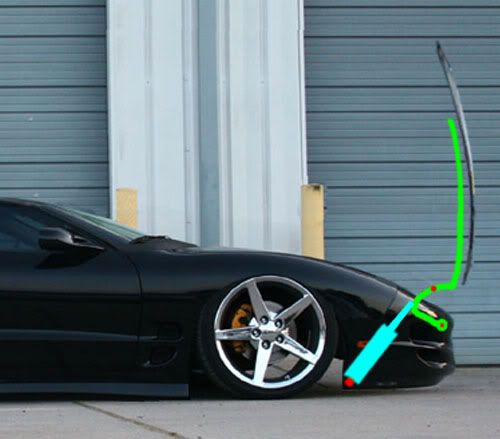
I guess opening the hood this far is fine for showing off, but when it comes to working under the hood I can pull the release pins and tilt the hood all the way forward, like so:
Just a note, these big dog actuators are rated at 1.5" per second with a 200lb capacity and I plan to use pnuematic struts to counterbalance the weight of the hood as best as I can. This setup should be quick at 4 seconds from closed to open. (I'm not gonna wait around 12+ seconds for a pair of Spal actuators )
)

These are the strongest, fastest actuators I could find for a reasonable price.
Any opinions or ideas to improve the setup?
The green part is a steel tubing support structure. I'll be using a 6" stroke actuator which is 13" long closed and 19" extended. As you can see, I can't figure out how to open the hood more than this. A longer 9" stroke actuator is too long to fit.
I guess opening the hood this far is fine for showing off, but when it comes to working under the hood I can pull the release pins and tilt the hood all the way forward, like so:
Just a note, these big dog actuators are rated at 1.5" per second with a 200lb capacity and I plan to use pnuematic struts to counterbalance the weight of the hood as best as I can. This setup should be quick at 4 seconds from closed to open. (I'm not gonna wait around 12+ seconds for a pair of Spal actuators
)These are the strongest, fastest actuators I could find for a reasonable price.
6" Stroke 200 lb Force
[FA-200-L-12-6"] $129.99
These units are 200 lbs force with Aluminum shaft, and a tough plastic Case. 2 wire configuration for ease of use, 12vdc operation, fixed limit switches, very quiet. Current draw is up to 10 amps at full load.
[FA-200-L-12-6"] $129.99
These units are 200 lbs force with Aluminum shaft, and a tough plastic Case. 2 wire configuration for ease of use, 12vdc operation, fixed limit switches, very quiet. Current draw is up to 10 amps at full load.
Last edited by JasonWW; 09-30-2009 at 05:22 PM.
 10-02-2009, 01:42 AM
#3
I am wondering how you will mount the actuator ends onto the front of the Raptor hood, and where the actuators will be located and mounted? How about a front-down brainstorming image to help with figuring out where the actuators will mount to? The metal frame on the Raptor hood will have to be carefully placed or a flat type, like a sliding rail design (like seat sliding rails) to clear everything if the vehicle is still a front-engined setup and not mid or rear like you were planning in the past.
 10-02-2009, 07:18 AM
#5
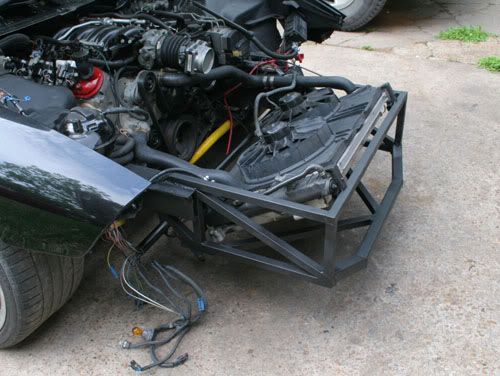
I also have an idea to bolt 2 pieces of square tubing to the hood underside from front to rear, but only attach each tube to the hood at the ends. Two attachment points in the front and two on the rear. Bolting them on will allow shimming so I can get the height just right. Each actuator has limit switches built in so I have this idea of using rubber bushings on the actuator mount or mounts so that a certain closing pressure can be applied to the hood (maybe 10lbs?) so it's nice and steady while driving.
The only problem I can see is one actuator working and the other not. It might want to twist my hood up. I may need to rig up a circuit to prevent that.
Last edited by JasonWW; 10-02-2009 at 07:43 AM.

Trending Topics
10-02-2009, 08:21 PM
#8
I've been messing around with this in Photoshop. Does your Photoshop base car account for the extended fenders/bumper? If you lengthen the front bumper in the photoshop pic to the real life extended length, you have much more room to work with and more actuator positioning options.
10-03-2009, 10:57 AM
#9
I've been messing around with this in Photoshop. Does your Photoshop base car account for the extended fenders/bumper? If you lengthen the front bumper in the photoshop pic to the real life extended length, you have much more room to work with and more actuator positioning options.
 I guess the choptop is showing a little. I haven't chopped it yet. I chose a picture of how the car would look in the future.
 Besides just using a picture, I measured the room on either side of the radiator to how long an actuator I can fit in that position. A 17" long unit (6" stroke) is about the biggest I can fit.
 10-03-2009, 03:14 PM
#11
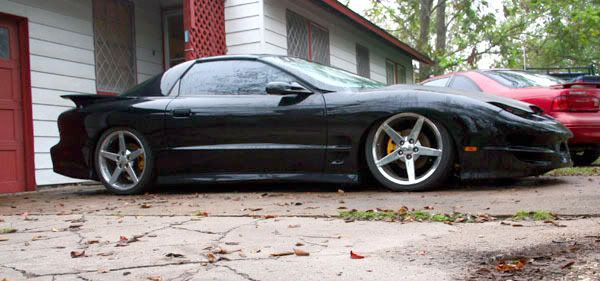
I'm not sure what you mean, the picture should be accurate other than the lowness. I'm not that low - yet. I guess the choptop is showing a little. I haven't chopped it yet. I chose a picture of how the car would look in the future.
Besides just using a picture, I measured the room on either side of the radiator to how long an actuator I can fit in that position. A 17" long unit (6" stroke) is about the biggest I can fit.
I guess the choptop is showing a little. I haven't chopped it yet. I chose a picture of how the car would look in the future. Besides just using a picture, I measured the room on either side of the radiator to how long an actuator I can fit in that position. A 17" long unit (6" stroke) is about the biggest I can fit.
Crazy. I knew they were big but I didn't think they were THAT big. From the above pic it looks to me like you'd need a custom-dimension bumper cover - one that was deeper than stock. If that were the case, then you would have more room to work with than your photoshop job shows, since the bumper in the photoshop pic seems to be stock dimensions.