Sail Panel Removal Instructions... my version
 10-07-2012, 04:01 PM
#1
On The Tree
Thread Starter
iTrader: (6)
Join Date: Sep 2011
Location: Sierra Vista, AZ
Posts: 195
Likes: 0
Received 0 Likes
on
0 Posts
Okay so here is a quick write up on my sail panel removal, I did research high and low all over ls1tech and Google and found tons of other people attempting the same thing. But no actual step-by-step pictures and instructions so after 2 days of trial and error I finally found the easiest way to go about pulling the sail panel from the metal in one piece. Mind you I did the by myself and had no help.
This process takes a little bit of time and work while I love 6LE and I have a product or two of his sometimes I just need to save myself a few bucks and do the work myself. I have heard good and bad about his sail panel but as most of us I don't have the money to throw away at something that can be done myself. But, by all means if you do not have the time to focus on this project or don't have the patience mark's sail panel replacement is just for you.
For starters the tools you will need:
- Portable tool box for the junkyard to assist in removed hatch, panels, etc.
- Portable Sawzall w/ a few metal blades (this is for removing the roof from the pre 98 model)
- 4 1/2'' Angle Grinder with approximately 5 Fast/Clean Metal Cutting Blades
- Windshield Removal Tool w/ at least 15' spool of cutting wire
- Heat Gun (optional, if you can get the windshield removal tool cutting fast enough you won't need a heat gun)
- Metal wire cutters (for cutting wire from the spool)
- Safety Glasses... of course
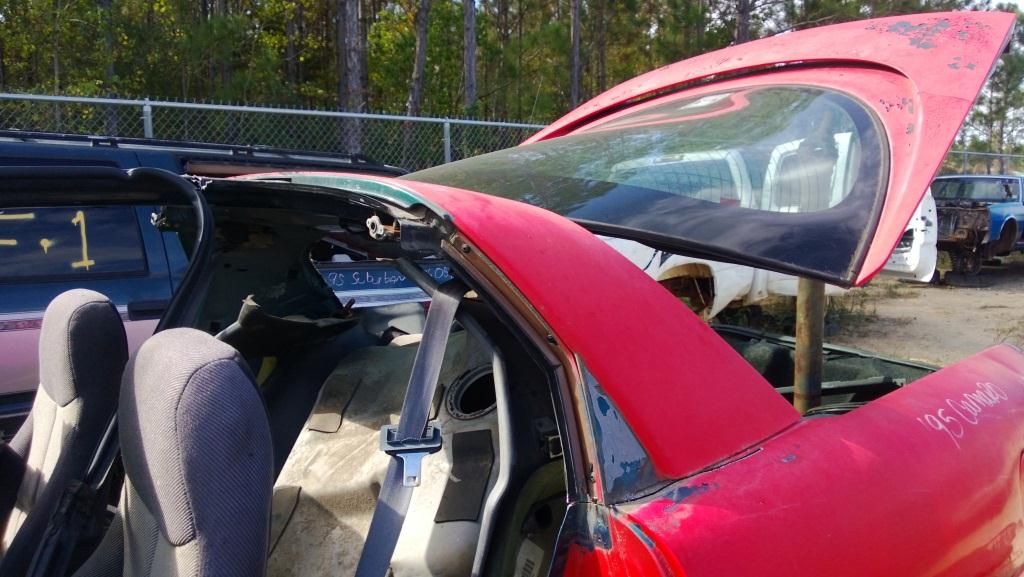
First step is to obtain the roof of a 1993-1997 f-body with t-tops (makes job easier if the older car had t-tops). You can either go to a junk yard or do like I did and hit up Craigslist. I found someone parting out a red 96 only an hour from my house so I called ask if I could have the roof showed up and he had the roof cut off and on the ground ready to roll for 100 bucks. If you go to a junk yard and cut one off yourself use a portable sawzall (more than likely they wont have a power source in the middle of a junkyard for a corded). Find your f-body and inspect for any damage on the sail, don't waste your time if there is. Remove the hatch and t-tops/weather lining, plus any interior from the inside. Cut at the t top intermediate panel back by the sail. Then cut at the pillars just be sure to cut well BELOW the sail panel because you don't want to cut into it. Remove you panel and you should have something that resembles this:

Second Step This is where "my version" of removing this sail panel kicked in. If you look at the picture above I originally took a marker made an outline cut out the center for heat gun, learned the hard way this was useless. You need to carefully and taking your time cut out completely around the sail panel leaving only the metal specifically glued to the sail panel left. Yes, its tedious and took me a good 2 hours. You will find that you need to cut other pieces to get in there and get a good cut with your angle grinder but it can be done. If you look at my picture you will see the cuts made in black around the outside and in the middle you will need to cut the cross braces as close to the glued piece of metal as possible, shown in red.

Third Step ... this is the funnest part, removing the last of the metal from the sail panel. Now since I did this by myself these instructions are base off of doing this myself. Get your windshield removal tool ready (learn how it works and prepare yourself for a work out).
Now back to the sail panel. You will always need to work toward you with the windshield cuter since you will be doing it by yourself. The trick is to work from the inside and work piece by piece until you get to the center. The first piece to remove is the inside of the sail panel triangle.

The reason this has to be removed separate is when you try and cut it with the cutting wire it will catch on the metal since is it has a bend in it. Cut in the picture as shown where the read is from the bottom where the t-top latches straight up to the top. MAKE SURE you only cut through the metal do not let it go deep or it will cut into the sail panel. The trick is to cut slowly and stop once you see the smoke (this is from the glue being cut and smoldering). After the cut is made you insert your windshield wire behind the point of the cut by the t-top, work upwards pulling the wire to you and in a matter of seconds you will have the result you see above. BTW Ignore the heat gun, I thought I was going to need it and after I started booking it with the wire the wire got hot enough to cut the glue like a knife through butter. Next is to make a cut up by the t-top latch again but this time back towards the hatch going straight across as shown.

Then insert your wire behind the cut. Now due to the lip of the sail panel you cant cut perpendicular to it you have to cut an angle as shown but its not a big deal. Wrapping a foot around the pillar and planting on the metal still left in the center start pulling up with your windshield wire cutters and viola you should have removed that whole side for the pillar and it will resemble something like this. If you look closely you can see where I tried to be skilled and cut without my arm support on the angle grinder, yeah don't do this because now I gotta patch a spot I cut through the sail panel. Follow through the same process on the other side.

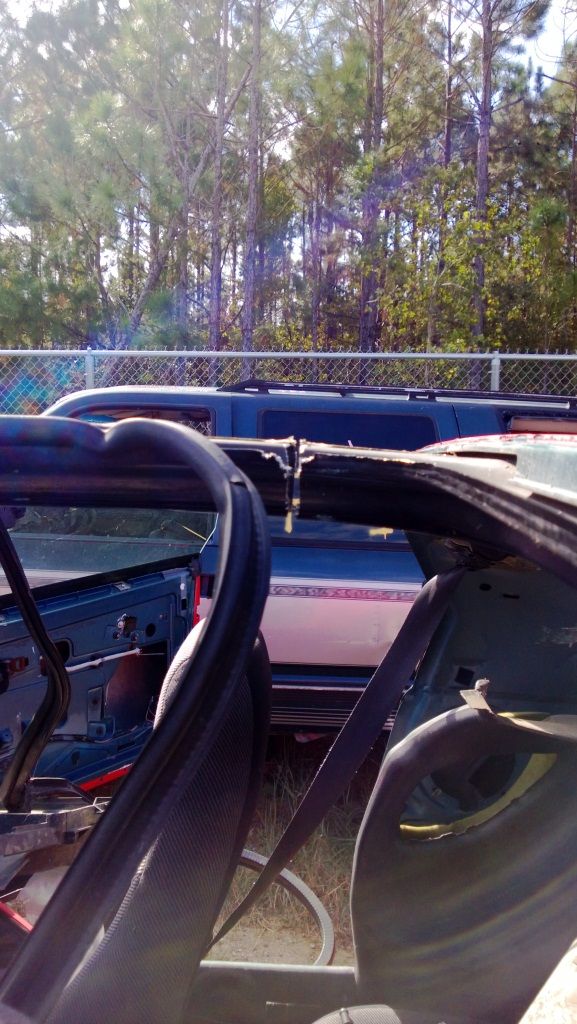
You should now have something that resembles this image and your pretty much on the home stretch.

Now relax, take a seat on your sail panel like I did and start wire cutting away, make sure you put something behind the pillars if they really start to bounce so they don't snap under their own weight.

Excuse the picture angle my three year old took it for me, lol... like I said I pretty much had only myself to do this.
And this should be your end result!

Yeah, for some reason this sail panel had 007 on the underside of it.
I have attached a few pictures for references and end results of where I accidentally went too far with my cuts, so be cautious or you will wind up with the same stuff I have to patch up. But, its a small price to pay.
As of right now I am moving soon so I will not be ripping off my old sail panel so this will be all the instructions I have for a month or two until I get settled down and begin prepping this one for paint and tearing off my old sail panel on my 02 ws6. As far as the glue goes on the back side of the sail panel, you can get a grinding wheel for your angle grinder and grind the majority of it off.
Granted this seems like a lot of work to just obtain a sail panel, but more than likely anyone that has already done this knows that this job is a headache. Others may have done it easier, but this is my method and like I said it was done by myself and no other help.
This process takes a little bit of time and work while I love 6LE and I have a product or two of his sometimes I just need to save myself a few bucks and do the work myself. I have heard good and bad about his sail panel but as most of us I don't have the money to throw away at something that can be done myself. But, by all means if you do not have the time to focus on this project or don't have the patience mark's sail panel replacement is just for you.
For starters the tools you will need:
- Portable tool box for the junkyard to assist in removed hatch, panels, etc.
- Portable Sawzall w/ a few metal blades (this is for removing the roof from the pre 98 model)
- 4 1/2'' Angle Grinder with approximately 5 Fast/Clean Metal Cutting Blades
- Windshield Removal Tool w/ at least 15' spool of cutting wire
- Heat Gun (optional, if you can get the windshield removal tool cutting fast enough you won't need a heat gun)
- Metal wire cutters (for cutting wire from the spool)
- Safety Glasses... of course
First step is to obtain the roof of a 1993-1997 f-body with t-tops (makes job easier if the older car had t-tops). You can either go to a junk yard or do like I did and hit up Craigslist. I found someone parting out a red 96 only an hour from my house so I called ask if I could have the roof showed up and he had the roof cut off and on the ground ready to roll for 100 bucks. If you go to a junk yard and cut one off yourself use a portable sawzall (more than likely they wont have a power source in the middle of a junkyard for a corded). Find your f-body and inspect for any damage on the sail, don't waste your time if there is. Remove the hatch and t-tops/weather lining, plus any interior from the inside. Cut at the t top intermediate panel back by the sail. Then cut at the pillars just be sure to cut well BELOW the sail panel because you don't want to cut into it. Remove you panel and you should have something that resembles this:
Second Step This is where "my version" of removing this sail panel kicked in. If you look at the picture above I originally took a marker made an outline cut out the center for heat gun, learned the hard way this was useless. You need to carefully and taking your time cut out completely around the sail panel leaving only the metal specifically glued to the sail panel left. Yes, its tedious and took me a good 2 hours. You will find that you need to cut other pieces to get in there and get a good cut with your angle grinder but it can be done. If you look at my picture you will see the cuts made in black around the outside and in the middle you will need to cut the cross braces as close to the glued piece of metal as possible, shown in red.
Third Step ... this is the funnest part, removing the last of the metal from the sail panel. Now since I did this by myself these instructions are base off of doing this myself. Get your windshield removal tool ready (learn how it works and prepare yourself for a work out).
Now back to the sail panel. You will always need to work toward you with the windshield cuter since you will be doing it by yourself. The trick is to work from the inside and work piece by piece until you get to the center. The first piece to remove is the inside of the sail panel triangle.
The reason this has to be removed separate is when you try and cut it with the cutting wire it will catch on the metal since is it has a bend in it. Cut in the picture as shown where the read is from the bottom where the t-top latches straight up to the top. MAKE SURE you only cut through the metal do not let it go deep or it will cut into the sail panel. The trick is to cut slowly and stop once you see the smoke (this is from the glue being cut and smoldering). After the cut is made you insert your windshield wire behind the point of the cut by the t-top, work upwards pulling the wire to you and in a matter of seconds you will have the result you see above. BTW Ignore the heat gun, I thought I was going to need it and after I started booking it with the wire the wire got hot enough to cut the glue like a knife through butter. Next is to make a cut up by the t-top latch again but this time back towards the hatch going straight across as shown.
Then insert your wire behind the cut. Now due to the lip of the sail panel you cant cut perpendicular to it you have to cut an angle as shown but its not a big deal. Wrapping a foot around the pillar and planting on the metal still left in the center start pulling up with your windshield wire cutters and viola you should have removed that whole side for the pillar and it will resemble something like this. If you look closely you can see where I tried to be skilled and cut without my arm support on the angle grinder, yeah don't do this because now I gotta patch a spot I cut through the sail panel. Follow through the same process on the other side.
You should now have something that resembles this image and your pretty much on the home stretch.
Now relax, take a seat on your sail panel like I did and start wire cutting away, make sure you put something behind the pillars if they really start to bounce so they don't snap under their own weight.
Excuse the picture angle my three year old took it for me, lol... like I said I pretty much had only myself to do this.
And this should be your end result!
Yeah, for some reason this sail panel had 007 on the underside of it.
I have attached a few pictures for references and end results of where I accidentally went too far with my cuts, so be cautious or you will wind up with the same stuff I have to patch up. But, its a small price to pay.
As of right now I am moving soon so I will not be ripping off my old sail panel so this will be all the instructions I have for a month or two until I get settled down and begin prepping this one for paint and tearing off my old sail panel on my 02 ws6. As far as the glue goes on the back side of the sail panel, you can get a grinding wheel for your angle grinder and grind the majority of it off.
Granted this seems like a lot of work to just obtain a sail panel, but more than likely anyone that has already done this knows that this job is a headache. Others may have done it easier, but this is my method and like I said it was done by myself and no other help.
Last edited by WS6_Veteran; 10-07-2012 at 04:13 PM.

 10-10-2012, 03:15 PM
#3
TECH Fanatic

I still need to replace mine.
10-25-2012, 05:20 AM
#4
Teching In

Join Date: Mar 2010
Location: martindale
Posts: 6
Likes: 0
Received 0 Likes
on
0 Posts
I spent hours looking for a thread exactly like this a few weeks ago. ended up cracking 2 sails at a junk yard. Thank you so much for the write up. Should come in very useful in my future attempts.
10-25-2012, 05:30 AM
#5
Teching In
Join Date: Mar 2010
Location: martindale
Posts: 6
Likes: 0
Received 0 Likes
on
0 Posts
I spent hours looking for a thread exactly like this a few weeks ago. ended up cracking 2 sails at a junk yard. Thank you so much for the write up. Should come in very useful in my future attempts.
12-11-2013, 04:03 PM
#7
LS1Tech Administrator
iTrader: (3)
Join Date: Nov 2001
Location: Schiller Park, IL Member: #317
Posts: 32,019
Likes: 0
Received 1,467 Likes
on
1,058 Posts

This is a great write-up, and should be included in the sticky...so I will add it. 
Trending Topics
12-11-2013, 09:58 PM
#8
TECH Apprentice
iTrader: (12)
Join Date: Sep 2009
Location: San Diego, Florida, New York
Posts: 350
Likes: 0
Received 0 Likes
on
0 Posts

This is a great post. I took one off a 94 Camaro last week and yes the wire did get caught on the metal that was raised. But I worked through it hard. Just used the wire. I brought a generator and heat gun but it did not help me because I did not know the glue lines. I'm going to get two more sail panels. I didn't cut the sail panel off the body because I thought it would be double work and I felt it being on the car will give good support. Bring water also because you will sweat a lot working the windshield removal tool. Get the tool from Harbour freight. Why have a mold made when hundreds are getting crushed weekly throughout the country. I've been afraid to tackle this for years but I'm changing and painting the nose so sail panel repair will happen at the same time. I did it solo also.
12-14-2013, 09:26 PM
#9
Finally got mine finished yesterday afternoon. A few tips, a cable saw is a good tool to have if you don't have a windshield removal tool. Also, the heat gun wasn't required but it made cuts faster. And finally, don't be shy with the cutoff wheel but get a feel for when it gets through the metal before it gets to the fiberglass. Pics to come on Monday.
12-17-2013, 02:22 PM
#10
Maybe these pics will help, maybe they won't...
Donor in the junkyard, a 95.
Mind the gap!
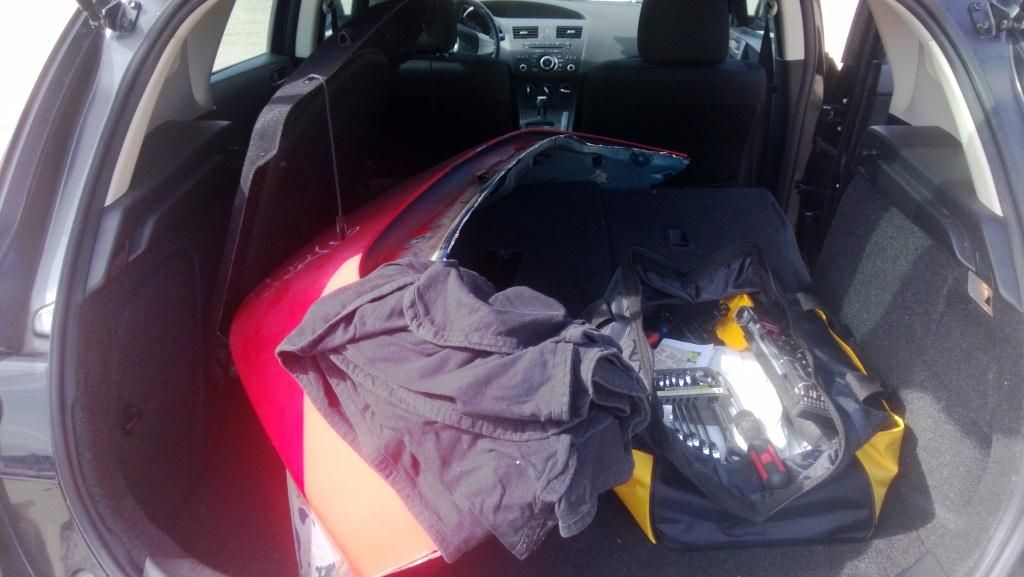
In the back of a Mazda 3 hatchback... oh yeah
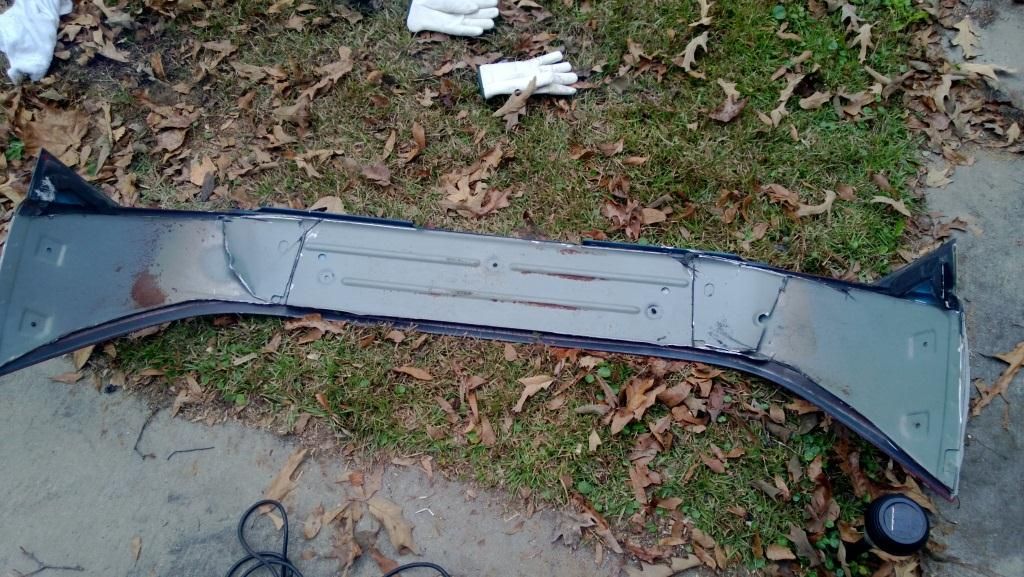
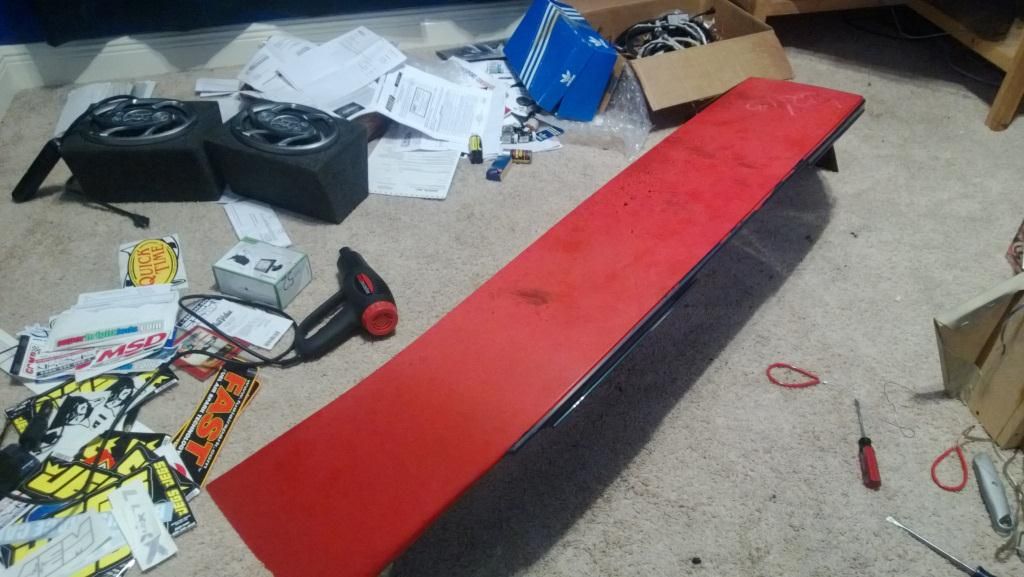
After most of the inside steel was cut away, time to address the outer steel (where the sail panel is glued)
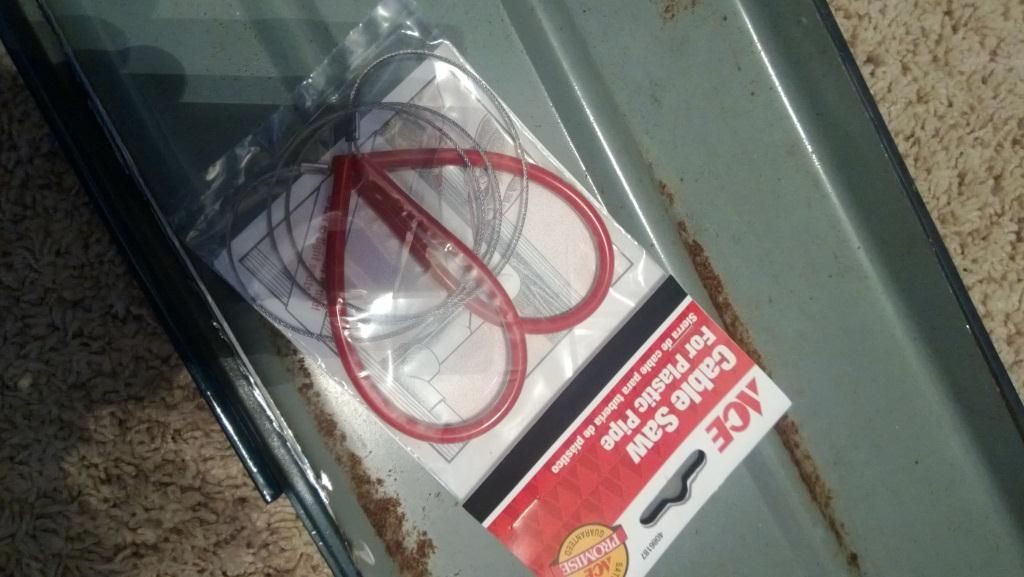
This tool was REALLY helpful! I've never used a windshield removal tool and Harbor Freight was nowhere near me, so I picked up this cable saw on the recommendation of an ACE guy.
All the steel is gone...

And I didn't break it! A few times I thought I was going to.
So like I said before, a heat gun is very helpful. When 20-30 strokes of the saw MAY cut ~1", it would cut ~2" in three strokes with the heat gun. Also, there are three glued dots in the middle section and two on the sides, one on each side. They pretty much stopped the cutting until I just focused the heat gun on them and then cut through.
I also used the cutoff tool alot more than I originally thought I would. Sure, I have a couple spots in my sail panel where I started getting into fiberglass, but I never went all the way through and it made for easy removal of steel. The body shop has the piece now, and I've asked them to patch it up and prime the bottom once all the adhesive is off.
Much thanks to the OP! I did follow his general order of progression, but it was the write-up that inspired me to tackle it!
Donor in the junkyard, a 95.

Mind the gap!

In the back of a Mazda 3 hatchback... oh yeah

After most of the inside steel was cut away, time to address the outer steel (where the sail panel is glued)

This tool was REALLY helpful! I've never used a windshield removal tool and Harbor Freight was nowhere near me, so I picked up this cable saw on the recommendation of an ACE guy.

All the steel is gone...

And I didn't break it! A few times I thought I was going to.

So like I said before, a heat gun is very helpful. When 20-30 strokes of the saw MAY cut ~1", it would cut ~2" in three strokes with the heat gun. Also, there are three glued dots in the middle section and two on the sides, one on each side. They pretty much stopped the cutting until I just focused the heat gun on them and then cut through.
I also used the cutoff tool alot more than I originally thought I would. Sure, I have a couple spots in my sail panel where I started getting into fiberglass, but I never went all the way through and it made for easy removal of steel. The body shop has the piece now, and I've asked them to patch it up and prime the bottom once all the adhesive is off.
Much thanks to the OP! I did follow his general order of progression, but it was the write-up that inspired me to tackle it!
12-17-2013, 02:57 PM
#11
TECH Apprentice
iTrader: (8)
Join Date: Apr 2009
Location: Orange county, ny
Posts: 365
Likes: 0
Received 0 Likes
on
0 Posts
You should add one thing......Do this after leaving in the sun and getting hot. Cutting that glue is damn near impossible in the winter (for people who live in the northern states) I tried and gave up. Sat until the summer and cut like butter
I have mine sitting in the basement painted waiting to go on once its the car is out of storage.
You can also avoid any other cutting if you use some thin sheet metal to protect the sail panel you are trying to salvage from the wire cutter.
Nice write up though. Could have used this reference last summer
12-30-2013, 07:41 AM
#12
My 99 has this disease - not real bad yet but its the worst part of my cars paint so I went to my local pick and pull and found 3-4 doner cars which made me happy I'm glad I brought my sawzall and got busy. It came off the '97 quickly-15-20 minutes I even glt a black one- I somehow feel like that was the easy part! getting the steel off will probably be a PITA  I wanted to get one while these while the cars are still available in the bone yard- and I got out for $50. I'm going to start removing the steel and maybe this summer I'll finish it up I'm betting that this will be hard to cut off not being attached to the car
  and I'm nervous about cracking the glass getting this apart, anyone care to say how delicate this is? Thanks themealonwheels and WS6 veteran for your pics I've always like to see what I'm getting into before I dive in!
I wanted to get one while these while the cars are still available in the bone yard- and I got out for $50. I'm going to start removing the steel and maybe this summer I'll finish it up I'm betting that this will be hard to cut off not being attached to the car and I'm nervous about cracking the glass getting this apart, anyone care to say how delicate this is? Thanks themealonwheels and WS6 veteran for your pics I've always like to see what I'm getting into before I dive in! Last edited by zman1969; 12-30-2013 at 07:49 AM.
12-30-2013, 02:58 PM
#13
My 99 has this disease - not real bad yet but its the worst part of my cars paint so I went to my local pick and pull and found 3-4 doner cars which made me happy I'm glad I brought my sawzall and got busy. It came off the '97 quickly-15-20 minutes I even glt a black one- I somehow feel like that was the easy part! getting the steel off will probably be a PITA I wanted to get one while these while the cars are still available in the bone yard- and I got out for $50. I'm going to start removing the steel and maybe this summer I'll finish it up I'm betting that this will be hard to cut off not being attached to the car and I'm nervous about cracking the glass getting this apart, anyone care to say how delicate this is? Thanks themealonwheels and WS6 veteran for your pics I've always like to see what I'm getting into before I dive in!
I wanted to get one while these while the cars are still available in the bone yard- and I got out for $50. I'm going to start removing the steel and maybe this summer I'll finish it up I'm betting that this will be hard to cut off not being attached to the car and I'm nervous about cracking the glass getting this apart, anyone care to say how delicate this is? Thanks themealonwheels and WS6 veteran for your pics I've always like to see what I'm getting into before I dive in! It's awesome you grabbed a black one, I initially wished it had been an option for me. However, after doing the removal, I would just have scratched the paint all to hell anyway. Now I'm almost thankful the previous owner half-*** painted over the original paint, it kind of protected the surface as I was wiggling around on the panel in the yard! I wouldn't say it's impossible to get out of this project without paint, but REALLY be careful as you get into it. Try to protect the top with towels and cloth whenever you'll be putting force on it.
I don't have good news for you on the fiberglass strength. When I was all done, I found two hairline cracks at the corners where the little triangles meet the main "hoop". They were not cracked through, but it wouldn't have taken much to break them if I had gotten any more ambitious. I think the biggest precaution you could take against actually breaking the thing while removing the steel would be to watch your leverage points. I was guilty of using a heat gun and wedges at times, and most of the time it worked as long as I slowly added force and stopped when it seemed to stress.
Come to think of it, the sail panel as a whole did have quite a bit of forgiveness until I localized forces by using wedges in small places. Just be careful when you add localized force to try and separate steel. If it's getting too tough, cut away a little more steel and keep going with the adhesive. You'll be fine, you're only in it for $50!
And since you're in TX, hook 'em!