Anyone here paint there own car?
 01-05-2015, 10:25 AM
#1
Staging Lane
Thread Starter

Join Date: Nov 2014
Location: North Carolina.
Posts: 70
Likes: 0
Received 0 Likes
on
0 Posts
Hey folks! I've done a few things to my car here lately, and now that its just the way i want it i'm thinking about painting it myself. I've had to many bad experiences with Maaco. The car was originally blue, the previous owner decided to paint it that weird blue green teal mix? Apparently only 300 were made FACTORY with this color in the year 95? Check my pics to verify that. Since you cant make a car look bad in a picture, my paint looks good in all the pics, when in real life the clear coat is coming off in huge spots, and my drivers side door doesn't match because the previous owner switched it because of a kid hit it with a shopping kart and fucked it up, that was the story i was told which is hard to believe.. anyways, whats the best way to go about this and the longest lasting paint. I will be painting the car back to blue so i wont have to do the door jambs and all that mess.
PS The last picture, The car with the mismatched door and on sawblade rims is mine. Keep in mind these are all pics from when i first got the car.
PS The last picture, The car with the mismatched door and on sawblade rims is mine. Keep in mind these are all pics from when i first got the car.


 01-05-2015, 05:19 PM
#3
TECH Enthusiast

Yes many of us here have painted our own stuff.
Being able to do a good job yourself really does require acquiring the needed skills through practice, as well as acquiring all the needed supplies ,tools, & place to do the spraying at.
In your case, you may need to completely sand down back to original paint if its as bad as it sounds.
With doing paint yourself , at least you're in control of doing a proper amount of prepwork . Also if you properly prep & use decent materials, you can make up for some worksite shortcomings through good colorsanding & buffing skills.
my first thought is if you can take a small part, prep & paint it with spray can paint such as rust oleum enamel, & sand & buff it to look like mirror, then maybe your ready to work up to painting a whole car. It's all about personal talent, skill & hardwork. Without expanding your limits, you never know just what you might be able to do - or not.
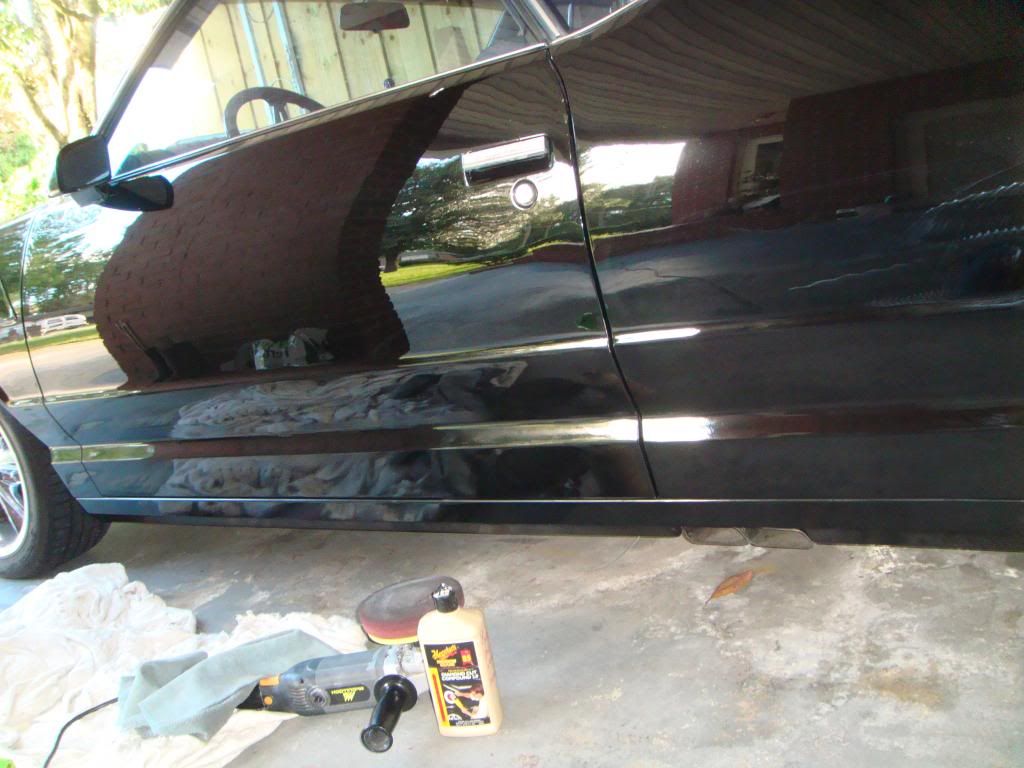
Here's my diy paint, front end repainted under an open carport at night a few years ago.
Bodyline down in this pic is dupli-color ceramic spray can engine paint with some sanding & buffing next to real paint, just for temporary.
Being able to do a good job yourself really does require acquiring the needed skills through practice, as well as acquiring all the needed supplies ,tools, & place to do the spraying at.
In your case, you may need to completely sand down back to original paint if its as bad as it sounds.
With doing paint yourself , at least you're in control of doing a proper amount of prepwork . Also if you properly prep & use decent materials, you can make up for some worksite shortcomings through good colorsanding & buffing skills.
my first thought is if you can take a small part, prep & paint it with spray can paint such as rust oleum enamel, & sand & buff it to look like mirror, then maybe your ready to work up to painting a whole car. It's all about personal talent, skill & hardwork. Without expanding your limits, you never know just what you might be able to do - or not.
Here's my diy paint, front end repainted under an open carport at night a few years ago.

Bodyline down in this pic is dupli-color ceramic spray can engine paint with some sanding & buffing next to real paint, just for temporary.
 01-05-2015, 08:37 PM
#4
Teching In

Join Date: Aug 2013
Posts: 8
Likes: 0
Received 0 Likes
on
0 Posts
The ultimate would be to have it blasted and sealed. You should not pay any more than 600-800 for the blasting (exterior only).
If you are on a budget here is what you do my man.
The trick is to only concentrate on one panel at a time. If you take on to much it can get away from you and turn into a huge mess. If you take your time and do it few times per panel you would be surprised at how nice it can come out.
Once you have them all stripped just clean it up real nice and unmask it. Now you will have small strips of paint along the edge of each panel. I would use a 3M stripper disk (part 07470, http://www.autobodytoolmart.com/pc-1...isc-07470.aspx) on a die grinder or high speed drill to strip it.
Now it is stripped. This is where most amateurs screw up. Most people don't etch the metal to give the primer or sealer a nice "tooth" to hang on to so the sealer or primer peels off or bubbles later on. The other huge mistake people make is to just throw some spray can primer on it. Spray can primer is usually lacquer based and has no corrosion resistance or etching capability. If you do not prep the metal properly and spray a good sealer over it you will be doing this all over again in a few years after you have put that nice paint job on it.
Metal cleaning, etching, and priming.
[*]First thing to consider is that you have everything you need from this point to sealer right in front of you. You do not want the car to sit for days in bare metal before you seal it. If you could knock this all out in a weekend (providing that the car is inside a garage or shop) the better. If you are doing this outside you need to get it done same day.
[*]DA sand the entire body with 80 grit. Sand it till it is clean and shiny. [*]Clean metal with a good acid metal etch cleaner. I like PPG's DX579. http://www.tcpglobal.com/autobodydepot/rustremove.aspx). Just follow the instructions. Make sure you get the car super dry after the wash. [*]Now the metal is clean and etched. It should have a slight goldish tone to it. [*]Tape it up and apply 2 coats epoxy sealer. I prefer PPG's DP line but if you are on a budget I would use Northstars EP210 epoxy primer (http://www.computerlogic.com/northst...urfacers.htm#a). This stuff is just as good as DP but half the price.
Now It might seem a little intimidating if you have never sprayed before. Don't sweat it. Just go and buy a Cheap HVLP gravity fed gun from somewhere like Harbor Freight Tools. Just keep the pressure down around 15 psi and it is cake. That primer is very easy to spray. Don't even worry if you get a little run here and there. You are going to sand the hell out of this car along the process anyway. Just make sure you get a nice thick coating over the whole car. A couple of coats should do it, but 3 would not hurt.
A friend of mine sent me this. Not sure if you can use a stripper on our cars, guess i can't see why not. Good luck with the car man hope it turns out nice!
If you are on a budget here is what you do my man.
- Remove all exterior mouldings, door handles, bumpers, etc.
- Tape off all of the glass with duck tape and cardboard (make sure you overlap the duck tape about 1/2 inch onto the body so that the stripper does not get into the cracks around the windows).
- Tape all of the panel gaps, seams, and holes (door handles, marker lights, locks, antenna, etc) with duck tape. I usually cut the duck tape down to 1/2 strips to cover the panels gaps. Its ok to overlap the panel a bit. Tust me the biggest mess is if that stuff gets into any gpas, cracks, or holes.
- Sand the surface with 80 grit on a DA (dual action sander) just to break the surface a bit. You dont need to sand it down far. You just want to penetrate the paint a bit so the chemical stripper does not have to fight through the top resin which is the touphest part of the paint.
- Using a thick paint brush go ahead and apply the paint stripper as thick as you can (within reason) and let it sit as per the products instruction (usually 10-15 minuets).
- Scrape with a sharp and wide putty knife.
- Repeat this process as much as needed panel by panel.
The trick is to only concentrate on one panel at a time. If you take on to much it can get away from you and turn into a huge mess. If you take your time and do it few times per panel you would be surprised at how nice it can come out.
Once you have them all stripped just clean it up real nice and unmask it. Now you will have small strips of paint along the edge of each panel. I would use a 3M stripper disk (part 07470, http://www.autobodytoolmart.com/pc-1...isc-07470.aspx) on a die grinder or high speed drill to strip it.
Now it is stripped. This is where most amateurs screw up. Most people don't etch the metal to give the primer or sealer a nice "tooth" to hang on to so the sealer or primer peels off or bubbles later on. The other huge mistake people make is to just throw some spray can primer on it. Spray can primer is usually lacquer based and has no corrosion resistance or etching capability. If you do not prep the metal properly and spray a good sealer over it you will be doing this all over again in a few years after you have put that nice paint job on it.
Metal cleaning, etching, and priming.
[*]First thing to consider is that you have everything you need from this point to sealer right in front of you. You do not want the car to sit for days in bare metal before you seal it. If you could knock this all out in a weekend (providing that the car is inside a garage or shop) the better. If you are doing this outside you need to get it done same day.
[*]DA sand the entire body with 80 grit. Sand it till it is clean and shiny. [*]Clean metal with a good acid metal etch cleaner. I like PPG's DX579. http://www.tcpglobal.com/autobodydepot/rustremove.aspx). Just follow the instructions. Make sure you get the car super dry after the wash. [*]Now the metal is clean and etched. It should have a slight goldish tone to it. [*]Tape it up and apply 2 coats epoxy sealer. I prefer PPG's DP line but if you are on a budget I would use Northstars EP210 epoxy primer (http://www.computerlogic.com/northst...urfacers.htm#a). This stuff is just as good as DP but half the price.
Now It might seem a little intimidating if you have never sprayed before. Don't sweat it. Just go and buy a Cheap HVLP gravity fed gun from somewhere like Harbor Freight Tools. Just keep the pressure down around 15 psi and it is cake. That primer is very easy to spray. Don't even worry if you get a little run here and there. You are going to sand the hell out of this car along the process anyway. Just make sure you get a nice thick coating over the whole car. A couple of coats should do it, but 3 would not hurt.
A friend of mine sent me this. Not sure if you can use a stripper on our cars, guess i can't see why not. Good luck with the car man hope it turns out nice!
01-06-2015, 03:34 AM
#5
TECH Apprentice
iTrader: (2)

Join Date: Oct 2012
Location: Akron, Ohio
Posts: 367
Likes: 0
Received 0 Likes
on
0 Posts
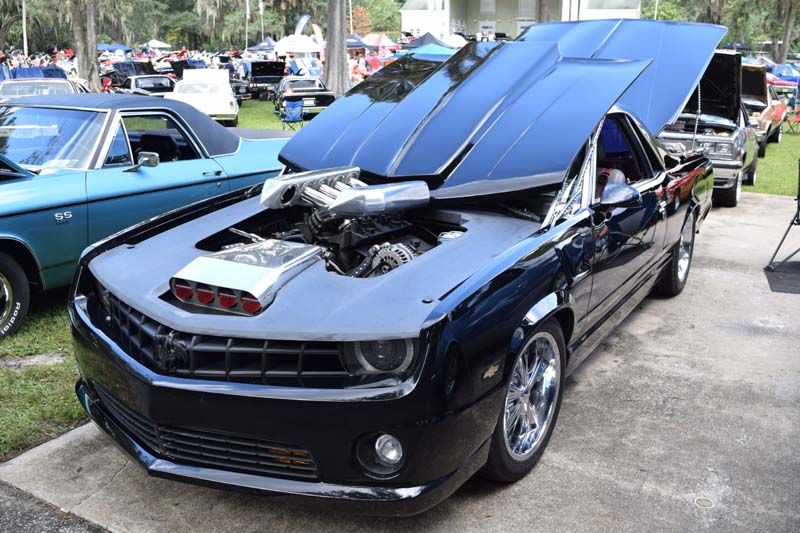
Painting it not rocket science. As mentioned above, prep is key. Not rushing products on top of one another is key. I painted my wife's mustang 3 years ago. It was my first ever complete paint job. It cam out absolutely beautiful. It even won a paint award at a show. The car was originally white, changed to jet black. You can tell it was white from the VIN tag, all other traces of white are gone.The car was totally tore down to pieces. I painted it in pieces, then re-assembled.
If you have mechanical ability, are willing to learn and take advice from others, you can paint. I'll tell you this, there is nothing more rewarding that having others drool over the job you did. Not one person believes it was my first paint job. I'm getting ready to lay color on my ranger in the spring, this one is gonna blow away the last job. First time around, i learned some tricks, from myself to save time and improve the job.
If you have mechanical ability, are willing to learn and take advice from others, you can paint. I'll tell you this, there is nothing more rewarding that having others drool over the job you did. Not one person believes it was my first paint job. I'm getting ready to lay color on my ranger in the spring, this one is gonna blow away the last job. First time around, i learned some tricks, from myself to save time and improve the job.
01-06-2015, 10:54 AM
#6
Staging Lane
Thread Starter
Join Date: Nov 2014
Location: North Carolina.
Posts: 70
Likes: 0
Received 0 Likes
on
0 Posts
Wow nice camaro man! That looks super nice for a spray can... I was thinking, buy rustoleoms automotive paint, say 3-4 quarts? I have a air compressor and all the equipment.. It will be my first paint job and as everyone else said,It's all in the prep... I'm just gonna take my time and take the car apart and paint it, then re assemble.
01-06-2015, 05:06 PM
#7
TECH Enthusiast
I mostly posted the spray can lower body work pic just to show what color sanding & buffing will do. Painting something with a spray can is good for something to practice sanding & buffing.
Rust oleum enamel is similar to your older single stage enamel paint. It will sand & buff out pretty well, but it will not stay looking that way if exposed to the elements more than the occasional showcar. If you had to have a really low budget job & were unsure of your skills, this would be an option. There are even additives to improve flow out & hardness of enamel paints.
A step up would be something such as the DuPont nason line, whether just single stage urethane or base solids clear. You will have mixing to contend with, but it will hold a shine better. Also consider the labor factor to prep & paint a whole car. Using an epoxy sealer as Jerry mentioned will help avoid a ton of issues in lifespan later.
For comparison of quality, the main part of my el camino was painted in 98' with DuPont chroma base line of base clear. The tailgate & bedcover were painted with Nason single stage. The entire front end is Nason single stage with Nason full solids clear. They all look the same in person when clean & cared for, but the single stage takes more effort to stay that way & the Nason clear is not as hard as the more expensive chromabase. The duplicolor spray can paint has been buffed a few times trying to keep up with the real paint.
Another FYI, solid color paint is easier to work with & holds out better in cheaper forms than a metallic color of paint . As intolerant as black is of poor bodywork, it is more forgiving in other ways, such as uneven spraying technique or color matching.
Last edited by jlcustomz; 01-06-2015 at 05:38 PM.
Trending Topics
01-09-2015, 01:02 PM
#8
TECH Fanatic
The ultimate would be to have it blasted and sealed. You should not pay any more than 600-800 for the blasting (exterior only).
If you are on a budget here is what you do my man.
The trick is to only concentrate on one panel at a time. If you take on to much it can get away from you and turn into a huge mess. If you take your time and do it few times per panel you would be surprised at how nice it can come out.
Once you have them all stripped just clean it up real nice and unmask it. Now you will have small strips of paint along the edge of each panel. I would use a 3M stripper disk (part 07470, http://www.autobodytoolmart.com/pc-1...isc-07470.aspx) on a die grinder or high speed drill to strip it.
Now it is stripped. This is where most amateurs screw up. Most people don't etch the metal to give the primer or sealer a nice "tooth" to hang on to so the sealer or primer peels off or bubbles later on. The other huge mistake people make is to just throw some spray can primer on it. Spray can primer is usually lacquer based and has no corrosion resistance or etching capability. If you do not prep the metal properly and spray a good sealer over it you will be doing this all over again in a few years after you have put that nice paint job on it.
Metal cleaning, etching, and priming.
[*]First thing to consider is that you have everything you need from this point to sealer right in front of you. You do not want the car to sit for days in bare metal before you seal it. If you could knock this all out in a weekend (providing that the car is inside a garage or shop) the better. If you are doing this outside you need to get it done same day.
[*]DA sand the entire body with 80 grit. Sand it till it is clean and shiny. [*]Clean metal with a good acid metal etch cleaner. I like PPG's DX579. http://www.tcpglobal.com/autobodydepot/rustremove.aspx). Just follow the instructions. Make sure you get the car super dry after the wash. [*]Now the metal is clean and etched. It should have a slight goldish tone to it. [*]Tape it up and apply 2 coats epoxy sealer. I prefer PPG's DP line but if you are on a budget I would use Northstars EP210 epoxy primer (http://www.computerlogic.com/northst...urfacers.htm#a). This stuff is just as good as DP but half the price.
Now It might seem a little intimidating if you have never sprayed before. Don't sweat it. Just go and buy a Cheap HVLP gravity fed gun from somewhere like Harbor Freight Tools. Just keep the pressure down around 15 psi and it is cake. That primer is very easy to spray. Don't even worry if you get a little run here and there. You are going to sand the hell out of this car along the process anyway. Just make sure you get a nice thick coating over the whole car. A couple of coats should do it, but 3 would not hurt.
A friend of mine sent me this. Not sure if you can use a stripper on our cars, guess i can't see why not. Good luck with the car man hope it turns out nice!
If you are on a budget here is what you do my man.
- Remove all exterior mouldings, door handles, bumpers, etc.
- Tape off all of the glass with duck tape and cardboard (make sure you overlap the duck tape about 1/2 inch onto the body so that the stripper does not get into the cracks around the windows).
- Tape all of the panel gaps, seams, and holes (door handles, marker lights, locks, antenna, etc) with duck tape. I usually cut the duck tape down to 1/2 strips to cover the panels gaps. Its ok to overlap the panel a bit. Tust me the biggest mess is if that stuff gets into any gpas, cracks, or holes.
- Sand the surface with 80 grit on a DA (dual action sander) just to break the surface a bit. You dont need to sand it down far. You just want to penetrate the paint a bit so the chemical stripper does not have to fight through the top resin which is the touphest part of the paint.
- Using a thick paint brush go ahead and apply the paint stripper as thick as you can (within reason) and let it sit as per the products instruction (usually 10-15 minuets).
- Scrape with a sharp and wide putty knife.
- Repeat this process as much as needed panel by panel.
The trick is to only concentrate on one panel at a time. If you take on to much it can get away from you and turn into a huge mess. If you take your time and do it few times per panel you would be surprised at how nice it can come out.
Once you have them all stripped just clean it up real nice and unmask it. Now you will have small strips of paint along the edge of each panel. I would use a 3M stripper disk (part 07470, http://www.autobodytoolmart.com/pc-1...isc-07470.aspx) on a die grinder or high speed drill to strip it.
Now it is stripped. This is where most amateurs screw up. Most people don't etch the metal to give the primer or sealer a nice "tooth" to hang on to so the sealer or primer peels off or bubbles later on. The other huge mistake people make is to just throw some spray can primer on it. Spray can primer is usually lacquer based and has no corrosion resistance or etching capability. If you do not prep the metal properly and spray a good sealer over it you will be doing this all over again in a few years after you have put that nice paint job on it.
Metal cleaning, etching, and priming.
[*]First thing to consider is that you have everything you need from this point to sealer right in front of you. You do not want the car to sit for days in bare metal before you seal it. If you could knock this all out in a weekend (providing that the car is inside a garage or shop) the better. If you are doing this outside you need to get it done same day.
[*]DA sand the entire body with 80 grit. Sand it till it is clean and shiny. [*]Clean metal with a good acid metal etch cleaner. I like PPG's DX579. http://www.tcpglobal.com/autobodydepot/rustremove.aspx). Just follow the instructions. Make sure you get the car super dry after the wash. [*]Now the metal is clean and etched. It should have a slight goldish tone to it. [*]Tape it up and apply 2 coats epoxy sealer. I prefer PPG's DP line but if you are on a budget I would use Northstars EP210 epoxy primer (http://www.computerlogic.com/northst...urfacers.htm#a). This stuff is just as good as DP but half the price.
Now It might seem a little intimidating if you have never sprayed before. Don't sweat it. Just go and buy a Cheap HVLP gravity fed gun from somewhere like Harbor Freight Tools. Just keep the pressure down around 15 psi and it is cake. That primer is very easy to spray. Don't even worry if you get a little run here and there. You are going to sand the hell out of this car along the process anyway. Just make sure you get a nice thick coating over the whole car. A couple of coats should do it, but 3 would not hurt.
A friend of mine sent me this. Not sure if you can use a stripper on our cars, guess i can't see why not. Good luck with the car man hope it turns out nice!