When you click on links to various merchants on this site and make a purchase, this can result in this site earning a commission. Affiliate programs and affiliations include, but are not limited to, the eBay Partner Network.
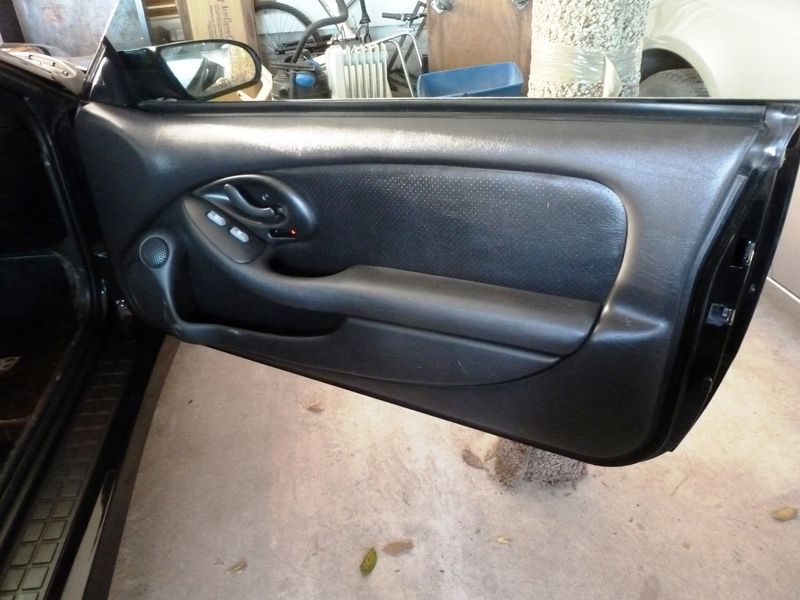
One thing I noticed is when the express down module for the driver window goes bad, the regulator stresses everything. It'll eventually start affecting the door skin itself.
This is a very easy mod. Just finished my '01 & my friend's Firehawk. FYI, better to do this "before" the panel cracks(or gets worse). Carefully remove the door panel, remove the surrounding 3-4 staples(you'll see right away how this relieves the "stress" on the panel), and re-attach with some light pic-hanging wire..thats it, then just re-install the door panel & you're done.
The boy and I decided to tackle the cracked driver's side door panel that has been annoying me since we got the car. Last year we removed the panel, glued the cracks, removed and reinstalled the window felt, and reinstalled the panel but it was still an eyesore, especially since I had to look at the damn thing every time I was driving the car. (The passenger side panel was perfect - but I did remove it and reinforce the crack-prone areas with flexible body repair material and removed and reinstalled the window felts in a "looser" position).
So we decided to replace the panel. We all know how hard an uncracked 2001-2002 ebony panel goes for, so I went for the alternative. The early cars - up to early 1997 used a different plastic material for the panel which doesn't crack when exposed to heat/cold cycles like the later panels do. The only problem is that they are grey and not ebony. So we found a really nice 1996 grey panel with a cloth insert and started the experiment.
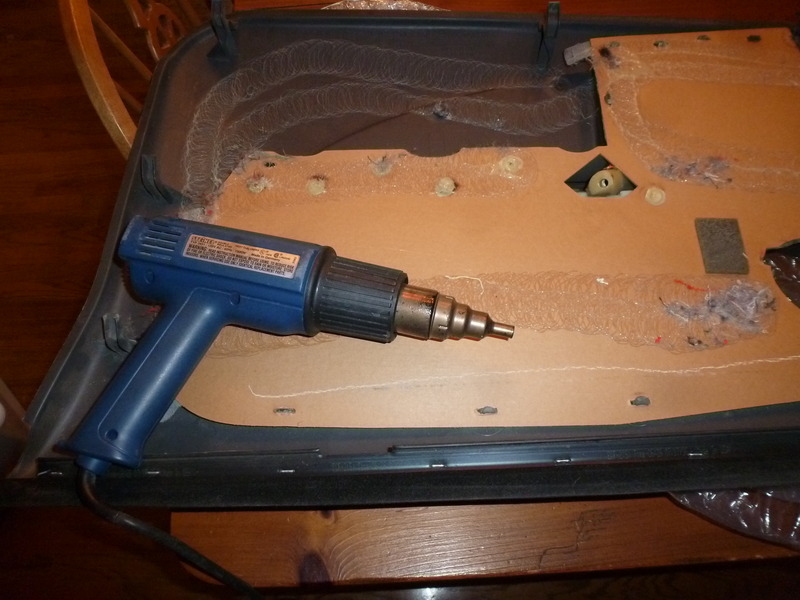
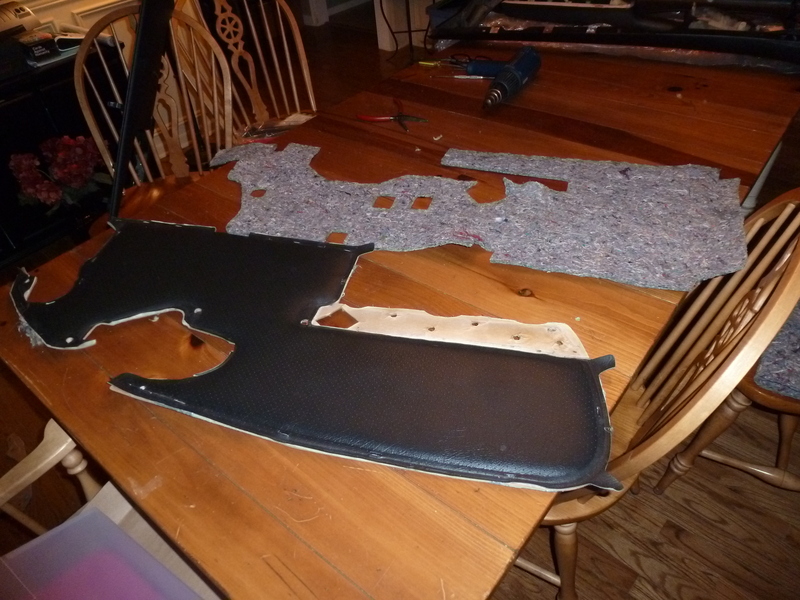
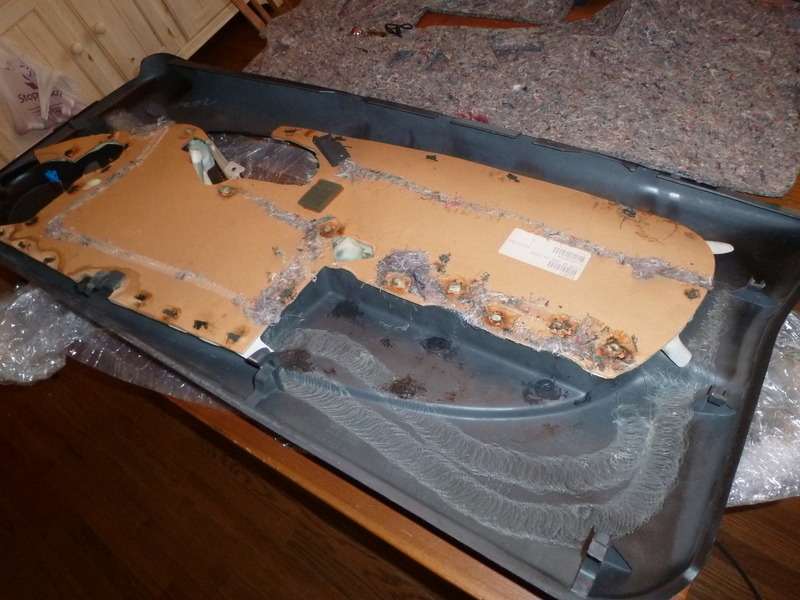
Since the panels used multiple parts that were plastic welded in place at the factory we used a heat gun to soften the melt points. The cardboard backed cloth panel then pulled right off the tabs. I actually trusted my son to wield the heat gun...lets just say he needs work on his aim...and I need to wear asbestos gloves.
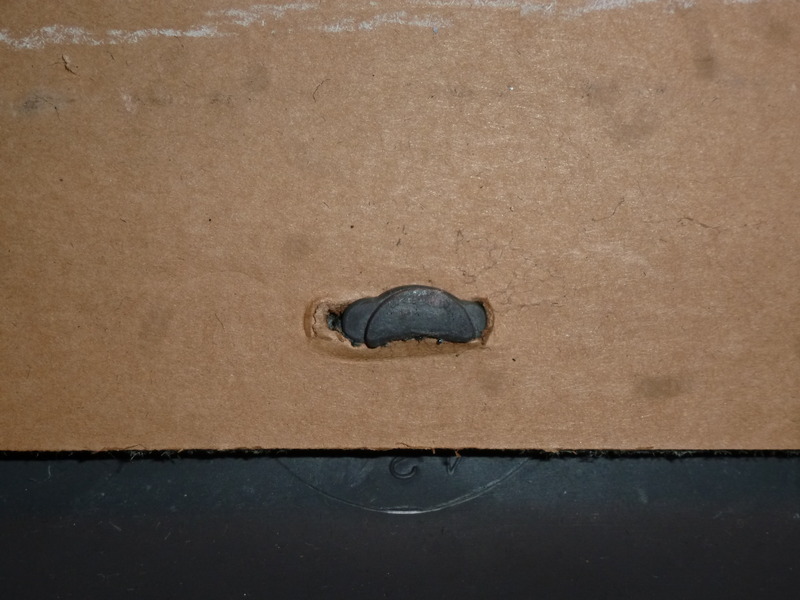
Here is one of the tabs before heating. After each one was softened with the heat gun, I just pulled the panel off one tab at a time. After the entire cardboard panel was removed I reheated each tab and squeezed it with a wide flat toothed pliers to remake the tab into something that would easily engage into the ebony cardboard panel's slots.
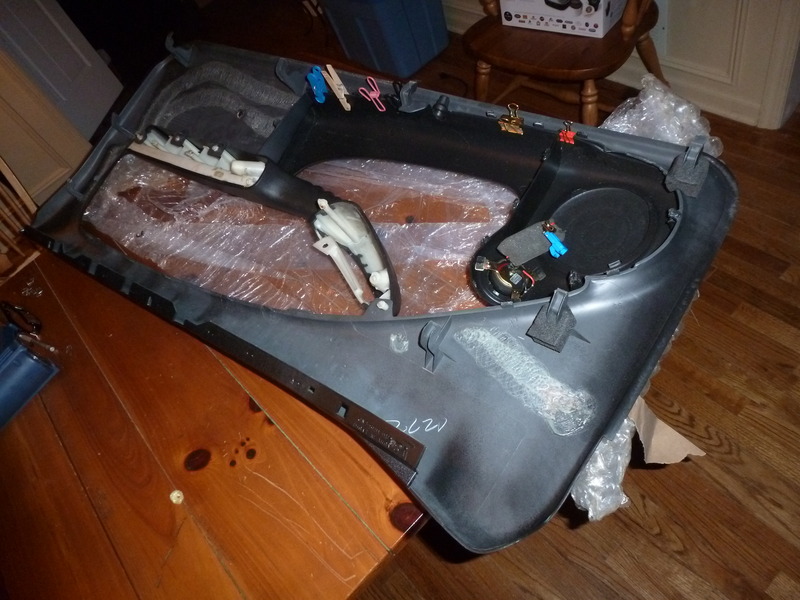
And here is the plastic panel after the cardboard-backed upholstery panel was removed. I will tell you that the arm rest mounting points are much harder to heat as they seem to be of a harder white plastic material and not polypropylene. (this photo is actually a couple steps ahead and shows the ebony arm rest and map pocket set in place. Note the color difference).
I went ahead and removed the arm rest and the map pocket as I wanted to install as much of the original stuff from my 2001 ebony panels as possible. Most people could stop at this point and then dye the panel as is to get ready to install the ebony leather interior upholstery panels.
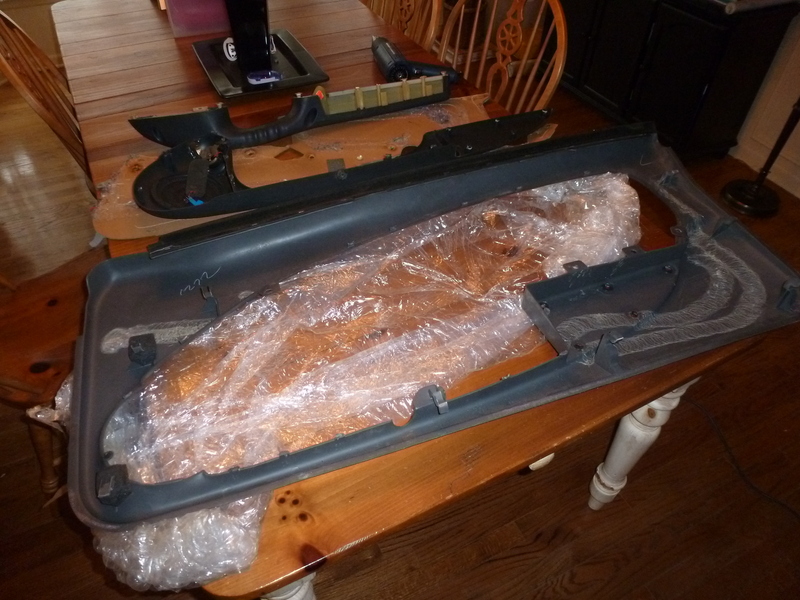
Here is the grey donor panel after everything has been removed.
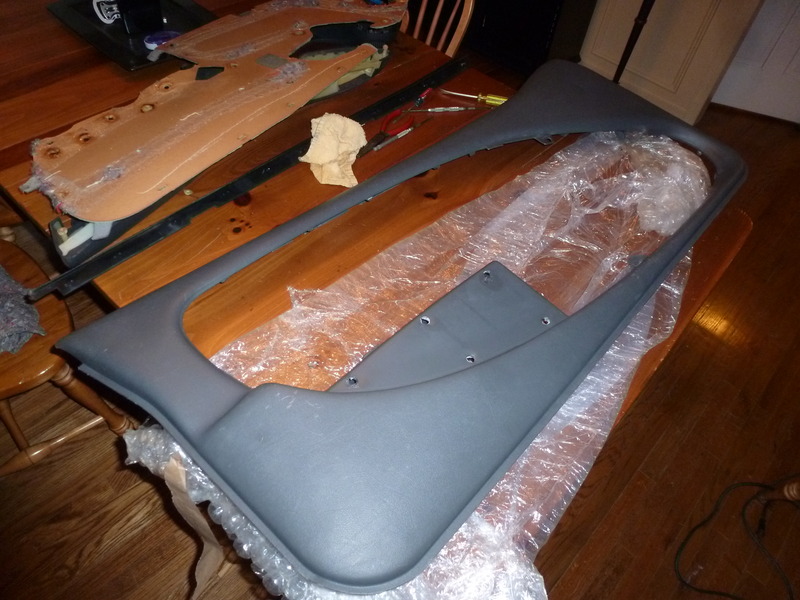
And after I scrubbed, cleaned and redyed the panel with SEM Laundau Black interior dye. This stuff is wonderful and I have used it for all sorts of black interiors over the years. Its a great match for the ebony panel color.
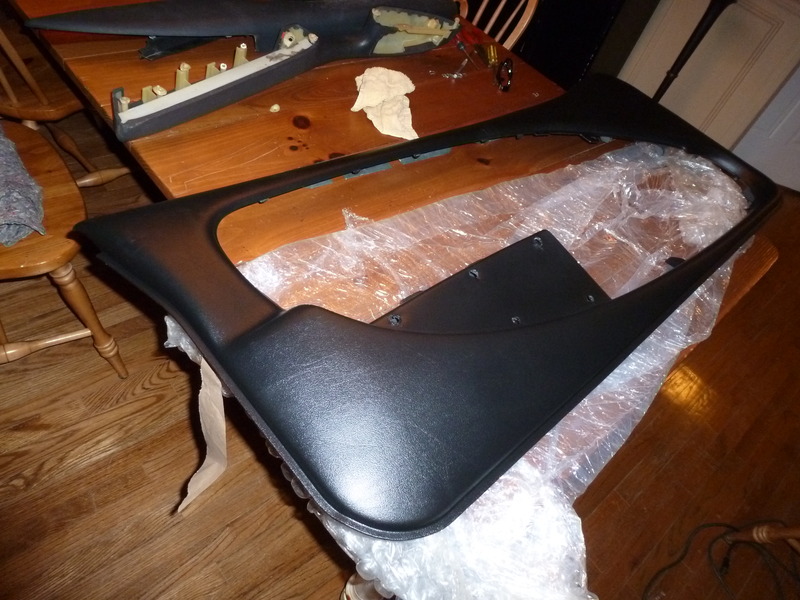
Here is the ebony upholstery panel from my cracked door panel:
With the ebony arm rest and map pocket in place, now came time to plastic weld the map pocket in to place. The arm rest has to wait until the cardboard upholstery panel is in place as its mounting tabs are melted over the panel.
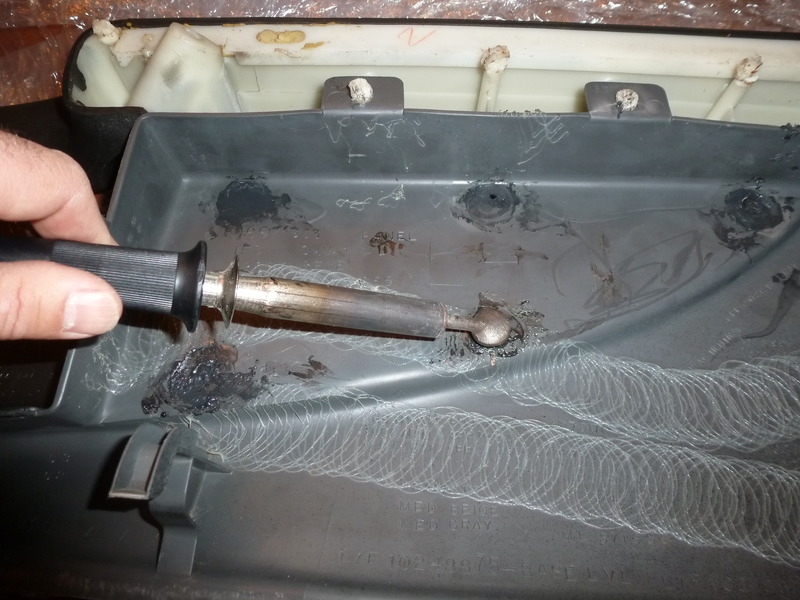
I used a plastic welder with a flat tip (basically just an overpriced soldering iron), to melt the tabs back into the panel and bond them together.
Once the map pocket was welded into place I reset the ebony upholstery panel onto the mounting tabs and heated each tab in order to retain the panel in its original position. Once again, the large, white plastic plastic tabs for the arm rest are the hardest to heat and manipulate due to whatever plastic they are made of.
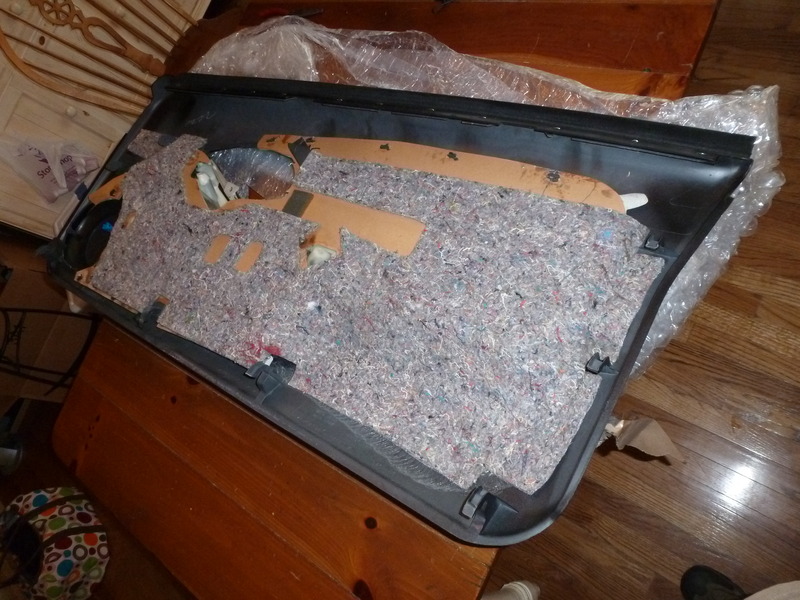
And then the insulation is reapplied. It was rather easy to use the heat gun in order to reactivate the existing sloppy application of glue all over the back of the panel (all the circular squiggly lines are glue). The insulation then stuck right into place.
I also reinstalled the original window felt using the wire from large paperclips. I cut them to a horseshoe shape and then bent them to form the new replacement staples. This allows the weatherstrip to flex a little and not bind the panel on hot/cold days.
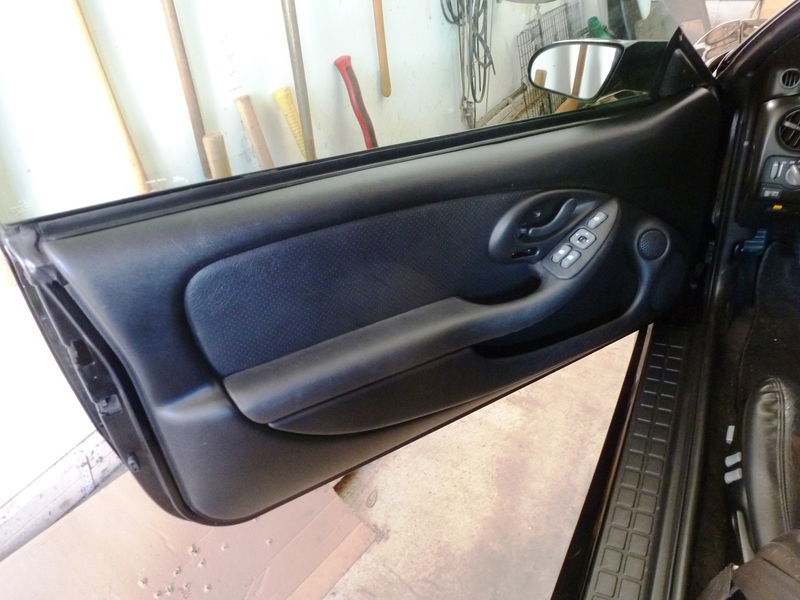
And here is how it looks in the car, when compared to the original ebony passenger side panel:
All in all the grey 1996 panel cost me $75 plus shipping and the can of SEM Laundau Black interior dye was $12. Sure beats $300 for a used ebony panel that is already brittle and ready to crack.
And here is how it looks in the car, when compared to the original ebony passenger side panel:
All in all the grey 1996 panel cost me $75 plus shipping and the can of SEM Laundau Black interior dye was $12. Sure beats $300 for a used ebony panel that is already brittle and ready to crack.
Is this something youd do for a fellow T/A enthusiast? I have an 02 Firewawk with the ebony interior, and both panels are cracked. Looks great!
The problem is that the panels are way too easily damaged in shipment. It is an easy fix at home on the dining room, when your wife is out shopping. Just make sure you clean up before she gets home!
I don't believe that for a minute, ..., I find it hard to believe that it is attributed to frame flex at all. 62 pages of people talking about the staples & how the panel is not allowed to flex & how it pulls the panel apart at that square corner, ..., etc., etc., ..., & now we learn it's all because we all need sub-frame connectors?!?
Next time you put your window down all the way, watch the door panel from the rear or from the door jamb, & watch the panel flex during that last 3-4 inches.
I wish people would stop blaming the felt strip, frame flex and every other insane speculation.
It is because GM switched up the formula for the plastic for the end of the 4th Gen Firebirds, which turned out to be substandard plastic. That is why the later 4th Gen Firebird door panels crack. This is why you can retrofit early 4th Gen door panels and dye them to the correct color like the one guys post.
Relieving the stress will help prevent the cracks, but until someone (HINT! HINT! Classic Industries et all) produces a reproduction door panel with quality plastic, this is going to continue to happen.
It is just like the issue with the bubbles in the roof sail panel. Substandard glue and lack of primer paint (substandard assembly of car). Thankfully 6 Liter Eaters has a reproduction sail panel.
I wish people would stop blaming the felt strip, frame flex and every other insane speculation.
It is because GM switched up the formula for the plastic for the end of the 4th Gen Firebirds, which turned out to be substandard plastic.
Thanks for swooping in for your first post with holy prophecy unsubstantiated by any supporting facts or information. (Especially when volumes and volumes of real facts, information, and experience precede your post.)
BTW - No one "blamed" the felt strip. The problem is with its attachment.
Thanks for swooping in for your first post with holy prophecy unsubstantiated by any supporting facts or information. (Especially when volumes and volumes of real facts, information, and experience precede your post.)
BTW - No one "blamed" the felt strip. The problem is with its attachment.
I was not trying to start an argument, but it was proven somewhere else that its is the formula of the plastic. I could have looked it up and provided a reference, but with your pleasant reply to a first time poster, it would not have made a difference.
Have a nice day!
Edit: This is not the original source, but it is an eBay reference to the issue with the plastic. I think I remember reading about the plastic in a print magazine, so I cannot exactly post a link to that.
FIREBIRD DOOR PANEL CRACKING: Contrary to what you might read elsewhere on the internet (but similarly related). The common door panel cracking is not due to "the staple" that the upper window sweep seal is mounted with. The supplier for GM changed the composition of the plastic (PPO) used in door panels produced somewhere in the early to middle of 1998. What happens is that when the panels are exposed to enough thermal cycles (cold-hot-cold), and particularly in colder climates, the PPO expands and contracts. This causes the PPO to become brittle. The most vulnerable point is where the panel has the most stress, which is at the 90 degree corner where the upper window sweep mounts. The cracking will a lot of times find it's way to the staple puncture. This is ususally after the crack started at the 90 degree bend. From many years of experience we've seen the cracks form going TO the staples rather than originating AT the staple and cracking away from it.
Last edited by HighTechUSFBulls; 10-01-2015 at 09:09 PM.
I was not trying to start an argument, but it was proven somewhere else that its is the formula of the plastic. I could have looked it up and provided a reference, but with your pleasant reply to a first time poster, it would not have made a difference.
One should tread carefully in a discussion with over 500 posts. Injecting new ideas is fine, but if you are going to do that - you should lay down a case.
The link you posted above would have been helpful, but I'm not sure you should be going to people selling things on ebay for facts. Welcome to this site! I think you'll find great tech discussion here and some deeper information on topics like this.
Originally Posted by HighTechUSFBulls
Edit: This is not the original source, but it is an eBay reference to the issue with the plastic. I think I remember reading about the plastic in a print magazine, so I cannot exactly post a link to that.
I think the "facts" posted in this add are probably correct and they are consistent with other posts in this thread where we have theorized about the material, expansion, contraction, stresses, etc. (It takes a good bit of reading to find that.)
Saying that "the problem" is the plastic the doors made out of is not correct and I suspect that helps the ebay salesman sell more parts. The material is used successfully out in the world in many applications. It doesn't self destruct, melt, etc. Maybe one could say that engineers changed the materials and didn't do enough homework?
The design and manufacture of the door panel is certainly flawed, taking in to account the materials, design, and fabrication techniques. This can be overcome in a number of ways, so there is not "one fix." However; I think that the staple repair has proven to be the least costly, fastest, and most elegant solution to this problem.
BTW - There is someone driving around USF with a killer cam/exhaust combo. It sounds like the devil is coming from a 1/2 mile away. I should have asked what they had before I left the area and regret it.
Njsteve: Thanks for your write-up, and the Landau Black tip. You did a great job.
I'm also working on my door panels now, circumventing the crack problem and changing color by covering the panel with black vinyl. I was going to re-use the factory staples to refit the window felt. They were surprisingly hard to bend, for me. I'll find out if my plan is unrealistic. Hats off to you for melting the white plastic from the armrest. I used a heat gun, and they hardly softened at all. Same with the black "buttons" holding the map pocket on. I mangled them, so I'll have to be creative when re-attaching time comes. Thanks to you, maybe the second panel will go better for me.
BTW, instead of reusing those hard-to-bend steel staples, just use some large paper clips and cut them in half, so you have a large U-shape. They are much easier to bend. And they also allow the weatherstrip to move and flex a little.
Thanks, I'll try that on the pass. panel. That one is missing a few staples, so I have to.
Your re-install of the map pocket went much cleaner than mine. I just didn't have enough material left to re-melt. Plus I used a heat gun vs. soldering iron. I used a combo of epoxying plastic (door panel type fasteners) and sheet metal screws/washers.
The same with the armrest, no choice but to put a screw in it. I thought of putting epoxy in the hole before the screw, but it had a pretty good bite, so I didn't.
Some of the black plastic tabs around the speaker just get destroyed, no matter how careful you are, in my case. Just have to hope not too many.
My panel is nothing to brag about, but is a big improvement over tan with a tan insert.
BTW, instead of reusing those hard-to-bend steel staples, just use some large paper clips and cut them in half, so you have a large U-shape. They are much easier to bend.
They are easier to bend because they are ductile and weak. With enough vibration and movement, they will crack and break. Paper clips also rust fast and will very quickly turn to dust inside a door panel.
Better to use some stainless or galvanized bailing wire if additional material is needed.
Hey NJSteve, long time since I've seen you over at PY.
So I've been putting this off way too long and now have two nice long cracks to deal with. One side is so long its almost all the way through but checked it today and thankfully its not all the way through yet so this is going to get done this week. I've watched multiple videos and read multiple threads but admittedly have not gone through every page of this one. I went back to post 159 where the first repair steps are posted, thankfully someone called that out. I pretty much get the gist of the repair, the one question I had is has anyone tried to smudge a tiny bit of something that could be used like a plastic filler in the crack before tightening down the zip tie? I'm just trying to think if there might be a way to add a little something there as filler just prior to compressing the two sides of the crack to either make it incredibly hard to see or completely undetectable. I've seen that ppl have had really good results with just compressing the two sides of the panel together but my cracks are so long I am afraid they'll still be noticeable after the standard repair.
I watched a completely unrelated video where a guy did a repair on a badly cracked door panel (no idea from what vehicle). He used adhesive to bring the two parts together, then used a soldering iron to create a little V, then applied more adhesive into the groove sanding lightly in between to get it completely flat and level with the rest of the panel. He then sprayed a little texture on it (no idea where I'd get that), then finished it off by airbrushing some color on.
Maybe when I first zip it up, it'll look just fine, but if the crack IS still noticeable, anyone try to fill it in a little, to blend it in? Sorry but I didn't want to search through this mammoth thread to see if anyone had proposed this before and if feedback was given.


 10-26-2014, 06:59 PM