

 04-25-2016, 04:04 PM
Last edit by: IB Advertising
See related guides and technical advice from our community experts:
Browse all: Air Intake and Exhaust Guides
- Camaro and Firebird: Header Reviews and How to Install Headers
Review and how-to
Browse all: Air Intake and Exhaust Guides

My Long Review, QTP 1 3/4 LT's & TSP 3" True dual System (LOTS O' PICS)
11-07-2005, 10:57 PM
#1
12 Second Club
Thread Starter
iTrader: (8)
Join Date: Jul 2004
Location: Vancouver, BC
Posts: 708
Likes: 0
Received 0 Likes
on
0 Posts

EVERY pic in this review is a hotlink to a higher rez pic. Click on the images for a 1024x768 version
When I was deciding on which Headers and Exhaust systems I wanted to purchase, I had to spend significant time searching for pics of the two, I had varying success doing so.
So having the means to writeup a review and post high quality pics, I figured I would share with anyone else trying to decide.
I decided on the QTP 1 3/4 Stainless steel headers for my LT's and the TSP 3" True dual system for the remainder of the exhaust.
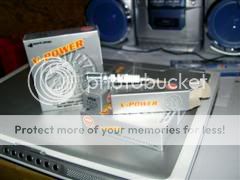
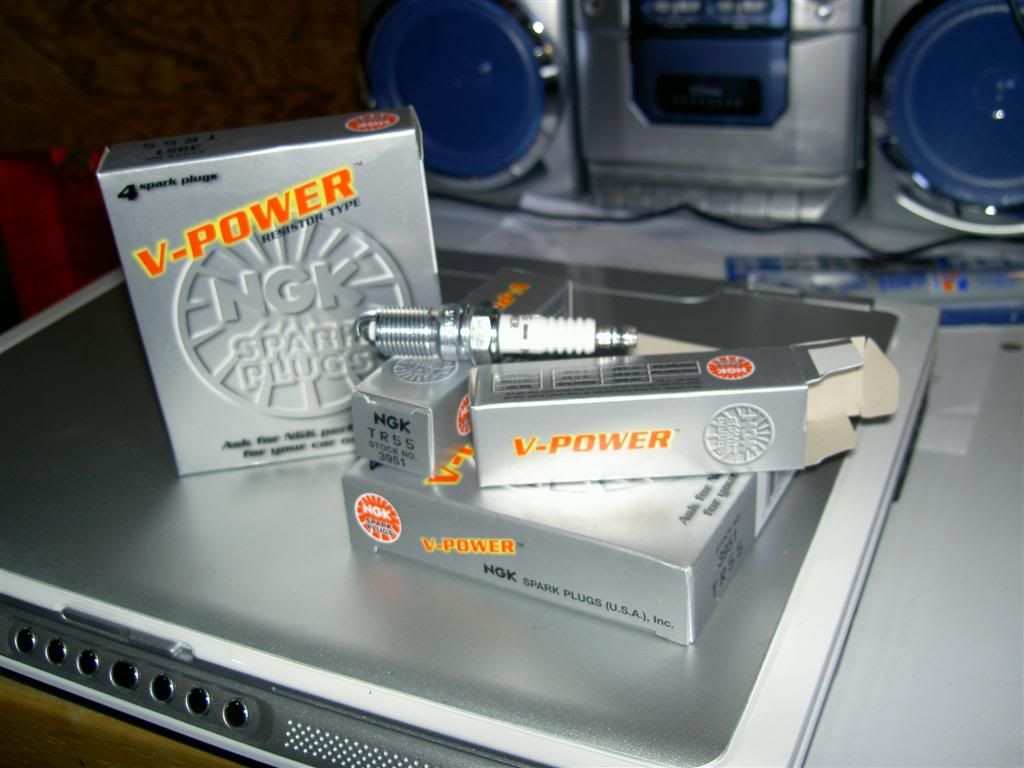
I also did a spark plug change and chose the NGK TR55's.
What follows is my experience with each product.
FYI the car in question is a 2000 Camaro SS A4.
Fully stock before install, except for an MTI Lid, but that has no influence on the install.
########### QTP 1 3/4 Stainless Steel LT Headers (Race Style) ###########
I purchased the headers from LS1speed.com.
The shipping was prompt, from what I could tell, the shipment came directly from QTP.
Packaging was minimal, just one big box with zero stuffing.
I spent significant time cleaning out the headers from the junk leftover from the manufacture process, metal chunks, dust etc..
The shipping and the cleaning wasn't something I was disappointed in, and I had no problem cleaning them out. I wouldn't expect the manufacturer to do that for every product.
The product was definitely in great condition, no dents, scrapes or anything worth mentioning, so overall shipping and packaging was not an issue.
I was very happy with the order process and the condition of the product.
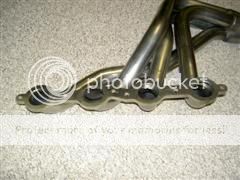
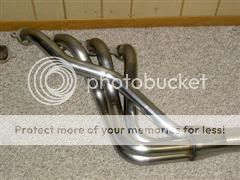
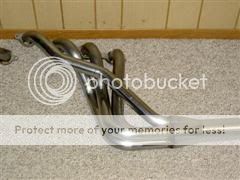
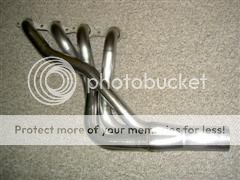
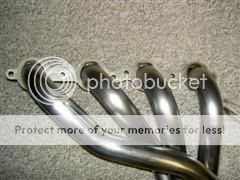
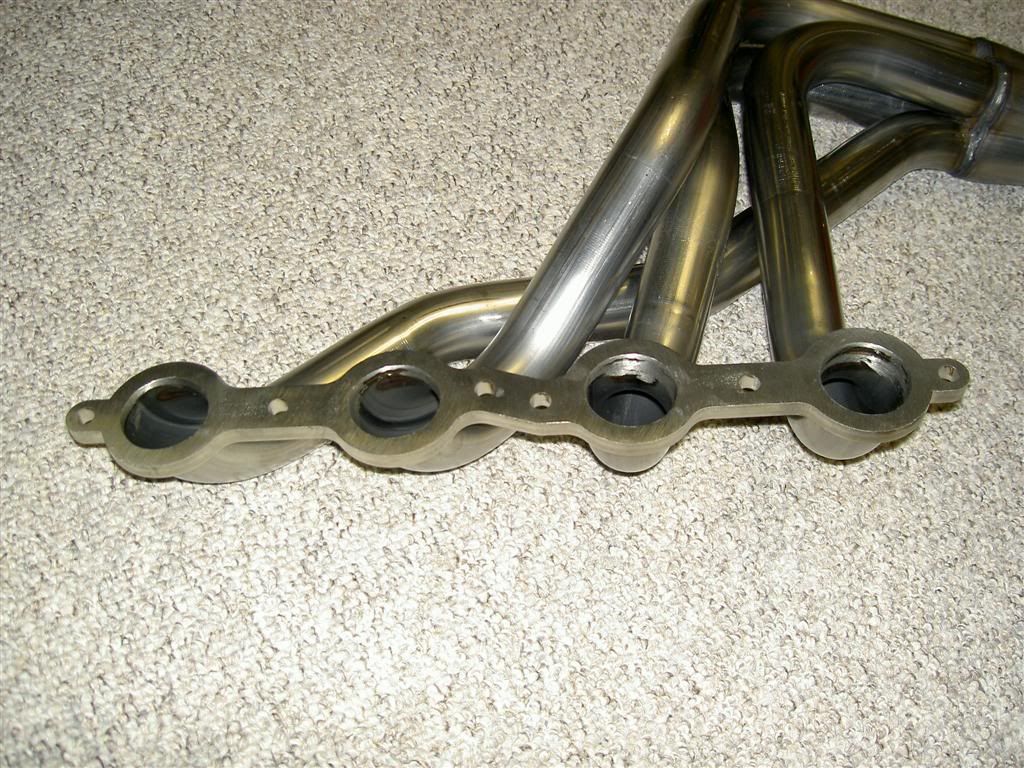
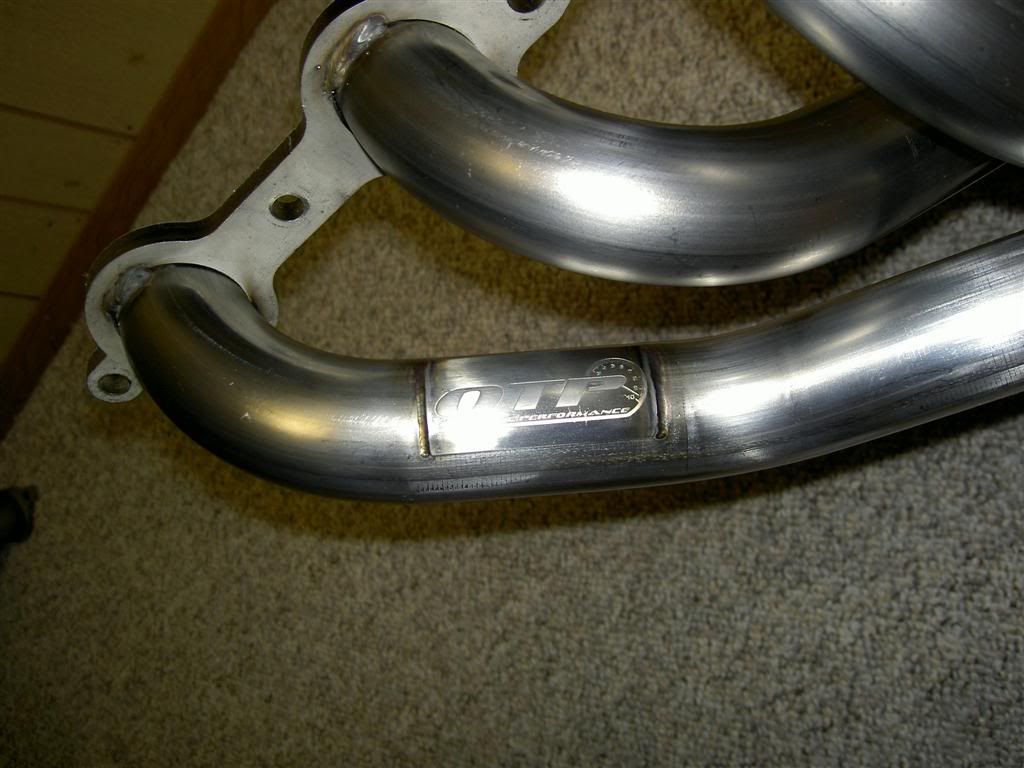
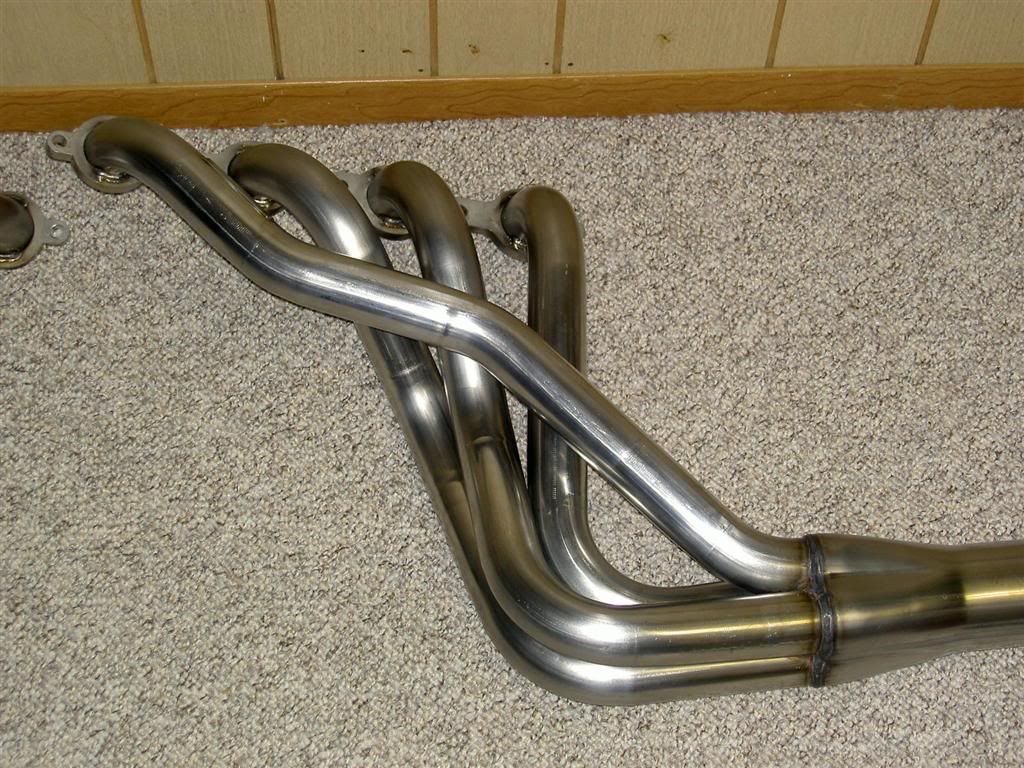
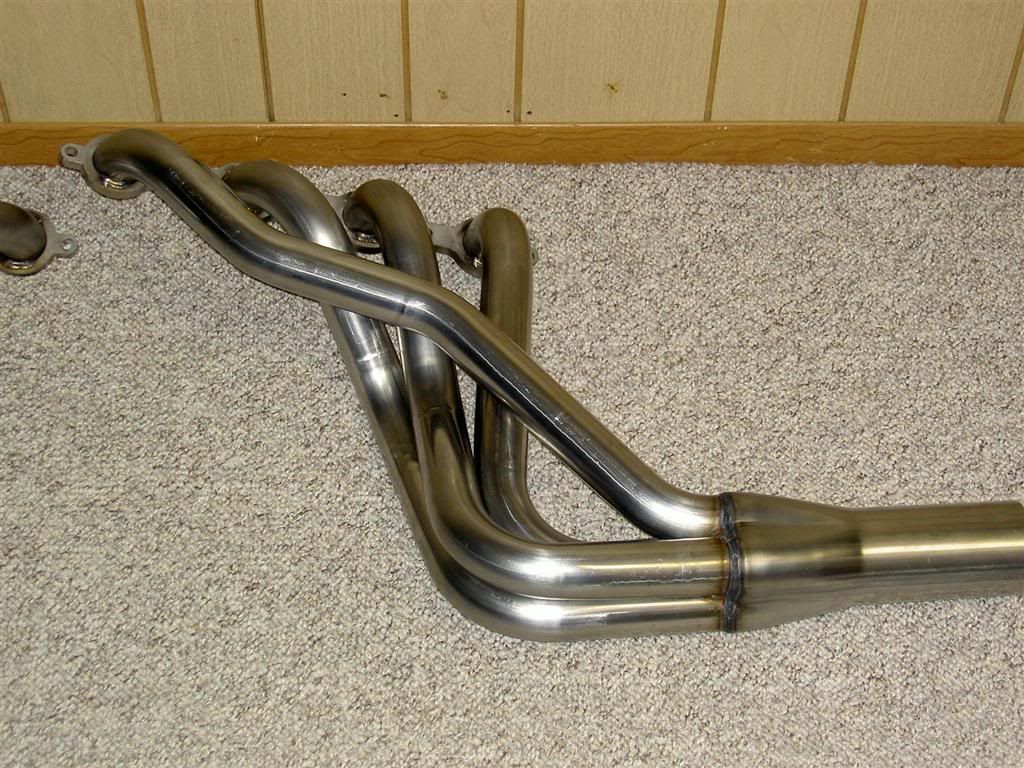
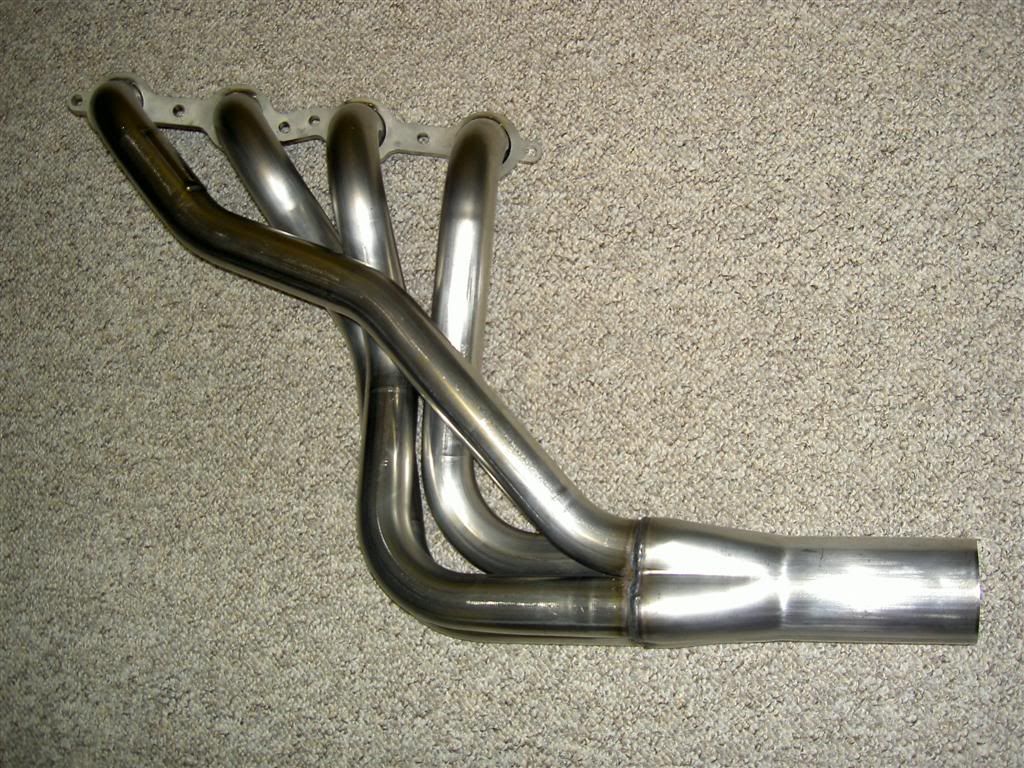
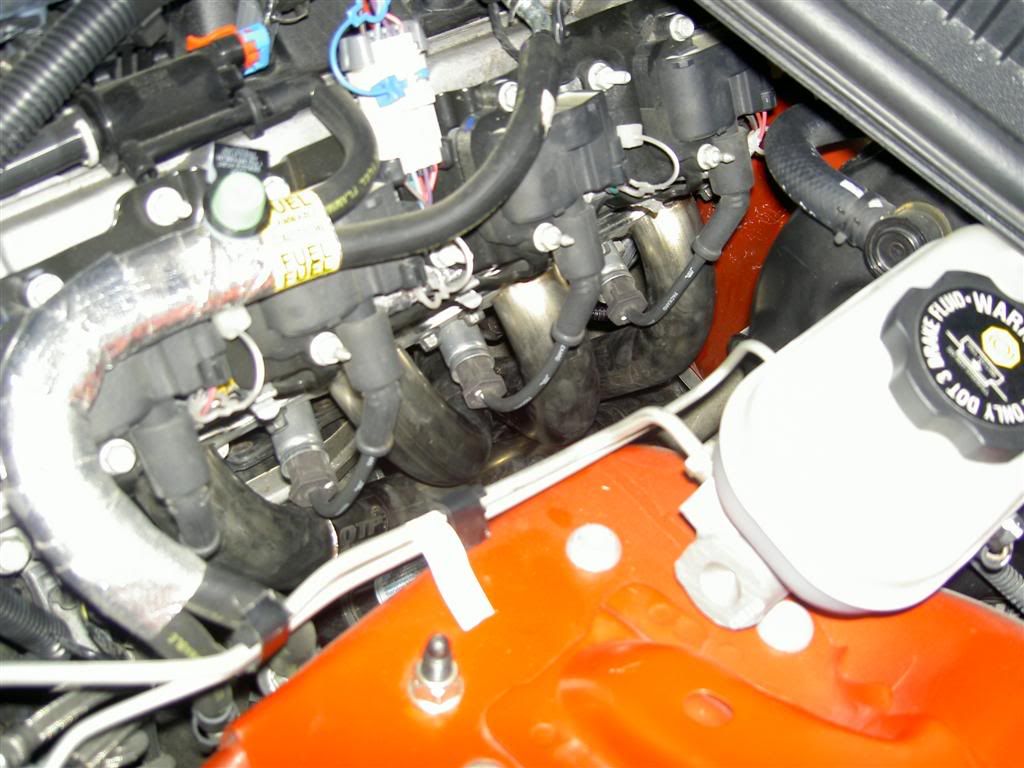
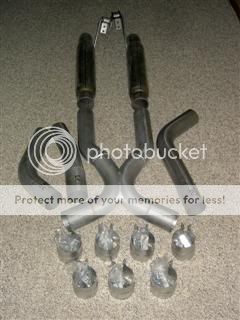
Pics of the product, after some polishing with Never-Dull metal polish.
Sorry I lost the pics of the passenger header. But below you'll see the welds, QTP logo and flanges.
$$$$$$$$$$$$$$$$$$$$ INSTALL $$$$$$$$$$$$$$$$$$$$
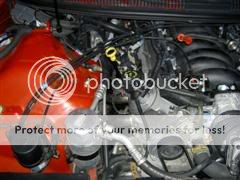
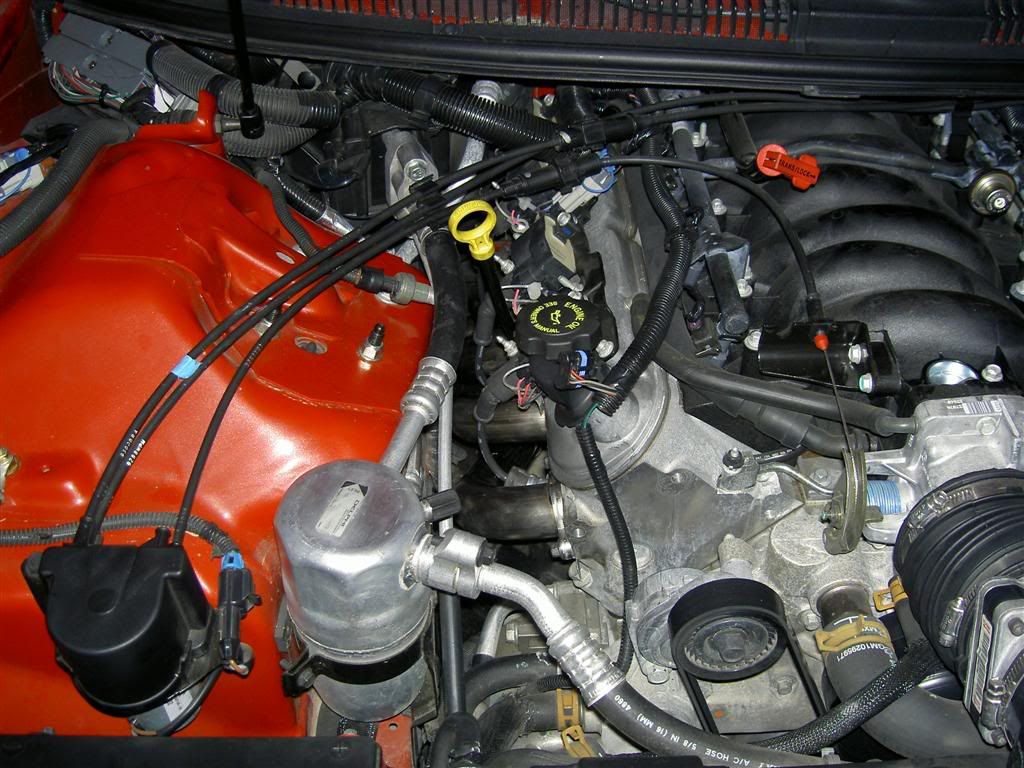
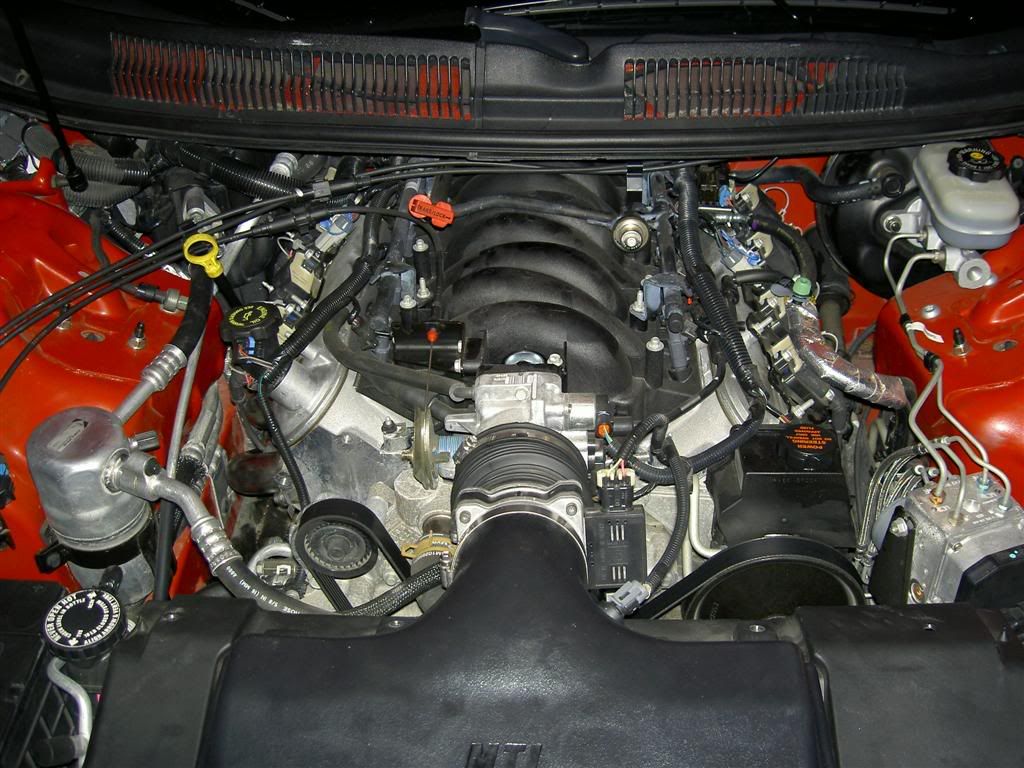
I chose the Race style headers Therefore I was removing the AIR and EGR.
I won't go into many details of the removal of these, as there are many tutorials on doing so.
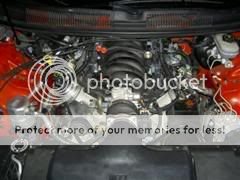
I will say that removing them definitely made the process easier and cleaned up the engine compartment.
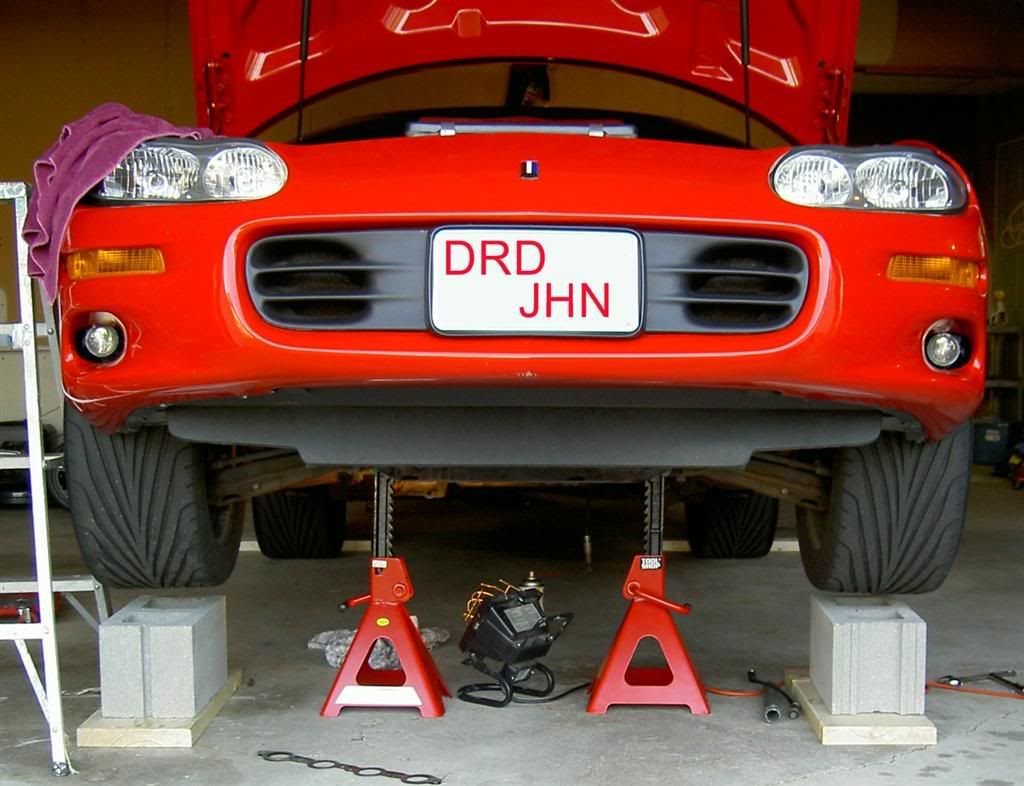
Prior to the install day, I drove the car onto two 2"x9"x 24" planks the night before, one under each front wheel.
This was to a) let the car cool b) give necessary clearance to get a jack underneath the K member.
As its been recommended, it is wise to put plenty of penetrating oil on the stock cat bolts the night before.
I'd also recommend putting some one the AIR and EGR flanges aswell if you are removing them, they were pretty tight and I had limited tools to get a good wrench on them.
TIP: If your having trouble getting oil on the Cat bolts, take a length of nylon tubing, about 2' would do.
Tape one end to the end of wire coat hanger and use the hanger as a guide to get the end ofthe tube right on the bolts.
Then shoot some penetrating oil down the other end of your 2' tube and blow if you have to to get it out the other end.
The coat hanger will let you hold the tube right on the bolt and get the oil right where you want it.
INSTALL DAY (I am not going to go over the entire thing, just some points that I would have done different if I was thinking.)
Remove AIR and EGR per whatever guide your using.
LS1Camaro.net ^^^has a good one, and more can be found on this site 00-02 Air Removal by - Freak - .
I had a large rolling style jack, and I placed one 2"x6"x 18" plank on the jack plate and jacked it up in the middle of the K member.
I'm not a fan of jacking metal on metal if i can avoid it so I did this to keep from scratching/denting. And it gave a little more height.
Stock manifolds should be the last to come out, this means O2 sensors, Cats and Y pipe should be either loose or gone before you try pulling them out.
Trying to get the cat bolts off a manifold that still has the 02's in and is not mounted to the heads, is a major PITA.
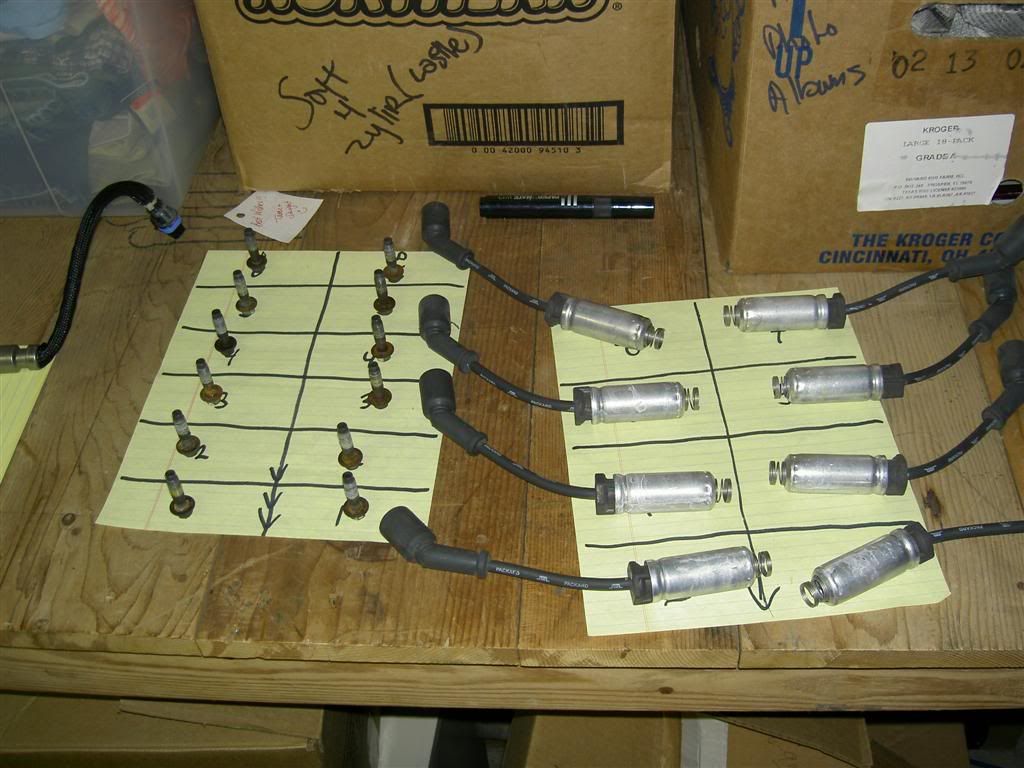
Once all the stock stuff was removed, I did the spark plug install.
NGK TR55's gapped @ .055 which seemed to be the most common gaping for something around my setup. Stock block with LT's and exhaust.
With everything removed, the spark plug install is simple. I DID leave the sparks in when I put the headers up.
I had help up top so I was VERY careful to not let the sparks get bumped by the headers when I put them up and in.
I also reused the stock plug wires.
TIP: Before your ready to slide the headers up, put some gloves on. I had mine all nice and shiny only to print and smudge them up trying to get them in. DOH!
Passenger side header went in like a breeze, I don't think I even had the jack stands maxed out for that one, I was actually juse seeing if it COULD go in, and WHAPOW it slid right up.
Drivers side header was a bit more complicated.
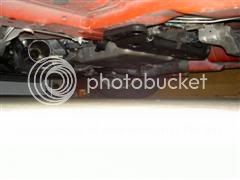
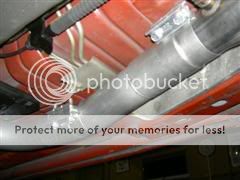
If you've read on QTP and other brands, its true you need to have the front jacked up HIGH.
In the pic below, you'll see the jack stands are maxed out. That is still not enough. I estimate from the k member to the ground you prob need somewhere around ~19 - 22 Inches to get it in. This was done by stacking TWO planks on the jack plate and jacking the K high as the jack would go.
Part of the issue is that I needed to get header vertical AND as far forward in the insertion point as I could.
Its all about what angle you go at it from, I had to do no grinding or jacking of the engine to get it in, once I had the right angle and height, it just slipped right up.
I bought some new GM header gaskets and reused the stock header bolts.
I cleaned the bolts on a bench grinder and got them good and clean before I reused them though. I also used antisieze on the header bolts, that may or may not have been the right decision. I've heard some do some don't. Judge that one for yourself.
Below are the pics of the install. Enjoy


When I was deciding on which Headers and Exhaust systems I wanted to purchase, I had to spend significant time searching for pics of the two, I had varying success doing so.
So having the means to writeup a review and post high quality pics, I figured I would share with anyone else trying to decide.
I decided on the QTP 1 3/4 Stainless steel headers for my LT's and the TSP 3" True dual system for the remainder of the exhaust.
I also did a spark plug change and chose the NGK TR55's.
What follows is my experience with each product.
FYI the car in question is a 2000 Camaro SS A4.
Fully stock before install, except for an MTI Lid, but that has no influence on the install.
########### QTP 1 3/4 Stainless Steel LT Headers (Race Style) ###########
I purchased the headers from LS1speed.com.
The shipping was prompt, from what I could tell, the shipment came directly from QTP.
Packaging was minimal, just one big box with zero stuffing.
I spent significant time cleaning out the headers from the junk leftover from the manufacture process, metal chunks, dust etc..
The shipping and the cleaning wasn't something I was disappointed in, and I had no problem cleaning them out. I wouldn't expect the manufacturer to do that for every product.
The product was definitely in great condition, no dents, scrapes or anything worth mentioning, so overall shipping and packaging was not an issue.
I was very happy with the order process and the condition of the product.
Pics of the product, after some polishing with Never-Dull metal polish.
Sorry I lost the pics of the passenger header. But below you'll see the welds, QTP logo and flanges.

$$$$$$$$$$$$$$$$$$$$ INSTALL $$$$$$$$$$$$$$$$$$$$
I chose the Race style headers Therefore I was removing the AIR and EGR.
I won't go into many details of the removal of these, as there are many tutorials on doing so.
I will say that removing them definitely made the process easier and cleaned up the engine compartment.
Prior to the install day, I drove the car onto two 2"x9"x 24" planks the night before, one under each front wheel.
This was to a) let the car cool b) give necessary clearance to get a jack underneath the K member.
As its been recommended, it is wise to put plenty of penetrating oil on the stock cat bolts the night before.
I'd also recommend putting some one the AIR and EGR flanges aswell if you are removing them, they were pretty tight and I had limited tools to get a good wrench on them.
TIP: If your having trouble getting oil on the Cat bolts, take a length of nylon tubing, about 2' would do.
Tape one end to the end of wire coat hanger and use the hanger as a guide to get the end ofthe tube right on the bolts.
Then shoot some penetrating oil down the other end of your 2' tube and blow if you have to to get it out the other end.
The coat hanger will let you hold the tube right on the bolt and get the oil right where you want it.
INSTALL DAY (I am not going to go over the entire thing, just some points that I would have done different if I was thinking.)
Remove AIR and EGR per whatever guide your using.
LS1Camaro.net ^^^has a good one, and more can be found on this site 00-02 Air Removal by - Freak - .
I had a large rolling style jack, and I placed one 2"x6"x 18" plank on the jack plate and jacked it up in the middle of the K member.
I'm not a fan of jacking metal on metal if i can avoid it so I did this to keep from scratching/denting. And it gave a little more height.
Stock manifolds should be the last to come out, this means O2 sensors, Cats and Y pipe should be either loose or gone before you try pulling them out.
Trying to get the cat bolts off a manifold that still has the 02's in and is not mounted to the heads, is a major PITA.
Once all the stock stuff was removed, I did the spark plug install.
NGK TR55's gapped @ .055 which seemed to be the most common gaping for something around my setup. Stock block with LT's and exhaust.
With everything removed, the spark plug install is simple. I DID leave the sparks in when I put the headers up.
I had help up top so I was VERY careful to not let the sparks get bumped by the headers when I put them up and in.
I also reused the stock plug wires.
TIP: Before your ready to slide the headers up, put some gloves on. I had mine all nice and shiny only to print and smudge them up trying to get them in. DOH!
Passenger side header went in like a breeze, I don't think I even had the jack stands maxed out for that one, I was actually juse seeing if it COULD go in, and WHAPOW it slid right up.
Drivers side header was a bit more complicated.
If you've read on QTP and other brands, its true you need to have the front jacked up HIGH.
In the pic below, you'll see the jack stands are maxed out. That is still not enough. I estimate from the k member to the ground you prob need somewhere around ~19 - 22 Inches to get it in. This was done by stacking TWO planks on the jack plate and jacking the K high as the jack would go.
Part of the issue is that I needed to get header vertical AND as far forward in the insertion point as I could.
Its all about what angle you go at it from, I had to do no grinding or jacking of the engine to get it in, once I had the right angle and height, it just slipped right up.
I bought some new GM header gaskets and reused the stock header bolts.
I cleaned the bolts on a bench grinder and got them good and clean before I reused them though. I also used antisieze on the header bolts, that may or may not have been the right decision. I've heard some do some don't. Judge that one for yourself.
Below are the pics of the install. Enjoy
Last edited by DirtyJohn; 05-10-2009 at 09:30 PM.
 11-07-2005, 10:58 PM
#2
12 Second Club
Thread Starter
iTrader: (8)
Join Date: Jul 2004
Location: Vancouver, BC
Posts: 708
Likes: 0
Received 0 Likes
on
0 Posts
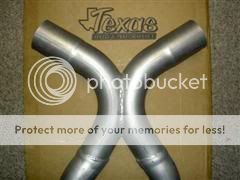
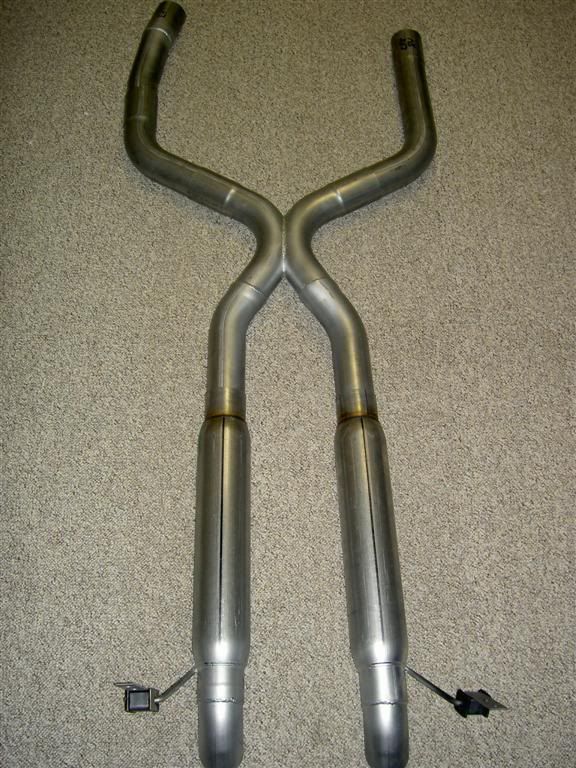
########### Texas Speed Inc 3" True Dual Exhaust W/18" Dynomax Bullets ###########
I was VERY happy with my entire experience with this kit.
Purchasing from TSP was as professional and convenient as anything ive purchased on the internet.
TSP got my order placed and shipped within 5 days from order to my door. That's pretty good in my book. Thanks Jon!
The product and packaging were much better than I was expecting after the headers.
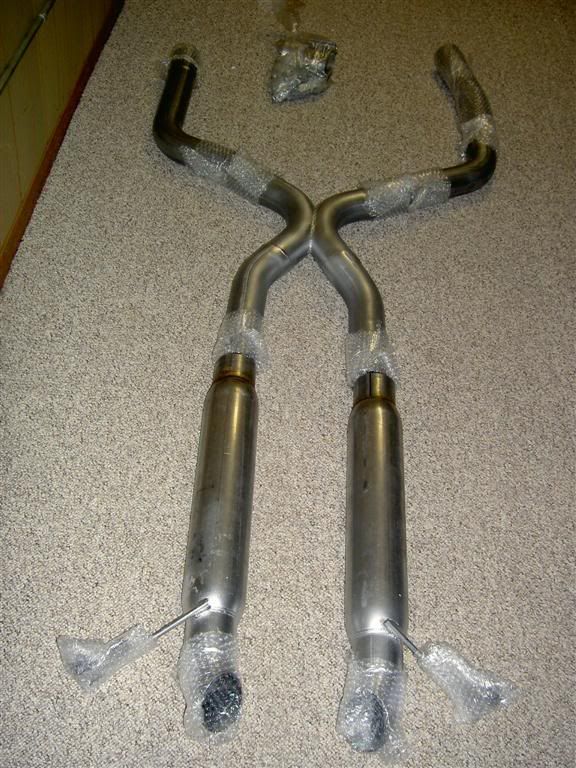
I wasn't expecting them to be packaged as carefully as they were. All the ends were bubble wrapped and the entire kit was drowned in styro peanuts.
I could tell that they took care in getting it to me in good shape.
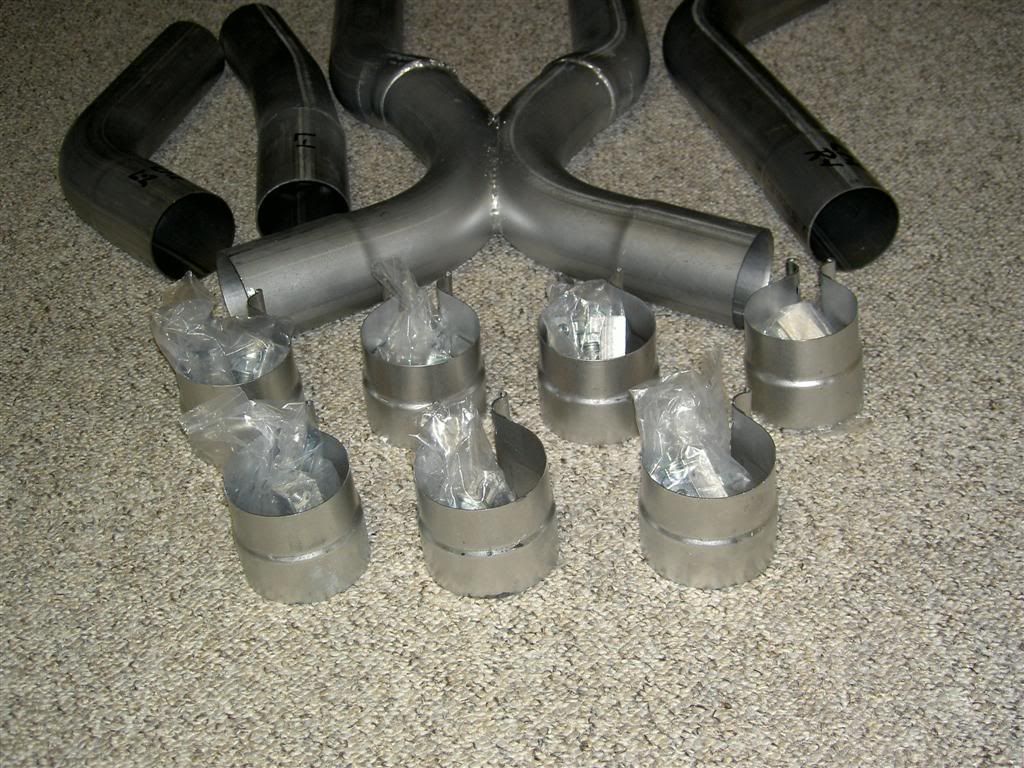
I also wasn't expecting to get the good 3" band clamps in the kit. That was an AWESOME suprise, I was expecting I would have to go out and get those on my own, and at ~$10 a piece, that was another $70 or so I had planned on spending.
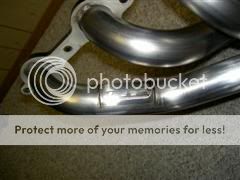
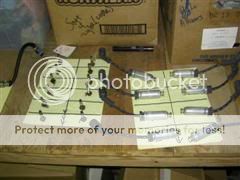
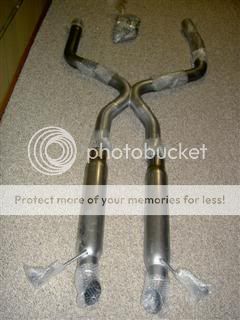
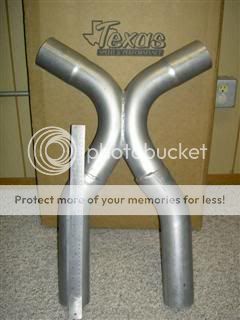
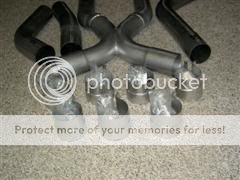
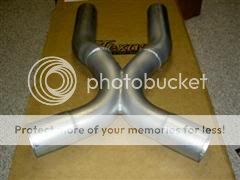
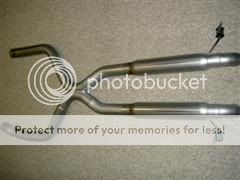
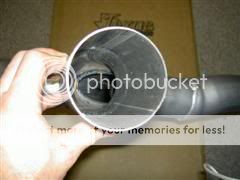
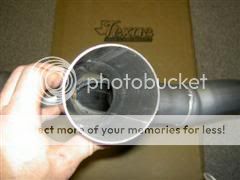
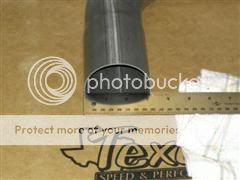
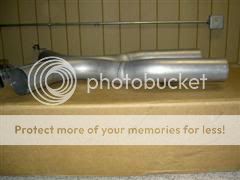
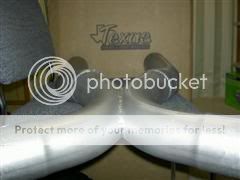
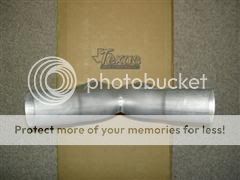
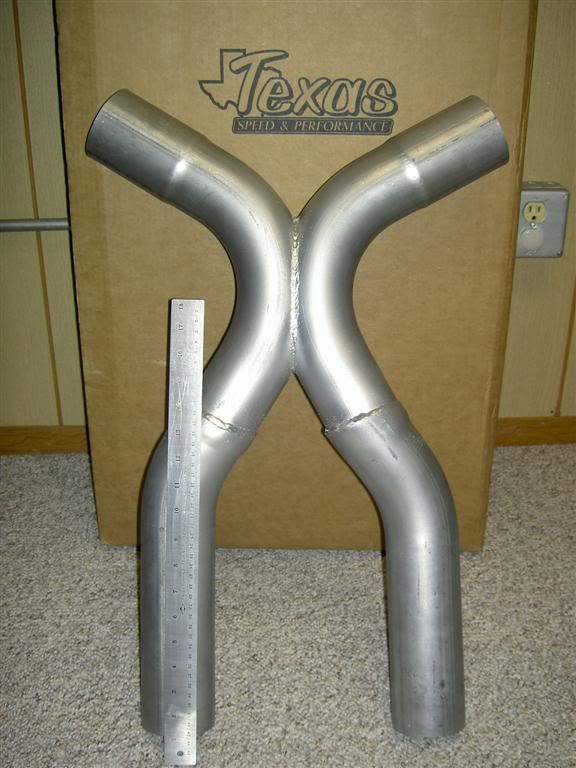
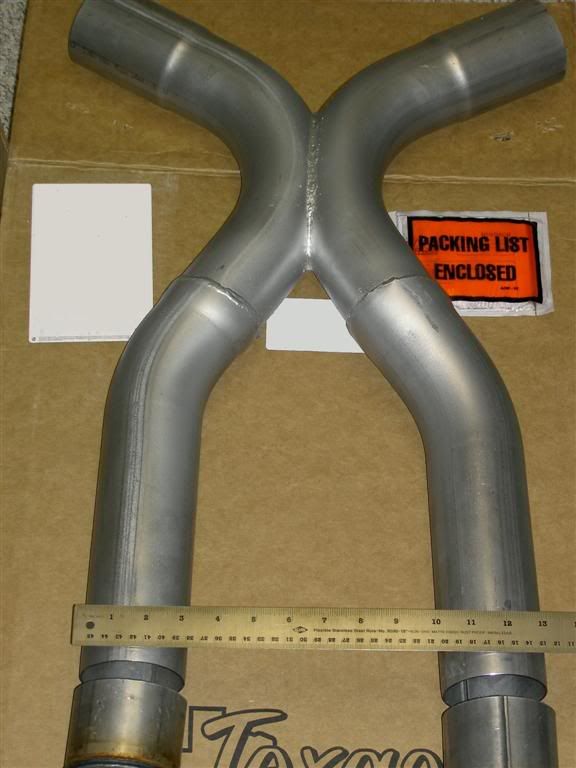
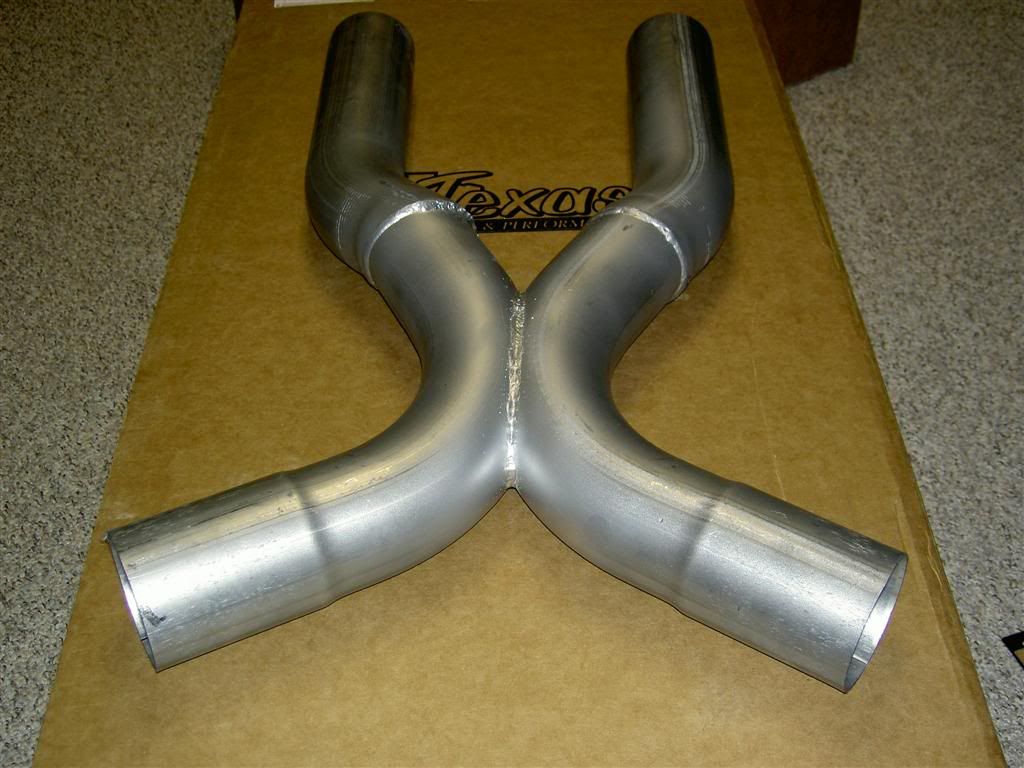
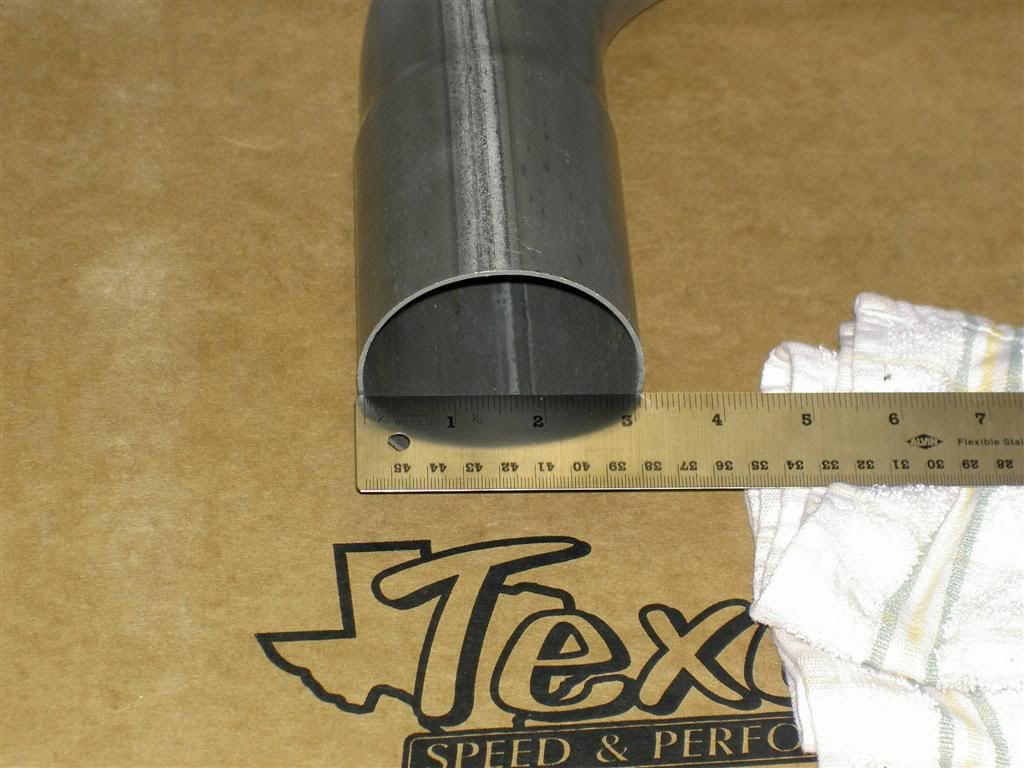
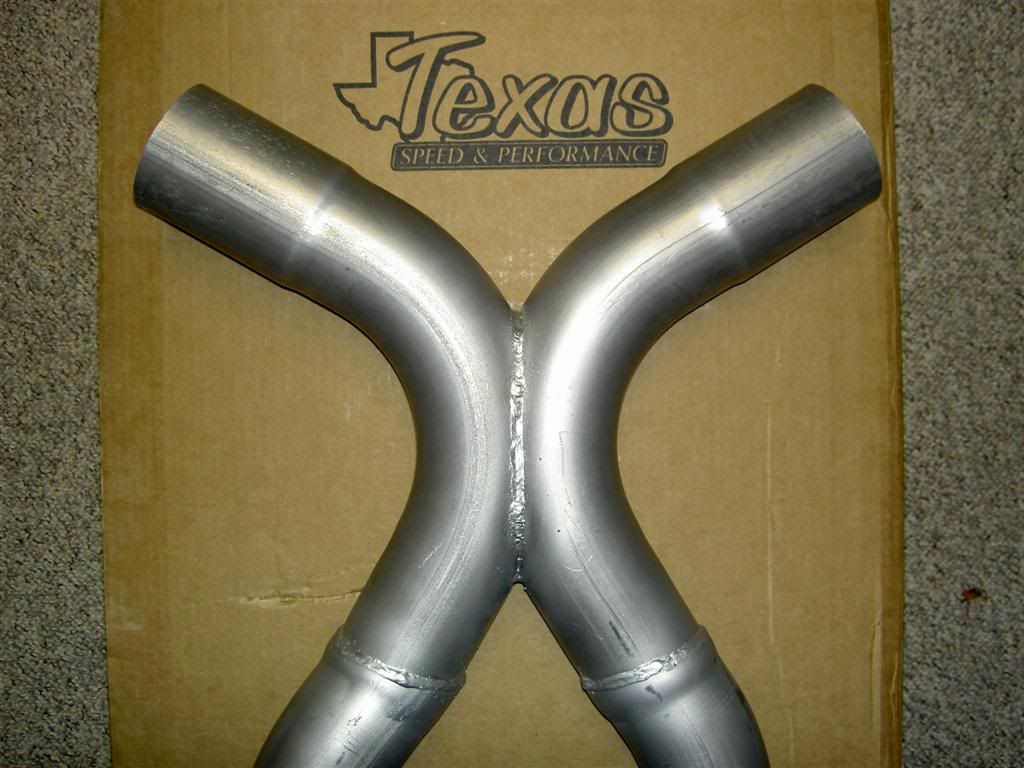
Below are pics of the product out of the box. I'll leave the determination on quality up to the reader.
I however was EXTREMELY satisfied. Good paint over welded spots, and the welds looked strong and complete. (I know nothing about welding )
)
(p.s. yes I know in some pics the X is upside down, I had to learn that later on.)
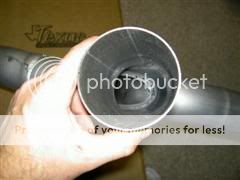
I DID do some cleaning of the cut ends on the pipes, there were some burrs and such that I didn't want interfering with the pipes slipping over each other.
I also cleaned some of the dust and metal chunks, no big deal, just a quick once over with a tire brush.
Again I didn't expect TSP to have done the cleaning. As the buyer, I was fine with taking those extra steps.

I was VERY happy with my entire experience with this kit.
Purchasing from TSP was as professional and convenient as anything ive purchased on the internet.
TSP got my order placed and shipped within 5 days from order to my door. That's pretty good in my book. Thanks Jon!
The product and packaging were much better than I was expecting after the headers.
I wasn't expecting them to be packaged as carefully as they were. All the ends were bubble wrapped and the entire kit was drowned in styro peanuts.
I could tell that they took care in getting it to me in good shape.
I also wasn't expecting to get the good 3" band clamps in the kit. That was an AWESOME suprise, I was expecting I would have to go out and get those on my own, and at ~$10 a piece, that was another $70 or so I had planned on spending.
Below are pics of the product out of the box. I'll leave the determination on quality up to the reader.
I however was EXTREMELY satisfied. Good paint over welded spots, and the welds looked strong and complete. (I know nothing about welding
)(p.s. yes I know in some pics the X is upside down, I had to learn that later on.)
I DID do some cleaning of the cut ends on the pipes, there were some burrs and such that I didn't want interfering with the pipes slipping over each other.
I also cleaned some of the dust and metal chunks, no big deal, just a quick once over with a tire brush.
Again I didn't expect TSP to have done the cleaning. As the buyer, I was fine with taking those extra steps.


Last edited by DirtyJohn; 06-05-2006 at 08:31 PM.
11-07-2005, 10:59 PM
#3
12 Second Club
Thread Starter
iTrader: (8)
Join Date: Jul 2004
Location: Vancouver, BC
Posts: 708
Likes: 0
Received 0 Likes
on
0 Posts
$$$$$$$$$$$$$$$$$$$$ INSTALL $$$$$$$$$$$$$$$$$$$$
This assumes you have completely removed the stock exhaust and all the parts that held it there.
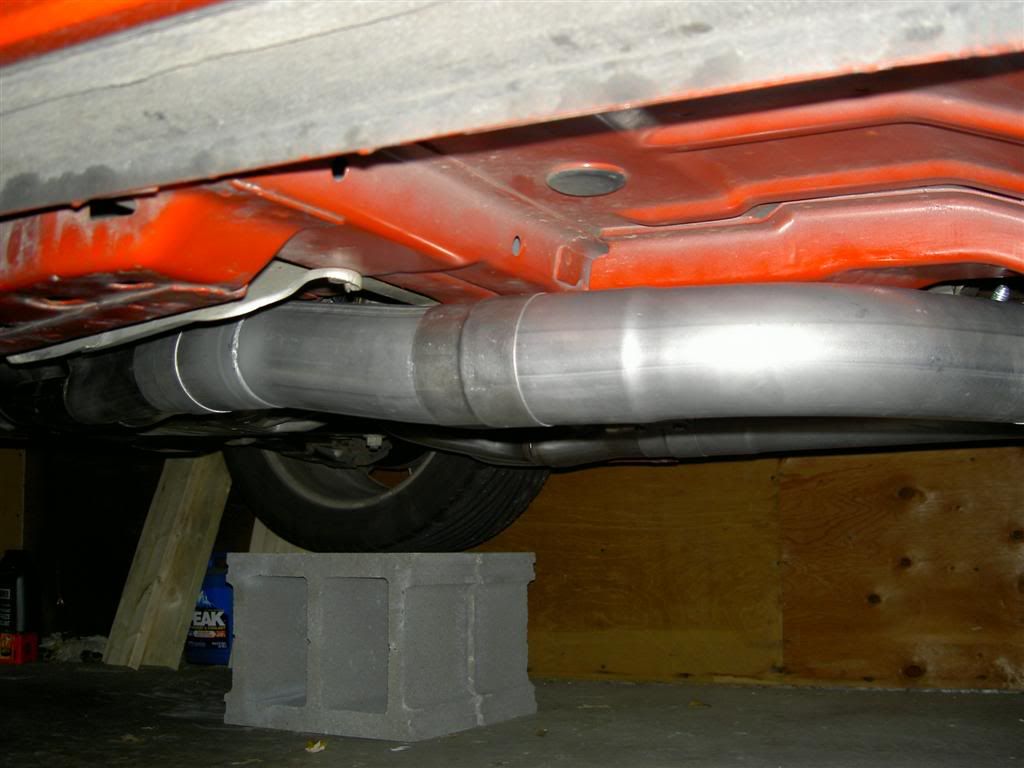
I had my car jacked up on concrete blocks. Again, some dispute the safety of this, and you can use your own judgement, but it worked for me.
With it this way, I had the car off the ground @ 12" at the front wheels, and 8" at the back wheels.
On blocks like this, I was able to have the room I needed and have the rear loaded so I could tuck the pipes up as far as possible.
Before slipping any parts on. I marked on the male end of the pipe, how far approx it is supposed to insert into the female end if it were inserted fully.
I used that as a guide to tell me how much muscling i needed to do to get it to fit as it was intended.
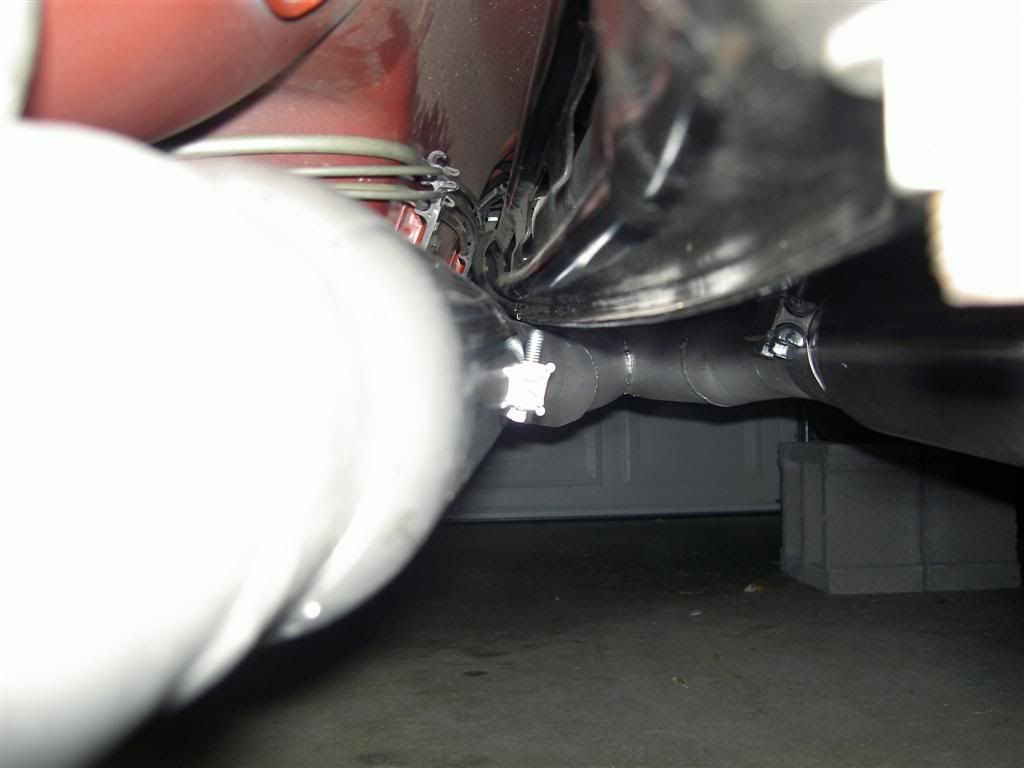
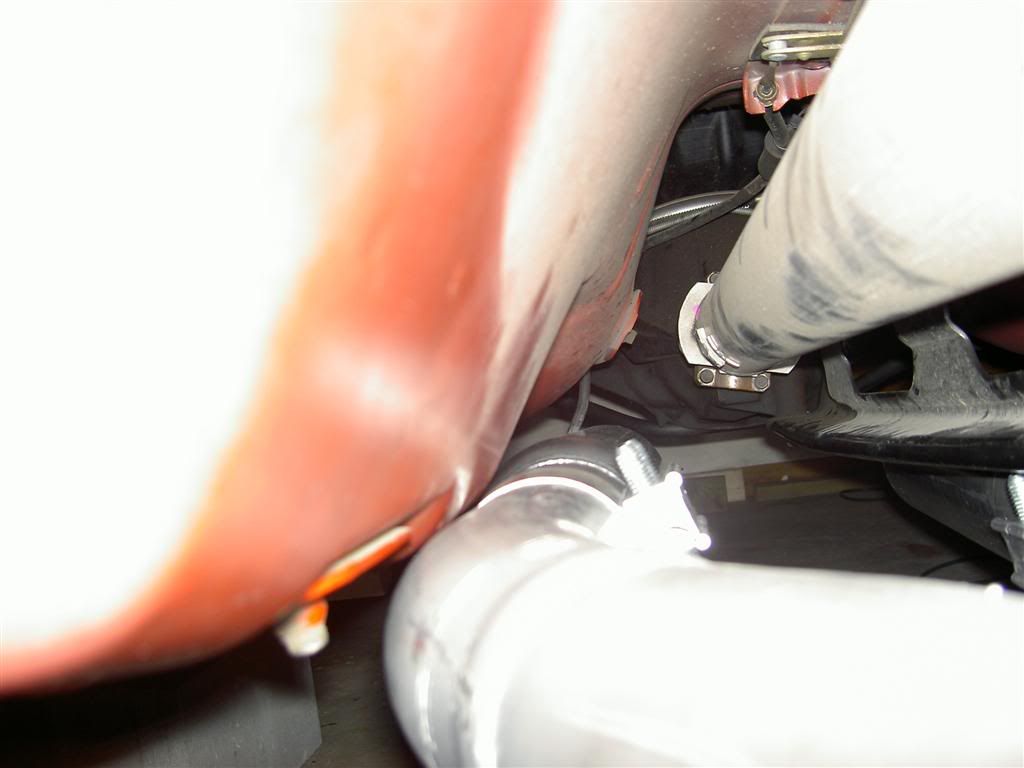
I started putting the pieces on from the headers back to the X.
The drivers side was simple to slide on and meneuver. It is 2 lengths of pipe before the X so it can be twisted and moved more to adjust for clearance.
The passenger side is one piece before the X so it gives you less ability to adjust. Fortunately clearance isn't so much an issue on this side.
I twisted and muscled the passanger side as far as I could get it to full insertion to get the kit to fit right.
I just kept twisting and pushing toward the header to inch it closer and closer to full insert.
I think I was still at least 2" from fully inserted when had it all said and done, but there was plenty of pipe in there so I'm not worried about leaks on that side.
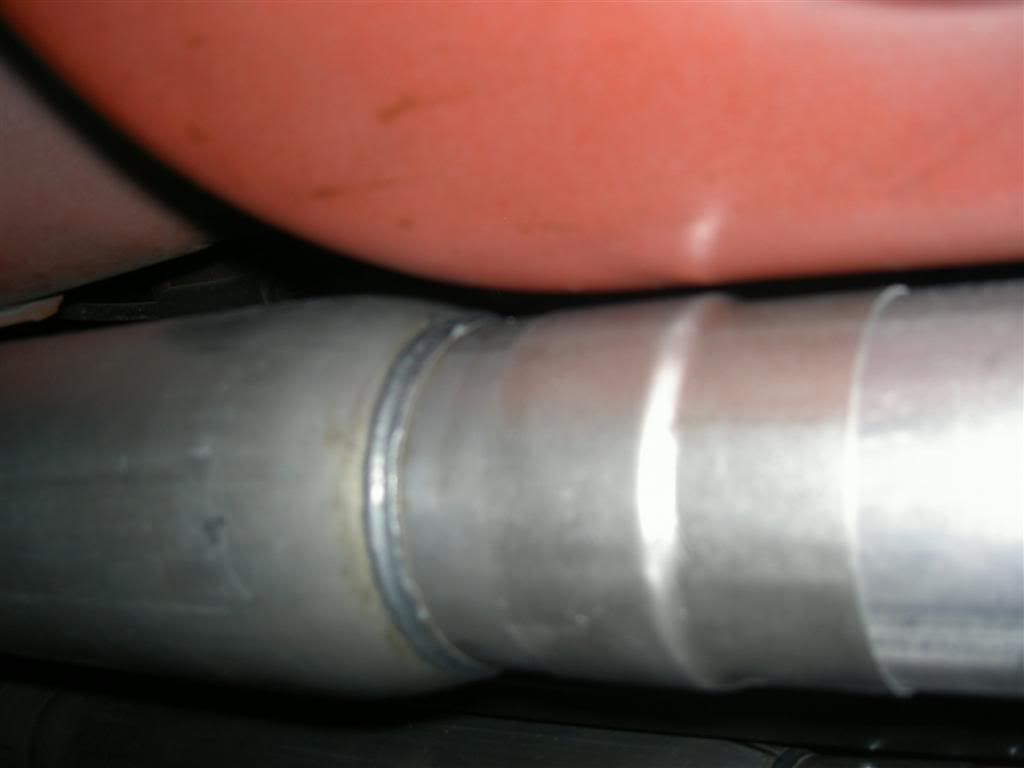
The driver side however did not fit as neatly as the pass.
To get the X to insert into both sides, I slid the pass side into the X first and then the driver side in.
I had to go with maybe 2" of inserted pipe in the L2 section of pipe, and a little less than full insertion in L1.
This could be because this kit is not designed to be used on QTP headers, regardless, there is plenty of length inserted and I don't fear it to be a problem.

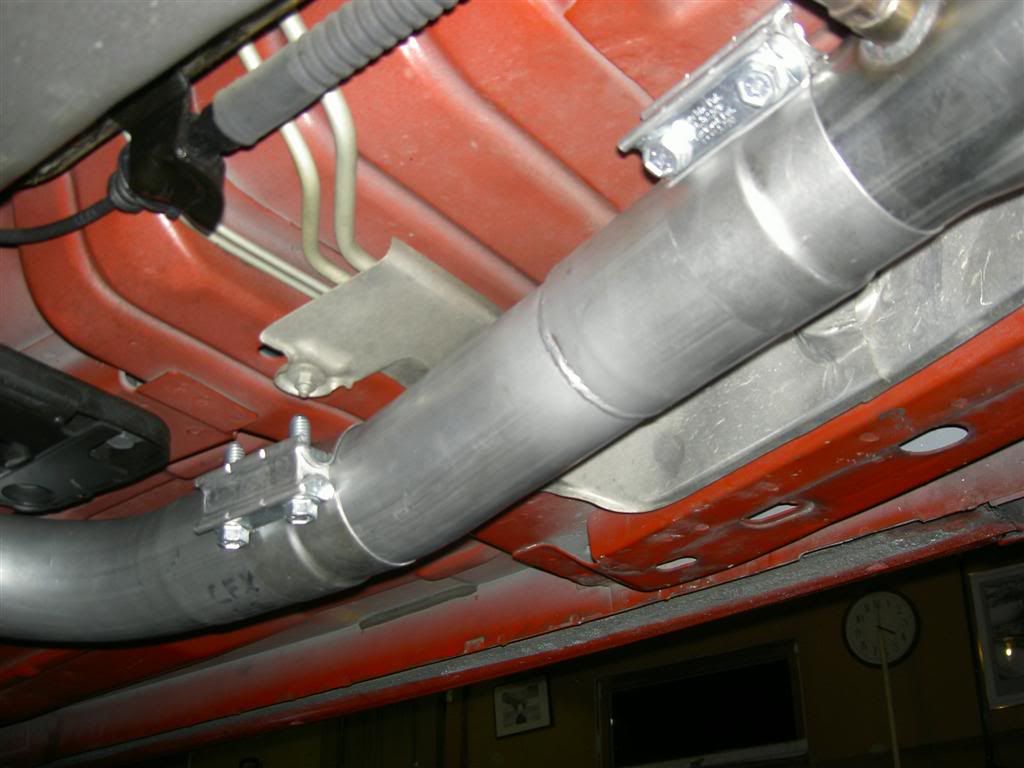
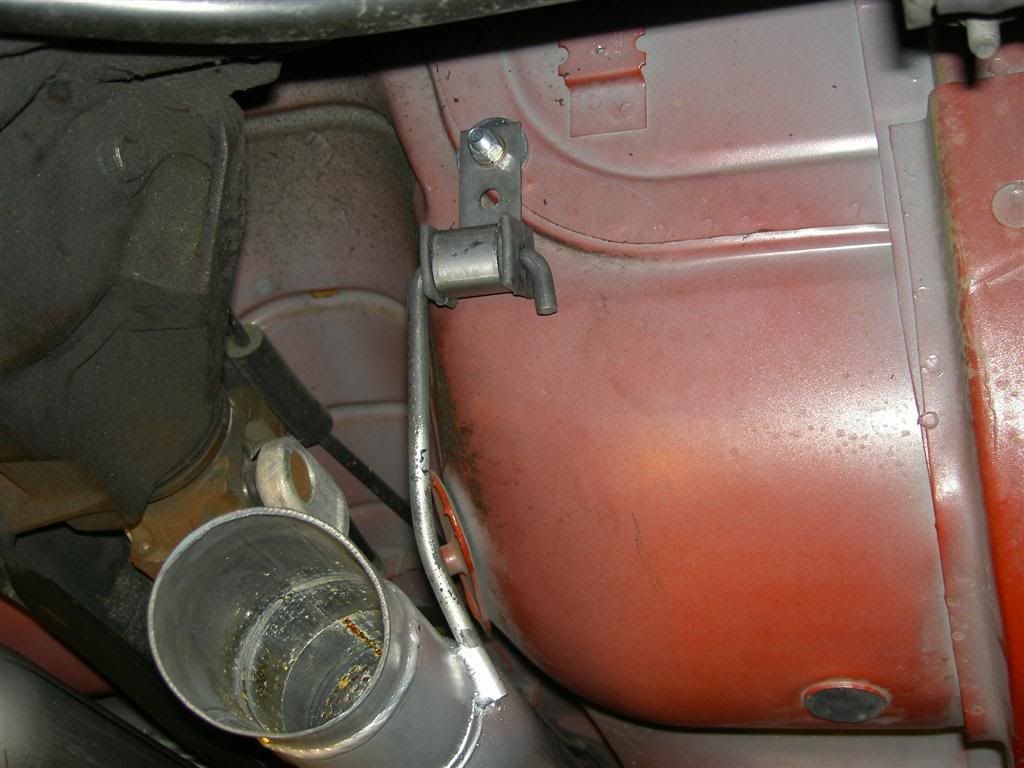
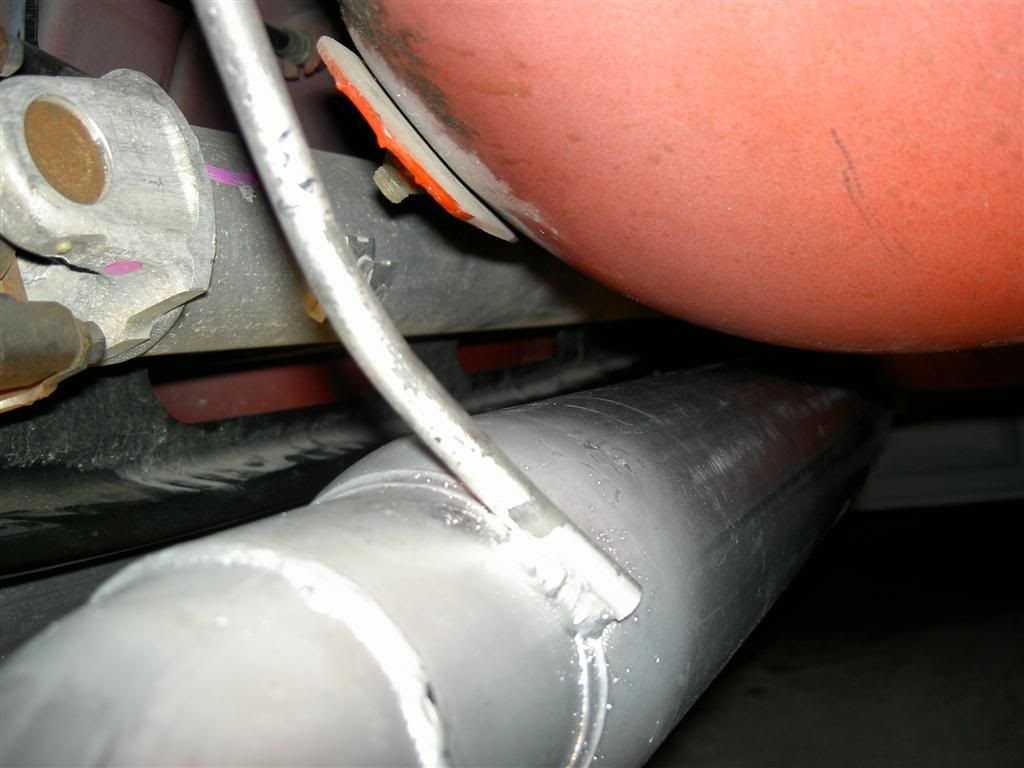
You may want to flip your fuel lines on the drivers side at this point. They are held in place by two routing brackets that are just screwed into the body.
I completely removed the brackets from the lines, flipped them over, put the lines back in and re-tightened them down.
It was tough to get them above the screwing point but with a little more muscle than felt comfortable they went into place.
It will feel like they REALLY don't want to go above those two points, but they will if you push em, just don't go all HULK SMASH! and you should be ok.

*added breaks between pictures
This assumes you have completely removed the stock exhaust and all the parts that held it there.
I had my car jacked up on concrete blocks. Again, some dispute the safety of this, and you can use your own judgement, but it worked for me.
With it this way, I had the car off the ground @ 12" at the front wheels, and 8" at the back wheels.
On blocks like this, I was able to have the room I needed and have the rear loaded so I could tuck the pipes up as far as possible.
Before slipping any parts on. I marked on the male end of the pipe, how far approx it is supposed to insert into the female end if it were inserted fully.
I used that as a guide to tell me how much muscling i needed to do to get it to fit as it was intended.
I started putting the pieces on from the headers back to the X.
The drivers side was simple to slide on and meneuver. It is 2 lengths of pipe before the X so it can be twisted and moved more to adjust for clearance.
The passenger side is one piece before the X so it gives you less ability to adjust. Fortunately clearance isn't so much an issue on this side.
I twisted and muscled the passanger side as far as I could get it to full insertion to get the kit to fit right.
I just kept twisting and pushing toward the header to inch it closer and closer to full insert.
I think I was still at least 2" from fully inserted when had it all said and done, but there was plenty of pipe in there so I'm not worried about leaks on that side.
The driver side however did not fit as neatly as the pass.
To get the X to insert into both sides, I slid the pass side into the X first and then the driver side in.
I had to go with maybe 2" of inserted pipe in the L2 section of pipe, and a little less than full insertion in L1.
This could be because this kit is not designed to be used on QTP headers, regardless, there is plenty of length inserted and I don't fear it to be a problem.
You may want to flip your fuel lines on the drivers side at this point. They are held in place by two routing brackets that are just screwed into the body.
I completely removed the brackets from the lines, flipped them over, put the lines back in and re-tightened them down.
It was tough to get them above the screwing point but with a little more muscle than felt comfortable they went into place.
It will feel like they REALLY don't want to go above those two points, but they will if you push em, just don't go all HULK SMASH! and you should be ok.
*added breaks between pictures
Last edited by DirtyJohn; 06-05-2006 at 08:32 PM.
11-07-2005, 10:59 PM
#4
12 Second Club
Thread Starter
iTrader: (8)
Join Date: Jul 2004
Location: Vancouver, BC
Posts: 708
Likes: 0
Received 0 Likes
on
0 Posts
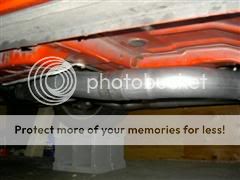
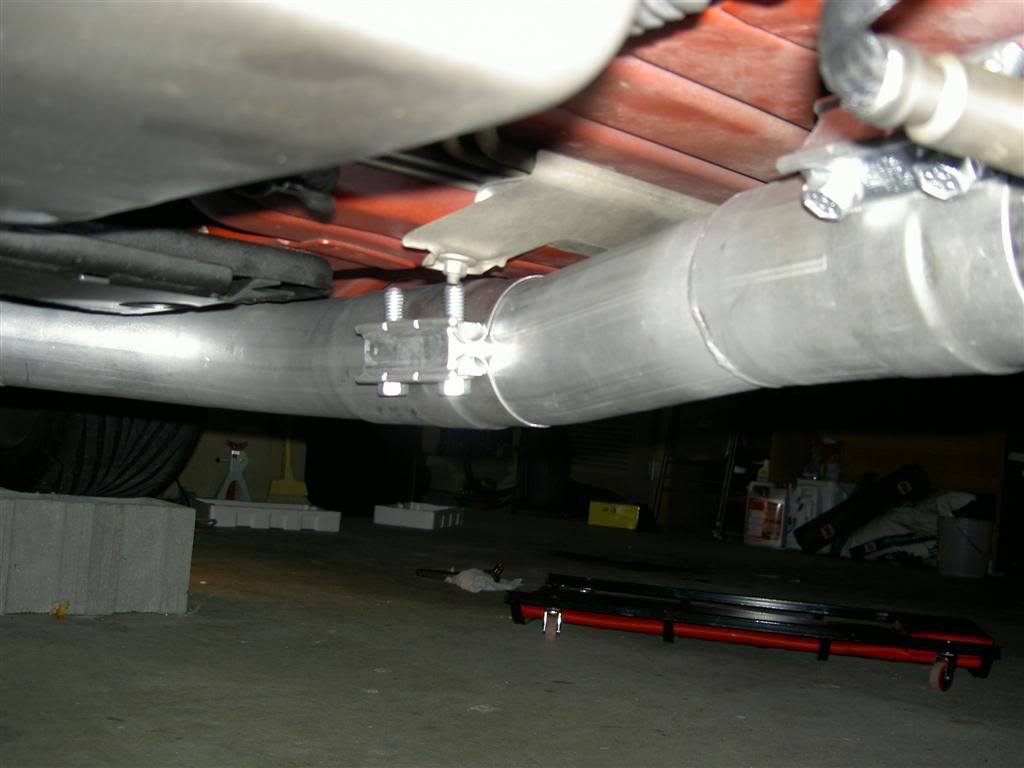
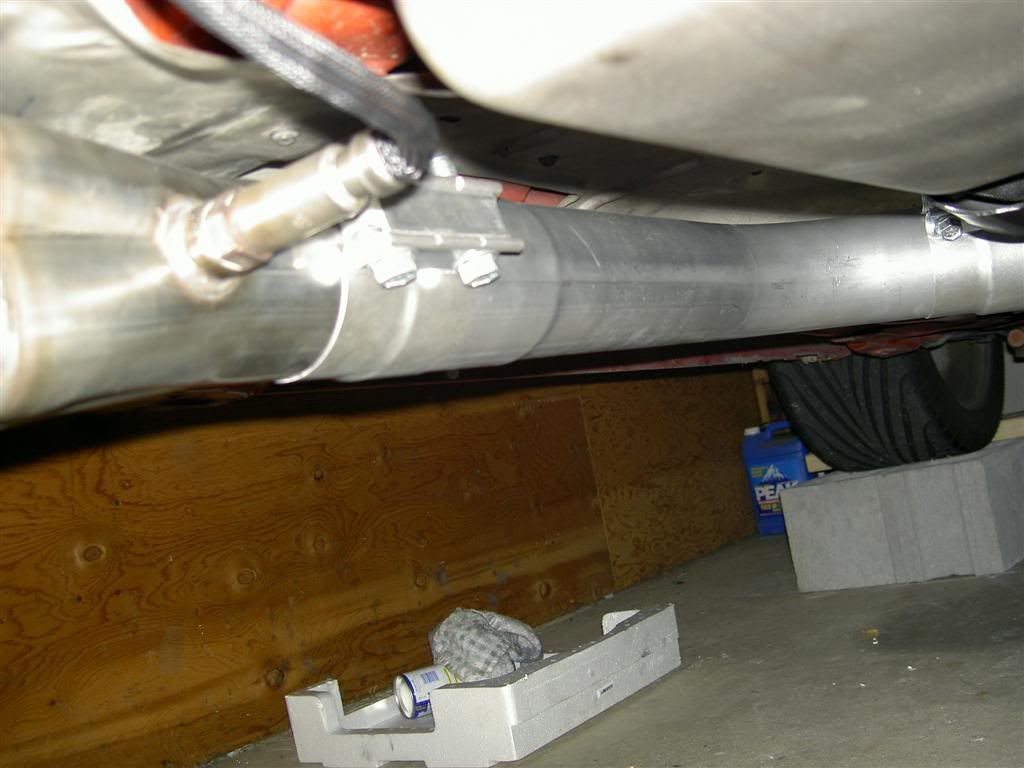
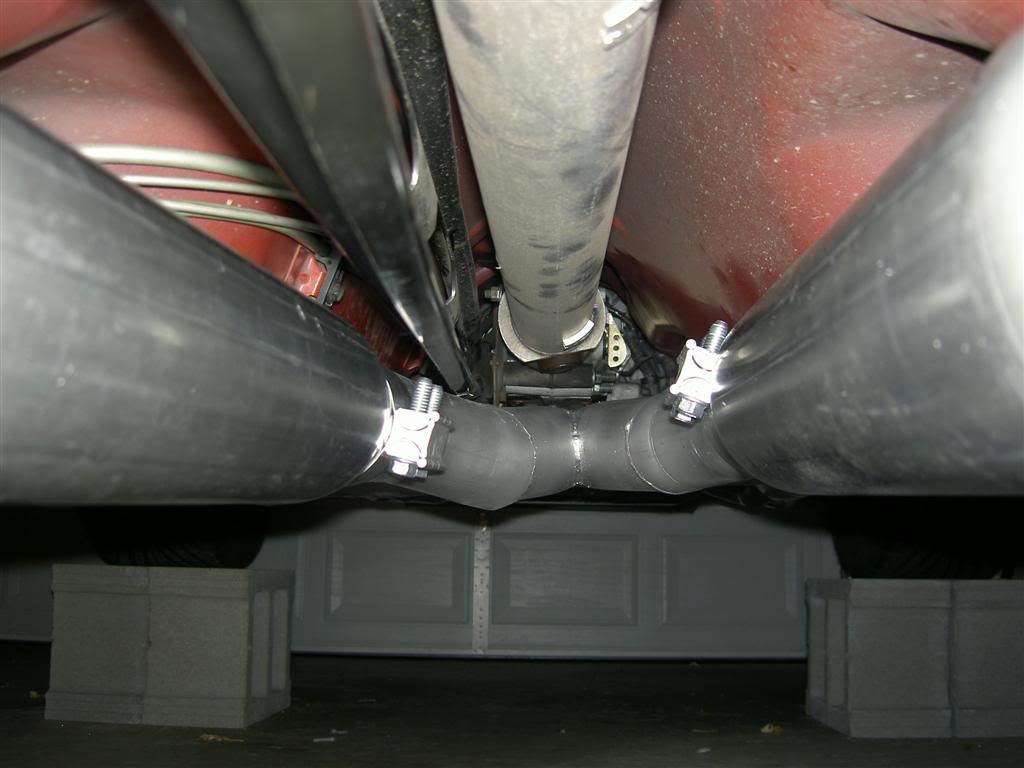
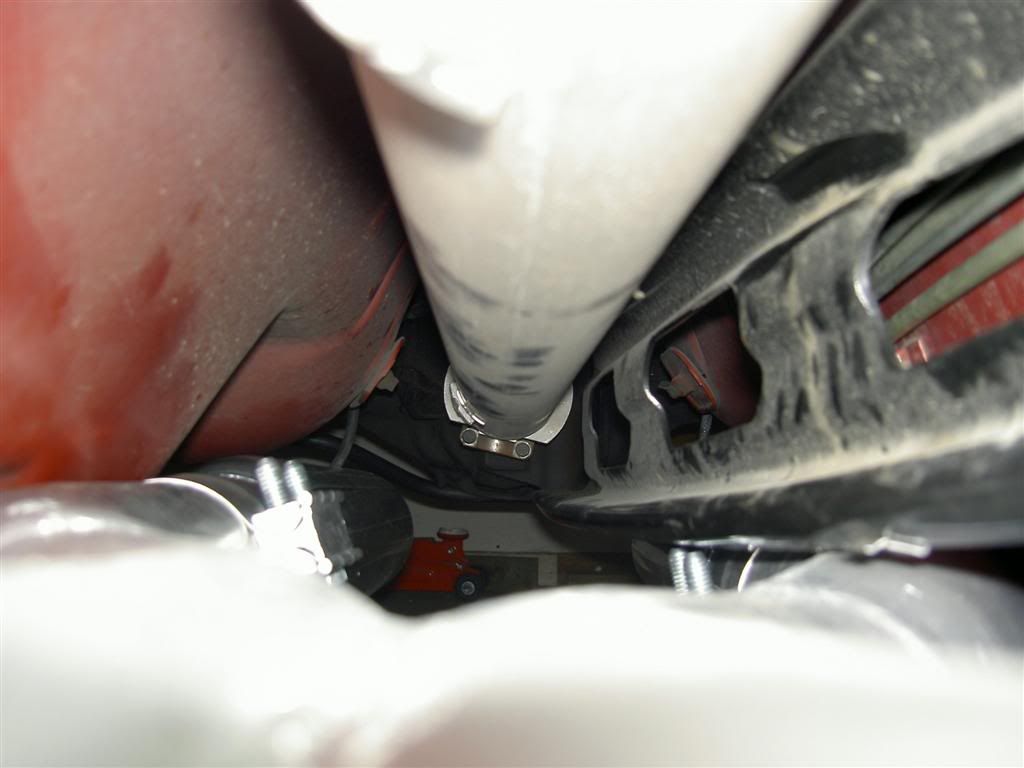
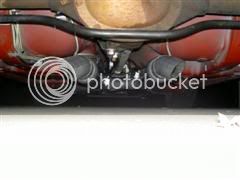
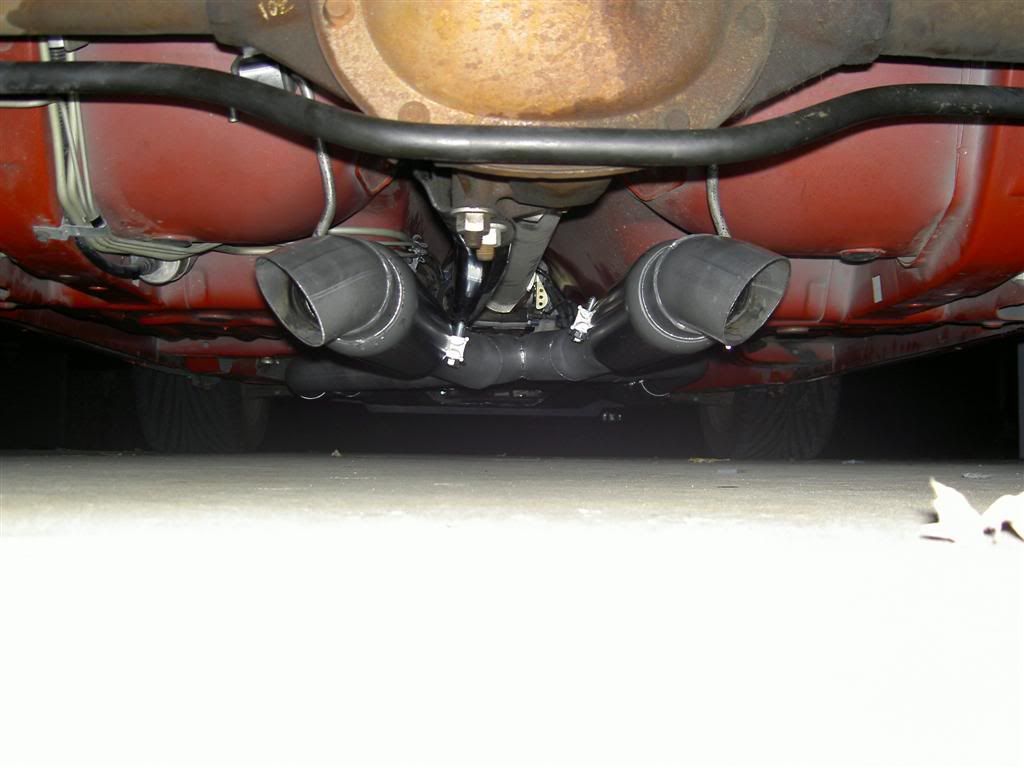
Getting the X in the best position took some trial and error. Basically what I shot for was as much pipe inserted on the pass side as possible.
You'll know your getting close to having it in the right position once the hangers start to get closer and closer to the rear seat wells.
Once the hangers are right up agains the rear seat wells, you will prob have all the pipes inserted in the optimal position.
I say inserted, not necessarily adjusted. They can still be twisted and adjusted to get optimal clearance. That comes next.
At this point, find a way to support the X while you can put the bullets on and mock up the final placement.
I used a smaller jackstand for the job, but having it hang from time to time while you rest from readjustment is nothing I think you have to worry real hard about. Just make sure its propped as often as possible.
Twist and adjust around the X pipe to get the bullets and everything rear of the X as parallel to the DS as your happy with.
Once its straight back and forth, work on the clearance by adjusting the X pipe a bit.
I adjusted the X with and without the mufflers on to get a feel of what all should be where. Both clearing the TA and the DS tunnel.
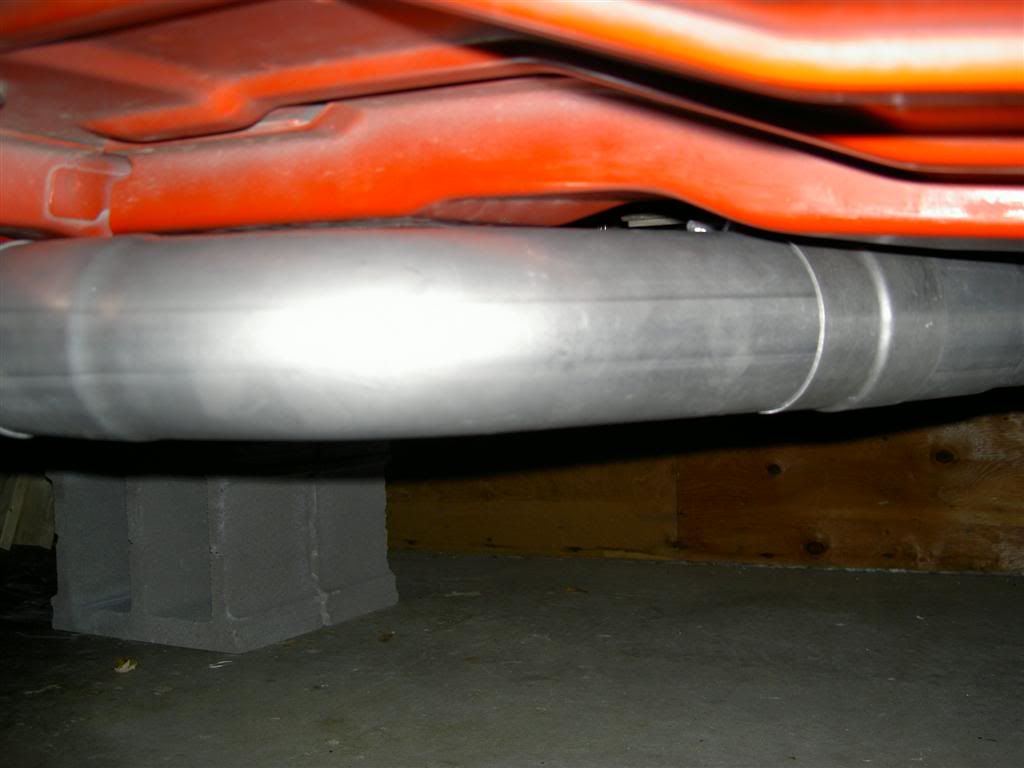
My theory was get everything as close to touching as possible and then give it just a little more room.
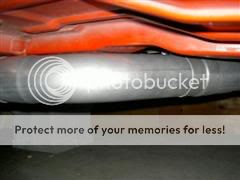
There are two places my X is close to the TA on my install, the spot nearer the front prob has about a small fingers width betw the X and TA.
The next place further toward the rear has very VERY little room, maybe a millimeter.
I know, this is prob going to rub but this is the spot that was most affected by pushing the bullets up in the rear.
I chose to push them up pretty high, mostly because I had the holes drilled already (not recommended yet) and wanted as much clearance as possible.
Clamp you job up initially, don't torque them down as tight as possible yet as there could be more adjustment, just enough to hold them in place.
Once I had them mocked to what I thought would be optimal adjustment and positioning by muscling them up, I marked my drill holes.
NOTE: DONT MARK YOUR DRILL HOLES YET!!! THIS WAS A MISTAKE. In retrospect, I would suggest, that you get a jack, and jack up the mufflers into position, by using a 2x4x24" or so board on the jack plate, perpendicular to the DS TA etc.. to push them up as far as possible.
This way there won't be any error on either side because you have a tired arm or shoulder etc.. and you will be able to mark your hole drill points with a free hand.
*added breaks between pictures
You'll know your getting close to having it in the right position once the hangers start to get closer and closer to the rear seat wells.
Once the hangers are right up agains the rear seat wells, you will prob have all the pipes inserted in the optimal position.
I say inserted, not necessarily adjusted. They can still be twisted and adjusted to get optimal clearance. That comes next.
At this point, find a way to support the X while you can put the bullets on and mock up the final placement.
I used a smaller jackstand for the job, but having it hang from time to time while you rest from readjustment is nothing I think you have to worry real hard about. Just make sure its propped as often as possible.
Twist and adjust around the X pipe to get the bullets and everything rear of the X as parallel to the DS as your happy with.
Once its straight back and forth, work on the clearance by adjusting the X pipe a bit.

I adjusted the X with and without the mufflers on to get a feel of what all should be where. Both clearing the TA and the DS tunnel.
My theory was get everything as close to touching as possible and then give it just a little more room.
There are two places my X is close to the TA on my install, the spot nearer the front prob has about a small fingers width betw the X and TA.
The next place further toward the rear has very VERY little room, maybe a millimeter.
I know, this is prob going to rub but this is the spot that was most affected by pushing the bullets up in the rear.
I chose to push them up pretty high, mostly because I had the holes drilled already (not recommended yet) and wanted as much clearance as possible.
Clamp you job up initially, don't torque them down as tight as possible yet as there could be more adjustment, just enough to hold them in place.
Once I had them mocked to what I thought would be optimal adjustment and positioning by muscling them up, I marked my drill holes.
NOTE: DONT MARK YOUR DRILL HOLES YET!!! THIS WAS A MISTAKE. In retrospect, I would suggest, that you get a jack, and jack up the mufflers into position, by using a 2x4x24" or so board on the jack plate, perpendicular to the DS TA etc.. to push them up as far as possible.
This way there won't be any error on either side because you have a tired arm or shoulder etc.. and you will be able to mark your hole drill points with a free hand.
*added breaks between pictures
Last edited by DirtyJohn; 06-05-2006 at 08:32 PM.
11-07-2005, 11:00 PM
#5
12 Second Club
Thread Starter
iTrader: (8)
Join Date: Jul 2004
Location: Vancouver, BC
Posts: 708
Likes: 0
Received 0 Likes
on
0 Posts
MY ONE COMMENT/SUGGESTION ON THE TSP DUAL SYSTEM
As mentioned above, The turndowns are welded in plaece at directly out the back and not angled in any fashion out or in.
I wanted to have them angled out 45deg towards the wheels which required bending the hanger bars.
You may or may not want to do this.
If this is the case your going to have to do some eyeballing and adjusting to get the hanger placement just right before you drill.
My nieghbor helped me with this, (after I tried blow torching and hammering etc...yes dumb I know) he had a large table vice. a breaker bar and a monkey wrench. It took some adjustment and readjustment of the hangers but i got it in the right position.
I would have liked to have seen this a little easier to adjust. As it was without the help of my neighbor, I would have been stuck with them straight out the back.
If I could make a recommendation, it would be to provide an option for the buyer to angle the turndows how they choose.
I don't know if this is possible, or desireable from a manufacturer perspective, could also be why I don't make exhaust kits, but it would be a nice feature.
At this point you MAY want to remove your rear seats.
Originally Posted by TheBlurLS1
You don't have to take the rear seats out. You can pop the hatch, remove the sailpanels/speakers. Then you can fold down the rear seat and pull the carpet up from the back. Pull it toward the front of the car. You will be able to get your FENDER washers/nuts and wrenches down there.
When you get done, just stuff the carpet back under the side panels, replace the sail panels and shut the hatch.
When you get done, just stuff the carpet back under the side panels, replace the sail panels and shut the hatch.
There's one bolt at the foot of each seat. Remove it and they pull right out. (I didn't know this and damn near tore out my pass side one, oops)
The rear seatback is removeable after you remove the two bolts on either side near the pivot point. Remove these, give the seatbelts some slack and
Slide the seat into the trunk area.
Once you have your drill holes marked, go ahead and drill.
The way I did this was prob due to me having a crappy low RPM drill. I had a bad angle and couldn't get any leverage.
What i did was drill a small hole directly in the middle of my mark. From there, I got all McGuyver and poked from the outside in through the carpet with something long and sharp, this gave me the spot to cut an X hole in the carpet to get some a drillng angle and the bolt I was putting in.
I cut the carpet maybe 1.5" X and moved away all the carpet padding to get at my small drill hole from the inside.
From there I drilled OUT with a 3/8 drill bit.
NOTE, make sure to get all that hairy padding out of the way of the drill bit, if it gets caught you get a big tangled mess.... DOH!
If you have a good drill it may not be that difficult for you. I had a hard time getting my crappy Black and Decker drill perpendicular to the seat well for a good drill. I was slipping all over the place, if you have a shorter bit, or a shorter type drill that may be what you want to use. Mind the carpet and padding if drilling all the way from the outside in.
For the bolts I used a 1 1/4 long 3/8" Hex head bolt from Home Depot and matching nut. I also got some locking washers for each side, along with some large metal washers and small rubber washers to maybe help with vibrations. I'd prefer some thicker rubber washers, and may go back and put some in, but for now these will do.
I put the bolt in from the inside out and tightened the nut from the outside.
If you can get someone to hold the bolts on the inside, slip your mufflers on and hang them up. Tighten down your hanging bolts and your almost done.

At this point, if your satisfied with how everything fit and is lined up, go ahead and tighten up your clamps.
I have no idea how tight you need to clamp the band clamps. I used a pretty large 1/2 ratchet and got some good leverage.
I've heard people use breaker bars and torque the bajeebus out of them. I was hesitant to go apeshit tightening the clamps on the headers but they got it just as good as the rest.
Lower that bad boy back onto the ground and check your job.
Start it up and listen for leaks. Take it for a spin and listen for banging and whatnot.
*added breaks between pictures
Last edited by DirtyJohn; 06-06-2006 at 08:11 AM.
11-07-2005, 11:01 PM
#6
12 Second Club
Thread Starter
iTrader: (8)
Join Date: Jul 2004
Location: Vancouver, BC
Posts: 708
Likes: 0
Received 0 Likes
on
0 Posts
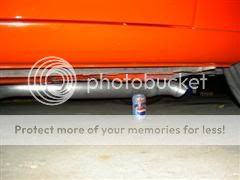
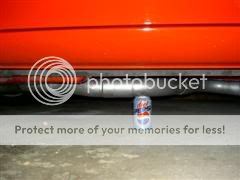
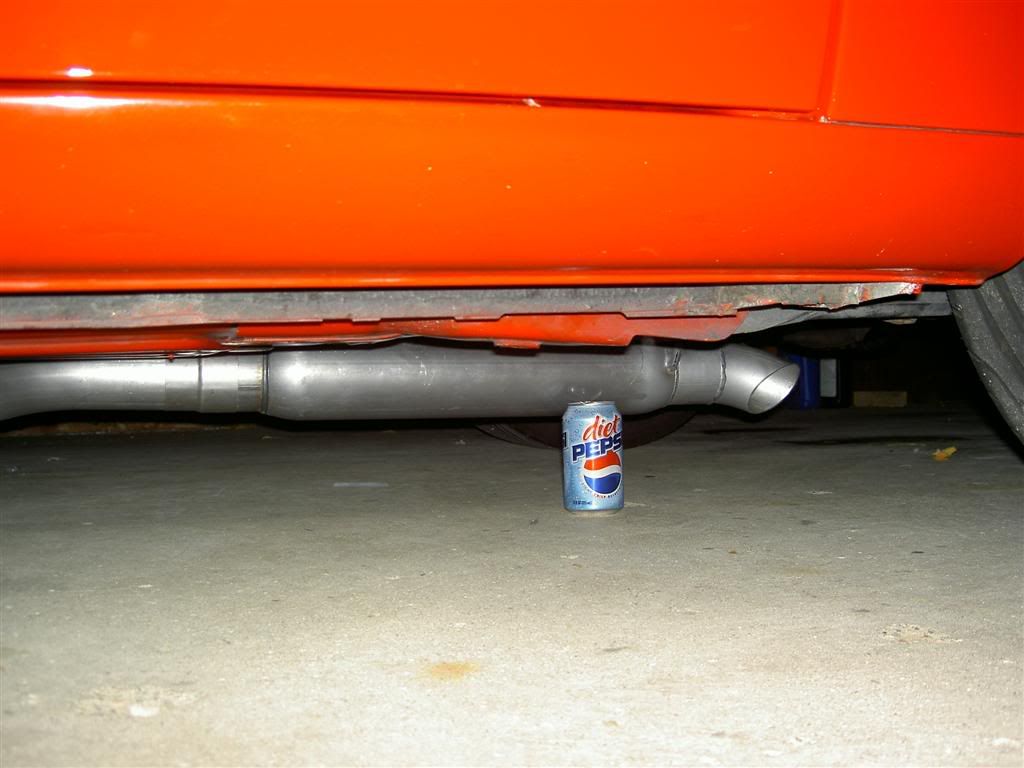
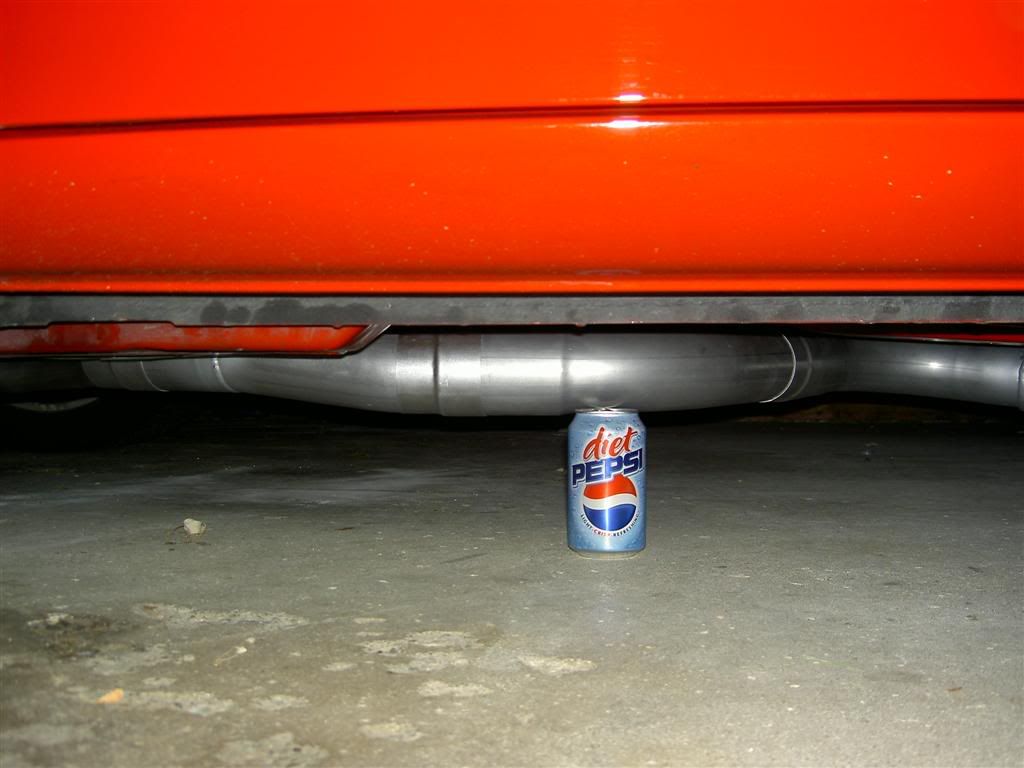
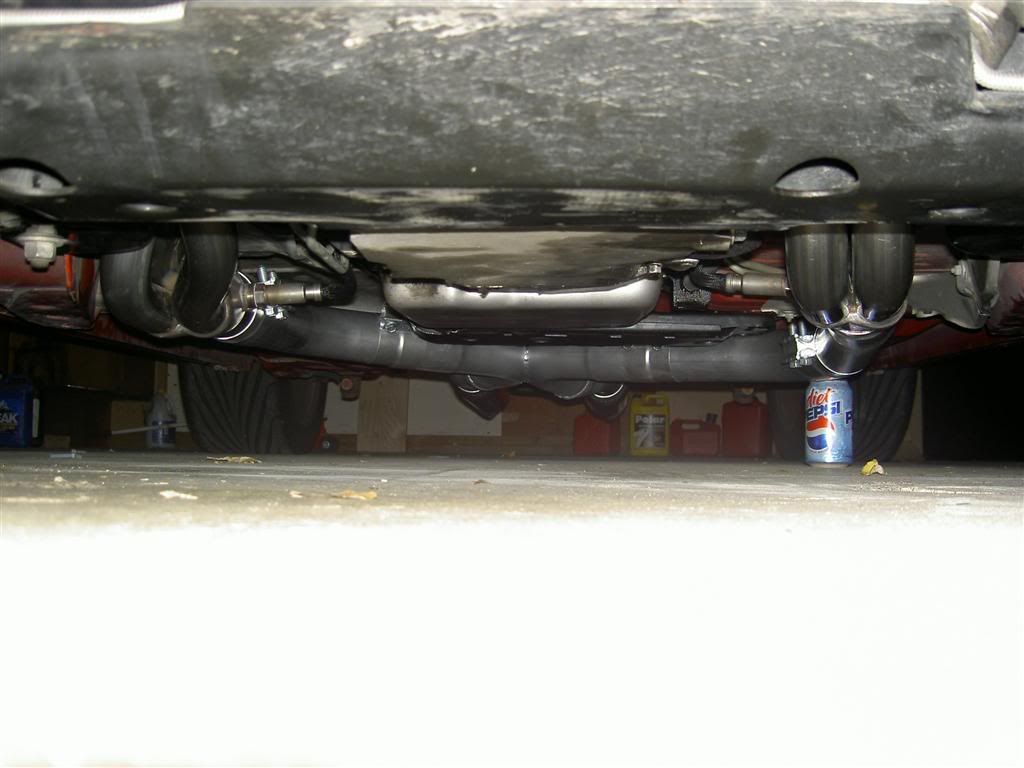
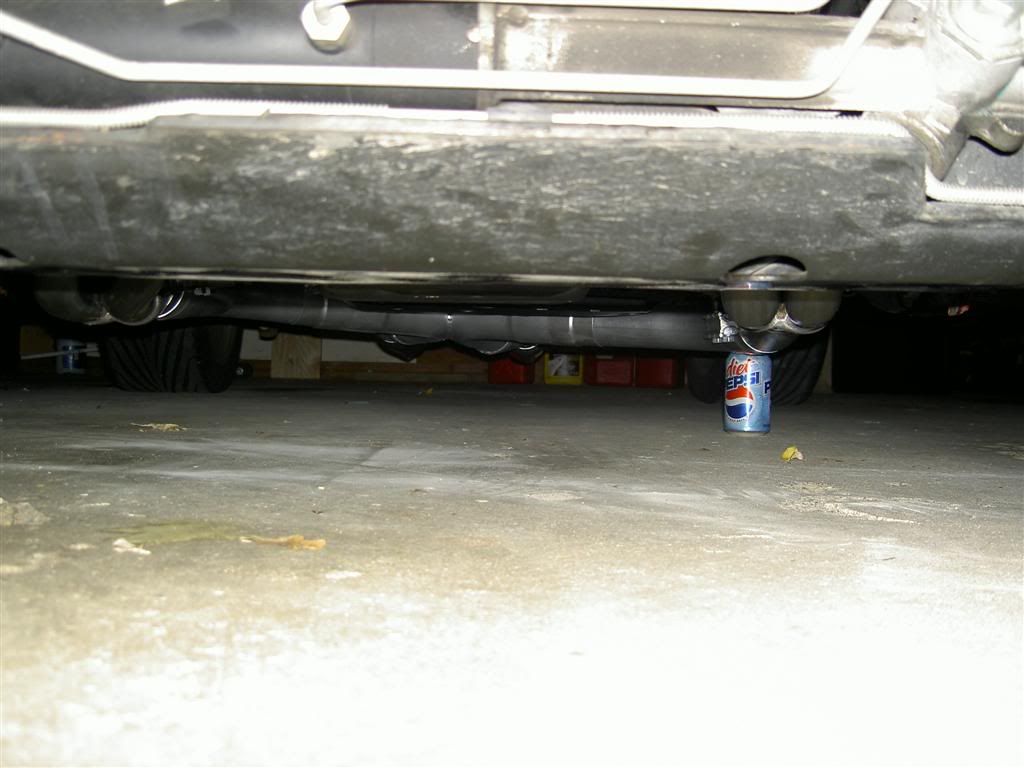
Give yourself the popcan test, take pics and post them on the interweb..
Pat youself on the back cause you just saved yourself about $1000 in labor. (At least I did with headers and exhaust)


Disclaimer:
I am a huge n00b. This was the first time I have done any kindof work on a vehicle in this manner so take this review with that large grain of salt.
If it turns out it looks like I did a decent job, than that should indeed be a testament to the quality of product reviewed here.
If it looks like I screwed up, please reply and let me know, anyone who reads it definately should know, and I would like to know so I can try and fix it.
As it stands now I have no banging, misfires or exhaust leaks that I know of. I also only have 100 miles on the car since the install so you be the judge.
Take this review for what it is, one guys review and tips on his personal experience, nothing more.
I was just happy with my experience both with the work and with the products so I figured I'd share.
I hope you enjoyed it.
DJ
Last edited by DirtyJohn; 06-05-2006 at 08:33 PM.
Trending Topics
11-07-2005, 11:15 PM
#9
TECH Addict
iTrader: (28)
Join Date: Sep 2002
Location: Central Texas
Posts: 2,170
Likes: 0
Received 0 Likes
on
0 Posts
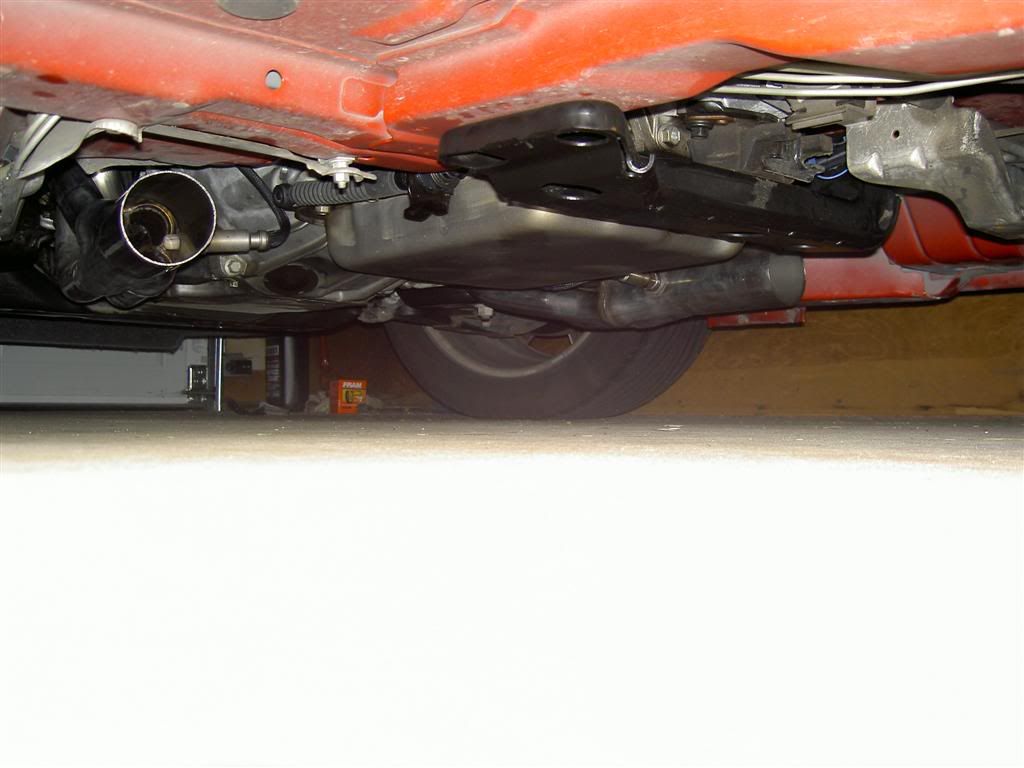
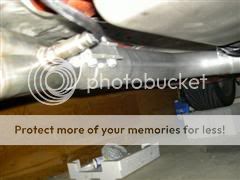
Looks like a very clean install, and you've got great clearance compared to what I had with this set-up. For it being your first time doing something like this, you did a pretty good job. Props to you.

 11-07-2005, 11:37 PM
#12
Your car sits up high as hell to have that much clearance with that system. The driver pipe coming off the header is what Im talking about. Almost a whole can clearance and thats with the pipe dropping down off the header to clear the rib on the floorpan.
Good write up. How much was the system to your door?
Good write up. How much was the system to your door?
11-07-2005, 11:58 PM
#13
12 Second Club
Thread Starter
iTrader: (8)
Join Date: Jul 2004
Location: Vancouver, BC
Posts: 708
Likes: 0
Received 0 Likes
on
0 Posts
Originally Posted by MattIROC
Can you post a sound clip of how it sounds? Looks good. Nice writeup, very detailed!
I however have some high standards of the quality of multimedia I post...
so if/when i do it, I want good recording equipment.
As of right now I don't have said equipment
 As soon as I do though...ITS ON LIKE DONKEY KONG !!!!
(that actually may be soon, depending on $$$)
Originally Posted by Full-force
Good write up. How much was the system to your door?
That kit was on my door in 5 days for $420. Contact them for current prices.
Good stuff, thanks TSP.
11-08-2005, 12:33 AM
#14
Launching!
iTrader: (5)
Join Date: Apr 2004
Location: Tucson, AZ
Posts: 227
Likes: 0
Received 0 Likes
on
0 Posts
Awesome pics and writeup man.
Couple questions for you:
-How has the polishing withstood a few heat cycles so far? My 1 3/4" QTPs just came in as well, and I wanted to do a little bit of polishing to make them look better, but i've heard that it doesn't last long due to the heat.
-How did you clean up the inside of the headers? I noticed the inside of the primaries on mine were pretty dirty with gunk and metal shavings.
-Chris
11-08-2005, 07:52 AM
#17
TECH Senior Member
iTrader: (15)

Join Date: Nov 2001
Location: Grand Prairie, TX
Posts: 5,109
Likes: 0
Received 0 Likes
on
0 Posts
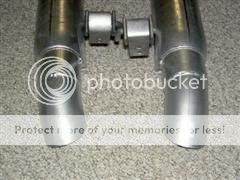
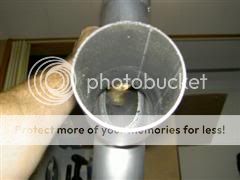
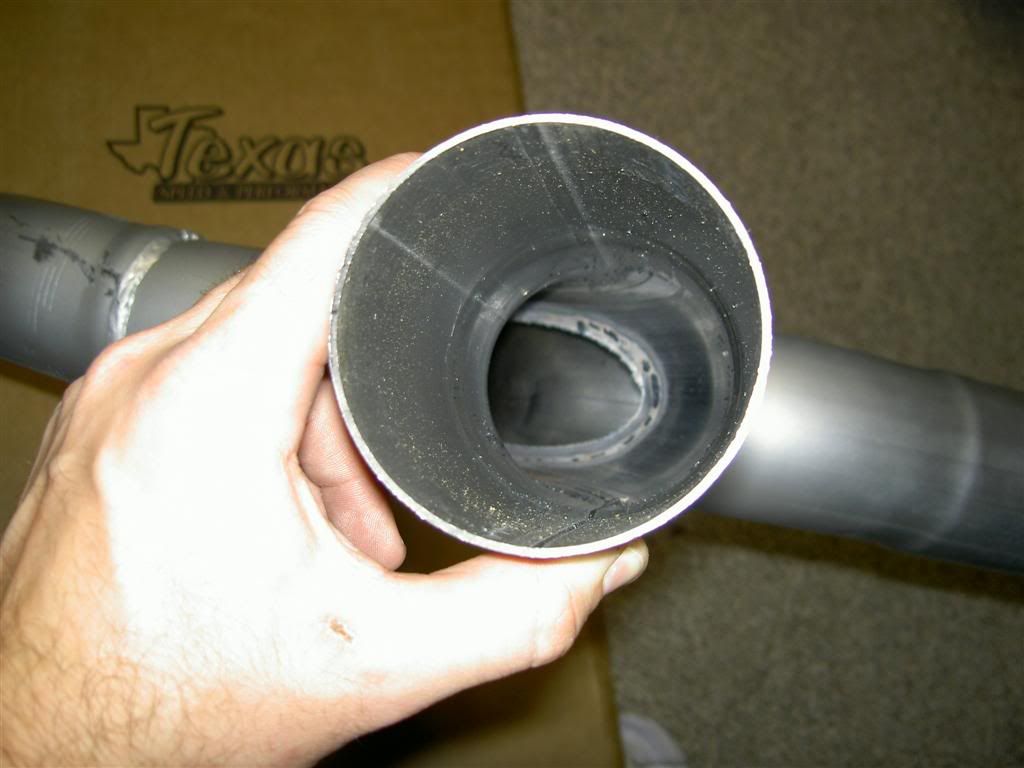
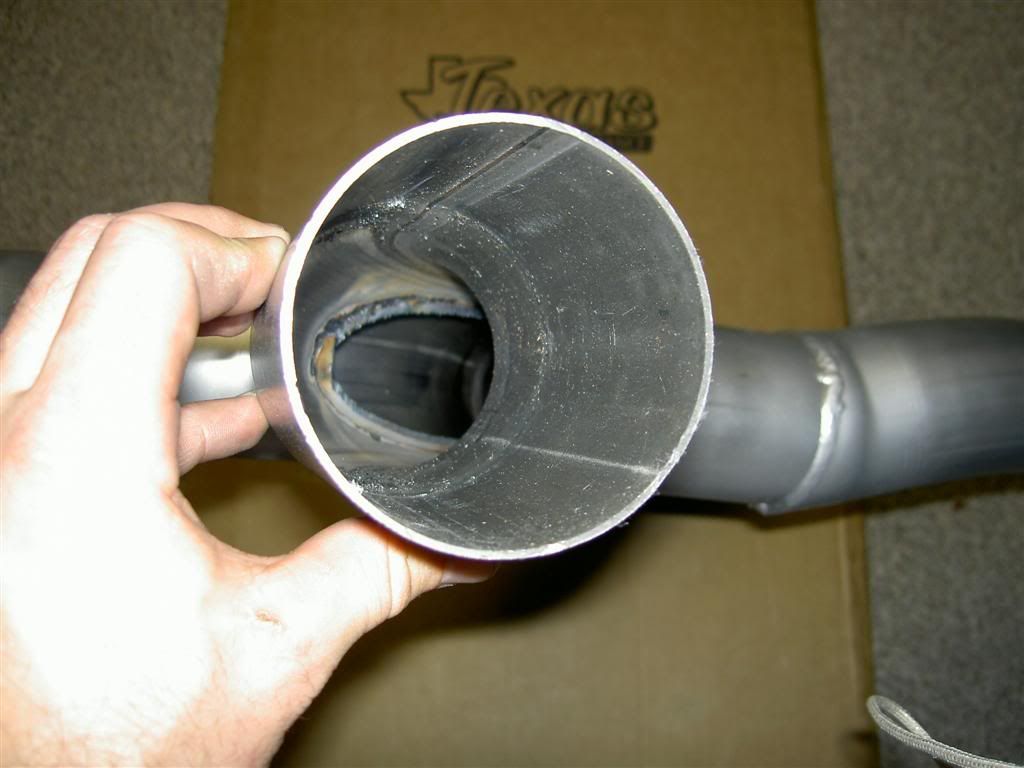
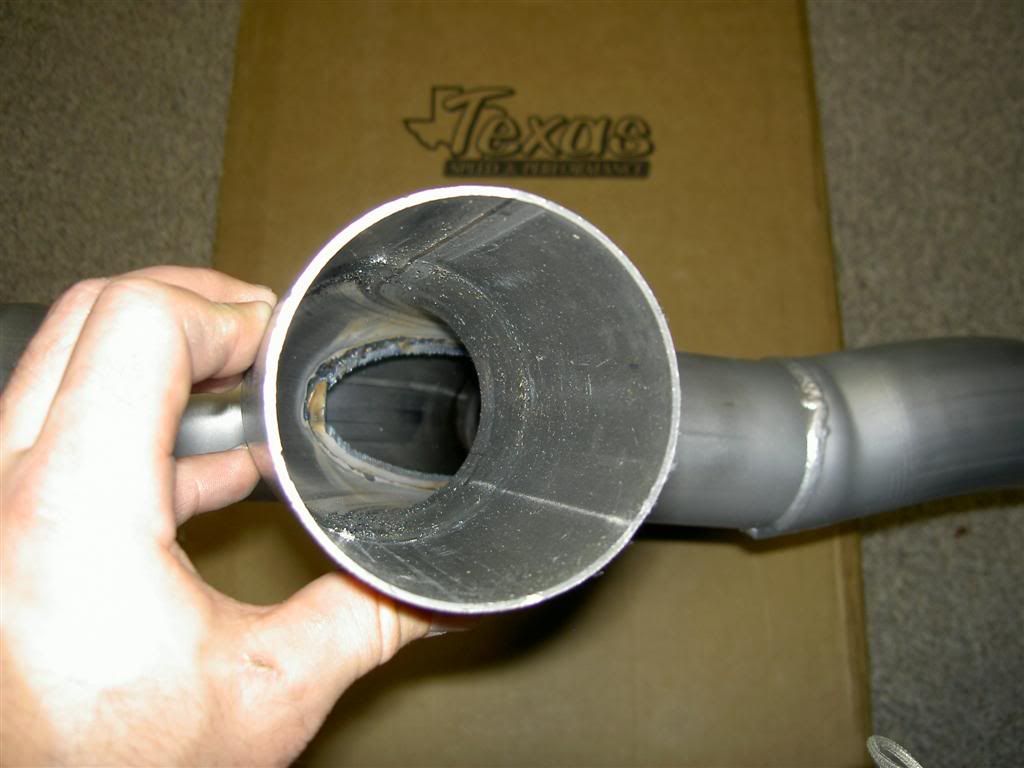
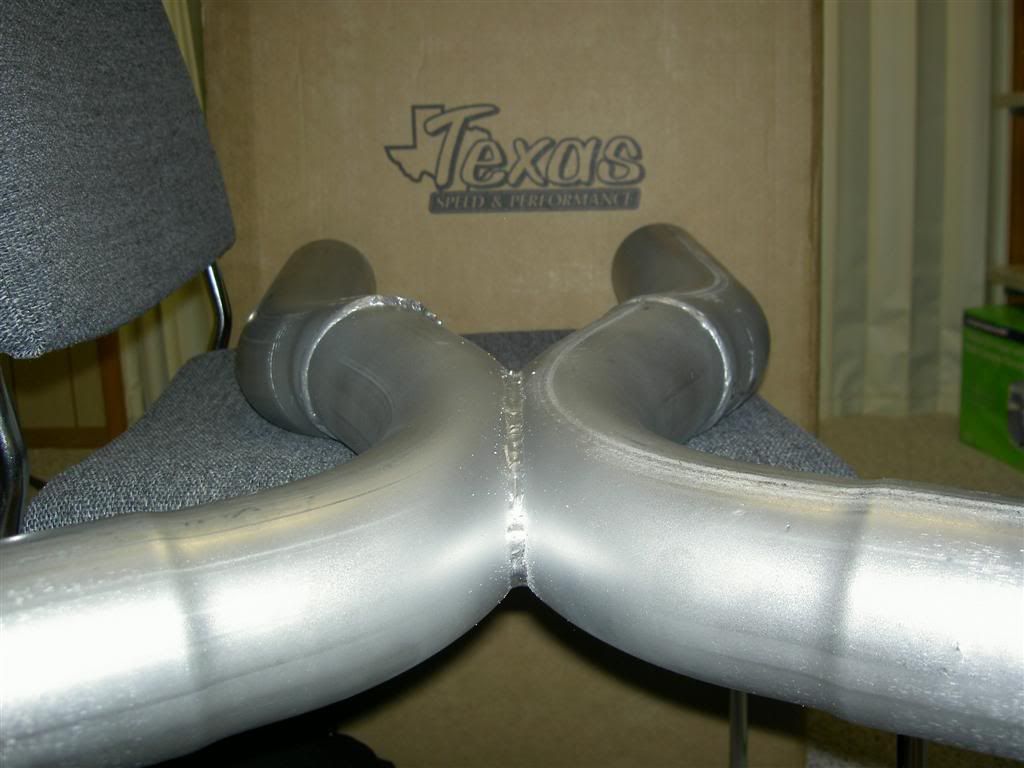
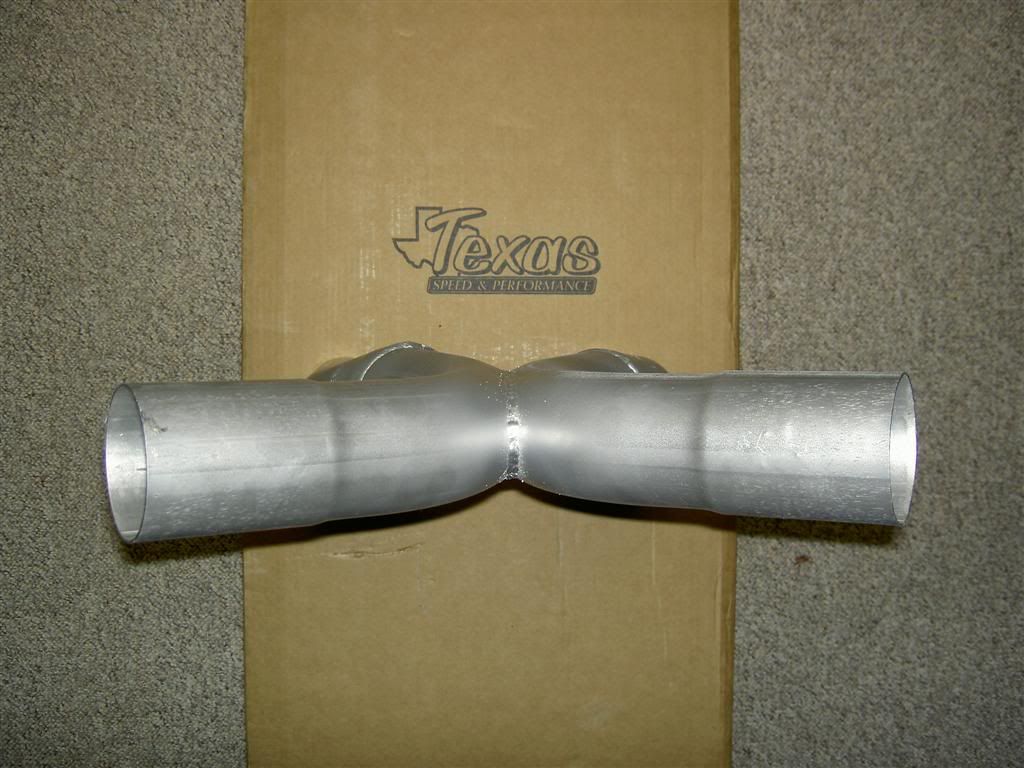
Make your pics of the inside of the X a little larger there bud....No sense in shrinking them to cover up the overlapping pipes inside that arent a smooth transition. Unshrink them and repost em.
Mike
Here's a picture of the inside of an X pipe I found and saved. Inside of a DR Gas unit to use as a comparison
http://i30.photobucket.com/albums/c3...k/HPIM0187.jpg
Unshrink them and repost em.Mike
Originally Posted by DirtyJohn
########### Texas Speed Inc 3" True Dual Exhaust W/18" Dynomax Bullets ###########
I was VERY happy with my entire experience with this kit.
Purchasing from TSP was as professional and convenient as anything ive purchased on the internet.
TSP got my order placed and shipped within 5 days from order to my door. That's pretty good in my book. Thanks Jon!
The product and packaging were much better than I was expecting after the headers.
I wasn't expecting them to be packaged as carefully as they were. All the ends were bubble wrapped and the entire kit was drowned in styro peanuts.
I could tell that they took care in getting it to me in good shape.
I also wasn't expecting to get the good 3" band clamps in the kit. That was an AWESOME suprise, I was expecting I would have to go out and get those on my own, and at ~$10 a piece, that was another $70 or so I had planned on spending.
Below are pics of the product out of the box. I'll leave the determination on quality up to the reader.
I however was EXTREMELY satisfied. Good paint over welded spots, and the welds looked strong and complete. (I know nothing about welding )
(p.s. yes I know in some pics the X is upside down, I had to learn that later on.)
I DID do some cleaning of the cut ends on the pipes, there were some burrs and such that I didn't want interfering with the pipes slipping over each other.
I also cleaned some of the dust and metal chunks, no big deal, just a quick once over with a tire brush.
Again I didn't expect TSP to have done the cleaning. As the buyer, I was fine with taking those extra steps.
I was VERY happy with my entire experience with this kit.
Purchasing from TSP was as professional and convenient as anything ive purchased on the internet.
TSP got my order placed and shipped within 5 days from order to my door. That's pretty good in my book. Thanks Jon!
The product and packaging were much better than I was expecting after the headers.
I wasn't expecting them to be packaged as carefully as they were. All the ends were bubble wrapped and the entire kit was drowned in styro peanuts.
I could tell that they took care in getting it to me in good shape.
I also wasn't expecting to get the good 3" band clamps in the kit. That was an AWESOME suprise, I was expecting I would have to go out and get those on my own, and at ~$10 a piece, that was another $70 or so I had planned on spending.
Below are pics of the product out of the box. I'll leave the determination on quality up to the reader.
I however was EXTREMELY satisfied. Good paint over welded spots, and the welds looked strong and complete. (I know nothing about welding
)(p.s. yes I know in some pics the X is upside down, I had to learn that later on.)
I DID do some cleaning of the cut ends on the pipes, there were some burrs and such that I didn't want interfering with the pipes slipping over each other.
I also cleaned some of the dust and metal chunks, no big deal, just a quick once over with a tire brush.
Again I didn't expect TSP to have done the cleaning. As the buyer, I was fine with taking those extra steps.
http://i30.photobucket.com/albums/c3...k/HPIM0187.jpg
Last edited by V6 Bird; 01-23-2006 at 07:27 AM.
11-08-2005, 07:55 AM
#18
TECH Senior Member
iTrader: (15)
Join Date: Nov 2001
Location: Grand Prairie, TX
Posts: 5,109
Likes: 0
Received 0 Likes
on
0 Posts
Thats shitty you had to clean out your pipes...Im talking about the left over metal that was not cut cleanly on each cut too...
Borla, Magnaflow, Flowmaster, etc. they dont leave you with that kind of crap in there. That sucks man.
Mike
*reposted pictures removed
Borla, Magnaflow, Flowmaster, etc. they dont leave you with that kind of crap in there. That sucks man.
Mike
Originally Posted by DirtyJohn
########### Texas Speed Inc 3" True Dual Exhaust W/18" Dynomax Bullets ###########
I was VERY happy with my entire experience with this kit.
Purchasing from TSP was as professional and convenient as anything ive purchased on the internet.
TSP got my order placed and shipped within 5 days from order to my door. That's pretty good in my book. Thanks Jon!
The product and packaging were much better than I was expecting after the headers.
I wasn't expecting them to be packaged as carefully as they were. All the ends were bubble wrapped and the entire kit was drowned in styro peanuts.
I could tell that they took care in getting it to me in good shape.
I also wasn't expecting to get the good 3" band clamps in the kit. That was an AWESOME suprise, I was expecting I would have to go out and get those on my own, and at ~$10 a piece, that was another $70 or so I had planned on spending.
Below are pics of the product out of the box. I'll leave the determination on quality up to the reader.
I however was EXTREMELY satisfied. Good paint over welded spots, and the welds looked strong and complete. (I know nothing about welding )
(p.s. yes I know in some pics the X is upside down, I had to learn that later on.)
I DID do some cleaning of the cut ends on the pipes, there were some burrs and such that I didn't want interfering with the pipes slipping over each other.
I also cleaned some of the dust and metal chunks, no big deal, just a quick once over with a tire brush.
Again I didn't expect TSP to have done the cleaning. As the buyer, I was fine with taking those extra steps.
I was VERY happy with my entire experience with this kit.
Purchasing from TSP was as professional and convenient as anything ive purchased on the internet.
TSP got my order placed and shipped within 5 days from order to my door. That's pretty good in my book. Thanks Jon!
The product and packaging were much better than I was expecting after the headers.
I wasn't expecting them to be packaged as carefully as they were. All the ends were bubble wrapped and the entire kit was drowned in styro peanuts.
I could tell that they took care in getting it to me in good shape.
I also wasn't expecting to get the good 3" band clamps in the kit. That was an AWESOME suprise, I was expecting I would have to go out and get those on my own, and at ~$10 a piece, that was another $70 or so I had planned on spending.
Below are pics of the product out of the box. I'll leave the determination on quality up to the reader.
I however was EXTREMELY satisfied. Good paint over welded spots, and the welds looked strong and complete. (I know nothing about welding
)(p.s. yes I know in some pics the X is upside down, I had to learn that later on.)
I DID do some cleaning of the cut ends on the pipes, there were some burrs and such that I didn't want interfering with the pipes slipping over each other.
I also cleaned some of the dust and metal chunks, no big deal, just a quick once over with a tire brush.
Again I didn't expect TSP to have done the cleaning. As the buyer, I was fine with taking those extra steps.
Last edited by WILWAXU; 12-03-2005 at 12:28 AM.
11-08-2005, 08:03 AM
#19
12 Second Club
Thread Starter
iTrader: (8)
Join Date: Jul 2004
Location: Vancouver, BC
Posts: 708
Likes: 0
Received 0 Likes
on
0 Posts
Originally Posted by V6 Bird
Make your pics of the inside of the X a little larger there bud....No sense in shrinking them to cover up the overlapping pipes inside that arent a smooth transition. Unshrink them and repost em.
Mike
Unshrink them and repost em.Mike
You might want to try clicking on the pics you see there.
They just so happen to be hot links to full sized 1024x768 pics.
Yeah, in case anyone else doesn't know.
EVERY pic in this review you see now, is a hotlink to a higher rez pic.
I didn't want to bog down my hosting provider every time this thread was viewed so I gave you the option of picking what you wanted to see.
V6 Bird, you lose at the internet bud

p.s. Thanks to everyone else who commented on the review.
It took me a long time and I did it to give a fair review on a product I was happy with, but gave the pics so you could make the decision for yourself.
11-08-2005, 08:10 AM
#20
12 Second Club
Thread Starter
iTrader: (8)
Join Date: Jul 2004
Location: Vancouver, BC
Posts: 708
Likes: 0
Received 0 Likes
on
0 Posts
Originally Posted by V6 Bird
Thats shitty you had to clean out your pipes...Im talking about the left over metal that was not cut cleanly on each cut too...
Mike
Mike
As I stated in the original review, cleaning the pipes was NO BIG DEAL.
Took me maybe 15 minutes TOPS and gave me the opportunity to make the product and install my own. Like i said originally, prob not necessary but I did it because I enjoyed it.