HUMOUNT and Pioneer 1 din HU's
 01-18-2006, 04:07 PM
#1
Teching In
Thread Starter

Join Date: Dec 2005
Location: Sacramento, CA
Posts: 40
Likes: 0
Received 0 Likes
on
0 Posts
How far would say a Pioneer DEH-P6800MP 1 din unit stick out from a HUMOUNT "flush mount" or any other mounting kit? I don't really want the thing sticking out 1/2" to 1". The web site says flush but just wanted to make sure.
I just had a Pioneer DEH-P77DH installed last night and I failed to read the part about it only taking ONE external source. I bought the IPOD and SIRIUS units and it can only control 1, so it has to go, but it sure fut nice and has plenty of power for my new 4 speakers.
This is for a 2001 Camaro SS
I just had a Pioneer DEH-P77DH installed last night and I failed to read the part about it only taking ONE external source. I bought the IPOD and SIRIUS units and it can only control 1, so it has to go, but it sure fut nice and has plenty of power for my new 4 speakers.
This is for a 2001 Camaro SS
Last edited by illy5603; 01-18-2006 at 04:26 PM.
 01-19-2006, 11:22 AM
#3
Teching In
Thread Starter
Join Date: Dec 2005
Location: Sacramento, CA
Posts: 40
Likes: 0
Received 0 Likes
on
0 Posts
Originally Posted by NBM7278
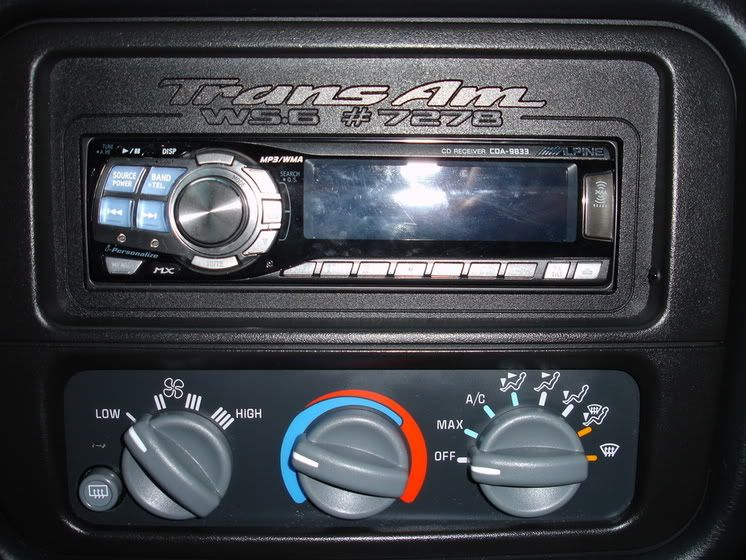
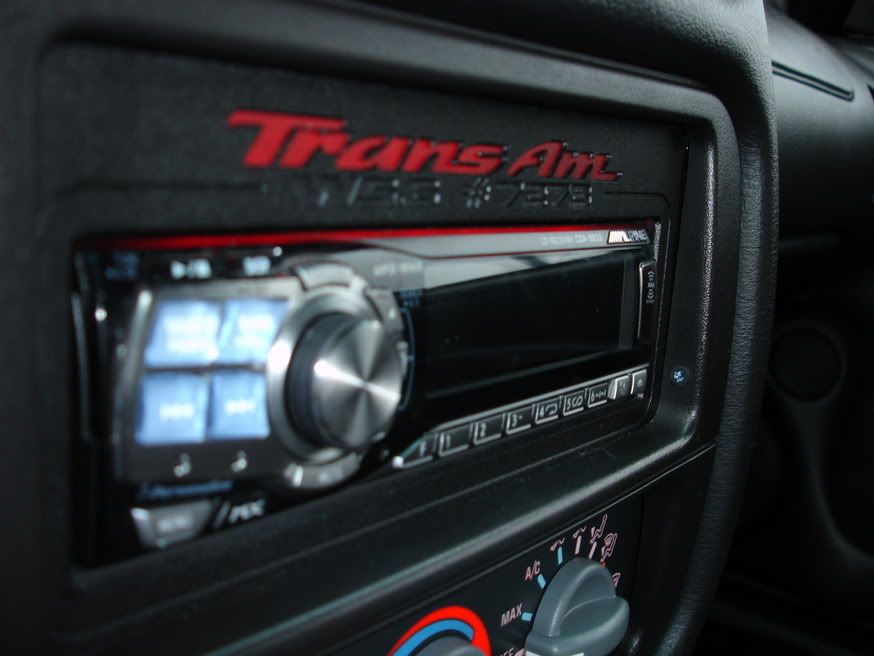
I have the humount kit with an alpine-9833. The unit is perfectly flush and looks stock.
01-20-2006, 06:26 AM
#4
Launching!
Join Date: Jun 2005
Location: Greensboro, NC
Posts: 266
Likes: 0
Received 0 Likes
on
0 Posts
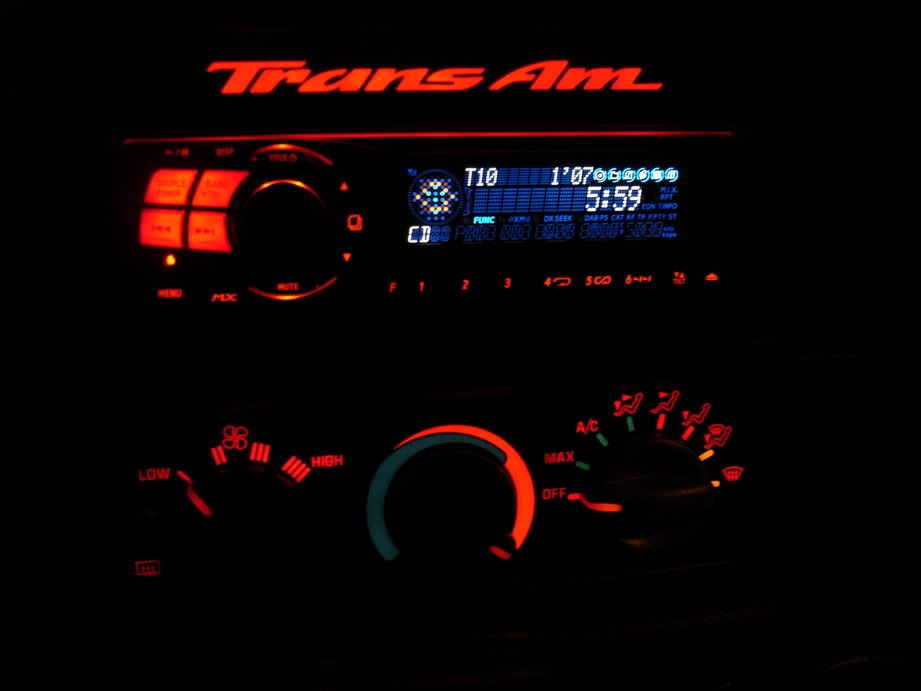
I havd the one with the "Trans Am" that lights up (above the opening). I also had my build number printed below the illuminated area. Honestly, I couldn't be happier. I've had people ride with me that say it looks stock. The illumination matches nearly perfectly. I have a little extra glow that comes around one of the edges, but not enough to distract me or make it look out of place. Lastly, everytime I drive at night....it seems like I appreciate it as much as the first time I saw it.
I'll try to get some pics and post it up tonight. Others have similar pics online, but I'll post em up later tonight. All in all, definately worth the money.
I'll try to get some pics and post it up tonight. Others have similar pics online, but I'll post em up later tonight. All in all, definately worth the money.
Trending Topics
01-23-2006, 03:32 PM
#8
On The Tree
Join Date: Aug 2005
Location: Wichita Falls, Texas
Posts: 165
Likes: 0
Received 0 Likes
on
0 Posts
NMB7278 ... a quick "cheap fix for the glow strip you are talking about would be some good double sided tape and black construction paper. cut about a 1" strip about 1" longer than the opening for the headunit then apply the tape just under the lettering on the back side, stick the top of the paper to the tape and let the bottom rest on the head unit with 1/2" on either side of the opening.
there are many ways to block that light and add to your very nice finishing touch but that would be the cheapest and easiest (aside from just painting the back of the LED's but I don't know why they wouldn't have done that unless there's a heat build up issue with the LED's, which there shouldn't be) to do and as long as you used a quality tape should hold through the summer heat. I'm a pretty detail oriented person and something like that would drive me nuts.
there are many ways to block that light and add to your very nice finishing touch but that would be the cheapest and easiest (aside from just painting the back of the LED's but I don't know why they wouldn't have done that unless there's a heat build up issue with the LED's, which there shouldn't be) to do and as long as you used a quality tape should hold through the summer heat. I'm a pretty detail oriented person and something like that would drive me nuts.
Last edited by joe_kool315; 01-23-2006 at 03:37 PM.
01-23-2006, 10:46 PM
#10


mine fits flush also. everyone says they think it looks cool, especially at night.
heres a couple of pics http://pg.photos.yahoo.com/ph/peterl...lawl/my_photos
heres a couple of pics http://pg.photos.yahoo.com/ph/peterl...lawl/my_photos
01-24-2006, 09:51 PM
#11
Teching In

Join Date: Jan 2006
Posts: 22
Likes: 0
Received 0 Likes
on
0 Posts
I have a problem with mine not lighting up evenly all the way across the LED's. The right side lights up bright with the dimmer on low, and as i turn the dimmer up the left side comes up to match the right side. Has anyone else had the same problem and how did you fix it?
01-25-2006, 06:21 AM
#12
Launching!
Join Date: Jun 2005
Location: Greensboro, NC
Posts: 266
Likes: 0
Received 0 Likes
on
0 Posts
Originally Posted by Z28 DIddy
I have a problem with mine not lighting up evenly all the way across the LED's. The right side lights up bright with the dimmer on low, and as i turn the dimmer up the left side comes up to match the right side. Has anyone else had the same problem and how did you fix it?
01-25-2006, 10:23 AM
#14
On The Tree
Join Date: Aug 2005
Location: Wichita Falls, Texas
Posts: 165
Likes: 0
Received 0 Likes
on
0 Posts
Originally Posted by Z28 DIddy
they came all wired, all there is, is one wire to go to the dimmer, and one for ground. I'll try taking it apart though, cause it's driving me nuts
unless you want to void what ever warrenty you might have I'd reccomend contacting the manufacturer FIRST. It may be they got a bad batch of LED's or a bad connection on your paticular unit. If you go tearing it apart you'll be on the hook for replacing it instead of them.
01-25-2006, 11:03 AM
#15
Launching!
Join Date: Jun 2005
Location: Greensboro, NC
Posts: 266
Likes: 0
Received 0 Likes
on
0 Posts
Now I'm confused, are we talking about the LEDs for the mounting plate or the radio? My mounting plate came with all the pieces separate and I had to put it together (LEDs, bracket, covers, and mounting plate).
01-25-2006, 09:22 PM
#17
On The Tree
Join Date: Aug 2005
Location: Wichita Falls, Texas
Posts: 165
Likes: 0
Received 0 Likes
on
0 Posts
nmb7278 I'm assuming they changed their practice and started fully assembling them at their place insted of relying on the common consumer (most of which probably don't even honestly know what an LED is other than "it makes cool light"). now it sounds like they've gone a step futher and started covering the circuit with epoxy this "should" fix the light shining through the opening problem like you have on your installation. with the black epoxy on the circuit none of the LED lighting will shine out of the back of the plate at all (or atleast that's what I'm assuming cause that makes sense)
01-26-2006, 06:37 AM
#18
Launching!
Join Date: Jun 2005
Location: Greensboro, NC
Posts: 266
Likes: 0
Received 0 Likes
on
0 Posts
I wondered if anybody would've had some problems with setting theirs up. I've had plenty of experience with wires and such, so I just used heat shrink, solder, and some loosely fit wire ties. Good to hear that they have enough business to upgrade.
01-26-2006, 02:48 PM
#19
On The Tree
Join Date: Aug 2005
Location: Wichita Falls, Texas
Posts: 165
Likes: 0
Received 0 Likes
on
0 Posts
 I wasn't saying that IS what they did ... just assuming since the product seems to have gone through some R&D since you got yours. I hope to get one soon and upgrade my system after uncle sam gets some of the tax money back to me so I'll find out first hand soon enough hopefully.
It only made sence because the average "joe" probably doesn't own a soldering iron or owns one but has only used it a hand full of times connecting speakers and simple stuff such as that. I wouldn't have a problem but not many folks teach electronic courses and fix TV/VCR/Strero's in their spare time so I have many hours behind a soldering Iron.
01-26-2006, 04:51 PM
#20
Teching In
Join Date: Jan 2006
Posts: 22
Likes: 0
Received 0 Likes
on
0 Posts
I contacted humount.com and they are going to make me a new light bar and send it out to me. They got back to me within 24 hours and didn't try to cop out of it like lots of other companies do. T's up to them!