When you click on links to various merchants on this site and make a purchase, this can result in this site earning a commission. Affiliate programs and affiliations include, but are not limited to, the eBay Partner Network.
Wiring Schematic to convert camaro power mirrors with a firebird switch
So i got t/a door panels on my camaro, i got the ta switch panels now and i got the harness that plugs into the the new t/a switch. does anyone know the schematics to which wire does what and goes to what ?
You will have to rewire the connections between the switch and the mirrors to make it work. The two switches (Camaro and Firebird) are wired to the mirrors completely differently. They only have four out of the eight wires in common - orange (12V+), black (ground), white (left mirror move right), and red with white (right mirror move right). The other four wires don't match up at all.
The difference is that Camaros use a common wire to provide power to a single mirror for two different functions. Both the down and left movements for the left mirror use the light blue wire, for the right mirror it is gray.
Firebirds use a common wire to provide power for a single function to both mirrors. The yellow wire provides power for upward movement on both mirrors and the light blue wire provides power for left movement on both mirrors.
The other wires would have to be cross connected after you bypass the common wire connections to the mirrors (light blue and gray wires).
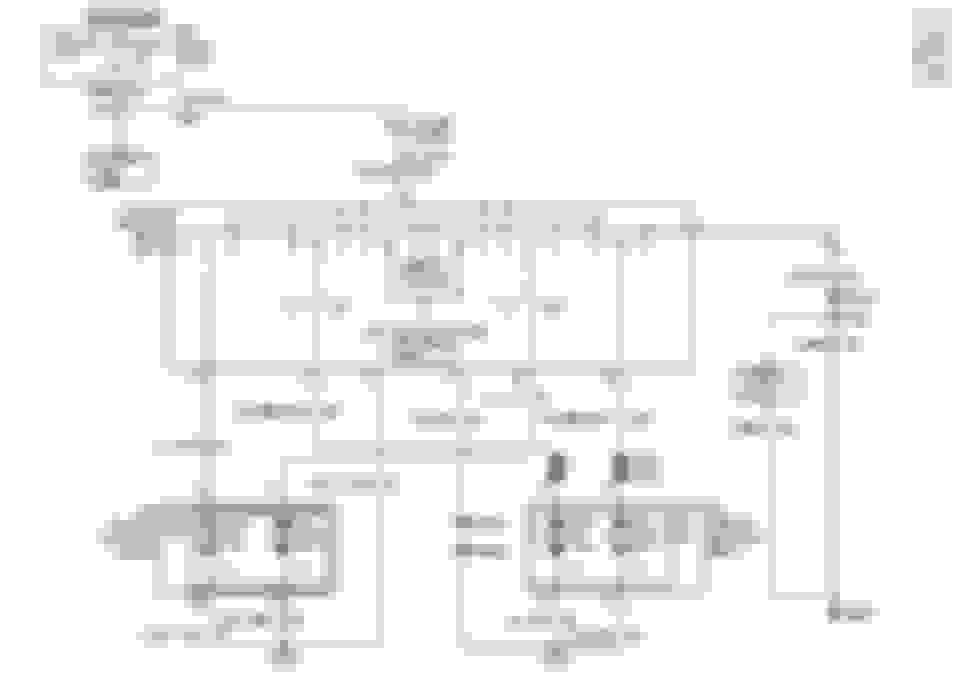
Here are the schematics for the switches and mirrors so you can see the difference:
Camaro Power Mirrors
Firebird Power Mirrors
Note how the light blue wire and the gray wire in the Camaro are split to two connections on the same mirror. On the Firebird the yellow wire and the light blue wire are split to go to both mirrors.
Last edited by WhiteBird00; 01-05-2022 at 08:25 AM.
Okay, here is the connector for the Firebird switch:
Five of the existing wires can be connected to the switch without rewiring:
Connect the black wire to A
Connect the yellow wire to C
Connect the white wire to D
Connect the red with white wire to G
Connect the orange wire to H
The other wires will have to be modified or replaced in order to work. A couple of the wires that go to two connections on the Camaro mirrors will have to be separated into individual connections. When you cut a wire at the mirror be sure leave enough of a pigtail to connect a different wire in the next step.
Here is the mirror connector:
Connect the light blue wire to B but disconnect it from pin C at the left side mirror.
Connect the gray wire to F but disconnect it from pin B at the right side mirror.
Now, splice the brown with white wire into the yellow wire at pin C of the switch.
Finally, run a new wire from pin E at the switch to pin C at the left mirror. Splice a new wire into the light blue wire at pin B of the switch and run it to pin B at the right side mirror.
What you end up with is the following connections:
A -> ground
B -> both mirrors B
C -> both mirrors D
D -> left mirror A
E -> left mirror C
F -> right mirror C
G -> right mirror A
H -> power
This matches the Firebird switch to the Camaro mirrors.
There are two ways to check the switch - one is test it with a multimeter and the other is test the mirror functions so that you can deduce if the switch is the problem. In this particular case it would probably be easier to test the mirror functions because of the complex way the Firebird mirror switch works.
To test the mirror wiring you will need a power source. A 12V source using jumper wires with probes and alligator clips would be best but you can probably use a 9V battery in a pinch.
Disconnect the wires from the switch and test pairs there to see if you get the correct response from the mirror. Start with the left mirror. Apply power to the white wire and ground to the light blue wire - the mirror should move right (inward). Then reverse the connections and the mirror should move left (outward). Next, connect power to the yellow wire and ground to the new wire you connected between switch pin E and left mirror pin C. The mirror should move up. Reverse the connections and the mirror should move down.
For the right side, power on the red with white and ground on the new wire you spliced into the light blue wire will move the mirror right (outward), reversing them moves it left (inward). Power on the brown with white wire and ground on the gray wire will move it up, reversing them moves it down.
If all these check out then you know the wiring is correct and the switch is the problem. If they don't work as expected then you need to check your wiring.
Sorry I am new to this. I am looking for wiring schematic for 2014 camaro power mirror switch. I see link in this post, but I can�t click on it I am trying to use this switch to control c5 Vette mirrors. Thanks
Those underlined labels in post #4 weren't links - they were merely labels for schematics which were hosted on a website that I have long since shut down (this is a 15 year old thread after all).
I have reposted the schematics on the off-chance that they may be of some help, although I doubt that the 2014 Camaro was wired anything like the old 4th generation ones. It might give you a starting point to test and label your switch using a multimeter to determine continuity between terminals in various switch positions.
Unfortunately, I don't have schematics for 2014 Camaro but I do have one for C5 Corvette...
C5 Corvette Left Mirror
As you can see, the setup is completely different from f-bodies as the switch only provides signals to the Door Control Module rather than directly powering the mirror motors. As I said, I have no idea how 2014 Camaros are set up - they may be similar to Corvettes with a control module or they may have the simpler direct power configuration of 4th gen f-bodies.
I've heard that you can get access to factory wiring schematics for free if you sign up on the AutoZone website... it might be worth a try.
BTW, is there some reason you wouldn't just use a factory window switch in your C5 Corvette?
Only was going to use the 2014 switch as I had access to one with the pigtail for free and it was small and looked good. I may have access to a 2002 camaro switch as well, it sounds like that will be more compatible with the corvette mirror wiring. It seams the camaro switch takes a 12v +&- and sends it to two wires to move mirror, reversed polarity to change direction? If that�s the case I can wire the switch amd use a volt meter to figure out from there. Thanks so much for replying
 09-18-2006, 07:11 PM