
99-02 odo, swapped OEM smd leds with white smd leds, +converting odo to OLED screen
 04-11-2014, 12:05 AM
#1

****The finished OLED display is on page 7***
I recently changed the leds in my odometer and went about it a different way than all I have seen, so I figured I'd post it up so its in the search history on here. I didn't use the traditional thru hole leds like most have, I used the stock style right angle 3mm smd led. The color I used was natural white with a 5600K color temp. The brand of the led was Osram, and they did have all the other typical colors for this particular led. For reference, the stock leds are red/orange, not pure red.
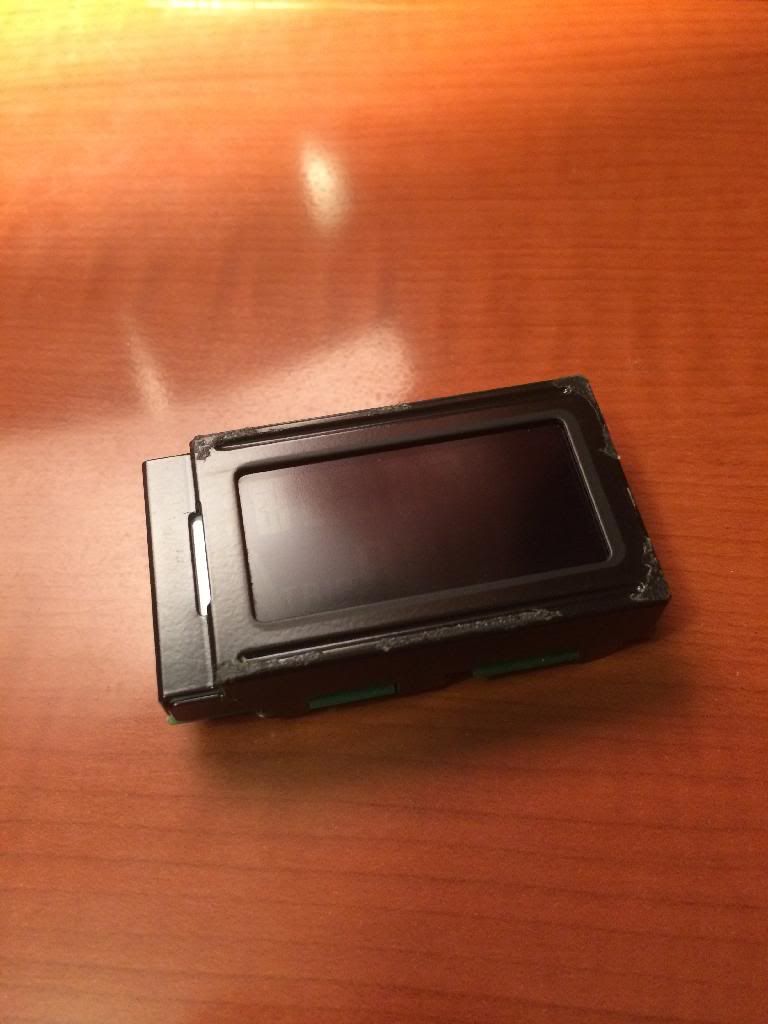
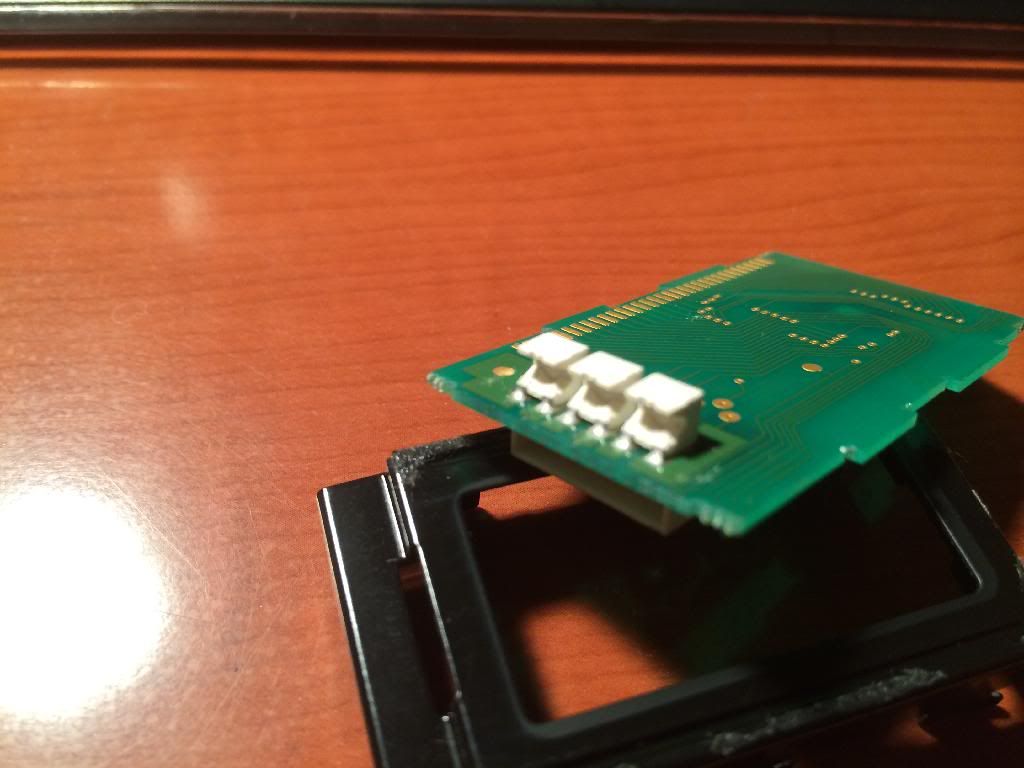
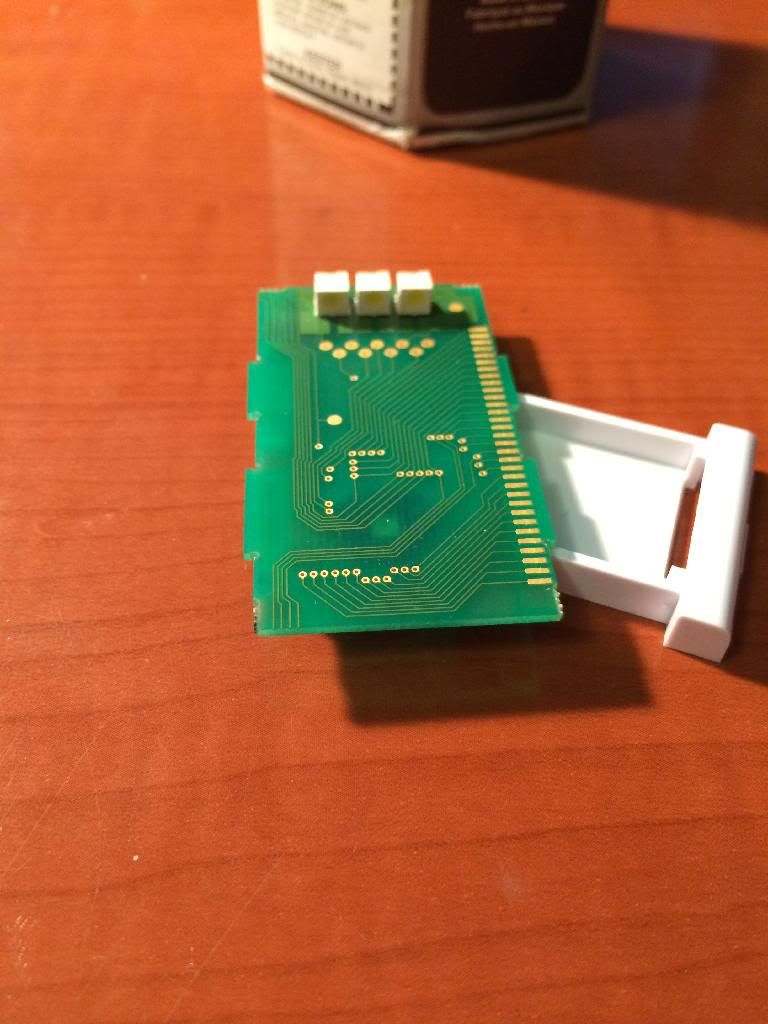
Heres the stock module. For those that dont know, it is different than the 97-98 version that is backlit. The lighting is self contained and edge lit with 3 right angle 3mm smd leds.
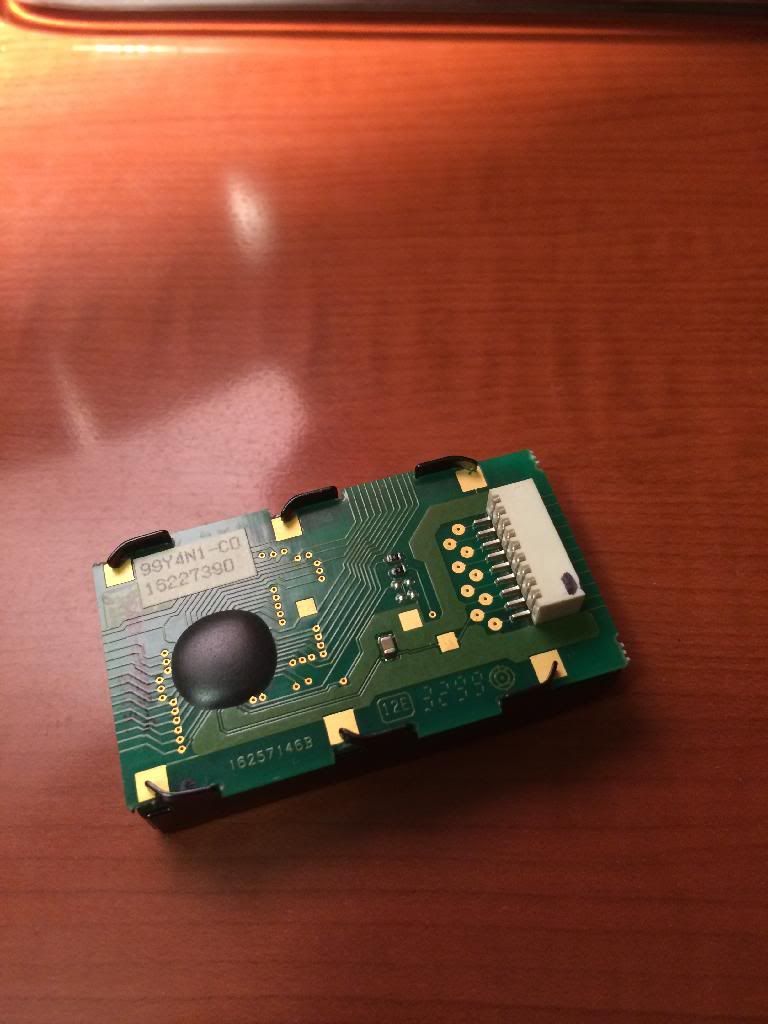
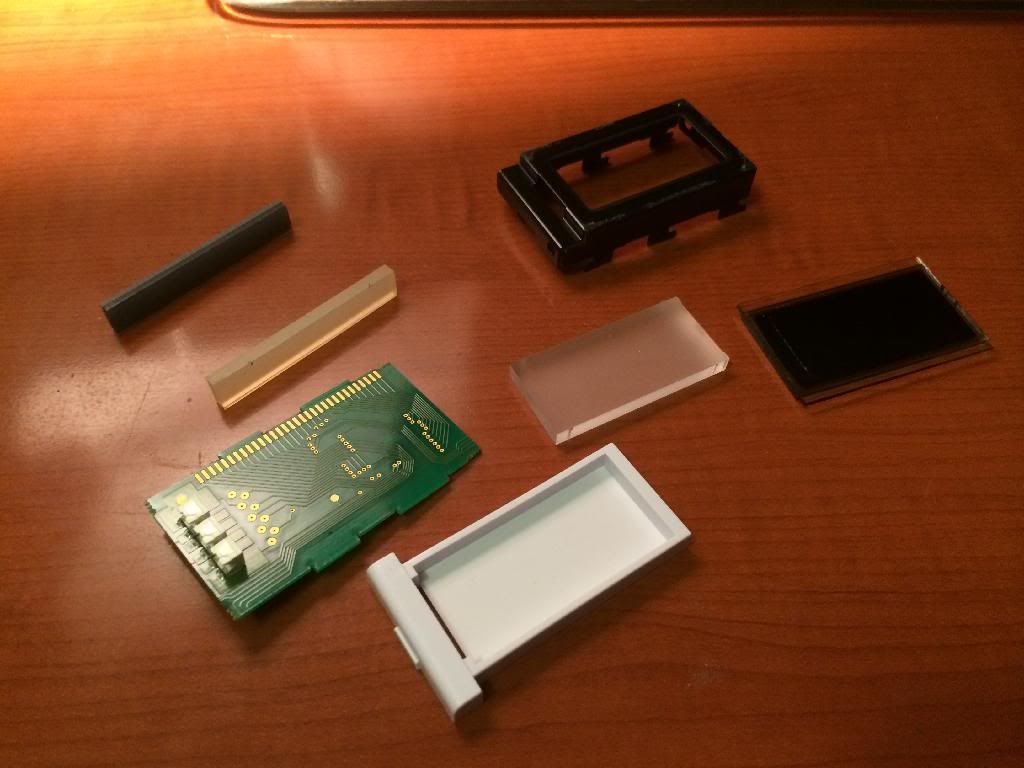
And here it is taken apart. Its not rocket science, you just need to be careful. Bend the bottoms tabs straight, pull the cage off and its straight forward from there. The white light diffuser is not attached to anything, its just retained by the cage. Just make sure the silicone zebra strips go back in the same place. The clear one on bottom and the one with the black in it on top as this one allows the voltage to pass from the pcb board to the lcd screen.
Stock leds front and rear.
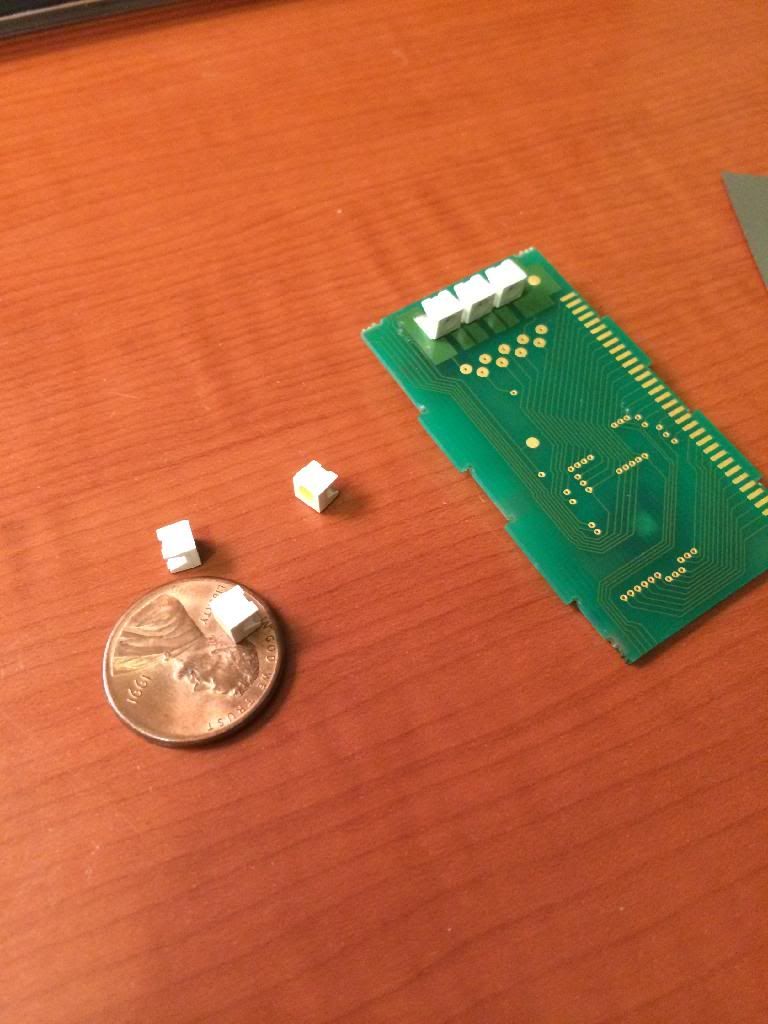
New leds next to sock module. These things are TINY.
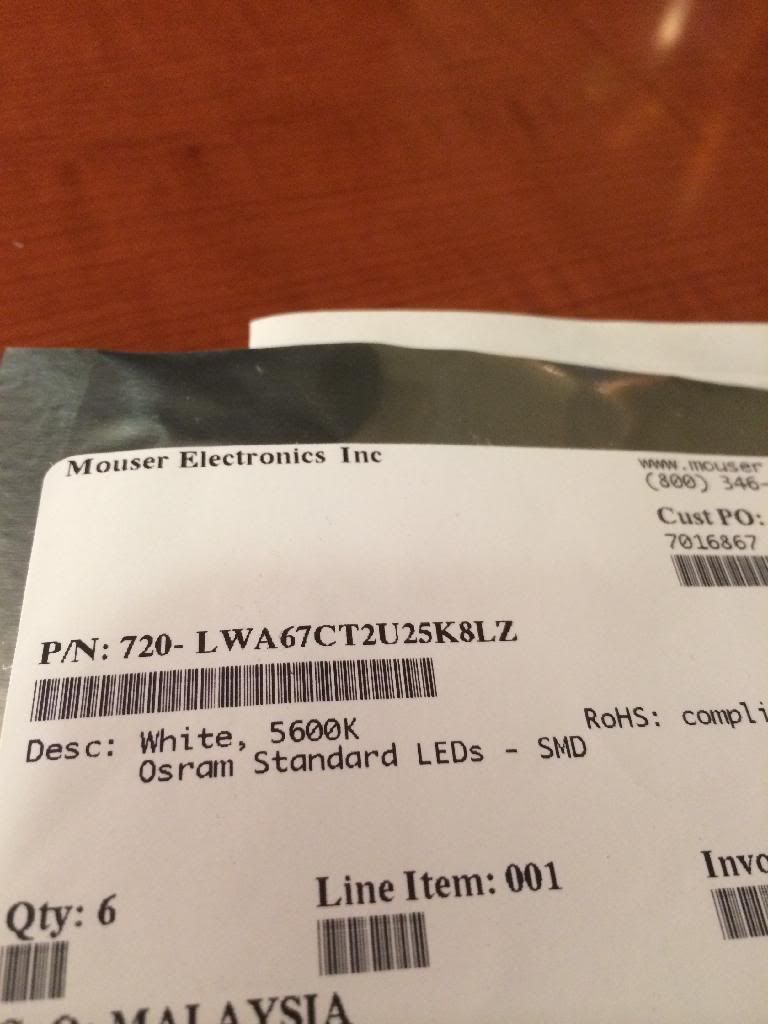
Part number for the Osram leds I used.
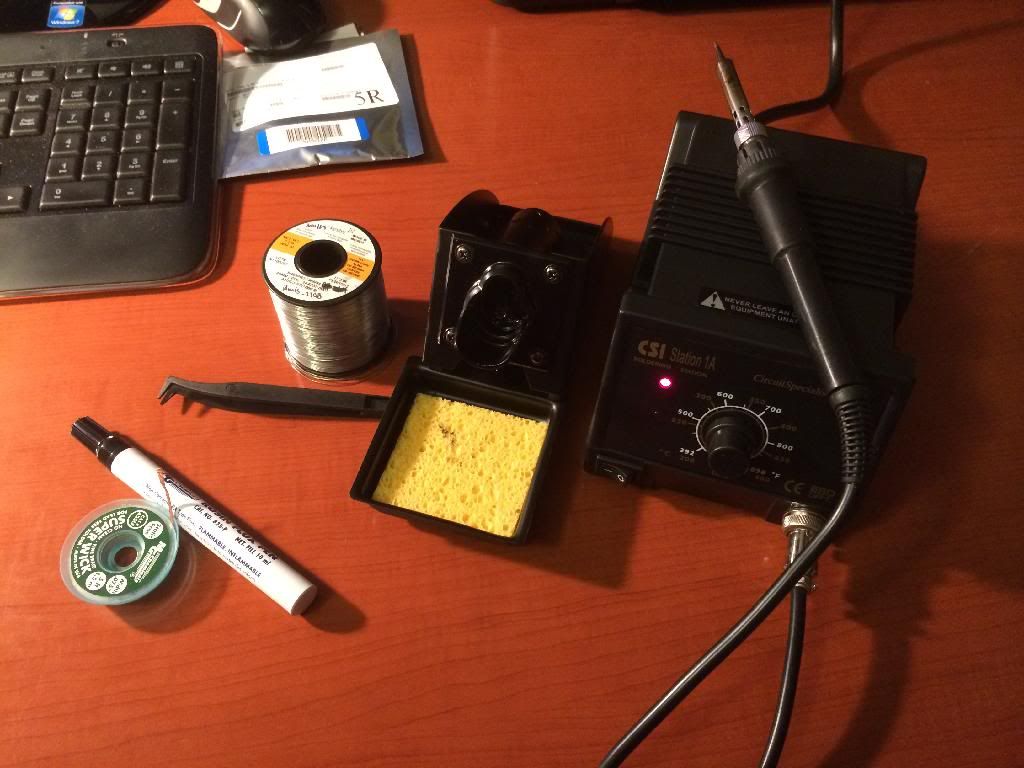
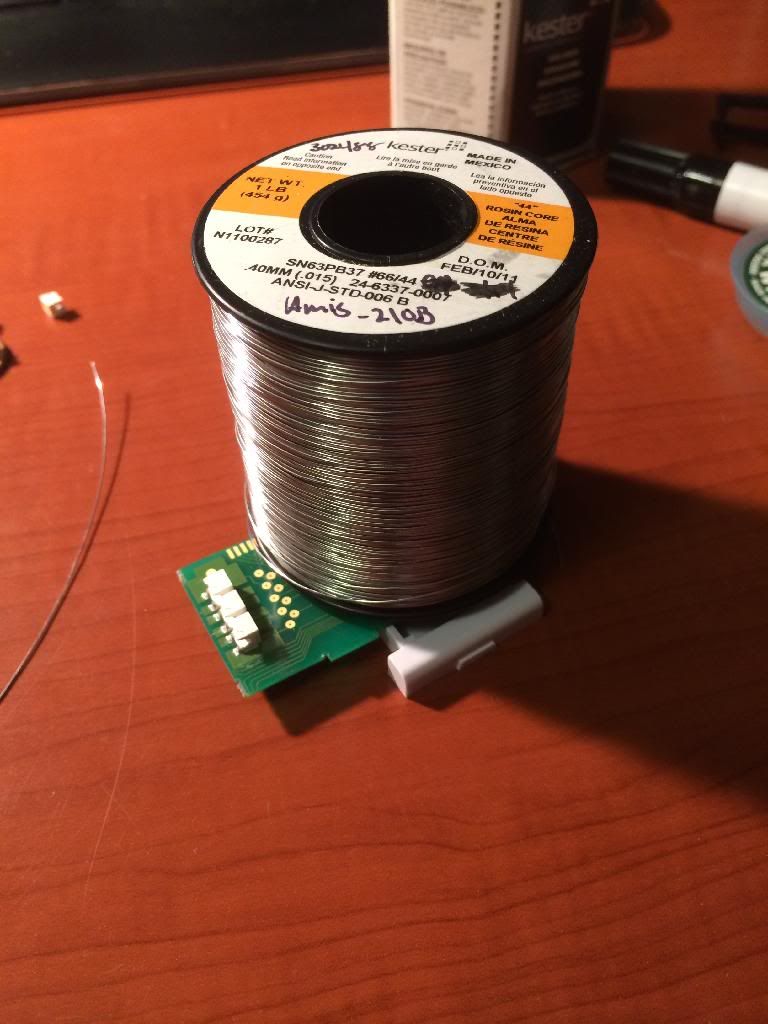
If your going to use smd's be prepared. They are very sensitive to heat, so a solder gun without an adjustable temp setting is going to get to hot. I kept my solder station at about 400 degrees. Also very helpful is solder wick( the copper strip roll in the pic) to remove the old solder. Solder wick isn't necessary but it makes it alot cleaner and easier removing the stock leds. There are alot of good tutorials on youtube on how to use it. ITs also good to have a solder flux pen, it makes soldering so much easier. To use it you just swipe over the area your going to solder, after soldering use a q-tip and clean the area with IPA(alcohol). Also key if your gonna use smd's is a good pair of tweezers( the ones in the pic are not ) and very thin solder. The solder I used was .015". Lastly a small fine tip on the solder gun itself.
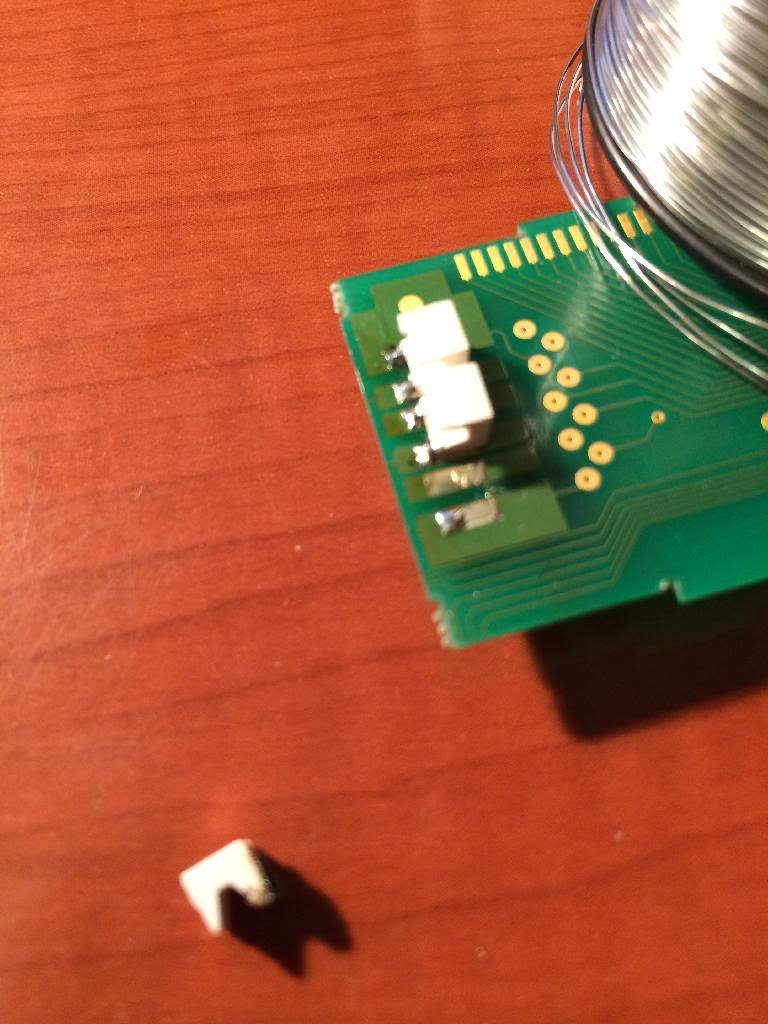
My super high tech way holding the board down while I switched out the leds Function over form, it worked.
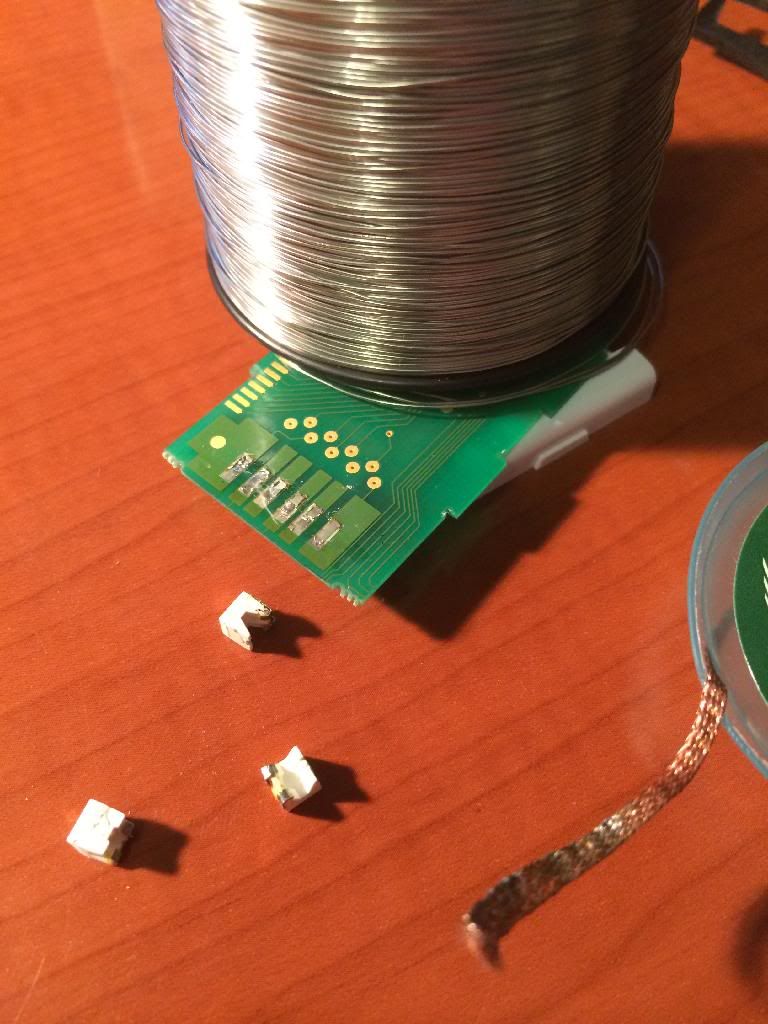
To remove the stock smd's heat one side while pulling up a little. You should use tweezers here, but mine sucked so I used my finger to pry up while removing them.
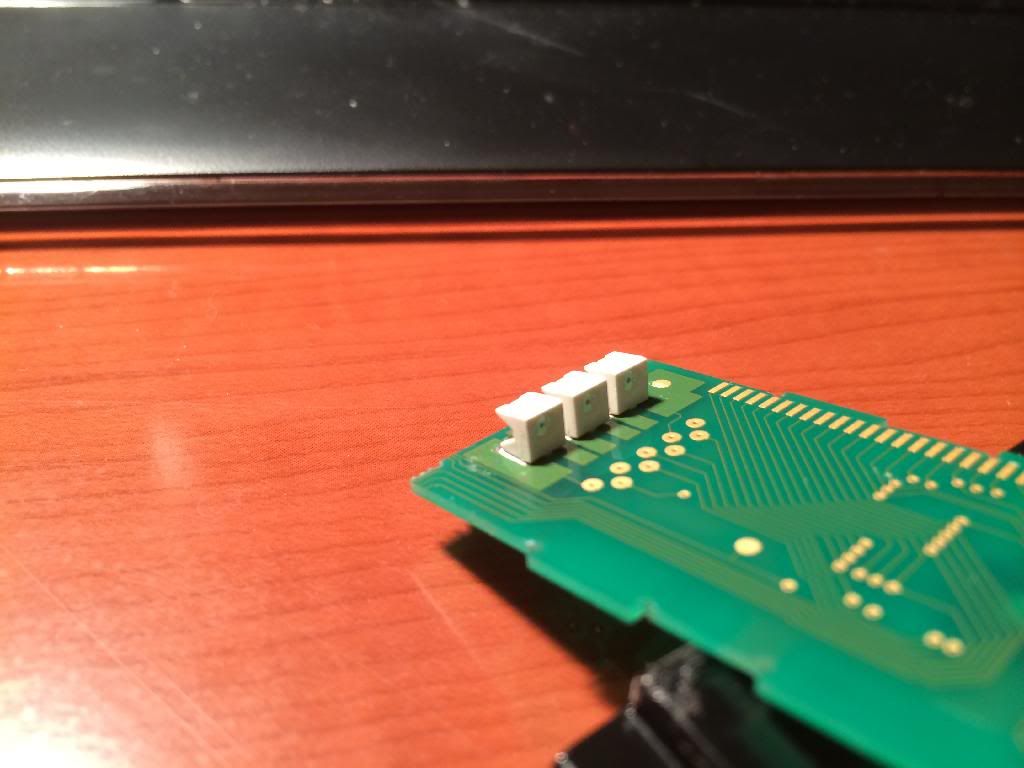
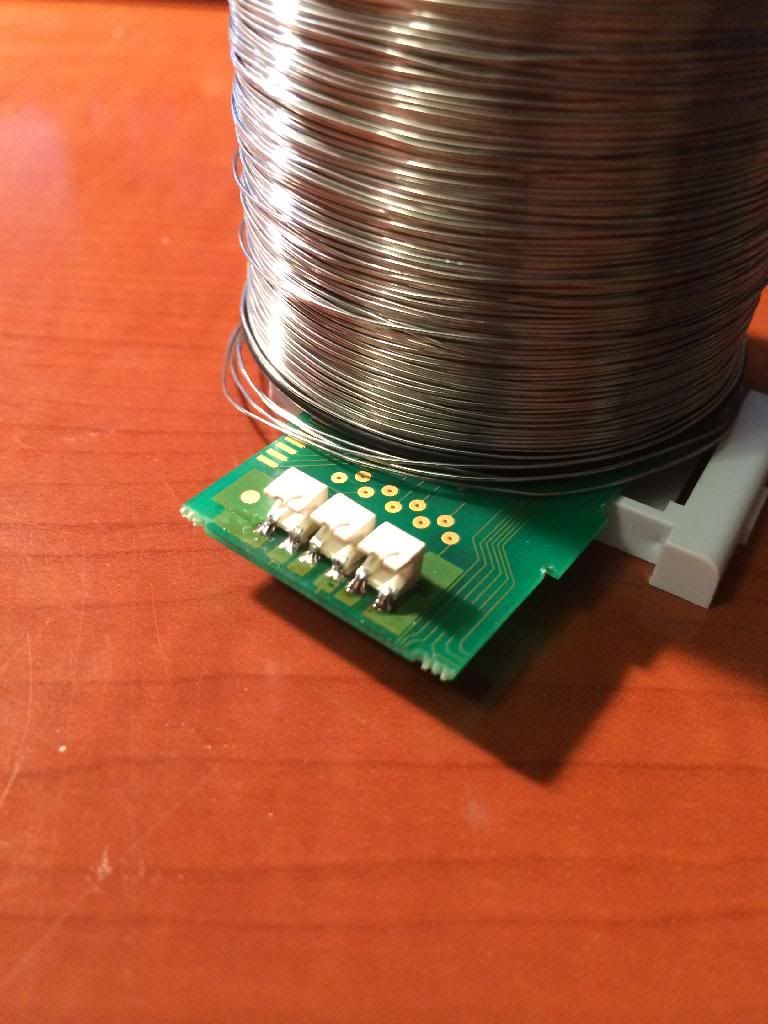
As tiny as they are, its not hard at all to solder new smds in. First off, the stock circuit is designed for leds, so no resistors, also the right angle leds install one way with the diode facing to the right, so you dont need to worry about positive and negative. If you set the led in place correctly the + and - is correct by default. The green film on the board is called solder resist, it keeps the solder on the copper pad and prevents it from going off where it should be. I started installing the new leds by first adding a small amount of solder on the bare copper pad. As you can see in the pic theres a small blob of solder on the first bare copper pad. Then put the led in place and melt the solder to led. Now that its not going anywhere you can solder the other terminal. Repeat for the other 2 leds.
All done
Heres what the result looks like with white. It kind of sucks. I wanted it to be black and white. Not so.
It looks great during the day, you cant see the blue.
I recently changed the leds in my odometer and went about it a different way than all I have seen, so I figured I'd post it up so its in the search history on here. I didn't use the traditional thru hole leds like most have, I used the stock style right angle 3mm smd led. The color I used was natural white with a 5600K color temp. The brand of the led was Osram, and they did have all the other typical colors for this particular led. For reference, the stock leds are red/orange, not pure red.
Heres the stock module. For those that dont know, it is different than the 97-98 version that is backlit. The lighting is self contained and edge lit with 3 right angle 3mm smd leds.


And here it is taken apart. Its not rocket science, you just need to be careful. Bend the bottoms tabs straight, pull the cage off and its straight forward from there. The white light diffuser is not attached to anything, its just retained by the cage. Just make sure the silicone zebra strips go back in the same place. The clear one on bottom and the one with the black in it on top as this one allows the voltage to pass from the pcb board to the lcd screen.

Stock leds front and rear.


New leds next to sock module. These things are TINY.

Part number for the Osram leds I used.

If your going to use smd's be prepared. They are very sensitive to heat, so a solder gun without an adjustable temp setting is going to get to hot. I kept my solder station at about 400 degrees. Also very helpful is solder wick( the copper strip roll in the pic) to remove the old solder. Solder wick isn't necessary but it makes it alot cleaner and easier removing the stock leds. There are alot of good tutorials on youtube on how to use it. ITs also good to have a solder flux pen, it makes soldering so much easier. To use it you just swipe over the area your going to solder, after soldering use a q-tip and clean the area with IPA(alcohol). Also key if your gonna use smd's is a good pair of tweezers( the ones in the pic are not
) and very thin solder. The solder I used was .015". Lastly a small fine tip on the solder gun itself. 
My super high tech way holding the board down while I switched out the leds
Function over form, it worked. 
To remove the stock smd's heat one side while pulling up a little. You should use tweezers here, but mine sucked so I used my finger to pry up while removing them.

As tiny as they are, its not hard at all to solder new smds in. First off, the stock circuit is designed for leds, so no resistors, also the right angle leds install one way with the diode facing to the right, so you dont need to worry about positive and negative. If you set the led in place correctly the + and - is correct by default. The green film on the board is called solder resist, it keeps the solder on the copper pad and prevents it from going off where it should be. I started installing the new leds by first adding a small amount of solder on the bare copper pad. As you can see in the pic theres a small blob of solder on the first bare copper pad. Then put the led in place and melt the solder to led. Now that its not going anywhere you can solder the other terminal. Repeat for the other 2 leds.

All done


Heres what the result looks like with white. It kind of sucks. I wanted it to be black and white. Not so.

It looks great during the day, you cant see the blue.


Last edited by LT4vert; 02-17-2016 at 10:57 AM. Reason: Modified thread contents
 04-11-2014, 12:06 AM
#2
***Maybe like 2 people will be interested in this part, lol, Im kinda of an electronics nerd and super ocd when I get a vision of how I want a project to go.
For reference this is the look I was going for with the odometer with the high black/white contrast, as its the first step of bigger gauge cluster project Im working on.

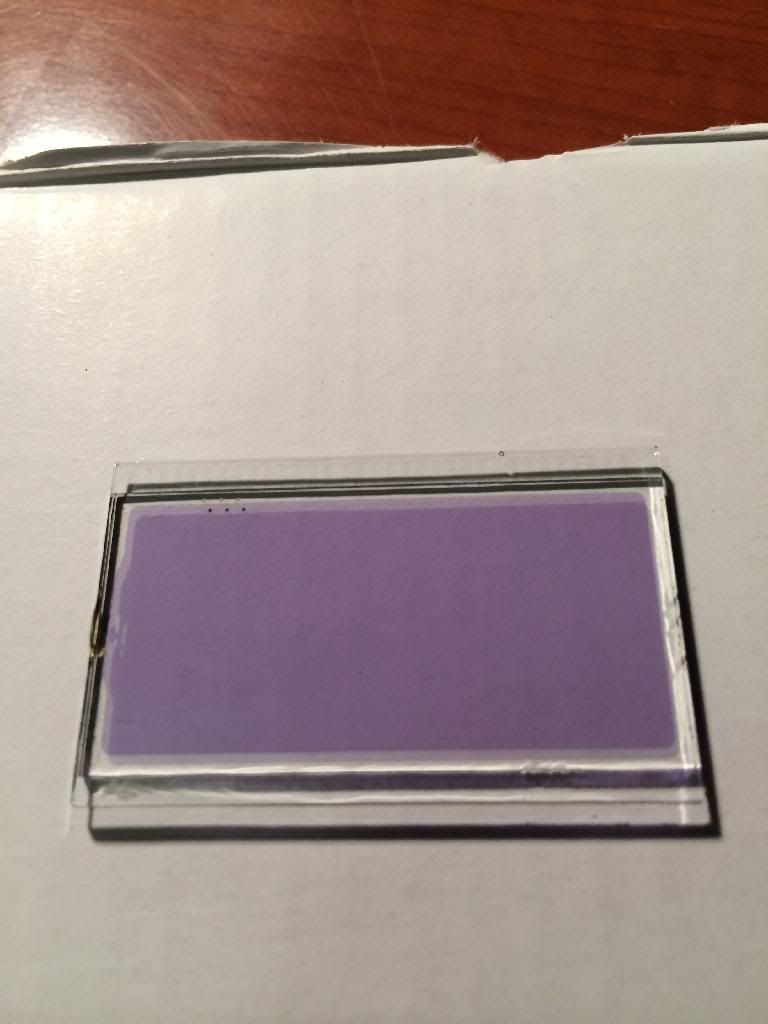
With the better than average knowlegde I have of lcd screens, I removed the polarizing films to why all the blue with the white leds . I found the polarizing fluid in the glass is purplish blue for whatever reason, it mostly clear in other applications. Its impregnated in the glass so it cant be removed.
films pulled off

Heres what got, freakin purple grrrrr.
I have some higher end nitto-denko polarizing film, so I tried that to see if I could get a better contrast and a darker background. It was only marginally better than the stock films.
front film on
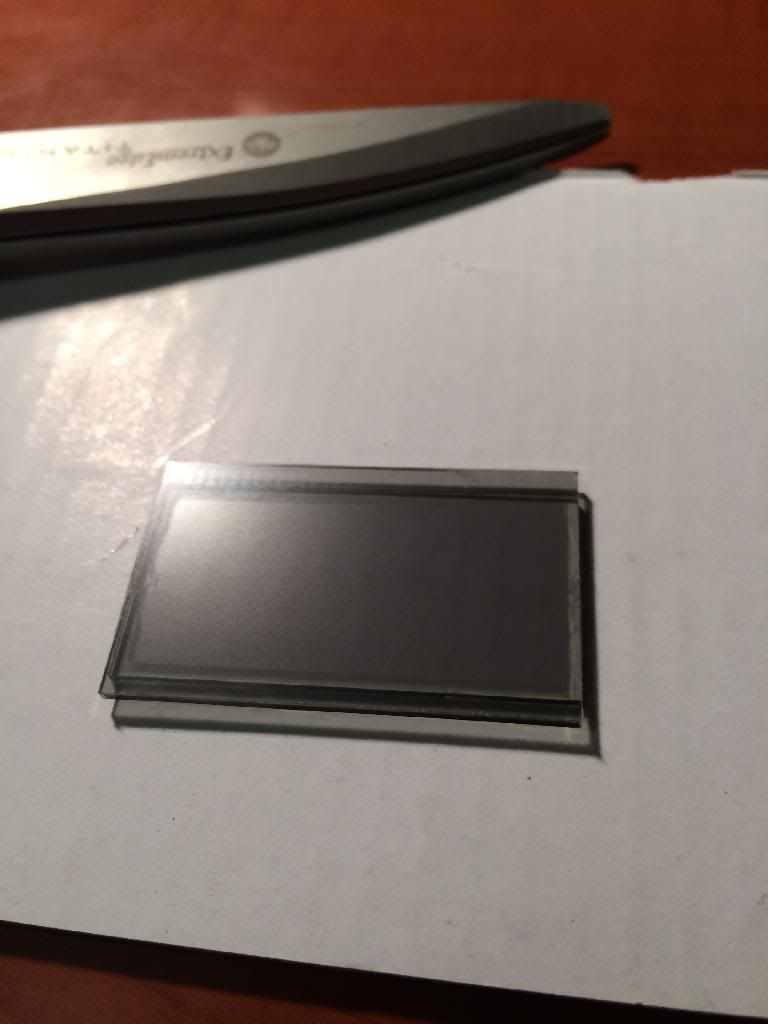
then rear
Im kind of stuck where Im at right now. I am talking with a company about re-producing the odometer screen with a OLED. That will definitely give a pure dark black background and bright white numbers. They seem to think it will be possible to retrofit a OLED screen, but cost will be the determining factor.
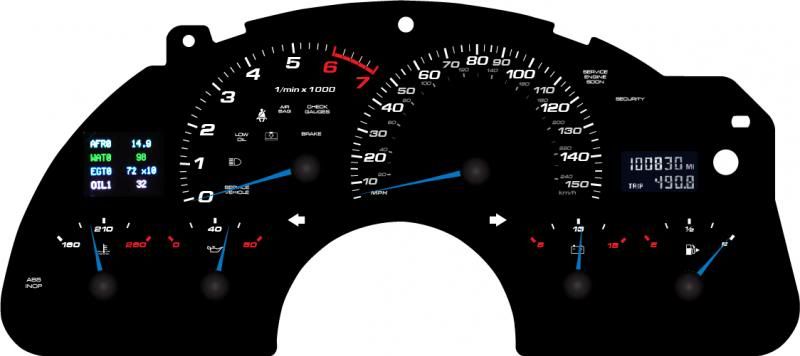
Heres what final cluster will look like with the new gauge face and plx dm-100 scan gauge fabbed into the left side of the cluster with the relocated warning icons. Hopefully I have success matching the odometer. Guess we'll see.
For reference this is the look I was going for with the odometer with the high black/white contrast, as its the first step of bigger gauge cluster project Im working on.
With the better than average knowlegde I have of lcd screens, I removed the polarizing films to why all the blue with the white leds . I found the polarizing fluid in the glass is purplish blue for whatever reason, it mostly clear in other applications. Its impregnated in the glass so it cant be removed.
films pulled off

Heres what got, freakin purple grrrrr.

I have some higher end nitto-denko polarizing film, so I tried that to see if I could get a better contrast and a darker background. It was only marginally better than the stock films.
front film on

then rear

Im kind of stuck where Im at right now. I am talking with a company about re-producing the odometer screen with a OLED. That will definitely give a pure dark black background and bright white numbers. They seem to think it will be possible to retrofit a OLED screen, but cost will be the determining factor.
Heres what final cluster will look like with the new gauge face and plx dm-100 scan gauge fabbed into the left side of the cluster with the relocated warning icons. Hopefully I have success matching the odometer. Guess we'll see.

Last edited by LT4vert; 03-26-2015 at 04:23 PM.
 04-11-2014, 11:59 AM
#6
Thank You.
Sounds like a great plan. I'm just trying to utilize some current technologies, bump up the tech and make the cluster more visually appropriate for the the car without going aftermarket. The stock gauges remind me of a Cavalier or 90's GM truck The gauge face I designed in adobe illustrator. Im not going to have it produced until I finalize the fab work with the plx dm-100 scan gauge and get the warning icons moved to within the tach so I can get the custom features right on the face. If I have it made and something is off dimension wise, I eat it. The cherry on top will be if the black/white OLED odometer screen retrofit will work, so it matches everything else. If not, the way it is now, its gonna stick out like sore thumb at night.
The gauge face I designed in adobe illustrator. Im not going to have it produced until I finalize the fab work with the plx dm-100 scan gauge and get the warning icons moved to within the tach so I can get the custom features right on the face. If I have it made and something is off dimension wise, I eat it. The cherry on top will be if the black/white OLED odometer screen retrofit will work, so it matches everything else. If not, the way it is now, its gonna stick out like sore thumb at night. Trending Topics
 04-11-2014, 07:02 PM
#9
DaRReLL I wish man. I'm still fairly amatuerish. Its fun to mess with though and it saves me alot of money on projects like this.
Thanks. I bet on the blue. I'm pretty knowledgeable in color theory and while blue makes a nice visual statement the human eye has a hard time viewing the pure blue frequencies when it comes to lighting in something focused on legibility like a gauge cluster. Its one of the big reasons VW got rid of the blue gauge clusters and went to white. If you did white, I would stick to lower color temps 4000-5600K natural whites. After seeing mine lit up with 5600K, a common cool white led (6500-10000K) will make it look bluer... if a more whitish blue tone is what your after though, the cool temps may work better for ya.
Thanks. I bet on the blue. I'm pretty knowledgeable in color theory and while blue makes a nice visual statement the human eye has a hard time viewing the pure blue frequencies when it comes to lighting in something focused on legibility like a gauge cluster. Its one of the big reasons VW got rid of the blue gauge clusters and went to white. If you did white, I would stick to lower color temps 4000-5600K natural whites. After seeing mine lit up with 5600K, a common cool white led (6500-10000K) will make it look bluer... if a more whitish blue tone is what your after though, the cool temps may work better for ya.
04-12-2014, 07:04 PM
#10
Staging Lane

Join Date: Feb 2014
Posts: 92
Likes: 0
Received 0 Likes
on
0 Posts
DaRReLL I wish man. I'm still fairly amatuerish. Its fun to mess with though and it saves me alot of money on projects like this.
Thanks. I bet on the blue. I'm pretty knowledgeable in color theory and while blue makes a nice visual statement the human eye has a hard time viewing the pure blue frequencies when it comes to lighting in something focused on legibility like a gauge cluster. Its one of the big reasons VW got rid of the blue gauge clusters and went to white. If you did white, I would stick to lower color temps 4000-5600K natural whites. After seeing mine lit up with 5600K, a common cool white led (6500-10000K) will make it look bluer... if a more whitish blue tone is what your after though, the cool temps may work better for ya.
Thanks. I bet on the blue. I'm pretty knowledgeable in color theory and while blue makes a nice visual statement the human eye has a hard time viewing the pure blue frequencies when it comes to lighting in something focused on legibility like a gauge cluster. Its one of the big reasons VW got rid of the blue gauge clusters and went to white. If you did white, I would stick to lower color temps 4000-5600K natural whites. After seeing mine lit up with 5600K, a common cool white led (6500-10000K) will make it look bluer... if a more whitish blue tone is what your after though, the cool temps may work better for ya.
 04-13-2014, 11:15 AM
#13
ZexGX- Thanks man. Its been done, but by converting to hole thru traditional 3mm leds.
99 SS- Thanks you. I have no plans to be re-producing the cluster though beyond my car. What may be re-produced is the OLED odometer screen retro-fit. Still waiting on costs and I would need to pitch it to a vendor on this site because I cant afford vendor fees on this site to sell it myself. That will likely be a no-go though. I can't see too many beyond a handful being interested in converting the ODO display from lcd to OLED.
Last edited by LT4vert; 04-13-2014 at 12:15 PM.
 05-12-2014, 11:30 PM
#17
Small update on this for those that care. The white led's with the lcd just isnt going to work. Given the nature of how white leds work, theres no way to illuminate lcd glass in a display like this without a blue tint. Im so ocd, so that's just not exceptable to me.
So...I'm taking the opportunity to further expand my knowledge of electrical code writing/programming and learn something that will help me in more areas outside the car. I bought a 160x128 pixel, full color OLED module. With the help of a pretty brilliant programmer I met in Germany I figured out how to do the OLED on my own with his help and skipping the INSANE cost of having a business design one. I might have a $100 in the display when all is said and done as opposed to $3-4000 having one custom made, my jaw was on the ground getting quotes, I had no idea. He is helping me design a board that communicates with the stock cluster serial data. The display will be very simple for now just being black and white. When my skills improve I may do more with it.
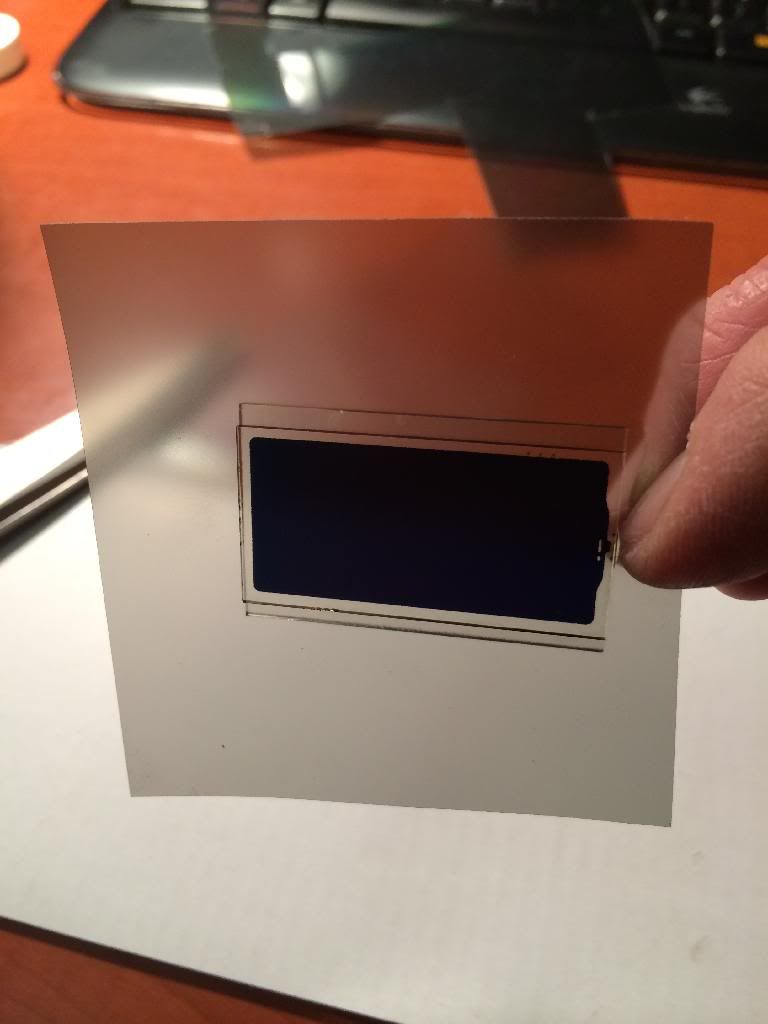
Here the new module I got for the ODO. It is bigger than the stock screen, and thankfully its about identical to the size of the screen from the plx dm-100 scan tool Im using on the opposite side of the cluster. Needless to say a little fab work is in order to the instrument cluster housing.

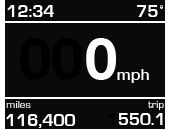
Heres what the new ODO display will look like. The OLED has a 2000:1 contrast ratio, blacks will be pure black and whites will be pure white. The guy in Germany already has a prototype board that is communicating with the 99-02 f-car cluster making it possible to get the speed, odo and trip info. The time and temp are external inputs.
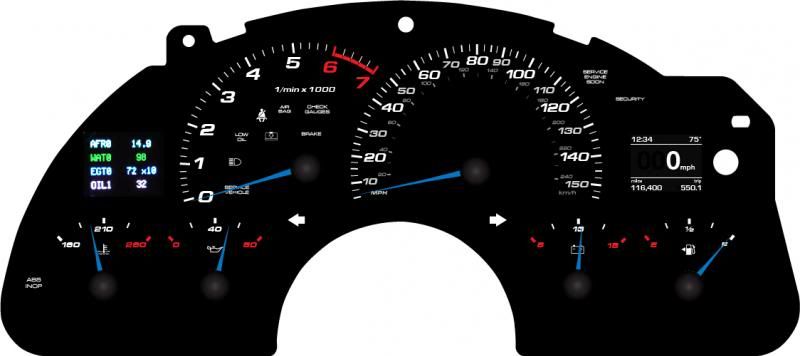
In the gauge face.
Should be about a month to month and 1/2. Cant wait to finally get this project done. Ive learned a ton of cool nerdy stuff, lol .
So...I'm taking the opportunity to further expand my knowledge of electrical code writing/programming and learn something that will help me in more areas outside the car. I bought a 160x128 pixel, full color OLED module. With the help of a pretty brilliant programmer I met in Germany I figured out how to do the OLED on my own with his help and skipping the INSANE cost of having a business design one. I might have a $100 in the display when all is said and done as opposed to $3-4000 having one custom made, my jaw was on the ground getting quotes, I had no idea. He is helping me design a board that communicates with the stock cluster serial data. The display will be very simple for now just being black and white. When my skills improve I may do more with it.
Here the new module I got for the ODO. It is bigger than the stock screen, and thankfully its about identical to the size of the screen from the plx dm-100 scan tool Im using on the opposite side of the cluster. Needless to say a little fab work is in order to the instrument cluster housing.
Heres what the new ODO display will look like. The OLED has a 2000:1 contrast ratio, blacks will be pure black and whites will be pure white. The guy in Germany already has a prototype board that is communicating with the 99-02 f-car cluster making it possible to get the speed, odo and trip info. The time and temp are external inputs.

In the gauge face.

Should be about a month to month and 1/2. Cant wait to finally get this project done. Ive learned a ton of cool nerdy stuff, lol .
Last edited by LT4vert; 05-12-2014 at 11:39 PM.