Appearance & Detailing Interior & Exterior Appearance Modifications
Sponsored by:
Sponsored by: DashLynx

Hiding Wiring Harness

Thread Tools
 
Search this Thread
 
Old 02-13-2018, 09:10 AM
  #1  
Teching In
Thread Starter
 
Jamesyyyy's Avatar
 
Join Date: Feb 2016
Location: Birmingham, AL
Posts: 16
Likes: 0
Received 0 Likes on 0 Posts
Default Hiding Wiring Harness

I am currently doing an engine swap on my 02 WS6, and I have he motor and trans out and I wanted to hide the wiring harness and fuse box, kinda like the wire tuck on the passenger side. Does anyone know the best way to go about doing this? I’m sorry if this is in the wrong place by the way lol
Old 02-13-2018, 10:27 AM
  #2  
Staging Lane
 
DT69cam's Avatar
 
Join Date: Dec 2015
Posts: 96
Likes: 0
Received 0 Likes on 0 Posts
Default

Guys run the wire harness through the passenger inner fenderwell.
Old 02-13-2018, 10:40 AM
  #3  
Teching In
Thread Starter
 
Jamesyyyy's Avatar
 
Join Date: Feb 2016
Location: Birmingham, AL
Posts: 16
Likes: 0
Received 0 Likes on 0 Posts
Default

For the one that connects to the fuse boxes?
Old 02-13-2018, 05:11 PM
  #4  
rwb
TECH Enthusiast
 
rwb's Avatar
 
Join Date: Jan 2002
Location: Kansas
Posts: 667
Likes: 0
Received 0 Likes on 0 Posts

Default

People usually move the fuse boxes down towards the front of the fender but still in the engine bay. Search for moving fuse boxes in this section.
Old 02-17-2018, 07:32 PM
  #5  
TECH Addict
iTrader: (36)
 
5.7stroker's Avatar
 
Join Date: Apr 2009
Location: OH
Posts: 2,122
Received 197 Likes on 154 Posts

Default

Custom PCM cover is where it's at.
Old 02-18-2018, 10:20 AM
  #6  
TECH Fanatic
iTrader: (8)
 
cancam99ss's Avatar
 
Join Date: Mar 2010
Location: Miami 33155
Posts: 1,134
Received 80 Likes on 57 Posts

Default

Originally Posted by 5.7stroker
Custom PCM cover is where it's at.
got a pic?
Old 02-18-2018, 10:42 AM
  #7  
TECH Fanatic
iTrader: (19)
 
Majestic9C1's Avatar
 
Join Date: Jun 2013
Location: Cincinnati, OH
Posts: 1,655
Received 22 Likes on 22 Posts

Default


kinda hard to see but its basically a bent piece of aluminum with a black wrap to cover up the pcm


also moved the fuse boxes where the AIR pump was and covered it up with a another piece of aluminum in carbon fiber wrap
Old 02-18-2018, 12:18 PM
  #8  
TECH Addict
iTrader: (36)
 
5.7stroker's Avatar
 
Join Date: Apr 2009
Location: OH
Posts: 2,122
Received 197 Likes on 154 Posts

Default

Originally Posted by cancam99ss
got a pic?
I took a piece of sheet metal and cut it then painted it and added window stripping to the edges. Then I made a 2nd piece and angled it 90 degrees and secured it with aluminum tape on the backside. It has a grove in it to accommodate the notch on the hood. It gets warm but works.

Majestic's is much simpler looking, so I may do something like he did.

Old 02-19-2018, 11:47 AM
  #9  
Teching In
 
blown69's Avatar
 
Join Date: Jul 2014
Location: Bonaire, Ga.
Posts: 37
Likes: 0
Received 0 Likes on 0 Posts
Default Custom block off inner fender panels and PCM cover

This is a picture of my son’s car we made block off panel using Zeus fasteners for easy access to fuse panel and coolant overflow tank. This also shows the PCM block off panel we made. We just got the 404 cid running and I will post detail shortly.
Corner shot of the same. If anyone want to see I can post before and after photos


Last edited by blown69; 02-19-2018 at 02:30 PM.
Old 02-24-2018, 10:31 AM
  #10  
Staging Lane
 
Daves03's Avatar
 
Join Date: Feb 2018
Location: Bessemer City NC
Posts: 94
Likes: 0
Received 0 Likes on 0 Posts
Default

dang blown69 that is a sweet looking ride, gives me the itch to do something to my car now
Old 02-24-2018, 11:16 AM
  #11  
TECH Addict
iTrader: (36)
 
5.7stroker's Avatar
 
Join Date: Apr 2009
Location: OH
Posts: 2,122
Received 197 Likes on 154 Posts

Default

blown69, very nice. How much for a pair of those block of plates and ecu cover in black?
Old 02-25-2018, 10:02 PM
  #12  
TECH Fanatic
iTrader: (8)
 
cancam99ss's Avatar
 
Join Date: Mar 2010
Location: Miami 33155
Posts: 1,134
Received 80 Likes on 57 Posts

Default exactly!

Originally Posted by 5.7stroker
blown69, very nice. How much for a pair of those block of plates and ecu cover in black?
ill be ready to buy ASAP!
Old 02-26-2018, 08:59 AM
  #13  
Teching In
 
blown69's Avatar
 
Join Date: Jul 2014
Location: Bonaire, Ga.
Posts: 37
Likes: 0
Received 0 Likes on 0 Posts
Default Block off panels

Originally Posted by cancam99ss
ill be ready to buy ASAP!
Have several projects going on at this time so making block off panels in the immediate future would be tough unless I had enough request to make many at one time. Post up if interested in making your own and I can post how I did it or again if interest is high enough I could make.
Old 02-26-2018, 09:13 AM
  #14  
TECH Fanatic
iTrader: (1)
 
jaxcam02's Avatar
 
Join Date: Jan 2010
Location: Jacksonville, Fl
Posts: 1,642
Received 18 Likes on 17 Posts

Default

I would love to see how you did them. Its simple but looks great
Old 02-26-2018, 09:35 AM
  #15  
TECH Addict
iTrader: (36)
 
5.7stroker's Avatar
 
Join Date: Apr 2009
Location: OH
Posts: 2,122
Received 197 Likes on 154 Posts

Default

Originally Posted by jaxcam02
I would love to see how you did them. Its simple but looks great
This x2
Old 02-26-2018, 10:19 AM
  #16  
10 Second Club
iTrader: (11)
 
Zmg00camaross's Avatar
 
Join Date: Jun 2009
Location: Missouri
Posts: 5,046
Received 47 Likes on 41 Posts

Default

Originally Posted by 5.7stroker
This x2
X3 looks nice.
Old 02-28-2018, 09:33 PM
  #17  
Teching In
 
blown69's Avatar
 
Join Date: Jul 2014
Location: Bonaire, Ga.
Posts: 37
Likes: 0
Received 0 Likes on 0 Posts
Default Pictures of making my block off panels

Originally Posted by Zmg00camaross
X3 looks nice.
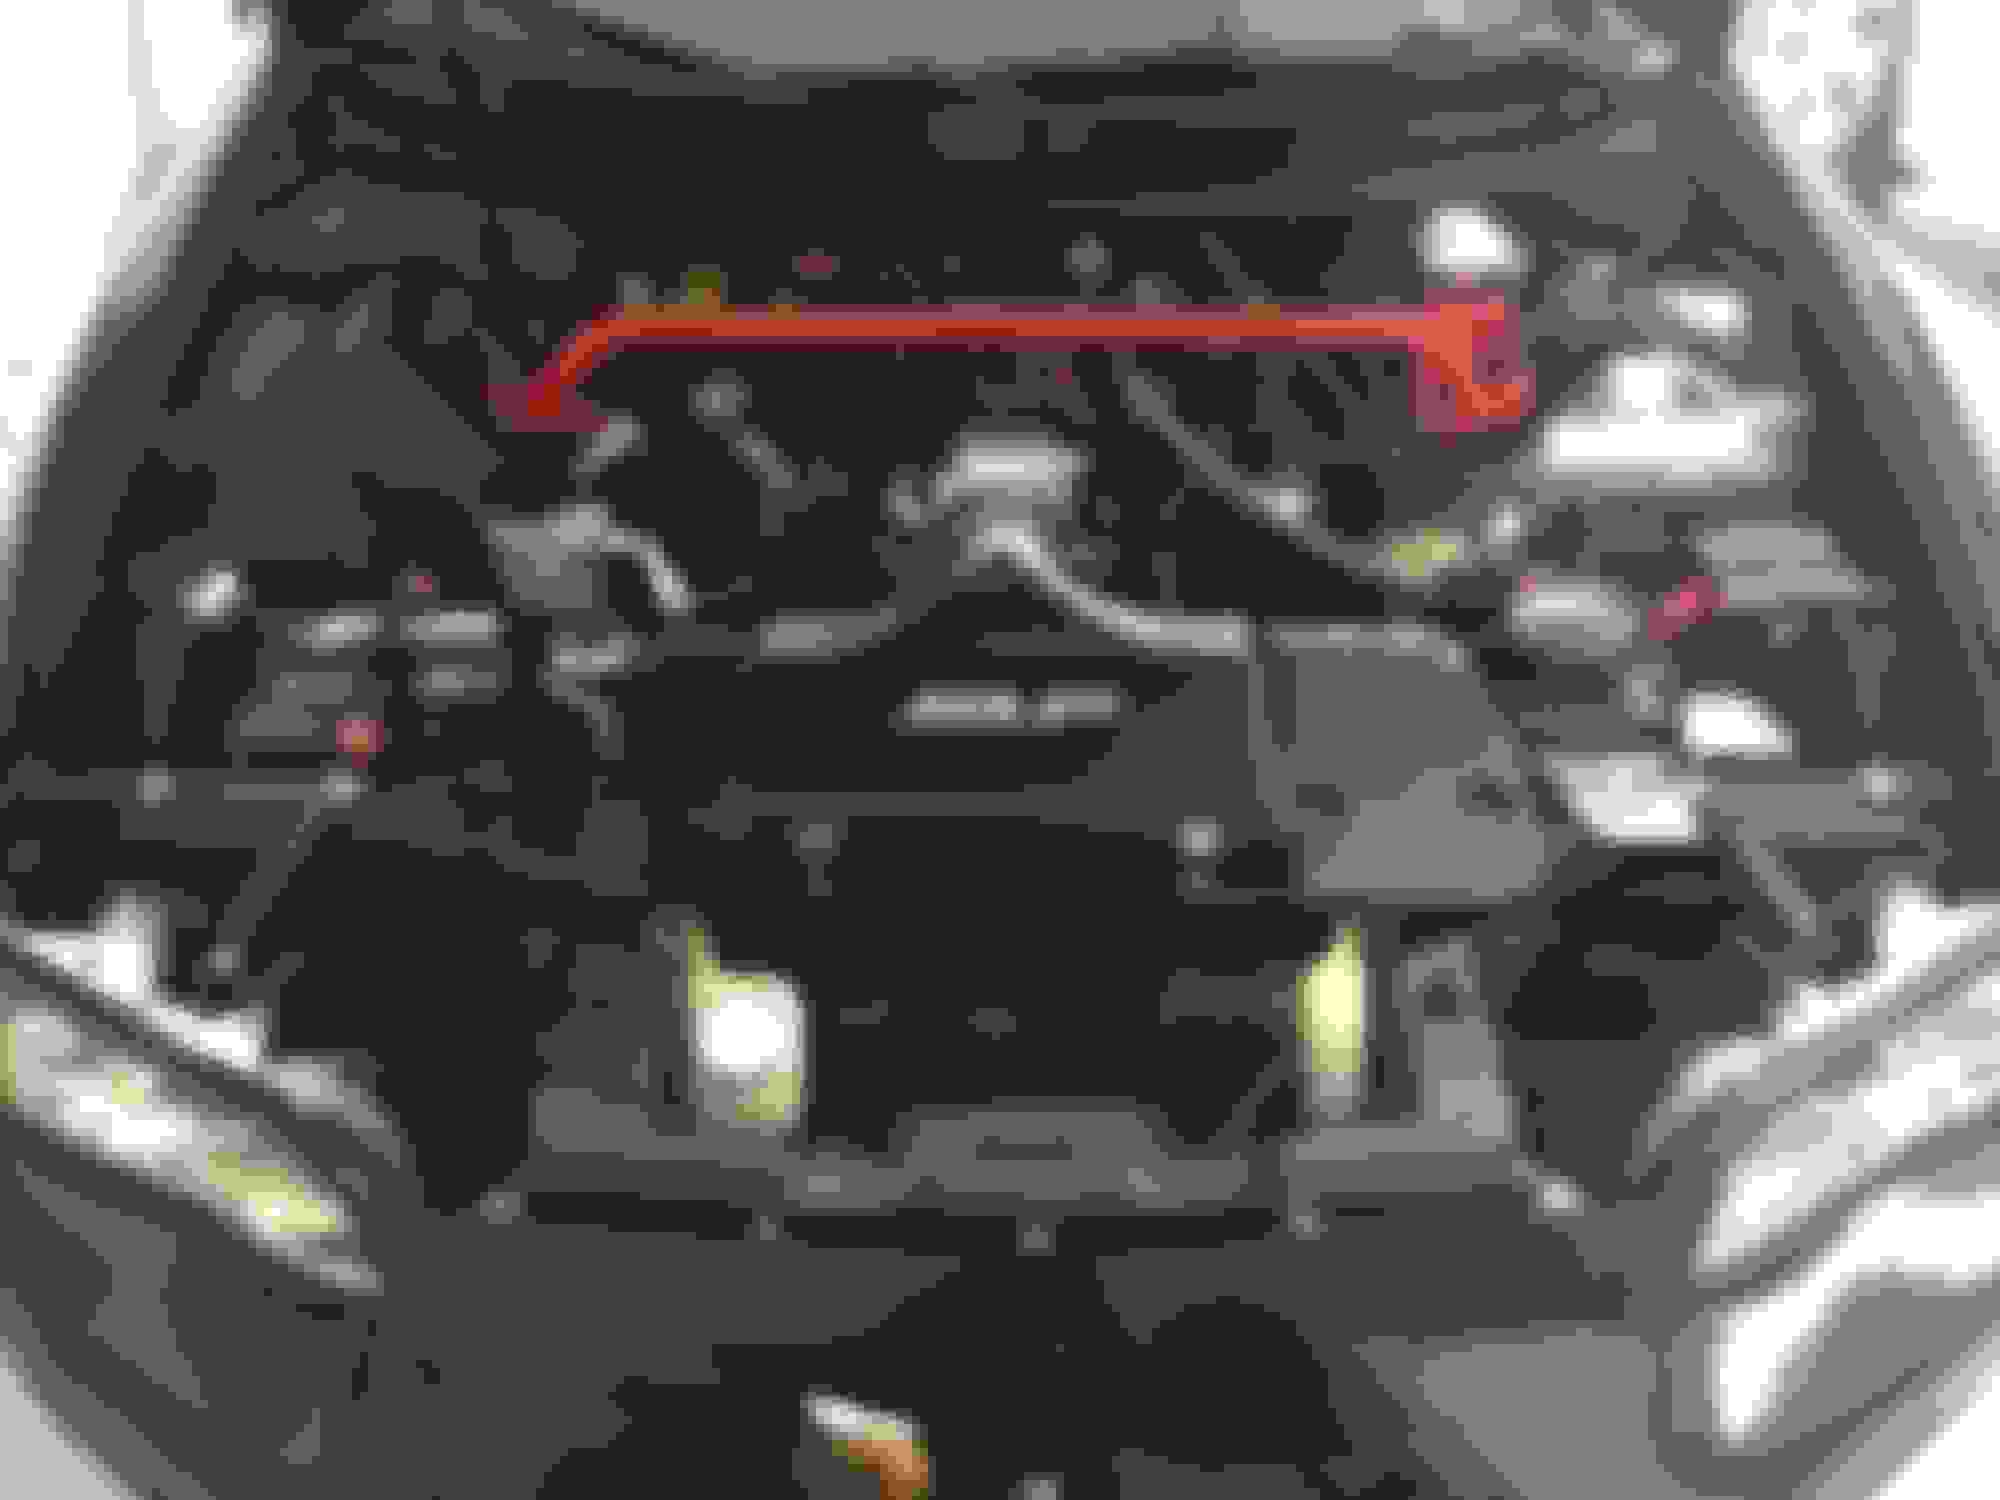
Picture of typical passenger side clutter.
Engine compartment prior to modifications and new 404cid Procharged LS2
Photo of fuse panels prior to lowering fuse blocks below level of block off panels
Passenger side prepped for paint with Zeus fastener plates installed
This panel was made using a piece of card board to trace the outline of the hole. The cardboard pattern was transferred to a piece of 18 gauge sheet metal and cut. I then found a piece of aluminum pipe 4 1/4” od and bent sheet metal panel around the pipe by hand. Nothing special just laid over and bent. I then riveted the Zeus panel brackets In easily accessible 4 corners. Placed the panel over the Zeus plates and reached thru the hole and marked for Zeus fasteners. Drilled holes and installed
Passenger side made the same way
Fuse panels relocated about 1-2 inches lower so will clear block off panel
Cut battery tray off to fit inside “box”. Dremmeled a new groove for the coolant pipe to fit in so it can be run beside radiator support out of sight. I cut the neck of the overflow tank off 1.5” so it would fit below block off panel. I used cut off section to reinforce the joint where section removed. Used 2 part epoxy to glue pipes together. I relocated battery to trunk to offset weight of procharger but a small battery, a/m over flow tank, methanol pump, etc. could be placed this area.
This shows the lower panel installed using 1.5” L- brackets riveted to inner fender to attach lower panel to. I used sheet metal screws to attach bottom portion of panel to side “frame”. This panel is about 1” above the frame and hides all the ugly wiring the runs along the top of the frame. Hole is for procharger to plenum pipe.
This shows lower panel installed
This is a picture of the almost finished engine compartment highlighting the block off panels.
Old 02-28-2018, 10:14 PM
  #18  
TECH Fanatic
 
ChopperDoc's Avatar
 
Join Date: Oct 2014
Location: Virginia
Posts: 1,220
Received 176 Likes on 107 Posts
Default

Blown69...

That is a sweet looking ride... Wow. I am humbled right now. I guess I will get to work as soon as the wife lets me... However, I don't know if she will let me spend that kind of time not actually fixing something.

Thank you for posting the "how to," though, I almost always do something different than everyone else lol. I am actually fabricating a K&N filter tube right now to work with a 100mm MAF. It's been taking some time, but it looks good so far, and is one of a kind, like yours. You have a fine specimen there to emulate. I like those ideas.
Old 02-28-2018, 11:04 PM
  #19  
TECH Fanatic
iTrader: (7)
 
Spartan7's Avatar
 
Join Date: Mar 2009
Location: Spring, TX
Posts: 1,714
Likes: 0
Received 6 Likes on 5 Posts

Default

Originally Posted by blown69
...
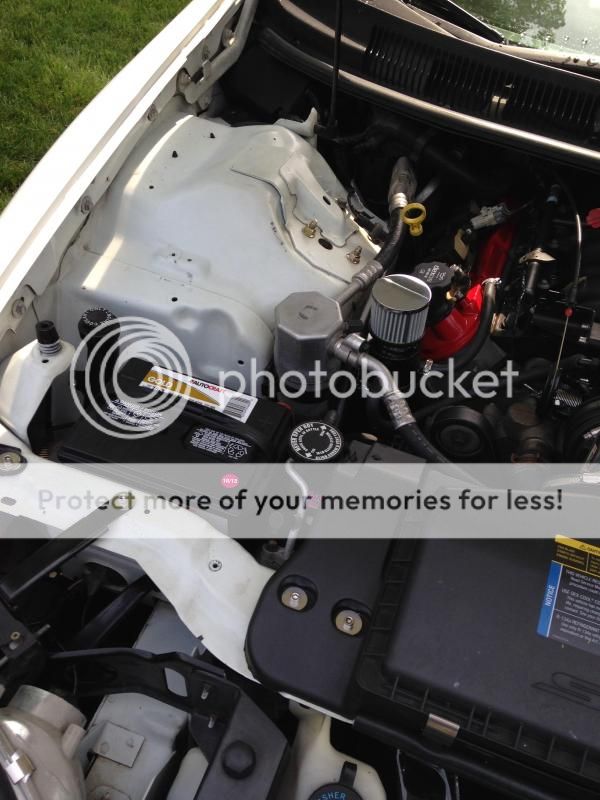
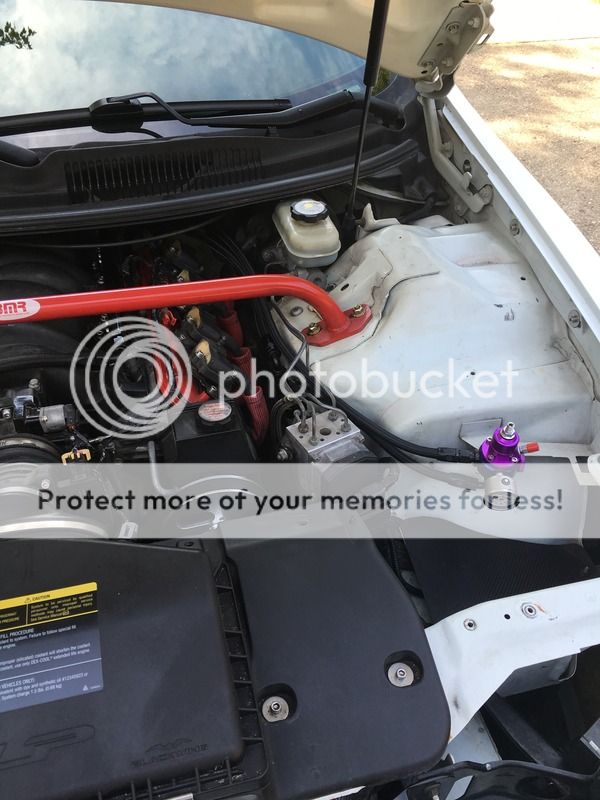
That's some really nice work you did. I didn't go nearly that far, but just cleaning up the ugly wires, LT1 fuel lines, and hood latch cable can do wonders (along with a nice paint job of course).

Old 03-01-2018, 07:28 AM
  #20  
Teching In
 
blown69's Avatar
 
Join Date: Jul 2014
Location: Bonaire, Ga.
Posts: 37
Likes: 0
Received 0 Likes on 0 Posts
Default

Originally Posted by ChopperDoc
Blown69...

That is a sweet looking ride... Wow. I am humbled right now. I guess I will get to work as soon as the wife lets me... However, I don't know if she will let me spend that kind of time not actually fixing something.

Thank you for posting the "how to," though, I almost always do something different than everyone else lol. I am actually fabricating a K&N filter tube right now to work with a 100mm MAF. It's been taking some time, but it looks good so far, and is one of a kind, like yours. You have a fine specimen there to emulate. I like those ideas.
Thanks for the kind words


Quick Reply: Hiding Wiring Harness


All times are GMT -5. The time now is 01:56 AM.