
My 4l60e build for my turbo car


 02-02-2019, 11:45 PM
#22
TECH Junkie
02-03-2019, 03:47 AM
#25

With the TransGo separator plate, if you put a checkball on the hole, you will see a lot of light because of the hole not being setup for the Torlon checkball. TransGo knew that when you used a steel checkball, that it would immediately make a good seat for it. Torlon ***** do not have the mass of the steel checkball and it will take awhile for it to seat in completely. With the Ford AOD separator plates, the holes were much better to use the Torlon checkballs, since that what they were designed for. If the separator plate that you are using is used and in good shape, the checkball holes will already have a good seat for the Torlon checkballs. I did not seat in the separator plate when I first used the Torlon checkballs until I had a problem. That is when I noticed the seats were not set to take Torlon checkballs when I saw a lot of light from the checkball not seating all the way. When I fixed that I decided from then on to make the seats accept Torlon checkballs. Since then no problem.
02-03-2019, 08:28 AM
#26
With the TransGo separator plate, if you put a checkball on the hole, you will see a lot of light because of the hole not being setup for the Torlon checkball. TransGo knew that when you used a steel checkball, that it would immediately make a good seat for it. Torlon ***** do not have the mass of the steel checkball and it will take awhile for it to seat in completely. With the Ford AOD separator plates, the holes were much better to use the Torlon checkballs, since that what they were designed for. If the separator plate that you are using is used and in good shape, the checkball holes will already have a good seat for the Torlon checkballs. I did not seat in the separator plate when I first used the Torlon checkballs until I had a problem. That is when I noticed the seats were not set to take Torlon checkballs when I saw a lot of light from the checkball not seating all the way. When I fixed that I decided from then on to make the seats accept Torlon checkballs. Since then no problem.
 02-04-2019, 03:47 PM
#29
I don’t think there’s a downside. Ford has been using them for a while.
I wanted to update. I was gonna take pics along the way. But there’s playoff how to’s on the web. Plus the major controversy on how other people build theirs may clash with how I do mine, so I decided I’d rather not get into a pissing match with anyone about it. I’ll do me, they can do them, kind of thing. I have a simple system and method that works for me. I’ll continue to use it until something else better comes along. I like to experiment on my own **** to see what works and what doesn’t. What I like and what I don’t like. I’ll share some of my thoughts and experiences below. I’ll first outline what I’ve done on this build.
-4l79 drum
-8 exidy custom th350 size frictions on the 3-4
-red alto wide band. Machined drum
-tig tack welded the low reverse drum snap ring in place.
-drilled 3-4 feedhole in separator plate to .092 (it works perfect like this, I didn’t change it from last build)
-sonnax 2nd servo piston
-superior 4th piston
-sonnax sealed servo pin. Clearance on the tightest side
-red alto low reverse clutches (I don’t care for red alto to be honest)
-alto high energy forward and overrun
-kolene steels on the forward and overrun
-stock pump rotor (has seen 7000+ many many times)
-high volume pump spring
-.500 boost valve
-new Borg Warner 4l65 sprags (overrun sprag is .050 taller elements) pics to be posted
-sonnax billet PINLESS accumulator pistons (all three)
-plastic checkballs
-factory separator plate
-shot peened and induction hardened 4l65 input and output shafts
-5 pinion rear planet, 4 pinion front
-late model heavy duty reaction shaft, roller bearing
-China beast sunshell. Yea. I’m a little on the fence about this. It’s the same thickness but i’m Still Leary if it. Couldn’t get my hands on a real beast.
all I can think of at the moment. Pics coming.
Last edited by Kfxguy; 02-04-2019 at 04:07 PM.
02-04-2019, 04:05 PM
#30
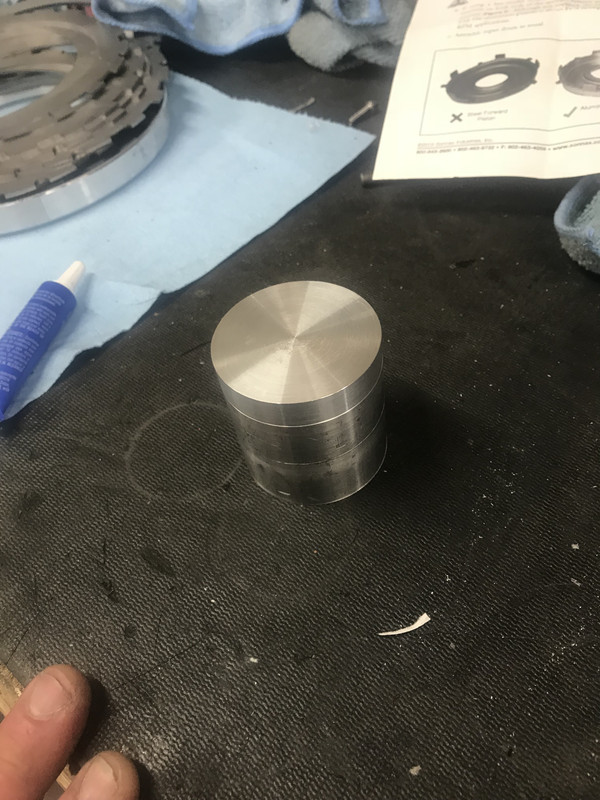
So I had to make a tool (I like making tools, I make them for people a lot) to properly press the input drum reinforcement sleeve on. I love having a lathe. Whipped it up in a couple minutes out of some thick pipe and a piece of solid billet barstock.
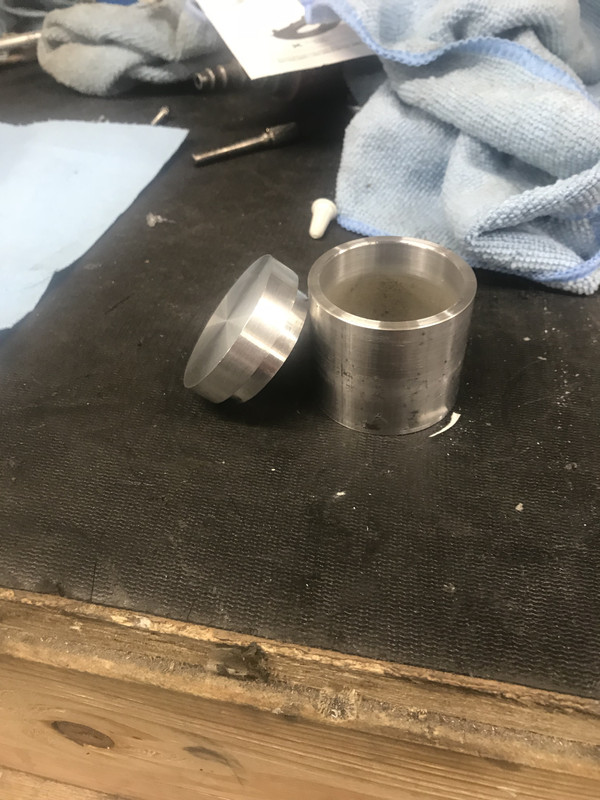
Top press fit in tightly. Worked perfectly
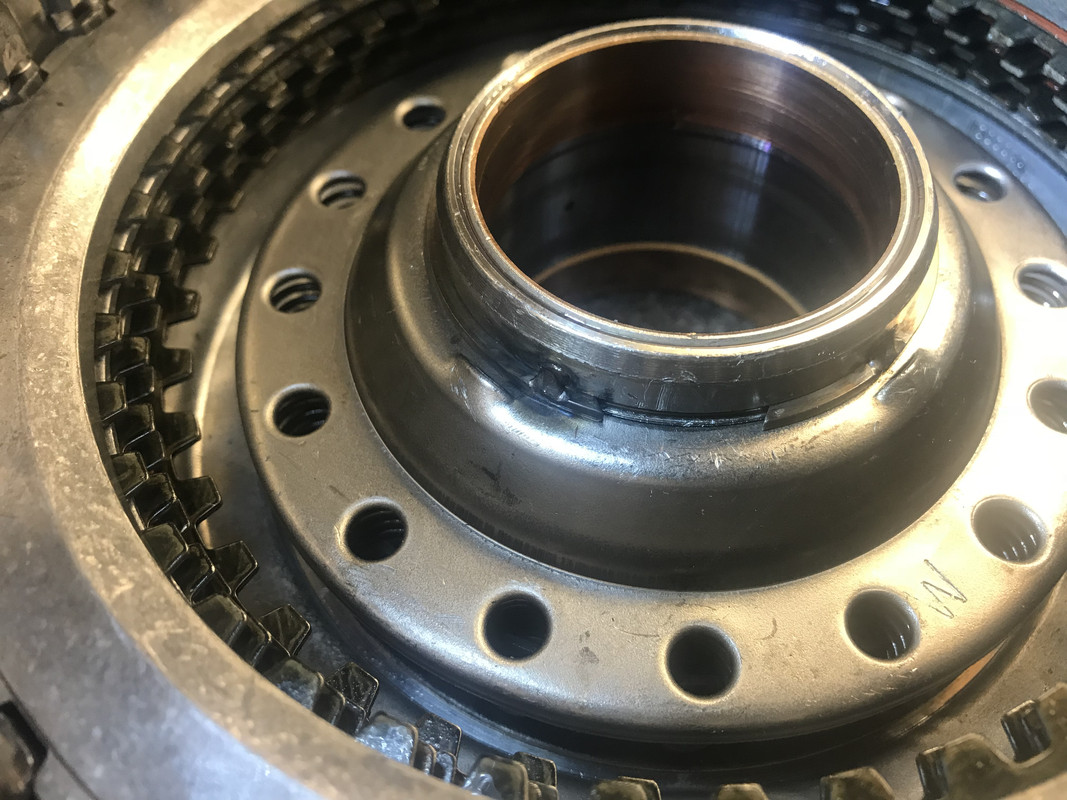
tacked the offending snap ring in place.
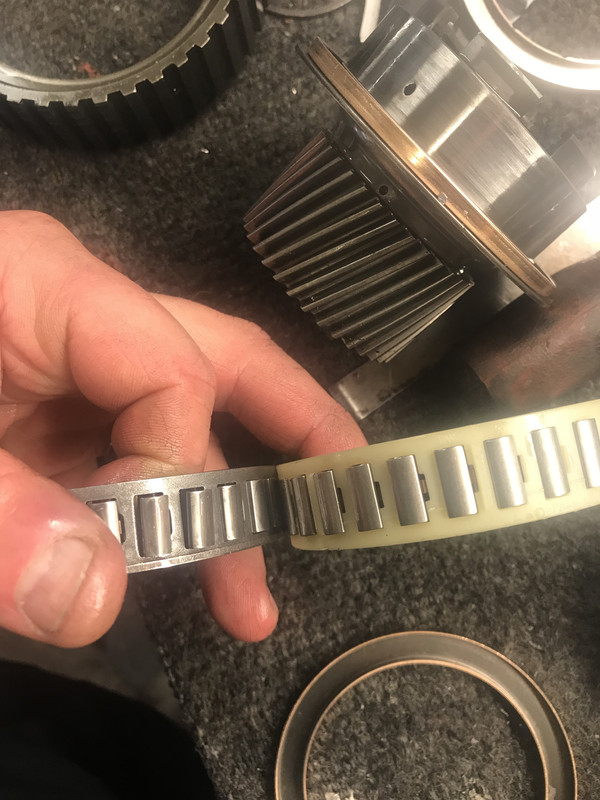
and don’t let anyone tell you a 4l65 overrun sprag is no different than a 4l60 one. I searched and search and could not find a definitive answer. So I’m posting it with proof here.
Top press fit in tightly. Worked perfectly
tacked the offending snap ring in place.
and don’t let anyone tell you a 4l65 overrun sprag is no different than a 4l60 one. I searched and search and could not find a definitive answer. So I’m posting it with proof here.
02-04-2019, 06:00 PM
#32
the first time i used a smart shell was in a buddy a buddy of mines car. It ran like 10.60’s on nitrous. It ballooned the shell and spread it apart. First one I ever used. And the last one. I only use a beast and I’ve had a few cars in the 9’s that never had a shell problem. The reason a beast weighs more is because it’s thicker. I’ll take strength in a weak area over less weight any day of the week. You can make your own decision. You think the smart shell is better, hey, your welcome to use it. I only speak from my personal experience and if I had a problem out of the very first one tried and never a problem out of a beast....well nothing anyone can say will convince me otherwise. i’m a huge sonnax fan too, I prefer their stuff over anything else but that’s just one item I won’t trust after failing on me the first try. I put a beast in that sane trans and that has been years ago. Never had another problem.
02-04-2019, 09:33 PM
#34
it was a mid 10 second full weight 4th gen car. On nitrous. And you even said the beast is much heavier. That’s a good thing in my opinion, I mean think about it. It’s a stamped piece of steel. How strong would it really be if it was thinner than a beast? I wouldn’t have even considered running the smart shell in a 9 second car. Two cars I built the trans for were running low 9’s at 148mph for one and like 152 in the other. No way I’d chance that. The car running 148 was also a full weight 4th gen. Supposedly it weighed right around 4000lbs with him in it and he had a big speaker box lol. I actually have a video of that car leaving on the back bumper.
02-05-2019, 07:06 AM
#35
TECH Junkie
I don’t think there’s a downside. Ford has been using them for a while.
I wanted to update. I was gonna take pics along the way. But there’s playoff how to’s on the web. Plus the major controversy on how other people build theirs may clash with how I do mine, so I decided I’d rather not get into a pissing match with anyone about it. I’ll do me, they can do them, kind of thing. I have a simple system and method that works for me. I’ll continue to use it until something else better comes along. I like to experiment on my own **** to see what works and what doesn’t. What I like and what I don’t like. I’ll share some of my thoughts and experiences below. I’ll first outline what I’ve done on this build.
-4l79 drum
-8 exidy custom th350 size frictions on the 3-4
-red alto wide band. Machined drum
-tig tack welded the low reverse drum snap ring in place.
-drilled 3-4 feedhole in separator plate to .092 (it works perfect like this, I didn’t change it from last build)This Shocks me...you must be seeing accelerated wear.
-sonnax 2nd servo piston
-superior 4th piston
-sonnax sealed servo pin. Clearance on the tightest side
-red alto low reverse clutches (I don’t care for red alto to be honest)
-alto high energy forward and overrun
-kolene steels on the forward and overrun
-stock pump rotor (has seen 7000+ many many times)If it's a 13 vane...this is asking for trouble. Trust me.
-high volume pump spring
-.500 boost valve
-new Borg Warner 4l65 sprags (overrun sprag is .050 taller elements) pics to be posted
-sonnax billet PINLESS accumulator pistons (all three)Block 4th accum by driving a check ball into the feed hole in the case. Peen the edges for insurance against poping out
-plastic checkballs
-factory separator plate
-shot peened and induction hardened 4l65 input and output shafts
-5 pinion rear planet, 4 pinion front
-late model heavy duty reaction shaft, roller bearing
-China beast sunshell. Yea. I’m a little on the fence about this. It’s the same thickness but i’m Still Leary if it. Couldn’t get my hands on a real beast.
all I can think of at the moment. Pics coming.
Sounds like you're confident in your processes but, with experience of myself and others...I'm going to say your valve body theory is, unique, for sure.
02-05-2019, 08:16 AM
#36
why would you think i have accelerated wear? I drilled the oil holes when I first built it to get more feed oil there. Not sure why that would lead you to believe I have accelerated wear?
pump rotor. I’ve never had a problem with a rotor because it was a 13v. Not sure what your theory is on that or why. I’ve been turning this engine 7000rpm on the regular for two years. Had another combo in another car and it was turning 7800 on the regular. Was my daily driver and I had a lead foot. No problem there either.
Dunno?
Last edited by Kfxguy; 04-21-2020 at 10:56 PM.
02-05-2019, 11:17 AM
#37
TECH Junkie
why would you think i have accelerated wear? I drilled the oil holes when I first built it to get more feed oil there. Not sure why that would lead you to believe I have accelerated wear. But ok.
pump rotor. Sorry, I’ve never had a problem with a rotor because it was a 13v. Not sure what your theory is on that or why, but it doesn’t add up to me. If you’ve had issues in the past, it was likely the converter depth was not correct
 on the rotor or the hub on the converter has too much runout. I have a buddy that was having problems with that and the shop that built it could not nail own the issue until he sent the convertor to have it checked. Got a new converter and guess what? No more broken rotors. My opinion is if it ain’t broke, don’t fix it. I’ve been tiring this engine 7000rpm on the regular for two years. Had another combo in another car and it was turning 7800 on the regular. Was my daily driver and I had a lead foot. No problem there either.
It's like the guys that make 1100 on sbe 5.3 sure it can be done...and some guys get lucky and have it last longer...but a set of forged rods is probably a good idea...even if they've been beating on it for a year.
I'm guessing you have accelerated wear because your feed hole size is incredibly small. For a build over 450 horse...if the 3rd feed hole doesn't start with a .1 you're not feeding it anywhere near enough. And more needs to get focus than just this feed hole...there are multiple other things that play into the 2-3 shift timing.
The 13 vane rotor has been known to fail even in stock vehicles with stock converters. It's just weaker by design. Yours may be fine...but from experience of many many 60e builds...mine either get a billet 13 rotor...or a stronger 10 vane. The 10 vane also supplies slightly more oil volume which is valuable in my eyes. And as for converter depth...duh. I've written on this forum and others on converter depth, and other elementary level basics. On a couple 13 vane pumps I had break a while back, I checked converter hub run out, concentric alignment of the crank to the pump (making sure the bell was properly aligned with the crank), etc. Its more in depth than just converter engagement...the 13 vane is just not what I think should be used in a serious performance build. IF 10% fail, that means 90% lived. Maybe you're in the 90%...but I don't take chances on the 10%
It sounds like you have a really good list of parts and a fairly good understanding of how to build a 4l60e, but don't be closed minded to new ideas or input. I learn every single day on this forum...from some guys more experienced than me, and some guys less experienced than me. I try not to shoot down ideas until they've been well discussed and vetted.
The following 2 users liked this post by MaroonMonsterLS1:
blsnelling (12-14-2020), Kfxguy (04-21-2020)
02-05-2019, 01:52 PM
#38
Let me just say...you're dealing with an incredibly limited sample size. 1 in this specific case.
It's like the guys that make 1100 on sbe 5.3 sure it can be done...and some guys get lucky and have it last longer...but a set of forged rods is probably a good idea...even if they've been beating on it for a year.
I'm guessing you have accelerated wear because your feed hole size is incredibly small. For a build over 450 horse...if the 3rd feed hole doesn't start with a .1 you're not feeding it anywhere near enough. And more needs to get focus than just this feed hole...there are multiple other things that play into the 2-3 shift timing. Not sure what wear would have to do with my CHOICE of not using a overly large hole. If you feed too much pressure and/or volume, you create more problems. Examples: rolled lip seals, bent apply cage, distorted apply plates and BLOWN out tags on the 3-4 clutch retaining snap ring at the end of the input drum. yes, I've seen people post about breaking the tangs on the drum. Goes back to what i keep saying, keep the **** simple.
The 13 vane rotor has been known to fail even in stock vehicles with stock converters. It's just weaker by design. Yours may be fine...but from experience of many many 60e builds...mine either get a billet 13 rotor...or a stronger 10 vane. The 10 vane also supplies slightly more oil volume which is valuable in my eyes. And as for converter depth...duh. I've written on this forum and others on converter depth, and other elementary level basics. On a couple 13 vane pumps I had break a while back, I checked converter hub run out, concentric alignment of the crank to the pump (making sure the bell was properly aligned with the crank), etc. Its more in depth than just converter engagement...the 13 vane is just not what I think should be used in a serious performance build. IF 10% fail, that means 90% lived. Maybe you're in the 90%...but I don't take chances on the 10% See my explanation below, you're probably running too much pressure, causing the rotors to break.
It sounds like you have a really good list of parts and a fairly good understanding of how to build a 4l60e, but don't be closed minded to new ideas or input. I learn every single day on this forum...from some guys more experienced than me, and some guys less experienced than me. I try not to shoot down ideas until they've been well discussed and vetted.
not trying to battle you or argue with you guy, and i'm definitely not trying to be close minded.....so apologies in advance if you take any of what i say, the wrong way.
02-05-2019, 02:24 PM
#39
TECH Junkie
The whole point of the forum is to save you from having to break your own stuff.
For example...someone may say to me "I know that from forums, a th400 will probably need to be dual fed." They didn't didn't have to smoke a trans behind a turbo setup, trace all the hydraulics, THEN dual feed it. I just knew that 100 other people had the failure and dual feeding was the fix.
Yes...the rotors absolutely break from extreme pressure. That's no doubt. Myself (and others that build a 4l60e for more power than we should) run in excess of 230 psi. When you can't increase clutch area or piston apply area...the only way left to get holding capacity is with pressure. I know you like to keep things simple...but re-routing fluid paths, blocking fluid, etc is what anybody in the performance trans industry has done forever...its why we can have them hold so much more power now than before.
I'm not sure how much power you've built a 60e for, but 400 or 450 is wildly different than 600.
how much pressure were you running previously? How much power?
You can go ahead and build your trans however you want. I was excited to see a build on here from someone new about building one behind a turbo setup...and I just want to see it be as successful as possible. That's why I'm trying to throw out some tips that don't always get shared. (same goes for PBA...he shares stuff people usually play close to their chest...and we all appreciate him for it). You don't have to take the tips...build it however you want...and if your setup works, then share back your success and we all can learn from it!
With the 4l79 drum, it makes it much much easier to get a trans to live...so you will probably be able to get away with more than most everyone else that doesn't use that drum.
Definitely don't want a battle or argument either...I just want to see this go well. If you prefer keeping it simple, I'll just hold off on pointers until you ask questions. Until then I'll just follow along with the progress!!
Good luck!
02-05-2019, 02:56 PM
#40
The whole point of the forum is to save you from having to break your own stuff.
For example...someone may say to me "I know that from forums, a th400 will probably need to be dual fed." They didn't didn't have to smoke a trans behind a turbo setup, trace all the hydraulics, THEN dual feed it. I just knew that 100 other people had the failure and dual feeding was the fix.
Yes...the rotors absolutely break from extreme pressure. That's no doubt. Myself (and others that build a 4l60e for more power than we should) run in excess of 230 psi. When you can't increase clutch area or piston apply area...the only way left to get holding capacity is with pressure. I know you like to keep things simple...but re-routing fluid paths, blocking fluid, etc is what anybody in the performance trans industry has done forever...its why we can have them hold so much more power now than before.
I'm not sure how much power you've built a 60e for, but 400 or 450 is wildly different than 600.
how much pressure were you running previously? How much power?
You can go ahead and build your trans however you want. I was excited to see a build on here from someone new about building one behind a turbo setup...and I just want to see it be as successful as possible. That's why I'm trying to throw out some tips that don't always get shared. (same goes for PBA...he shares stuff people usually play close to their chest...and we all appreciate him for it). You don't have to take the tips...build it however you want...and if your setup works, then share back your success and we all can learn from it!
With the 4l79 drum, it makes it much much easier to get a trans to live...so you will probably be able to get away with more than most everyone else that doesn't use that drum.
Definitely don't want a battle or argument either...I just want to see this go well. If you prefer keeping it simple, I'll just hold off on pointers until you ask questions. Until then I'll just follow along with the progress!!
Good luck!
For example...someone may say to me "I know that from forums, a th400 will probably need to be dual fed." They didn't didn't have to smoke a trans behind a turbo setup, trace all the hydraulics, THEN dual feed it. I just knew that 100 other people had the failure and dual feeding was the fix.
Yes...the rotors absolutely break from extreme pressure. That's no doubt. Myself (and others that build a 4l60e for more power than we should) run in excess of 230 psi. When you can't increase clutch area or piston apply area...the only way left to get holding capacity is with pressure. I know you like to keep things simple...but re-routing fluid paths, blocking fluid, etc is what anybody in the performance trans industry has done forever...its why we can have them hold so much more power now than before.
I'm not sure how much power you've built a 60e for, but 400 or 450 is wildly different than 600.
how much pressure were you running previously? How much power?
You can go ahead and build your trans however you want. I was excited to see a build on here from someone new about building one behind a turbo setup...and I just want to see it be as successful as possible. That's why I'm trying to throw out some tips that don't always get shared. (same goes for PBA...he shares stuff people usually play close to their chest...and we all appreciate him for it). You don't have to take the tips...build it however you want...and if your setup works, then share back your success and we all can learn from it!
With the 4l79 drum, it makes it much much easier to get a trans to live...so you will probably be able to get away with more than most everyone else that doesn't use that drum.
Definitely don't want a battle or argument either...I just want to see this go well. If you prefer keeping it simple, I'll just hold off on pointers until you ask questions. Until then I'll just follow along with the progress!!
Good luck!
Your right also, the forums are here to learn from others mistakes. I guess because i dont run high pressures, i haven't seen a rotor break. Only one of the guys I built one for actually dynoed his car. Thats the one I mentioned that i have a video of him leaving on the back bumper. he made 750 (i think 751 or 752 to be exact) to the tires with a large shot of gas. The trans would last about 10 months to a year before i had to go through it, mainly was a race car that he'd sometimes drive to work. I'd have some wear on the blue plate 3-4's and usually would break a hard part by that time (planets or sungears). i think we went through it about 3 times in 2.5 years. i used to beat myself up about it, but like i was told by a buddy....i didnt make the sun gears. I didnt cast the planets. Not to mention he went throught the 12 bolt rear breaking more than the trans AND his built th400 that he ended up going to, failed quicker than the 4l60 lol. the car was utterly brutal. hang on.....i'll post the video shortly.
another car i did one for ran like 9.20's at 152mph. and then a few mid to low 10 second cars. and my car, which I barely did anything to the trans initially. I didnt build the trans for boost, had i not put a turbo on it, it would have lasted many years. Its my fault too, why it broke. I ramped boost in too quick, added timing and took out all the tq management to try and make a hero pass. Soon as boost hit, shaft exploded. and by the looks of it, it actually exploded lol. I had the privilege of getting the weaker variant of output shaft. The 4l65 is supposed to be stronger.
heres the video of how hard this car used to leave. He made a shock adjustment and it came up more than normal and scared him so he let out. Lol.
Last edited by Kfxguy; 02-05-2019 at 03:07 PM.