
My 4l60e build for my turbo car
 01-23-2019, 03:42 PM
#1
ok, before I get the usual “just put a turbo 400 or 4l80e in it” I’ll let you know, this is my choice and my money and I want to see how far I can push it.
So i originally pulled it out around 89k Miles and freshened it up and did some minors mods to it and a yank converter. What I did originally was:
input drum reinforcement kit
8 gpz 3-4 clutches
kolene steels
beast sunshell
rollerized reaction shaft
5 pinion front and rear planets
wide bushings where applicable
red alto clutches
red alto wide band
resurface 2-4 band drum
sonnax billet 2-4 servo set
sonnax pinless accumulator pistons
sonnax sealed 2-4 pin
drilled 3-4 feed hole
hd 2-3 valve
hd pump spring
.500 boost valve
plastic check *****
all in all, what I consider a budget build that’ll hold 450-500rwhp and let me beat on it like I did. At that time, turbo was not in the cards. Things happened and then it ended up with a turbo. I knew it was only a matter of time before the 3-4 clutches ended up burning up, no matter.....I cut it no slack when I drove it. All was well until I went to the track. And this happened
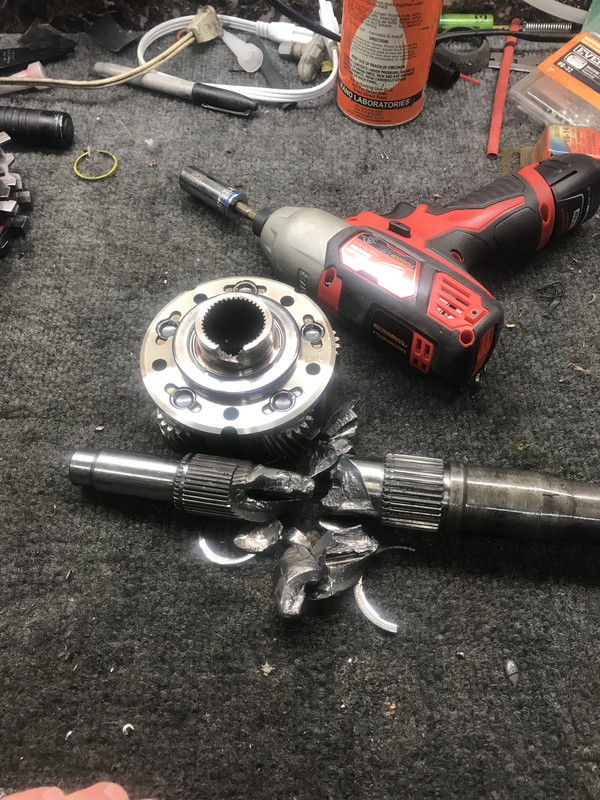
it took out the front planet, rear sprag, input shaft and drum, most of the bearings.
it welded itself together at the reaction shaft also, which because of that I can’t use the sunshell. Heck, it’s probably easier to just say what’s still good. Never seen a shaft mess up so much crap.
On to my new plans. I had the weaker of the 4l60 shafts, I ordered up some 4l65 input and output shafts that have been induction hardened and shot peened. Next best thing to the billet shafts. Besides, there’s no way I’m spending $700-$800 on two shafts. Not for this transmission I’m not. If it breaks again at this point it’ll be easier to cut my losses.
i ordered a 4L79 drum. If you're not familiar, they take an input drum and machine it for a billet end cap and open up the inside diameter a touch to be able to fit turbo 350 clutches. Those clutches are a bit wider and have more surface area than the regular 3-4 clutches. They also include a more rigid laser cut bottom apply plate.
All new 4l65 Borg Warner sprags. Supposedly the front one is wider than the normal 4l60. I’m going back with a four pinion planet on the front. Why? 1) cost. 2) in doing research, I’ve determined that the proof of extra strength added is inconclusive.
Tight blue molded piston set.
I plan on taking pics and posting as I build it. And I can’t wait to use this new drum. I was told that the 2-3 shift will be as firm as the 1-2 shift. I’ll let you guys know what I think about it.
So i originally pulled it out around 89k Miles and freshened it up and did some minors mods to it and a yank converter. What I did originally was:
input drum reinforcement kit
8 gpz 3-4 clutches
kolene steels
beast sunshell
rollerized reaction shaft
5 pinion front and rear planets
wide bushings where applicable
red alto clutches
red alto wide band
resurface 2-4 band drum
sonnax billet 2-4 servo set
sonnax pinless accumulator pistons
sonnax sealed 2-4 pin
drilled 3-4 feed hole
hd 2-3 valve
hd pump spring
.500 boost valve
plastic check *****
all in all, what I consider a budget build that’ll hold 450-500rwhp and let me beat on it like I did. At that time, turbo was not in the cards. Things happened and then it ended up with a turbo. I knew it was only a matter of time before the 3-4 clutches ended up burning up, no matter.....I cut it no slack when I drove it. All was well until I went to the track. And this happened
it took out the front planet, rear sprag, input shaft and drum, most of the bearings.
it welded itself together at the reaction shaft also, which because of that I can’t use the sunshell. Heck, it’s probably easier to just say what’s still good. Never seen a shaft mess up so much crap.
On to my new plans. I had the weaker of the 4l60 shafts, I ordered up some 4l65 input and output shafts that have been induction hardened and shot peened. Next best thing to the billet shafts. Besides, there’s no way I’m spending $700-$800 on two shafts. Not for this transmission I’m not. If it breaks again at this point it’ll be easier to cut my losses.
i ordered a 4L79 drum. If you're not familiar, they take an input drum and machine it for a billet end cap and open up the inside diameter a touch to be able to fit turbo 350 clutches. Those clutches are a bit wider and have more surface area than the regular 3-4 clutches. They also include a more rigid laser cut bottom apply plate.
All new 4l65 Borg Warner sprags. Supposedly the front one is wider than the normal 4l60. I’m going back with a four pinion planet on the front. Why? 1) cost. 2) in doing research, I’ve determined that the proof of extra strength added is inconclusive.
Tight blue molded piston set.
I plan on taking pics and posting as I build it. And I can’t wait to use this new drum. I was told that the 2-3 shift will be as firm as the 1-2 shift. I’ll let you guys know what I think about it.
 01-23-2019, 04:40 PM
#2
TECH Junkie

ok, before I get the usual “just put a turbo 400 or 4l80e in it” I’ll let you know, this is my choice and my money and I want to see how far I can push it.
So i originally pulled it out around 89k Miles and freshened it up and did some minors mods to it and a yank converter. What I did originally was:
input drum reinforcement kit
8 gpz 3-4 clutches
kolene steels
beast sunshell
rollerized reaction shaft
5 pinion front and rear planets-As you've already called out...they are an unnecessary cost. 4 pinions are not the weak point of this unit.
wide bushings where applicable
red alto clutches
red alto wide band-From experience...there are better options for both. Stock tan (yes that's not a typo) are my preference for anything other than the 3/4 clutches. The red alto clutches do well...until they don't. They can easily become "glazed" and then don't stand a chance. The tan's are more than capable (they're ON before torque is ever applied...so the static holding power is all you need to worry about and it's plenty adequate) and more forgiving imo. The band needs to change for sure...a carbon band will yield much better shift and last longer than the red alto.
resurface 2-4 band drum-Spend the $40-$70 and get a new OEM drum. It's well worth it.
sonnax billet 2-4 servo set.-Did you get both the sonax 2nd and sonnax 4th?
sonnax pinless accumulator pistons
sonnax sealed 2-4 pin-VERY good addition to the list. Most people overlook this and it can be a HUGE leak in the 3rd gear circuit. Good job!
drilled 3-4 feed hole-I doubt big enough. I don't mean that sarcastically...with a billet 2nd servo, and other internal mods...you can make leaps and bounds improvements in 2-3 shift feel. PM if you have questions on this specifically
hd 2-3 valve
hd pump spring
.500 boost valve-If you haven't already vacuum tested this setup...I advise you to do so. I prefer the sonnax o ring boost valve and PR spring.
plastic check *****
all in all, what I consider a budget build that’ll hold 450-500rwhp and let me beat on it like I did. At that time, turbo was not in the cards. Things happened and then it ended up with a turbo. I knew it was only a matter of time before the 3-4 clutches ended up burning up, no matter.....I cut it no slack when I drove it. All was well until I went to the track. And this happened
it took out the front planet, rear sprag, input shaft and drum, most of the bearings.
it welded itself together at the reaction shaft also, which because of that I can’t use the sunshell. Heck, it’s probably easier to just say what’s still good. Never seen a shaft mess up so much crap.
On to my new plans. I had the weaker of the 4l60 shafts, I ordered up some 4l65 input and output shafts that have been induction hardened and shot peened. Next best thing to the billet shafts. Besides, there’s no way I’m spending $700-$800 on two shafts. Not for this transmission I’m not. If it breaks again at this point it’ll be easier to cut my losses.
i ordered a 4L79 drum.Mason makes a beautiful piece. This will serve you very well. If you're not familiar, they take an input drum and machine it for a billet end cap and open up the inside diameter a touch to be able to fit turbo 350 clutches. Those clutches are a bit wider and have more surface area than the regular 3-4 clutches. They also include a more rigid laser cut bottom apply plate.
All new 4l65 Borg Warner sprags. Supposedly the front one is wider than the normal 4l60. Make sure it's the plastic cage...the lugs are slightly taller which means its stronger. I advise going with new inner and outer races and prepping them properly. I’m going back with a four pinion planet on the front. Why? 1) cost. 2) in doing research, I’ve determined that the proof of extra strength added is inconclusive.
Tight blue molded piston set.
I plan on taking pics and posting as I build it. And I can’t wait to use this new drum. I was told that the 2-3 shift will be as firm as the 1-2 shift. I’ll let you guys know what I think about it.
On top of this list, I HIGHLY encourage you to vacuum test both the valve body and the pump. There are HUGE circuit leaks in the valve body that can ruin the effectiveness of any hard parts. Even the 4l79 drum will not live if you don't properly tackle the hydraulic circuits. At a minimum, you will probably need o-ring'd end plugs, oversize reverse & fwd abuse bore plugs, and more than likely a tcc fix.
Here are some things I would add to your list if I were building it:
-Sonnax High Rev pump slide spring. This helps ensure you have proper pump volume at higher rpm.
-Superior "directional switch valve" to replace the OEM 3rd accumulator check ball capsule.
-When you press in your new input shaft...make sure to use a sealing compound (loctite) to ensure you don't develop leaks around the shaft.
-New EPC. (don't turn the screw...not sure how that keeps getting recommended all over the place)
-Block the 4th gear accumulator. You won't probably even notice the part throttle shifts...but if you ever make WOT 4th gear shifts you'll be grateful it's blocked
-I'm not sure which pinless accumulators you've used...but make sure fwd and 1-2 are updated. If you don't want to spend the money on pinless...new aluminum is just fine.
-I'm not sure what Mason is doing with his drum...so you may want to check with him...but if it still has the stock check ball in the input drum...I would replace it with the superior k070
-10 vane pump rotor with "unbreakable" rings. The 10 vane is stronger, has slightly more pump volume (about 3% by my calculations) and the rings will be much appreciated if you ever hit the limiter. New pump vanes are never a bad idea either.
It looks like you already have a very good list...I hope you keep this updated and show us a BIG hp number and a great track time to show people the 60e isn't the weakling people used to think it was.
01-23-2019, 04:49 PM
#3
This looks like quite the good list. I've made some notes up above (just my opinion on some things...not trying to say you did anything bad/wrong...just trying to share some options that I believe to be better that you may have not considered.
On top of this list, I HIGHLY encourage you to vacuum test both the valve body and the pump. There are HUGE circuit leaks in the valve body that can ruin the effectiveness of any hard parts. Even the 4l79 drum will not live if you don't properly tackle the hydraulic circuits. At a minimum, you will probably need o-ring'd end plugs, oversize reverse & fwd abuse bore plugs, and more than likely a tcc fix.
ll new 4l65 Borg Warner sprags. Supposedly the front one is wider than the normal 4l60. Make sure it's the plastic cage...the lugs are slightly taller which means its stronger. I advise going with new inner and outer races and prepping them properly. I’m going back with a four pinion planet on the front. Why? 1) cost. 2) in doing research, I’ve determined that the proof of extra strength added is inconclusive. it is the plastic cage one, getting it from Mason. what do you mean prepping them?
Here are some things I would add to your list if I were building it:
-Sonnax High Rev pump slide spring. This helps ensure you have proper pump volume at higher rpm. I have this already
-Superior "directional switch valve" to replace the OEM 3rd accumulator check ball capsule. I'll check into this
-When you press in your new input shaft...make sure to use a sealing compound (loctite) to ensure you don't develop leaks around the shaft. I always use loctite sleeve retainer, ive done alot of shafts, I use the sonnax drum often. I made spacers for this to do it safely in my press.
-New EPC. (don't turn the screw...not sure how that keeps getting recommended all over the place)
-Block the 4th gear accumulator. You won't probably even notice the part throttle shifts...but if you ever make WOT 4th gear shifts you'll be grateful it's blocked. maybe
-I'm not sure which pinless accumulators you've used...but make sure fwd and 1-2 are updated. If you don't want to spend the money on pinless...new aluminum is just fine. I have the sonnax billet pinless pistons
-I'm not sure what Mason is doing with his drum...so you may want to check with him...but if it still has the stock check ball in the input drum...I would replace it with the superior k070 will do
-10 vane pump rotor with "unbreakable" rings. The 10 vane is stronger, has slightly more pump volume (about 3% by my calculations) and the rings will be much appreciated if you ever hit the limiter. New pump vanes are never a bad idea either. supposedly the 13v has smoother fluid delivery. I have the rings too.
It looks like you already have a very good list...I hope you keep this updated and show us a BIG hp number and a great track time to show people the 60e isn't the weakling people used to think it was.
I sometimes have a bad habit (called being busy at work and trying to post to a forum lol) of not elaborating enough.....i have the sonnax oringed boost valve.
I also considered polishing the surfaces on the shafts and surfaces that ride in bushings.....thoughts?
01-23-2019, 06:53 PM
#4
TECH Junkie
If you polish anything. Be careful with clearance. I've never found it necessary unless a shaft was chewed more than normal.
The 13 vane is smoother. Marginally. I mean...really marginally. But 10 vane has more volume.
At 4000 rpm...you wont notice which is smoother.
Hell. I doubt you ever notice it at all. Volume is king in this trans. For high rpm stuff...over 7200...I'll actually use a 7 vane from an early 700r4
The 13 vane is smoother. Marginally. I mean...really marginally. But 10 vane has more volume.
At 4000 rpm...you wont notice which is smoother.
Hell. I doubt you ever notice it at all. Volume is king in this trans. For high rpm stuff...over 7200...I'll actually use a 7 vane from an early 700r4
01-23-2019, 07:05 PM
#5
If you polish anything. Be careful with clearance. I've never found it necessary unless a shaft was chewed more than normal.
The 13 vane is smoother. Marginally. I mean...really marginally. But 10 vane has more volume.
At 4000 rpm...you wont notice which is smoother.
Hell. I doubt you ever notice it at all. Volume is king in this trans. For high rpm stuff...over 7200...I'll actually use a 7 vane from an early 700r4
The 13 vane is smoother. Marginally. I mean...really marginally. But 10 vane has more volume.
At 4000 rpm...you wont notice which is smoother.
Hell. I doubt you ever notice it at all. Volume is king in this trans. For high rpm stuff...over 7200...I'll actually use a 7 vane from an early 700r4
01-24-2019, 03:22 PM
#6

To get this to hold up for high horsepower. Use Torlon checkballs. If you are using a new separator plate you will have to make a new seat for the Torlon checkballs (this is easy to do) as the Torlon checkballs take forever to create a perfect seat. Block the 3-2 control valve inboard, then when using the Sonnax 2nd apply servo you can drill out the 2-3 shift feed hole to .155" and the band release hole to .104". When using the Corvette servo, again block the 3-2 control valve inboard, then you can drill the 2-3 shift feed hole to .135" - .140" and the band release to .099" - .101". The Carbonite extra wide 2-4 band with a new oem drum is a good idea as suggested. Run the minimum band clearance. Set the 3-4 clutches at .025" minimum and .040" maximum. 10 vane rotor with the 13 vane slide. Install the slide/rotor at .002" minimum and .003" maximum clearance to pump body. Use the TransGo steel rings and "single" hi-rpm slide spring to keep the pressure up (flat) to apx. 8,000 rpm. I sometimes use the 7 vane setup with the 13 vane slide on motors going over 7,200 rpm for a faster pressure recovery. Install the reverse abuse plug or plug and valve assembly from Sonnax as suggested. Leave the reverse/input piston alone "no restrictor" in the aluminum piston. I have never had a checkball capsule in the input drum present a problem when using the correct hole sizes in the separator plate. If you want, block the checkball capsule completely and add a .035" hole at the bottom on the input drum just below the outside seal area on the 3-4 apply piston. This will stop any centrifuge from trying to apply the 3-4 clutches at hi-rpm in 1st & 2nd gears. Use the TransGo 7-CS clutch spring kit here, as this helps keep the 3-4 clutches off at hi-rpm in 1st & 2nd gears also, and makes for a cleaner and faster 3-2 downshift. Add the "white" actuator spring to the actuator valve from the TransGo Shift kit. This raises line pressure apx. 5-7 pounds. I prefer the TransGo .500" boost valve, however the Sonnax .490" boost valve with or without O-rings work ok too. When all is said and done, install a 0-300 psi. pressure gauge and see what the readings are at WOT at 4,000 rpm and higher. The pressure should be 235 - 245 psi. If lower you will need to address the EPC solenoid to get the correct pressure needed here. If higher, remove the white actuator spring if installed or you will need to address the EPC solenoid to correct this. This rarely happens too much pressure. Lower pressures are common and will hurt the 3-4 clutches before it will hurt the 2-4 band, and higher pressures can possibly cause parts breakage. If you have a very good 60 foot time, put the pressure gauge on it and make sure that it is not picking up air. This will be seen most on the 2-3 shift and the pressure gauge needle will fluctuate wildly. I use a Borg Warner Hi-Energy 10 clutch setup in the 3-4 setup with the stock input drum and an 11 clutch setup in the Sonnax input drum. There is more, however this should help a lot here.
Last edited by PBA; 01-24-2019 at 03:32 PM.
The following users liked this post:
matermark (06-20-2021)
01-24-2019, 04:47 PM
#7
To get this to hold up for high horsepower. Use Torlon checkballs. If you are using a new separator plate you will have to make a new seat for the Torlon checkballs (this is easy to do) as the Torlon checkballs take forever to create a perfect seat. Block the 3-2 control valve inboard, then when using the Sonnax 2nd apply servo you can drill out the 2-3 shift feed hole to .155" and the band release hole to .104". When using the Corvette servo, again block the 3-2 control valve inboard, then you can drill the 2-3 shift feed hole to .135" - .140" and the band release to .099" - .101". The Carbonite extra wide 2-4 band with a new oem drum is a good idea as suggested. Run the minimum band clearance. Set the 3-4 clutches at .025" minimum and .040" maximum. 10 vane rotor with the 13 vane slide. Install the slide/rotor at .002" minimum and .003" maximum clearance to pump body. Use the TransGo steel rings and "single" hi-rpm slide spring to keep the pressure up (flat) to apx. 8,000 rpm. I sometimes use the 7 vane setup with the 13 vane slide on motors going over 7,200 rpm for a faster pressure recovery. Install the reverse abuse plug or plug and valve assembly from Sonnax as suggested. Leave the reverse/input piston alone "no restrictor" in the aluminum piston. I have never had a checkball capsule in the input drum present a problem when using the correct hole sizes in the separator plate. If you want, block the checkball capsule completely and add a .035" hole at the bottom on the input drum just below the outside seal area on the 3-4 apply piston. This will stop any centrifuge from trying to apply the 3-4 clutches at hi-rpm in 1st & 2nd gears. Use the TransGo 7-CS clutch spring kit here, as this helps keep the 3-4 clutches off at hi-rpm in 1st & 2nd gears also, and makes for a cleaner and faster 3-2 downshift. Add the "white" actuator spring to the actuator valve from the TransGo Shift kit. This raises line pressure apx. 5-7 pounds. I prefer the TransGo .500" boost valve, however the Sonnax .490" boost valve with or without O-rings work ok too. When all is said and done, install a 0-300 psi. pressure gauge and see what the readings are at WOT at 4,000 rpm and higher. The pressure should be 235 - 245 psi. If lower you will need to address the EPC solenoid to get the correct pressure needed here. If higher, remove the white actuator spring if installed or you will need to address the EPC solenoid to correct this. This rarely happens too much pressure. Lower pressures are common and will hurt the 3-4 clutches before it will hurt the 2-4 band, and higher pressures can possibly cause parts breakage. If you have a very good 60 foot time, put the pressure gauge on it and make sure that it is not picking up air. This will be seen most on the 2-3 shift and the pressure gauge needle will fluctuate wildly. I use a Borg Warner Hi-Energy 10 clutch setup in the 3-4 setup with the stock input drum and an 11 clutch setup in the Sonnax input drum. There is more, however this should help a lot here.
i appreciate the time you took to write this. I try to live by the thought, keep it simple. Allow me to explain. First off, I addressed pretty much all the leaks and slippage issues caused my leaks. And upgraded the sun shell. I did the wide band and I usually use a carbon wide band but this time I wanted to try the red alto. I don’t buy a new drum unless it’s needed. I have a lathe, so I skimmed the surface and made it flat and true again. Let me just say, the band and drum look exactly the same as the day I originally built it almost two years ago. So if it ain’t broke, don’t fix it. Basically my output shaft exploded because well...turbo car that weighs almost 4000lbs. All the forward clutches looked like they did when I installed them. The 3-4 and over run (I have the hd2-3 valve that applies the overrun in 2nd and 3rd) looked like they were ever so slightly slipping. Actually was surprised at the good shape they were in. I expected them to be toast. This was a extremely budget build that was not intended to last with boost. Had I kept it naturally aspirated, it would have lasted much much longer. So with the results I got out of this thing so far, it only makes sense to not deviate far off from where I was, especially with how good it was working. It never skipped a beat until the shaft broke. So now I’m addressing both the input and output shafts, and using 9 turbo 350 clutches in the input drum, the should address my issues. I’m replacing the sprags with new Borg Warner 4l65 units and using the tight blue molded piston set for a better fluid seal.
I do not want it to shift any firmer than it does, I was actually considering toning the 1-2 shift down with a lighter accumulator spring. But I hate to go changing stuff when I know it works great as is, Hell it was holding good enough to explode the output shaft!
Trending Topics


The following users liked this post:
2BFAST (11-10-2020)
01-28-2019, 11:18 AM
#11
TECH Junkie
01-28-2019, 10:36 PM
#12
Any reason this wouldn’t work? I turned the Snap ring down some (diameter). Then I made a tool to flare the retaining tabs on the release spring. Then I touched them up a tad with my deemed. The result is a thicker, stronger, wider Snap ring that the tabs fit real tight.


The following users liked this post:
07GTLS (02-13-2023)
01-29-2019, 07:19 AM
#14
TECH Junkie
You can see the gap with that type of snap ring. Looks like a fruitless "mod" with little to gain and lots to lose by being the first one to try.
Two small tacs with the TIG and stock snap ring will solve any/all worries about having it pop out.
Cayenne...it depends what you want to buy. Typically the drum is just what you see in the pics above.
you can get it with or without a shaft.
You can also get the 4l78 which is a stock drum with machined cap...still uses stock frictions and steels...just has the more rigid cap (that I believe increases the stack height)
01-29-2019, 07:31 AM
#15
TECH Junkie
Cayenne...it depends what you want to buy. Typically the drum is just what you see in the pics above.
you can get it with or without a shaft.
You can also get the 4l78 which is a stock drum with machined cap...still uses stock frictions and steels...just has the more rigid cap (that I believe increases the stack height)
you can get it with or without a shaft.
You can also get the 4l78 which is a stock drum with machined cap...still uses stock frictions and steels...just has the more rigid cap (that I believe increases the stack height)
So besides different clutches and ring gear everything would swap over or is there other modifications needed on my end.
01-29-2019, 09:16 AM
#16
you'll have to put your shaft in (no pun intended....but still funny tho). I can let you know more when i get it. I had kinda planned on a step by step as i build it, if i have time. I also recommend the sonnax drum reinforcement kit.....im not sure if it come with it or not.
01-29-2019, 09:18 AM
#17
You can see the gap with that type of snap ring. Looks like a fruitless "mod" with little to gain and lots to lose by being the first one to try.
Two small tacs with the TIG and stock snap ring will solve any/all worries about having it pop out.
Cayenne...it depends what you want to buy. Typically the drum is just what you see in the pics above.
you can get it with or without a shaft.
You can also get the 4l78 which is a stock drum with machined cap...still uses stock frictions and steels...just has the more rigid cap (that I believe increases the stack height)
Two small tacs with the TIG and stock snap ring will solve any/all worries about having it pop out.
Cayenne...it depends what you want to buy. Typically the drum is just what you see in the pics above.
you can get it with or without a shaft.
You can also get the 4l78 which is a stock drum with machined cap...still uses stock frictions and steels...just has the more rigid cap (that I believe increases the stack height)
edit: I just ordered a new snap ring and spring assembly. I may take your advice and tack it in place. replacement parts are too cheap and i dont want to worry about it.
Last edited by Kfxguy; 01-29-2019 at 09:32 AM.
01-29-2019, 09:25 AM
#18
TECH Junkie
you'll have to put your shaft in (no pun intended....but still funny tho). I can let you know more when i get it. I had kinda planned on a step by step as i build it, if i have time. I also recommend the sonnax drum reinforcement kit.....im not sure if it come with it or not.
I do run the sonnax input drum sleeve
01-29-2019, 04:20 PM
#19
Will do. I didnt tell Mason that i was going to write anything about this drum, but I will gladly give my thoughts on it. I'm just glad theres an alternative to the high dollar sonnax drum. I'm a sonnax fan, no doubt, and I like their drum, Its just over priced in my opinion.
02-02-2019, 07:00 PM
#20

Damn...wish I'd known about prepping the plate to help the Torlon ***** seat faster!!
Tranny's still on the bench...worth removing the valve body for that purpose?
Sorry if this post is anything like a thread hijack!!!
Jake
Tranny's still on the bench...worth removing the valve body for that purpose?
Sorry if this post is anything like a thread hijack!!!
Jake