When you click on links to various merchants on this site and make a purchase, this can result in this site earning a commission. Affiliate programs and affiliations include, but are not limited to, the eBay Partner Network.
Okay guys, after driving this combination for a little over a week, I am not impressed.
With the exception of the 3-4 shift (which seems to happen at random speeds above 50 mph), it actually seems to shift SOFTER than it did before.
I wasn't looking for tire-chirping shifts, but I was expecting better than this.
3-2 downshift is REALLY delayed, taking about 3 seconds. I know that I didn't follow Dana's instructions on removing the 3-2 ctr. valve spring, but that still seems like an excessive amount of time.
Also, I was really disappointed with the line pressures; they aren't "bad," but I was expecting better than what I got.
Here are the before and after numbers
Before: Idle 2,500 rpm
Park/ N 65 110
Rev. 110 180
OD 69 120
1, 2 140 175
After Idle 2,500 rpm
Park/ N 75 120
Rev. 120 190
OD 75 150
1, 2 150 180
Before anyone asks, yes, I have the TV cable adjusted properly. I tried messing with it to give me higher pressures all around, but that goes away when I give it full throttle and the adjusting sleeve pulls all the way out.
Pulling the TV cable all the way out (while disconnected from the throttle body) can only make 180-190 psi.
The last thing I want to mention is that I used the springs for the diesel Suburbans, as per the Transgo instructions (I have 3.73 gears).
Removing the spring and opening up the "C" hole, will speed up the 3-2 downshift. If you want it even faster, drill "C" to .155". Make sure the partition in the case is not in the way of the oil flow. A Dremel might be needed to remove a little of the partition here if necessary.
Almost forgot. In the photo of the separator plate at the top you will see about half of the Blue shop towel showing through. Just to the left of that hole there is a very small hole. Peen it closed.
By the way. That is Damn It!
Dana,
Before I speak for you
Do you mind elaborating for the people in reader's ville why you like to peen closed the TVfeed orifice into the TV circuit
There is more work that can be done to the TV circuit which really peps these units up but I don't believe it's causing any of your issues here with shift feel OP
It's official: this thing is shifting in and out of overdrive on its own.
Originally Posted by dixiebandit69
With the exception of the 3-4 shift (which seems to happen at random speeds above 50 mph), .
When it DOES shift into overdrive, it's a good, positive shift. But at random times -with no change in vehicle speed/ throttle position - it will downshift to 3rd gear.
setting the tv cable to get max pressure isn't really the way to set it up. i set it up so the cable is tight at wot. hold the throttle wide open with one hand (disconnecting the return springs is a good idea) and with the other i use a small pair of vice grips and attach them to the crimp on the end of the cable. you should be able to pull the cable maybe 1/32". from this point you can back it off a click or 2. if you hook a gauge up having it set this way you will see pressure rise as soon as you move the throttle in the slightest (as long as tv geometry is right, even factory stuff can be off). backing the tv cable off a click or 2 should be noticeable in the way it behaves/shifts. tv should NOT be used to change shift points.
did you change the spring in the 3-4 shift valve and/or governor springs?
as far as your pressure it seems low. I would think it should be in the 200-220 Psi range.
What you are describing is a late 3-4 shift as opposed to a lock up issue.This can be tested by disabling TCC. If it is a late 3-4 shift, I believe it would be in one of 2 areas. 1st and easiest to go to is the govern or springs that got installed. Lighter is later so I would try a pair of heavier governor springs. The governor runs on a curve not on a direct 45 degree incline. This curve effects the 3-4 shift the most. heavier spring should let it shift at a slower MPH depending on throttle. I haven't used the TransGo SK700 kit in a long time. I just went to the JR kit for most 87 and later that have an auxiliary VB. GM fixed a lot of there early shift complaints that the full kit addressed by then. Plus it was very time consuming.
2nd it could be your choice of the 3-4 shift valve spring. If you have a food scale you can measure the compressed weight and put a 1-2 oz lighter spring. Measure the weight of the white spring & compare it to the OE spring. Maybe use the white spring over the brown. Did you save the OE springs? Can you identify the OE 3-4 spring. You could call TransGo tech support @ 1-626-443-7451 they are always very helpful. If you do call be sure to have your pressure test in front of you.
You stated
"Pulling the TV cable all the way out (while disconnected from the throttle body) can only make 180-190 psi."
With the LB1 boost valve you should have about 210 psi max.
What did you drill the plate holes sizes?
The TransGo SK700 kit is not a performance kit. It was designed to clean up GM's early 700R4's shift mishaps.
The 87 and up units were already redesigned and worked pretty good.
ya i would try stock gov springs, and if that doesn't fix it put the stock 3-4 spring in. this is why i install the roll pins opposite so you don't have to R&R the v/b.
Tranzman, I believe he decided against the LB1 for some reason. he is probably running the transgo spring or stock spring and i suspect this is why the max psi is lower.
EDIT:
dixie, just get the LB1 kit. I don't believe you can buy the spring separate. do this first before messing with the gov/3-4 valve and see if it fixes your lower than expected pump pressure.
I used the LB1 with the accompanying spring, instead of the TransGo booster spring.
When I get off work today, I'll unplug the connector to disable lockup and see if that changes anything.
ya i would try stock gov springs, and if that doesn't fix it put the stock 3-4 spring in. this is why i install the roll pins opposite so you don't have to R&R the v/b.
When you do this, do you just drill the holes all the way through, so you can take the pins out through the bottom?
UPDATE: I unplugged the connector, and it's doing exactly the same sh*t. Not a converter lockup issue.
I still have all of the springs, so I guess I'll play around with the governor springs this weekend; I'm not messing with the valvebody for another couple of weeks.
What sucks is that between the 4th accumulator delete and the tightened up band clearance, the 3-4 shift is BEAUTIFUL.
Never install the Brown spring on the 3-4 shift valve. It makes the 3-4 part throttle shift late to very late. Install the White 3-4 spring. Same with the early valve body install the Green spring, instead of the Orange spring.
Never install the Brown spring on the 3-4 shift valve. It makes the 3-4 part throttle shift late to very late. Install the White 3-4 spring. Same with the early valve body install the Green spring, instead of the Orange spring.
Words from a guy working "the been there done that" theory...
Never install the Brown spring on the 3-4 shift valve. It makes the 3-4 part throttle shift late to very late. Install the White 3-4 spring. Same with the early valve body install the Green spring, instead of the Orange spring.
Now that I've heard from one of the bosses on these transmissions, I just might drop the valvebody this weekend after all. Maybe.
I thought twice about installing that much heavier spring, but the instructions said that if you have 3.73 or lower gears, go with the Diesel springs.
Live and learn.
So do you want to tell us why we should peen the tiny hole closed on the separator plate? I haven't had time to review the hydraulic schematic for the TV circuit.
the holes are already drilled through. i just match the counter bore so the tang on the end of the roll pin has somewhere to go. when the valvebody is out you will see what i mean.
as far as your lower than expected pressure, maybe the pump is just tired?
If you are going to have variable Line Pressure...
I very highly recommend getting the TransGo TV Valve, Springs, and Plunger Spring, Spacer, Shim, Etc.
I like to use these on all builds, but with Fixed Line Pressure it is not as critical, and things can be made to work.
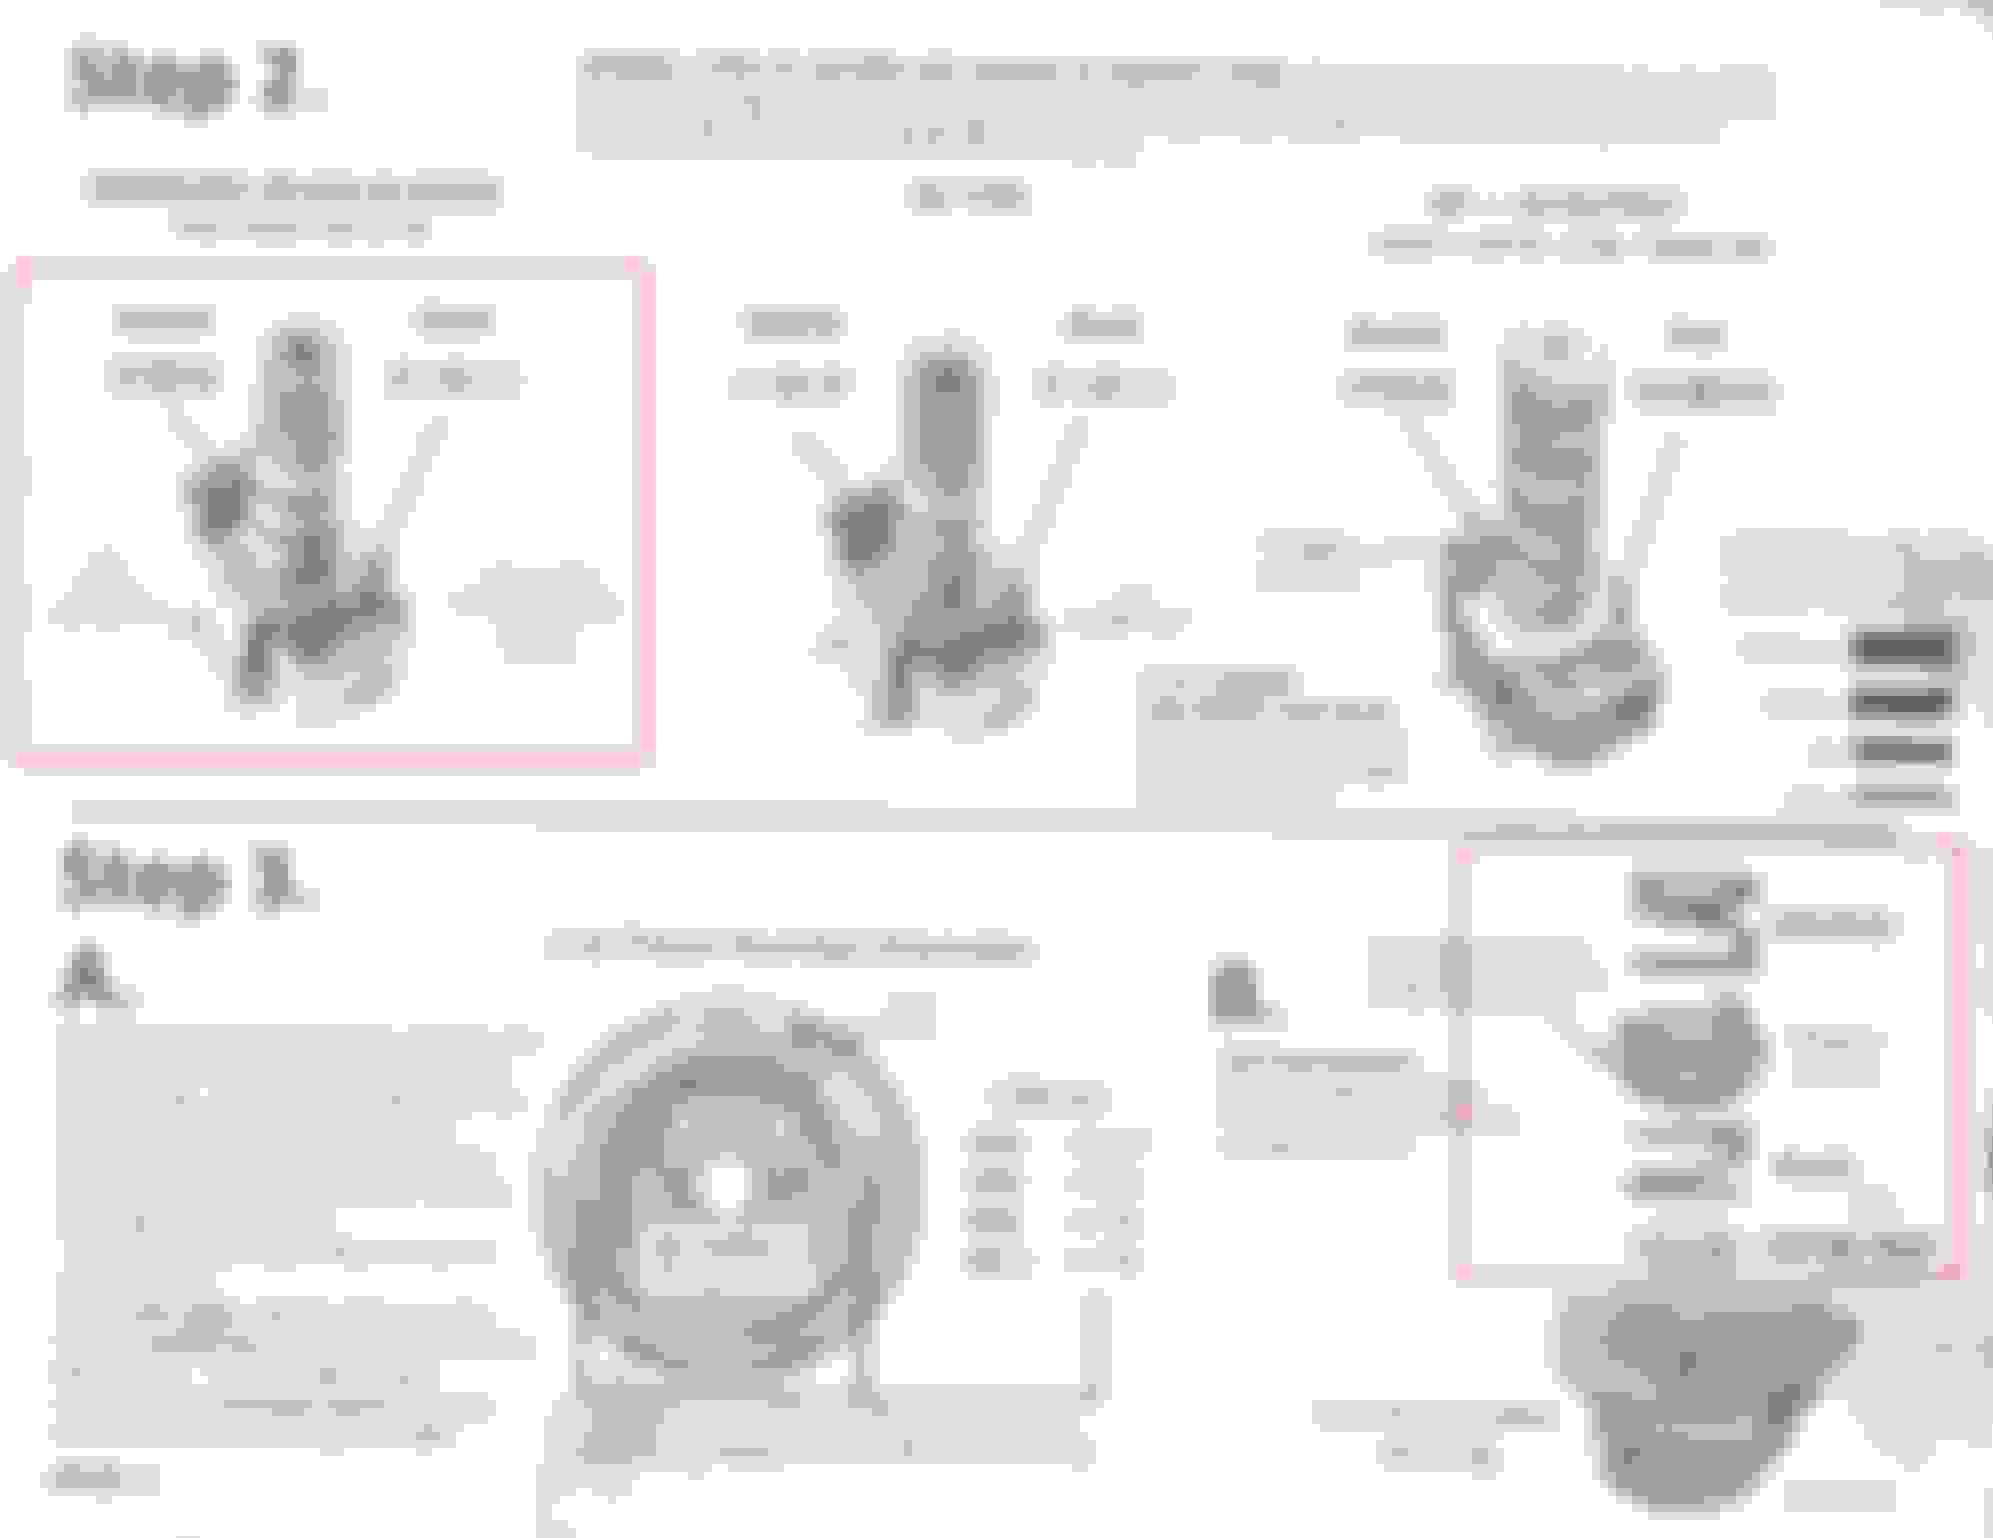
I recommend blocking the 3-2 Control Valve:
Originally Posted by vorteciroc
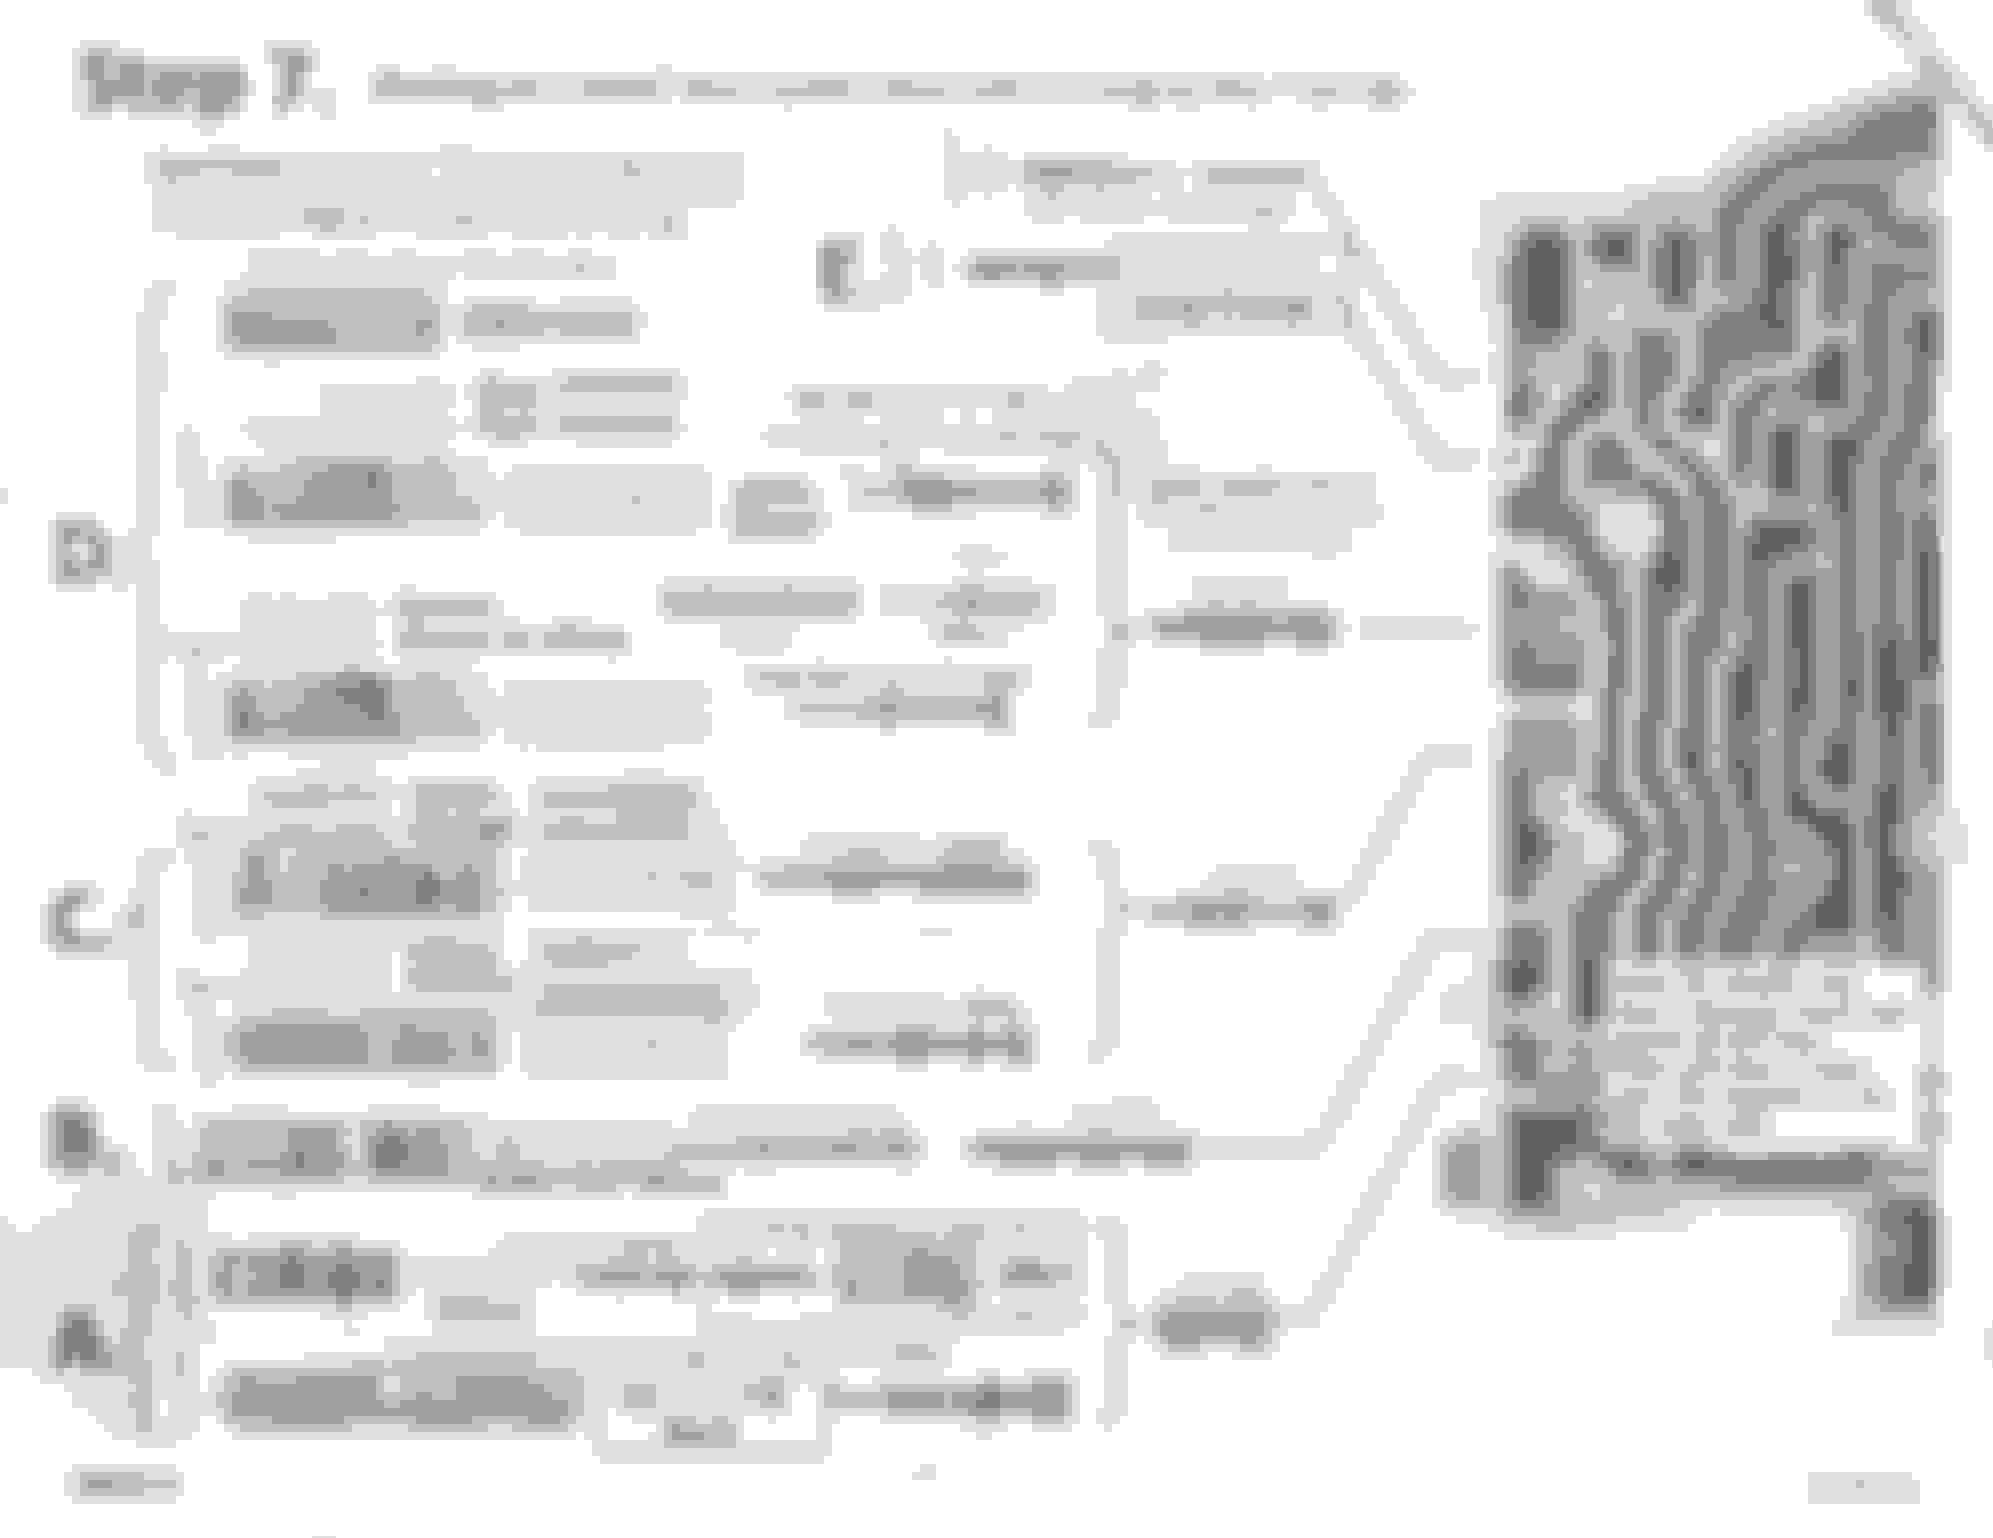
First, here is one of my Separator-Plates that we can use to identify the "Orifice-Holes" in the Image Below:
The RED Circled Orifice, marked "A" is: 3rd-Feed (I would normally make it 0.157") so your 0.155" Size here is Fine.
The RED Circled Orifice, marked "C" is: 3rd-Exhaust (I would normally make it 0.157") so your 0.155" Size here is Fine.
Orifice-Holes "A" and "C" are not normally the same size... we make them them same size as part of our Hydraulic Modifications to these Circuits.
Your 2-4 Band Servo Travel/ Clearance issue must be corrected first.
That Sonnax Servo Release Check-Valve needs to get removed with an "Easy-Out" Extractor.
Hopefully the 3-4 Clutch Clearance is acceptable.
Then the Modifications for "Ideal" 2-3 Up-Shift Timing should be done.
Quoted from my Post above:
"There is a 3rd-Accumulator/ Band Release Orifice next to the #2 Check-Ball.
The 3-2 Control Valve needs to be blocked, and the #2 Check-Ball Hole Plugged.
The 3rd-Accumulator/ Band Release Orifice must then be significantly enlarged."
What I am talking about is:
-Plugging the #2 Check-Ball Hole (Black Circle marked: "F" on my Separator-Plate).
-Drilling/ Enlarging the 3rd-Accumulator/ Band Release Orifice (Red Circle marked: "G" on my Separator-Plate).
Last, is blocking the 3-2 Control-Valve.
Keep the Original 3-2 Control-Valve, but Omit the Original Spring.
You need one more item, either:
-The Tiny Spring that goes under the Pivot-Pin of the Slide from the Oil-Pump (GM Part #8634098) (Aftermarket Part #A54540B) (DO NOT BUY ONE NEW FOR CRAZY PRICES, LIKE $14.95) It's $1.95 at "Global Transmission Parts" (globaltransmissionparts.com).
-A Tiny Cup-Plug that would be used to Plug the 4th Accumulator.
Install the 3-2 Control Valve, Blocked in place, as in the Image below:
Okay boys, it's been awhile, but I finally got back under this thing and removed the valvebody. I was really surprised by what I found!
It appears that I was sold the wrong valvebody gaskets; I'm guessing that these were the gaskets for the earlier transmission without the auxiliary valvebody.
A passageway was blown out.
Here it is with the new (correct) gasket in place:
I also blocked the 3-2 downshift valve like @vorteciroc said, but since I didn't have an appropriately sized cup-plug, I peened a nut to go in its place.
IT WORKED WONDERFULLY!
I decided to replace the TV valve lever assembly since I was getting lower than expected line pressure readings; there was some distortion on the original assembly (left), so I replaced it with the one on the right.
Overall assessment: No change in line pressure. I verified that the linkage is pushing the TV valve in all the way. I guess the pump is getting tired.
Now it shifts into overdrive too soon. It actually lugs the engine when it shifts at about 30 mph.
The 3-2 downshift works GREAT.
Yes the wrong gasket can cause considerable issues, Been there seen and even done that long ago, Now on the line presure, Yes the pump could be tired but unless it gouged or visably worn it seems unlikely,
Have you checked the TV LIMIT valve spring? Broken, wrong spring,missassembled or sticky valve could cause your presure and shift timing issues . I would look at that first myself.
If you do change the pump I would suggest changing to a 4l60e pump but that is my opinion as i have had great results with that set up both presure and line rise wise, Just be sure and make the hole in the case missing in aux cases for the fwd and block the D2 feed at top right of case "square hole round inside" vb check ball works well.
But to me short of a very badly worn pump or PR valve bore (sonnax does make Oringed boost valves or you can lathe cut in your exisiting for that ) The early shifts and low line point to an issue with the TV LIMIT VALVE or spring or leak in that circuit.
I posted full instruction on changing to the 60e pump in the 700r4 tips and tricks post by Marroon monster. (NOTE THE 60E PUMP CAN BE ANY STYLE OR YEAR AS LONG AS SHORT STATOR PWM OR NOT MAKES NO DIFFERENCE)
If it was ME. I would, if i pulled unit, Change out to use a 4L60E pump with a .500 boost valve and the small spring I have shown in my post before, I would verify the TV LIMIT valve and spring and modify it to allow removal and install without removing VB and or change the VB all together with a known virgin one I then modified blocking the 3-2 , Set feed sizes suitable to what you are looking to acheive shift wise. I would probaby ditch the TG stuff as I dont really care much for it personally (GM CALIBRATION OVER ALL AND FUNCTION WORKS PRETTY WELL IMO) . Use the sonnax TV spring in the throttle valve along with a solid spring to pin the throttle valve at WOT . Install a very stiff spring or block motion of the line bias valve.
Just my unsolicted thoughts on the matter, Note with the 4L6OE PUMP SET up as I have previoulsy described i have never seen less than 200 psi at FULL TV ussually in fact closer to 230 PSI, The only down side I have found is N-D engagement is a little harsh with stock stalls but just fine with stalls over 2500.
Also note quick easy way to raise overall shift point across board, remove GOV gear you will see a pocket in the valve, Place spring here , Make sure it fits pockek and fully compresses into it . You can find three different stiffness that will work here in a harbor freight assorted spring kit but can find even more with other sources, The stiffer the spring the later the over all shifts , I use this to fine tune over all shifts works well overall and is quick n easy unlike grinding or changing weights and from experience keeps the stock overall shift spacing and kick down functions.
__________________ Frank formerly of Performabuilt, Now just me, What can I build for you today? Call or message me. Click sig pic for my facebook


 06-06-2023, 06:38 PM