
LQ4/4L60E into 67 Chevelle

 01-27-2009, 09:47 AM
#43
On The Tree
Thread Starter
iTrader: (1)

Join Date: Jan 2009
Location: Modesto, CA
Posts: 197
Likes: 0
Received 0 Likes
on
0 Posts

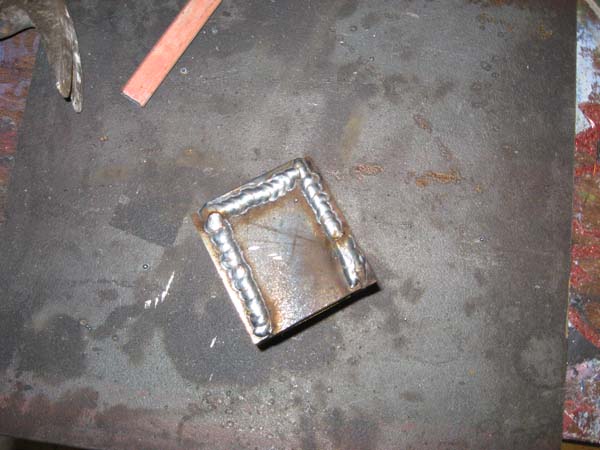
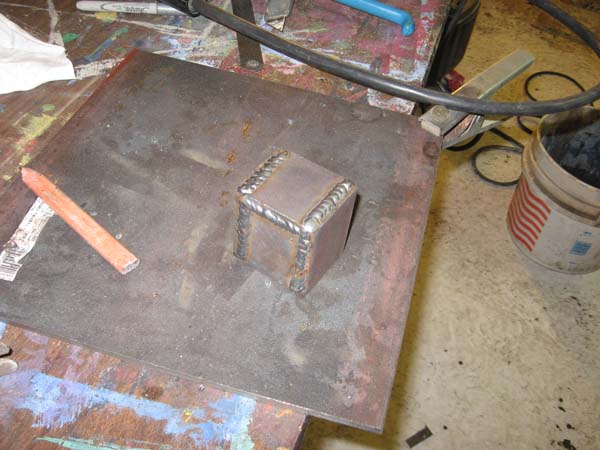
I bit the bullet yesterday and made my own frame stands out of 1/4" steel plate. Don't laugh, I haven't fired up my welder in a year and a half or two. These set the engine 1/2" higher than the stock '67 frame stands [the ones that cantilever]. The stands are just tacked on a 5" x 5" bottom plate for now and the passenger bottom plate needs to be welded off center to keep it off the hump at the top of the cross member........
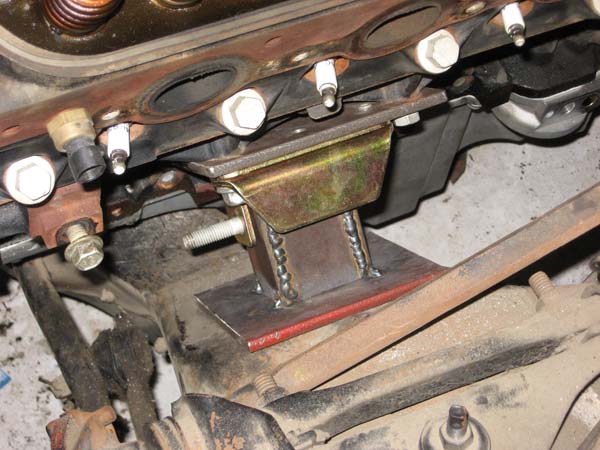
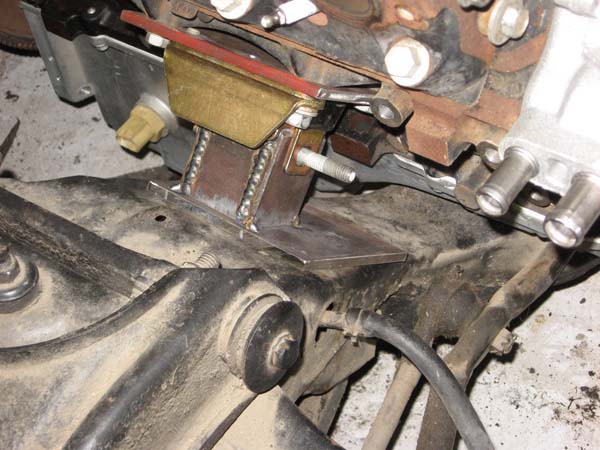
Cannot wait to get the engine/trans placement set so I can start seeing if all my accessories will fit.
Rob
Cannot wait to get the engine/trans placement set so I can start seeing if all my accessories will fit.
Rob
01-27-2009, 06:03 PM
#45
TECH Enthusiast

Robbie, why didnt you do that in the first place? looks real nice.for the rest of your mods make 2 sets of everything , looks like you will be passing me soon. JOHN
01-27-2009, 07:14 PM
#46
On The Tree
Thread Starter
iTrader: (1)
Join Date: Jan 2009
Location: Modesto, CA
Posts: 197
Likes: 0
Received 0 Likes
on
0 Posts
I didn't do this in the first place because I had no idea what I was getting into! Once I understand things, I come around.......
 . Very slowly though.
Make 2 of everything?
John, I saw you mention to someone that you had a template for your AC brackets. I may want to get my hands on that very soon. Is that a possibility?
Thanks for the call yesterday!! I appreciate the help!
Rob
01-29-2009, 07:57 AM
#49
Teching In

Join Date: Dec 2004
Location: N. MS
Posts: 45
Likes: 0
Received 0 Likes
on
0 Posts
https://ls1tech.com/forums/conversio...ml#post6091103
I thought this old thread might help.
The Hot Rod Project Build has some good reference pics. for a 67.
http://www.hotrod.com/projectbuild/1.../photo_04.html
Good luck
Malcolm
http://www.chevelles.com/showroom/sh...0/ppuser/13247
I thought this old thread might help.
The Hot Rod Project Build has some good reference pics. for a 67.
http://www.hotrod.com/projectbuild/1.../photo_04.html
Good luck
Malcolm
http://www.chevelles.com/showroom/sh...0/ppuser/13247
01-29-2009, 01:39 PM
#50
On The Tree
Thread Starter
iTrader: (1)
Join Date: Jan 2009
Location: Modesto, CA
Posts: 197
Likes: 0
Received 0 Likes
on
0 Posts
https://ls1tech.com/forums/conversio...ml#post6091103
I thought this old thread might help.
The Hot Rod Project Build has some good reference pics. for a 67.
http://www.hotrod.com/projectbuild/1.../photo_04.html
Good luck
Malcolm
http://www.chevelles.com/showroom/sh...0/ppuser/13247
I thought this old thread might help.
The Hot Rod Project Build has some good reference pics. for a 67.
http://www.hotrod.com/projectbuild/1.../photo_04.html
Good luck
Malcolm
http://www.chevelles.com/showroom/sh...0/ppuser/13247
Thanks, that was a cool build!
Nice car by the way Malcolm
Oh yeah, What is Hydo-boost?
Rob
01-29-2009, 02:59 PM
#51
Teching In
Join Date: Dec 2004
Location: N. MS
Posts: 45
Likes: 0
Received 0 Likes
on
0 Posts
just a pic I was sharing with someone on Chevelles.com wanting to see pics of 67s painted white.
There are pics of my unfinished project on over in my showroom, although I do need to update
because I am a little further along now.
Hydro-Boost is a power brake booster that uses pressure from the power
steering pump for brake assist rather than a vacume type booster.
Last edited by 67Mal; 01-29-2009 at 03:26 PM.
02-01-2009, 02:17 PM
#52
On The Tree
Thread Starter
iTrader: (1)
Join Date: Jan 2009
Location: Modesto, CA
Posts: 197
Likes: 0
Received 0 Likes
on
0 Posts
Thanks. Oh I just remembered the white 67, first pic in my showroom, is not mine.
just a pic I was sharing with someone on Chevelles.com wanting to see pics of 67s painted white.
There are pics of my unfinished project on over in my showroom, although I do need to update
because I am a little further along now.
Hydro-Boost is a power brake booster that uses pressure from the power
steering pump for brake assist rather than a vacume type booster.
Would love to see updated pics!!!!
Rob
02-01-2009, 02:33 PM
#53
On The Tree
Thread Starter
iTrader: (1)
Join Date: Jan 2009
Location: Modesto, CA
Posts: 197
Likes: 0
Received 0 Likes
on
0 Posts
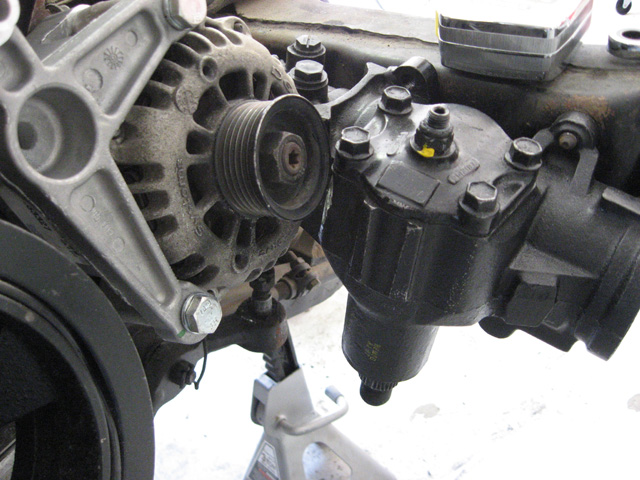
I thought I was going to have to fab a trans cross member, but thankfully I looked in the trunk where previous owner stored a bunch of parts and found the stock one. I cut the tab off, turned cross member 180 degrees, set car at ride height, set engine at 4 degrees angle and welded the tab back to the cross member with a half inch shim on the tab.
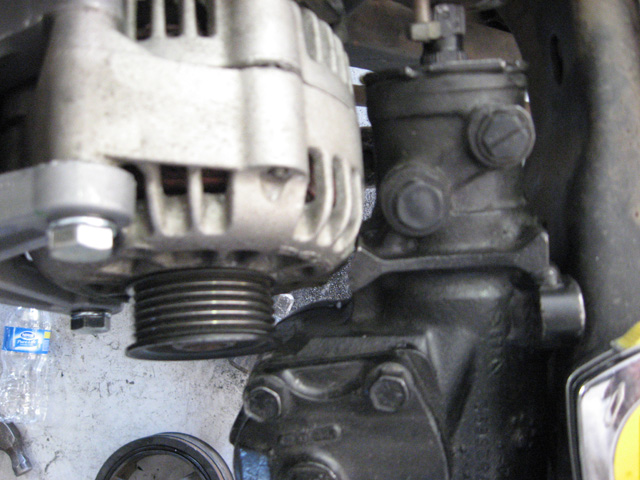
I started hanging accessories this weekend. spent a few hours nibbling on the power steering gear box to get the truck alternator to fit....I don't think I have ruined the gear box. I can install the belt without pulling the alt....
I then went to the power steering. I got a new reservoir with the F-Body kit so I assumed that I could just switch reservoirs and install. No Go! the truck PS pump is totally different. I ordered pump last night.
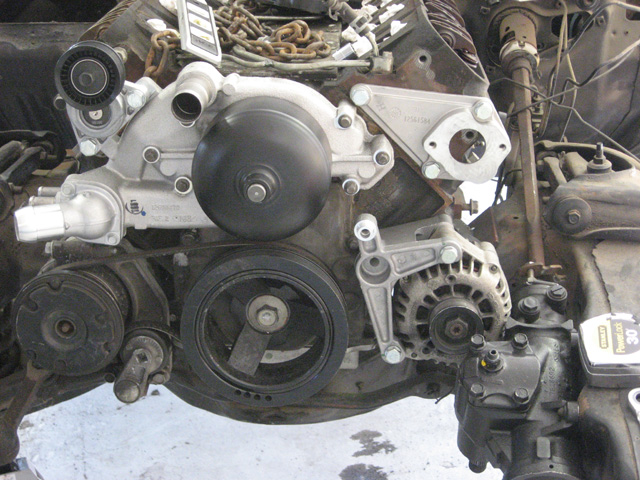
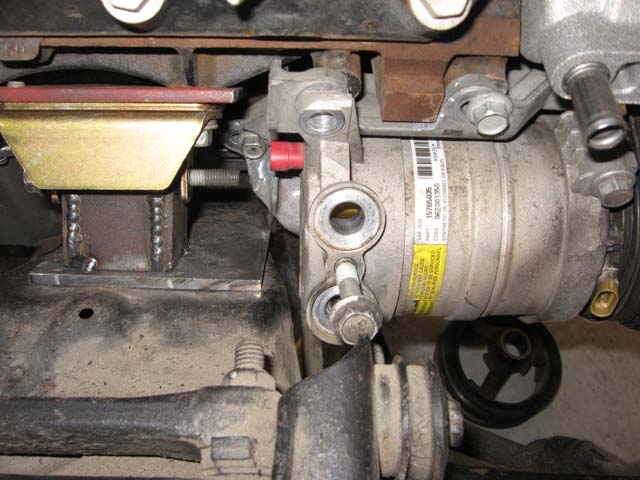
Then onto the A/C compressor. I again mistakenly assumed I would be able to use the truck a/c without issue. So, I modified the truck a/c bracket to move it back 3/8" [that coupled with the 3/8" difference in a/c belt placement on the F-Body crank pulley gives the needed 3/4"]. This works great, but the truck a/c belt doesn't fit now because I didn't realize the F-Body pulley diameter is smaller than the truck pulley. I hope there is a way to make up the difference.....
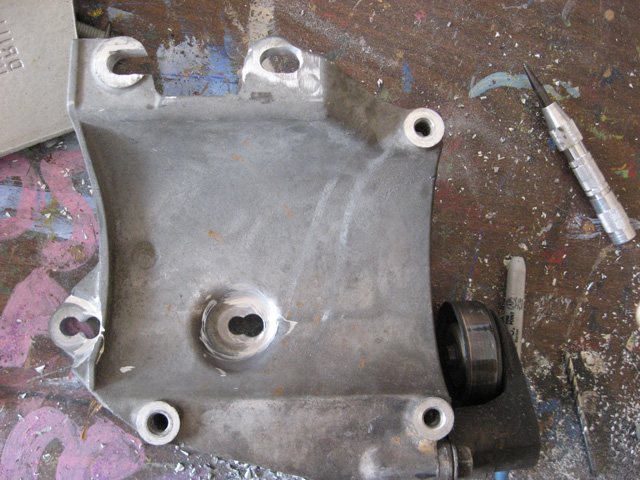
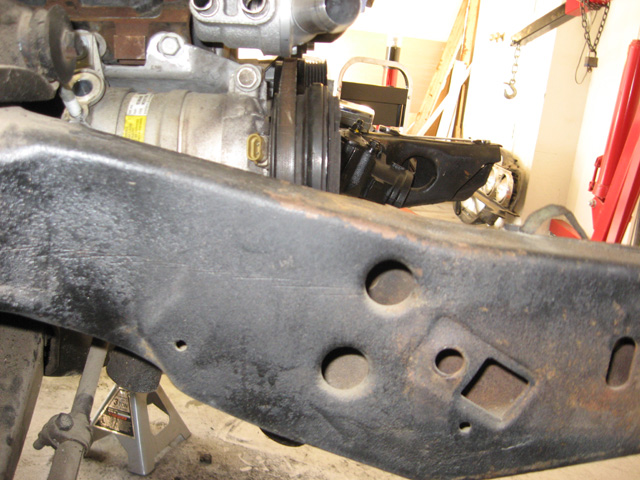
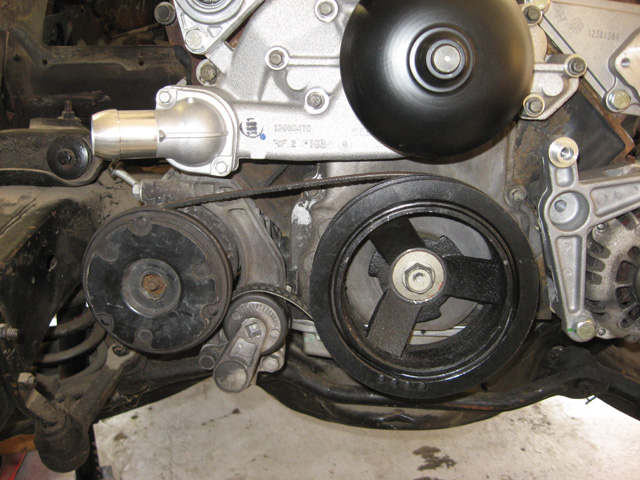
Still have plenty of room behind a/c compressor with this setup.....
Any input? ideas?
Rob
I started hanging accessories this weekend. spent a few hours nibbling on the power steering gear box to get the truck alternator to fit....I don't think I have ruined the gear box. I can install the belt without pulling the alt....
I then went to the power steering. I got a new reservoir with the F-Body kit so I assumed that I could just switch reservoirs and install. No Go! the truck PS pump is totally different. I ordered pump last night.
Then onto the A/C compressor. I again mistakenly assumed I would be able to use the truck a/c without issue. So, I modified the truck a/c bracket to move it back 3/8" [that coupled with the 3/8" difference in a/c belt placement on the F-Body crank pulley gives the needed 3/4"]. This works great, but the truck a/c belt doesn't fit now because I didn't realize the F-Body pulley diameter is smaller than the truck pulley. I hope there is a way to make up the difference.....
Still have plenty of room behind a/c compressor with this setup.....
Any input? ideas?
Rob
02-01-2009, 11:18 PM
#54
TECH Resident
iTrader: (3)

Join Date: Sep 2005
Location: Edmond, Oklahoma
Posts: 796
Likes: 0
Received 0 Likes
on
0 Posts
Looks like you had the same issues with the steering box and the alternator that I did. I ended up grinding down the steering box quite a bit and still didn't strike oil or anything major. Seeing where your alternator is and how you were able to fit AC makes me hopeful. As far as the belt goes or would suggest getting some string or something and getting an idea of what length you need then heading to the parts store and seeing if they have something that will work.
02-02-2009, 01:34 PM
#56
On The Tree
Thread Starter
iTrader: (1)
Join Date: Jan 2009
Location: Modesto, CA
Posts: 197
Likes: 0
Received 0 Likes
on
0 Posts
Looks like you had the same issues with the steering box and the alternator that I did. I ended up grinding down the steering box quite a bit and still didn't strike oil or anything major. Seeing where your alternator is and how you were able to fit AC makes me hopeful. As far as the belt goes or would suggest getting some string or something and getting an idea of what length you need then heading to the parts store and seeing if they have something that will work.
As for AC, after looking at john67 build, my ac compressor and the compressor he got of vintage are totally different. I believe his is the same as normal F-Body compressors. I assumed I would have problems too beings that my passenger side head is about 3/4" off the firewall, I thought I had the engine way back and the ac was going to hit. I was surprised it didn't. I just find it wierd that each ls1 into an A body seems so different for different people.
Rob
02-02-2009, 06:58 PM
#58
Launching!

Join Date: Jan 2008
Posts: 232
Likes: 0
Received 0 Likes
on
0 Posts
Looks like you have got it all under control.https://ls1tech.com/forums/conversio...-chevelle.html Nice job
02-02-2009, 11:27 PM
#59
TECH Resident
iTrader: (3)
Join Date: Sep 2005
Location: Edmond, Oklahoma
Posts: 796
Likes: 0
Received 0 Likes
on
0 Posts
Reading through your thread, I knew you ground on your box, but I didn't realize how much. How about your rag joint? did it end up OK? I know someone ended up with some sort of cv type joint but can find it right now. How come your thread dropped off and then all of a sudden you are driving the car? I would kill for the everything in between, like the harness info, wiring up the car, and whatever else happened when you went underground.. I will be bugging you relentlessly soon.....
As for AC, after looking at john67 build, my ac compressor and the compressor he got of vintage are totally different. I believe his is the same as normal F-Body compressors. I assumed I would have problems too beings that my passenger side head is about 3/4" off the firewall, I thought I had the engine way back and the ac was going to hit. I was surprised it didn't. I just find it wierd that each ls1 into an A body seems so different for different people.
Rob
As far as me falling off the map I apologize. I guess things just really got rolling and I didn't take time to document and post like I should have. Oddly enough, seemed like all those details like fuel and wiring went really fast looking back at it. For wiring I would say getting the Current Performance auxiliary fuse block was a good investment. As for fueling, if you can spring for it I would recommend the Spectre tank. I modified my stock tank with a tanksinc kit then used stainless steel braided lines and the common corvette filter/regulator. Feel free to ask me questions as you run into things and I will be glad to help where I can.
What is your compressor off of?
02-03-2009, 11:58 AM
#60
On The Tree
Thread Starter
iTrader: (1)
Join Date: Jan 2009
Location: Modesto, CA
Posts: 197
Likes: 0
Received 0 Likes
on
0 Posts
Pist0lpete,
My Compressor and bracket are off of a 2000 HD Truck. I have just assumed it is a normal LQ4 [truck] compressor and bracket.
Thanks for the help and suggestions. I will track down info on the Spectre tank, Current Performance auxiliary fuse block and the cv joint. But you explain cutting off the rag joint and grinding shaft, then putting another rag joint on? did you mean the cv joint is what you put back on?
I am waiting on parts [PS pump and Hooker Headers] before I finalize engine placement, so I was going to start wrapping my head around harness/wiring but I am have not located the info I need. I need to know how much harness to I take, Do I take the Truck fuse box [sure is big] or leave it, do I take anything inside the cab? Then how to modify it all...... I'll keep looking.
Rob