
Yet another, BMW E-36 LSx conversion...
 02-12-2010, 08:00 PM
#61

Power Steering update.
Now have the high pressure side of the power steering finished. Took the F-bod PS hose and M3 PS hose down to my favorite fluid line guys, (Oil Filter Service in Portland OR), showed them what I needed and let them build it the way they felt it should be built, and wa-la. F-bod hard line coming out of the P/S pump, Aeroquip hose in between with Aeroquip fittings beautifully soldered onto the GM and BMW hard lines, and the BMW Banjo fitting for the rack attachment. This new custom hose fits perfectly as it coils nicely around the alternator without touching anything.
I do have an idea for another custom built high pressure and low pressure line, would end up nicer than this and probably not much more in cost. Gonna bounce the concept off my buddy, (a member whose name escapes me, rhymes with "fell from the dike"?!), we’ll see what he says…
For now, here are the pics;
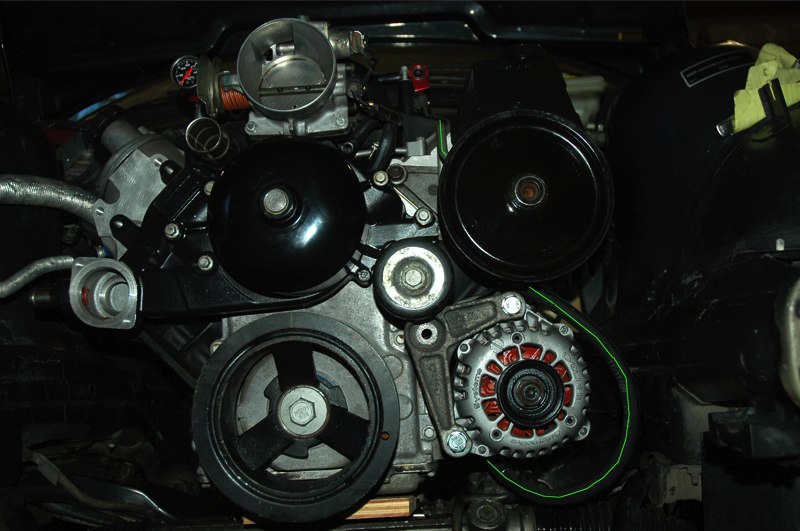
Last edited by BRAAPZ; 02-12-2010 at 08:09 PM.
 02-13-2010, 12:20 PM
#62
Cat is out of the bag, I am at liberty to release a little more info on this conversion that Mike Knell of JTR and myself have been collaborating on. As the project progresses, more items, (some of what is seen in this build) will be available through JTR directly, here is the link;
http://www.jagsthatrun.com/BMW_Order.html
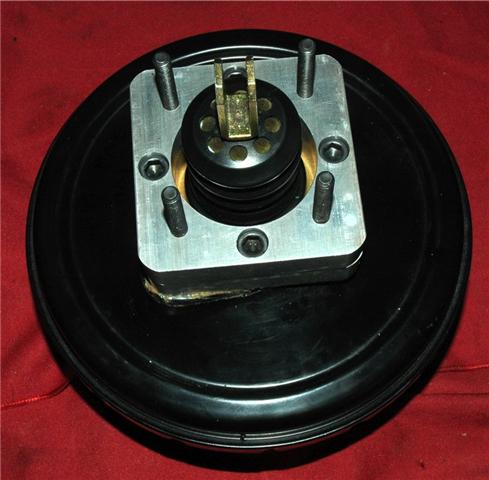
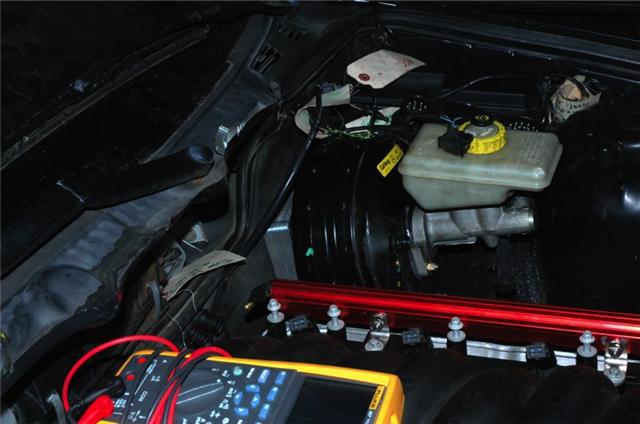
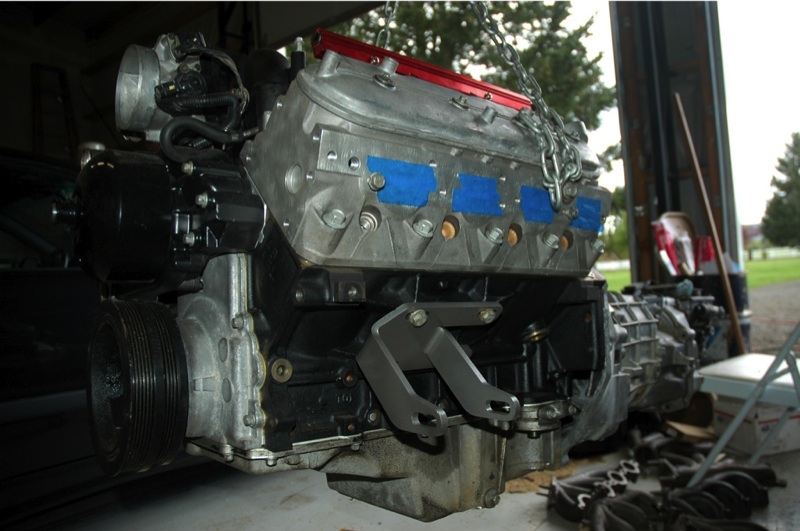
We found a smaller diameter brake booster allowing adequate valve cover to booster clearance that is one of the major issues with these conversions.
Here is one such booster I mocked up with my M3 master cylinder and the JTR booster adapter;
http://www.jagsthatrun.com/BMW_Order.html
We found a smaller diameter brake booster allowing adequate valve cover to booster clearance that is one of the major issues with these conversions.
Here is one such booster I mocked up with my M3 master cylinder and the JTR booster adapter;
02-13-2010, 12:50 PM
#63

the PS hose looks great.
 05-06-2010, 04:43 PM
#65
BREAK THROUGH on the clutch line!
Short version;
Due to the similar design of the master cylinder hydraulic line connection between GM and BMW, the OE GM LSx clutch line can be made to fit the BMW master cylinder with a small massage, no need to buy fittings, cut the GM clutch line, etc... Only thing needed to buy other than your slave cylinder is a remote bleeder line/kit like the one from TICKshift.com.
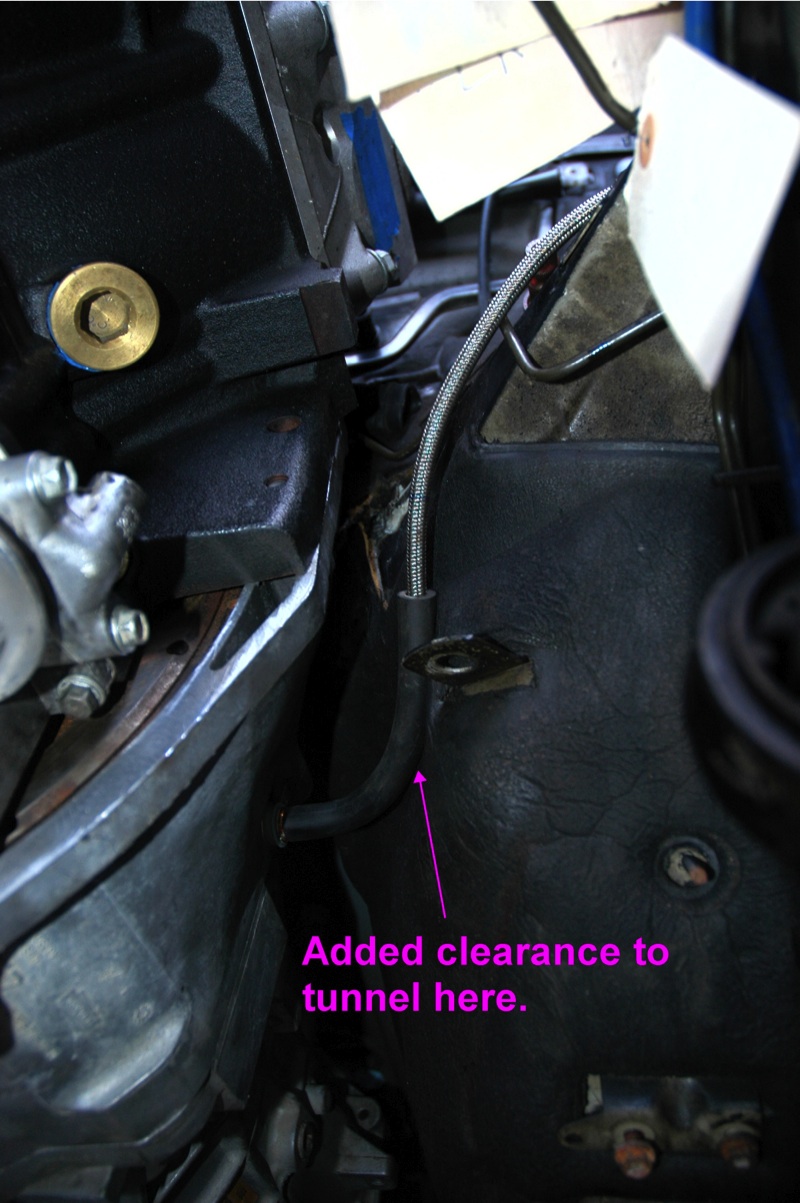
I did hammer the tunnel about 3/4" deep trough where the clutch line comes out of the bell-housing to relax the bend on the clutch line, fits nice in the tunnel.
Long version;
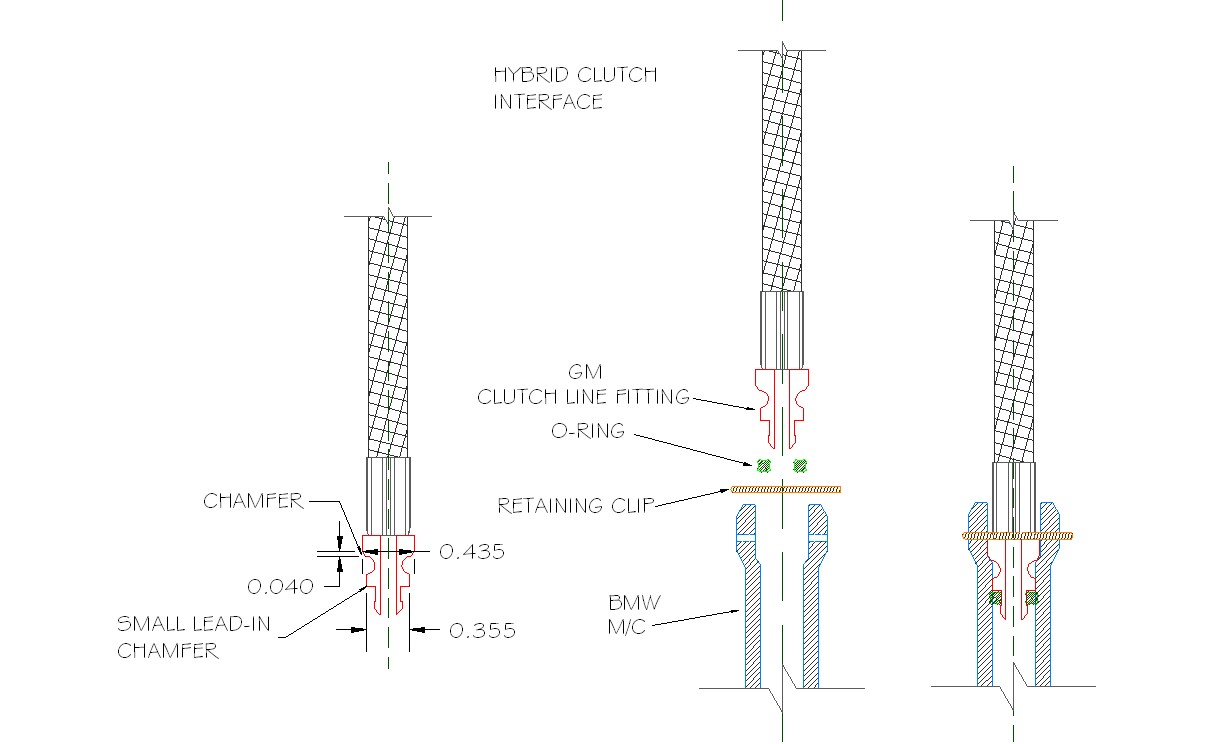
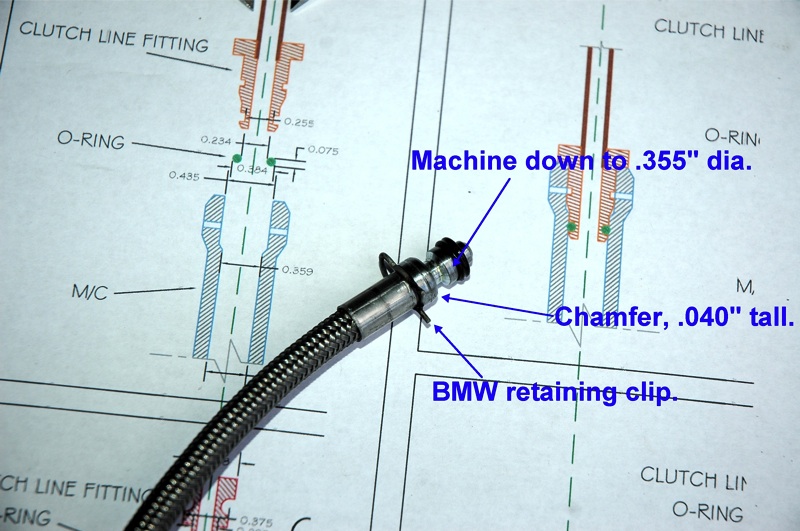
Yesterday in finishing up the clutch lines, I was going to go the typical route and cut the GM clutch line, install the -4 fitting, use the -4 to 10mmx1.0mm ISO bubble flare fitting, yadda yadda yadda, but with the GM clutch hose hooked up the trans I noticed its length is absolutely perfect in that it reaches the BMW master cylinder. I got to looking at the BMW master cylinder connection a little closer, removed the hard line retaining clip and wiggled the hard line out of the M/C and thought about what it might take to get the GM clutch line to plug into the BMW Master Cylinder. Spent some time measuring up both the GM and BMW master cylinder connection bores, then the GM and BMW clutch line fittings, sketched them out in AutoCAD and came to the conclusion it can be done. The BMW M/C bore is smooth at the O-ring diameter for what looks like all the way to the piston so the GM fitting could sit at any depth past the minimum. So I chucked the GM clutch line in the lathe and machined .020" off the diameter of the GM fitting as shown below and added a .040" tall chamfer to allow it to sit deep enough into the M/C to accept the BMW retaining clip and that's it, fits PERFECT! Using the GM O-ring, (BMW O-ring will not fit the GM fitting), it ends up compressing a total of .021” more than it does in the GM M/C, (tighter fit), not so much it causes any issues wit sealing, over squishing, etc. Surprising part is with a little brake fluid on the O-ring it doesn’t feel any tighter when installing it. Installed and removed several times to verify fitment. Best part is the GM clutch line is already the perfect length!
Here are the drawings and pics, enjoy…
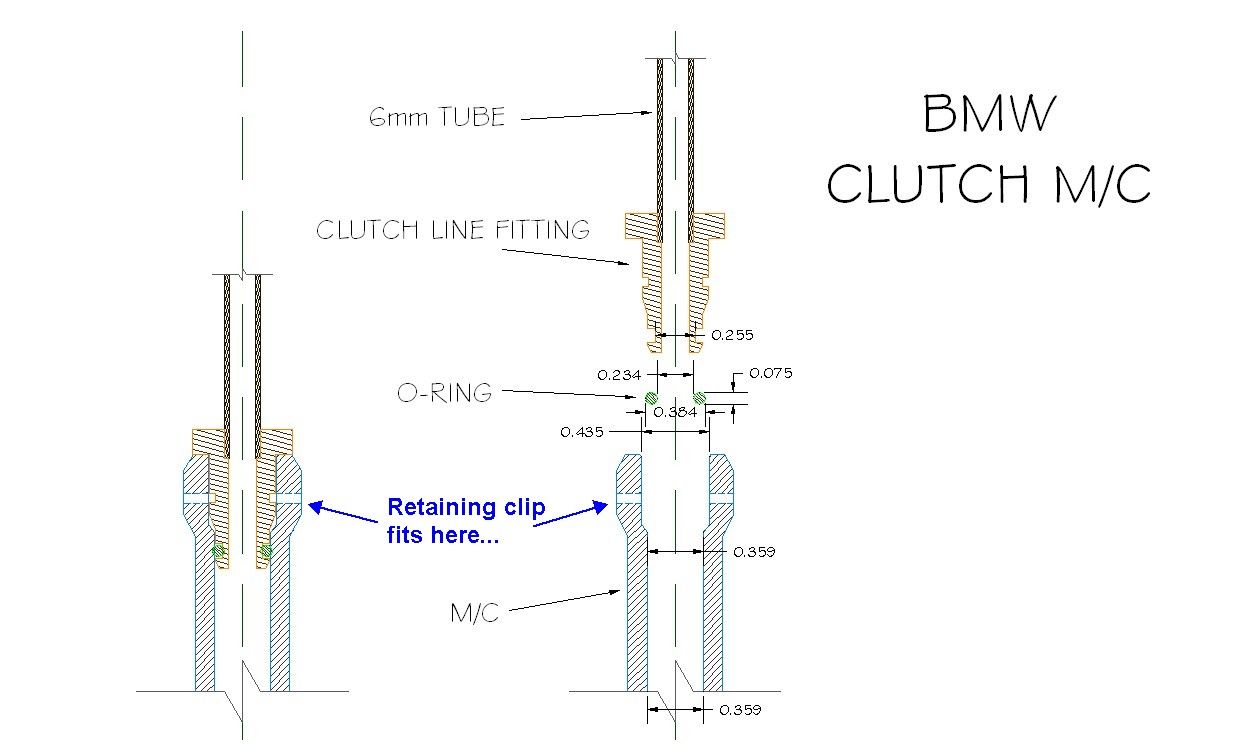
BMW Master Cylinder connection detail;
GM LSx Master Cylinder connection detail;

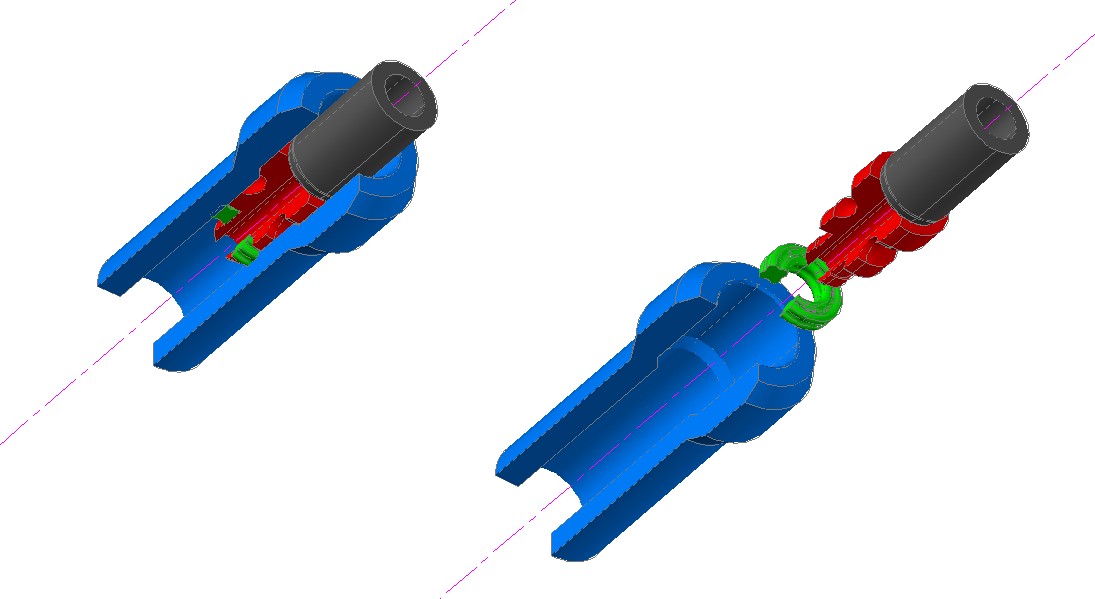
Hybrid LSx line-BMW Master Cylinder;
3D render of the Hybrid connection.
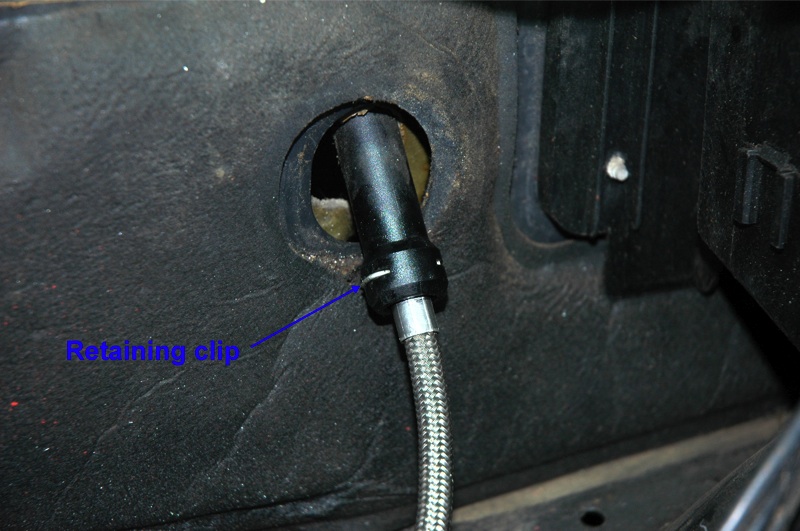
Retaining clip fits perfectly behind the crimped fitting;
Prior to installation;

INSTALLED! Retaining clip holds it firmly, wont go in any deeper or come out and it is already the PERFECT length! SAH-WEEET…
Short version;
Due to the similar design of the master cylinder hydraulic line connection between GM and BMW, the OE GM LSx clutch line can be made to fit the BMW master cylinder with a small massage, no need to buy fittings, cut the GM clutch line, etc... Only thing needed to buy other than your slave cylinder is a remote bleeder line/kit like the one from TICKshift.com.
I did hammer the tunnel about 3/4" deep trough where the clutch line comes out of the bell-housing to relax the bend on the clutch line, fits nice in the tunnel.
Long version;
Yesterday in finishing up the clutch lines, I was going to go the typical route and cut the GM clutch line, install the -4 fitting, use the -4 to 10mmx1.0mm ISO bubble flare fitting, yadda yadda yadda, but with the GM clutch hose hooked up the trans I noticed its length is absolutely perfect in that it reaches the BMW master cylinder. I got to looking at the BMW master cylinder connection a little closer, removed the hard line retaining clip and wiggled the hard line out of the M/C and thought about what it might take to get the GM clutch line to plug into the BMW Master Cylinder. Spent some time measuring up both the GM and BMW master cylinder connection bores, then the GM and BMW clutch line fittings, sketched them out in AutoCAD and came to the conclusion it can be done. The BMW M/C bore is smooth at the O-ring diameter for what looks like all the way to the piston so the GM fitting could sit at any depth past the minimum. So I chucked the GM clutch line in the lathe and machined .020" off the diameter of the GM fitting as shown below and added a .040" tall chamfer to allow it to sit deep enough into the M/C to accept the BMW retaining clip and that's it, fits PERFECT! Using the GM O-ring, (BMW O-ring will not fit the GM fitting), it ends up compressing a total of .021” more than it does in the GM M/C, (tighter fit), not so much it causes any issues wit sealing, over squishing, etc. Surprising part is with a little brake fluid on the O-ring it doesn’t feel any tighter when installing it. Installed and removed several times to verify fitment. Best part is the GM clutch line is already the perfect length!
Here are the drawings and pics, enjoy…
BMW Master Cylinder connection detail;
GM LSx Master Cylinder connection detail;
Hybrid LSx line-BMW Master Cylinder;
3D render of the Hybrid connection.
Retaining clip fits perfectly behind the crimped fitting;
Prior to installation;
INSTALLED! Retaining clip holds it firmly, wont go in any deeper or come out and it is already the PERFECT length! SAH-WEEET…
Last edited by BRAAPZ; 05-07-2010 at 09:39 AM. Reason: Added 3d rendering.
05-07-2010, 09:24 PM
#66
With the engine and trans just sitting in the car, using a remote reservoir, filled the clutch line, bled the clutch and wa-la, got clutch action and NO leaks! Clutch pedal “feels” pretty good, though wont for sure until the engine is running. Pedal pressure starts right off the top, has a slight ramp up in pressure till approx 2/3 pedal down then has a very distinct over-center feel as the pedal effort gets considerably lighter closer to the floor. Overall pedal effort feels about the same as I recall the stock M-3 clutch effort and next to Rons ’98 M-3, is the same but with a more pronounced over-center feel.
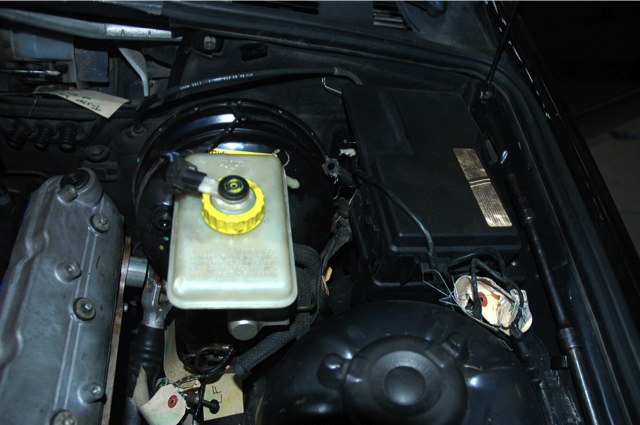
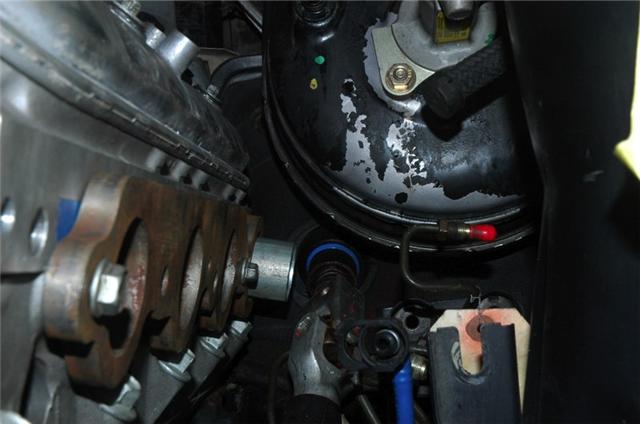
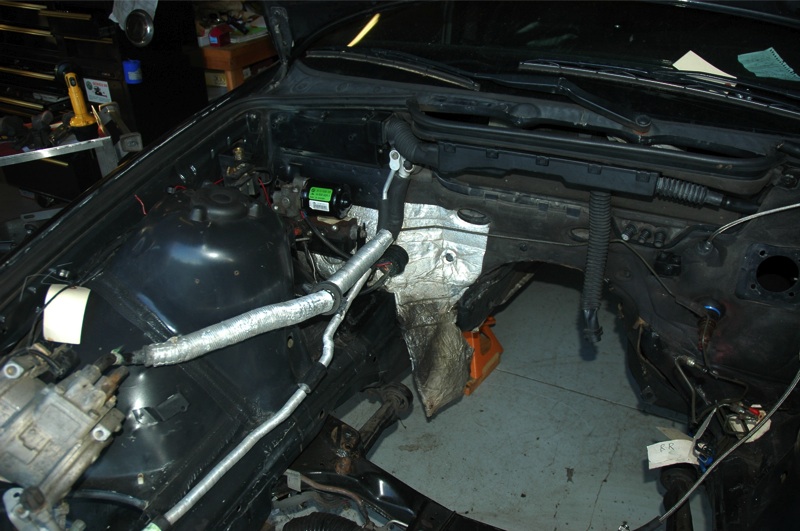
Spent a bit of the day upgrading my DIY brake pressure bleeder and setting up a BMW M/C reservoir cap for it. Hoping to have the ABS relocated and with new lines brakes done by the end of next week, or sooner. ;-)
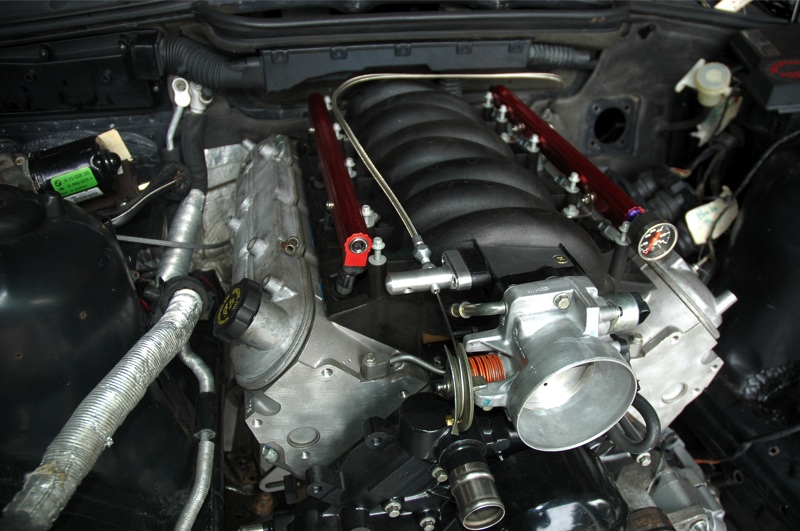
Pic from engine bay;

Pic from under the car;
Spent a bit of the day upgrading my DIY brake pressure bleeder and setting up a BMW M/C reservoir cap for it. Hoping to have the ABS relocated and with new lines brakes done by the end of next week, or sooner. ;-)
Pic from engine bay;
Pic from under the car;
05-11-2010, 03:05 PM
#67
Forgot the EFI update�
Made up my mind to go with the GM PCM and GM cruise control.
Sold the WOLF V500 and found Chevy Thunder, who will set you up with a stand alone GM PCM and harness for your LSx conversion. He sets some basic settings in the PCM such as tach signal to 6 cylinder, VATS delete, CAGS delete, sets the speed input to match whatever your gearing and tire size is, etc. He also custom builds the harness to whatever length you need to fit your application, including all the connectors you need such as the DLC, your choice fuel injector connector style, O-2 sensor connectors style, 3 wire or 5 wire MAF, coil sub harness connectors, GM cruise control, etc. Also includes the necessary relays and fuses for fuel pump, PCM power, cooling fans, configures for single or dual fan, your choice. The PCM is left unlocked for future tuning if you so desire. I received the PCM and harness and WOW! Every wire/connector is labeled for easy hook up. Relays, fuses, etc. Also included is a very thorough CD regarding many aspects of installing the LSx and PCM including diagrams etc. Very very helpful for anyone doing an LSx conversion.
I also did a bit of research and picked up the HP-Tuners pro suite so I can fine tune everything once it is up and running. Already been using the HP-Tuners to diagnose hung 2nd gear shifts and low idle swings on my wifes Suburban, (TPS/connector issues along with MAP sensor going out).
On his web site is tons of LSx info, PCM pin outs, how to measure your car to determine how long you need the PCM harness to be, etc. Lots of other pages hidden on the site that aren�t accessed from the main pages, just surf around�
http://www.chevythunder.com/
The LSx stuff;
http://www.chevythunder.com/ls1_page_1.htm
Made up my mind to go with the GM PCM and GM cruise control.
Sold the WOLF V500 and found Chevy Thunder, who will set you up with a stand alone GM PCM and harness for your LSx conversion. He sets some basic settings in the PCM such as tach signal to 6 cylinder, VATS delete, CAGS delete, sets the speed input to match whatever your gearing and tire size is, etc. He also custom builds the harness to whatever length you need to fit your application, including all the connectors you need such as the DLC, your choice fuel injector connector style, O-2 sensor connectors style, 3 wire or 5 wire MAF, coil sub harness connectors, GM cruise control, etc. Also includes the necessary relays and fuses for fuel pump, PCM power, cooling fans, configures for single or dual fan, your choice. The PCM is left unlocked for future tuning if you so desire. I received the PCM and harness and WOW!
Every wire/connector is labeled for easy hook up. Relays, fuses, etc. Also included is a very thorough CD regarding many aspects of installing the LSx and PCM including diagrams etc. Very very helpful for anyone doing an LSx conversion. I also did a bit of research and picked up the HP-Tuners pro suite so I can fine tune everything once it is up and running. Already been using the HP-Tuners to diagnose hung 2nd gear shifts and low idle swings on my wifes Suburban, (TPS/connector issues along with MAP sensor going out).
On his web site is tons of LSx info, PCM pin outs, how to measure your car to determine how long you need the PCM harness to be, etc. Lots of other pages hidden on the site that aren�t accessed from the main pages, just surf around�
http://www.chevythunder.com/
The LSx stuff;
http://www.chevythunder.com/ls1_page_1.htm
05-12-2010, 07:34 PM
#69
Haven’t touched the brake lines yet tough I keep threatening to. I am short one little custom bracket for the ABS sensor, with that in hand I would be far more inclined to finish the brakes 100%. ;-)
Today’s distraction was the throttle which is now 100%. I have the clutch and throttle 100%.
Used the Lokar 36” LS1 cable and it fits perfectly. Length is perfect, clevis fits the BMW pedal perfectly, throttle travel is perfect, TB hits WOT with .050” between the pedal and the pedal stop on the floorboard, couldn’t be any easier. Only actual work involved was altering the angle of the firewall penetration so the throttle cable ferrule was aimed more directly at the pedal for smoother actuation.
Next on the to-do list in order of priority;
Brake lines for the ABS relocate.
Heater hose and dual zone climate control valve relocate.
Swap the diff flange out to the 4 bolt style.
Mount the cruise control module and figure out the A/C.
Repair the rear shock tower mounts, (removed the rear tires and WOWZERS! Shock tower sheet metal is literally separating from the body!)
Lokar Clevis fits BMW pedal perfectly!
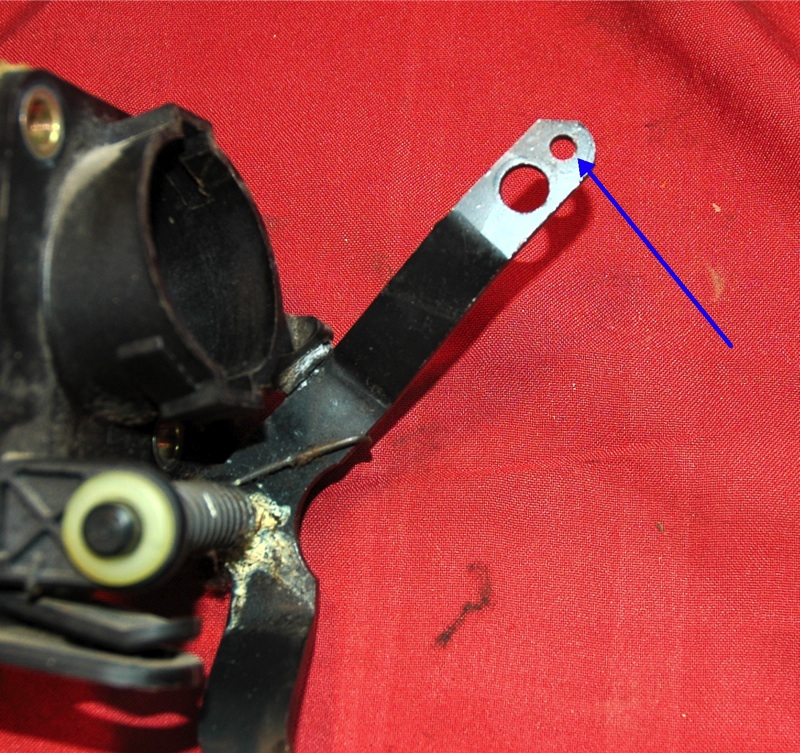
Throttle cable connected and routed.
Today’s distraction was the throttle which is now 100%. I have the clutch and throttle 100%.
Used the Lokar 36” LS1 cable and it fits perfectly. Length is perfect, clevis fits the BMW pedal perfectly, throttle travel is perfect, TB hits WOT with .050” between the pedal and the pedal stop on the floorboard, couldn’t be any easier. Only actual work involved was altering the angle of the firewall penetration so the throttle cable ferrule was aimed more directly at the pedal for smoother actuation.
Next on the to-do list in order of priority;
Brake lines for the ABS relocate.
Heater hose and dual zone climate control valve relocate.
Swap the diff flange out to the 4 bolt style.
Mount the cruise control module and figure out the A/C.
Repair the rear shock tower mounts, (removed the rear tires and WOWZERS! Shock tower sheet metal is literally separating from the body!)
Lokar Clevis fits BMW pedal perfectly!
Throttle cable connected and routed.
05-14-2010, 10:08 PM
#70
Small update.
Pulled the engine/trans out of the car and “finally” relocated the ABS module to the passenger side behind the strut tower.
Drilled the spot welds that held the blower motor tray that was in this position, using the ABS module mount brackets cut off from the driver side, hastily fused them to new sheetmetal to hold the module in its new location. Welds look like….. well… lets just say pigeon poo is more aesthetic, but it works. Welding is not one of my strong points.
If time permits this weekend, I plan to have the ABS module plumbed.
Plenty of room to mount the GM cruise control module next to the ABS module and the climate control valves under the ABS module, if I don’t mount them where the ABS module used to reside under the brake M/C.
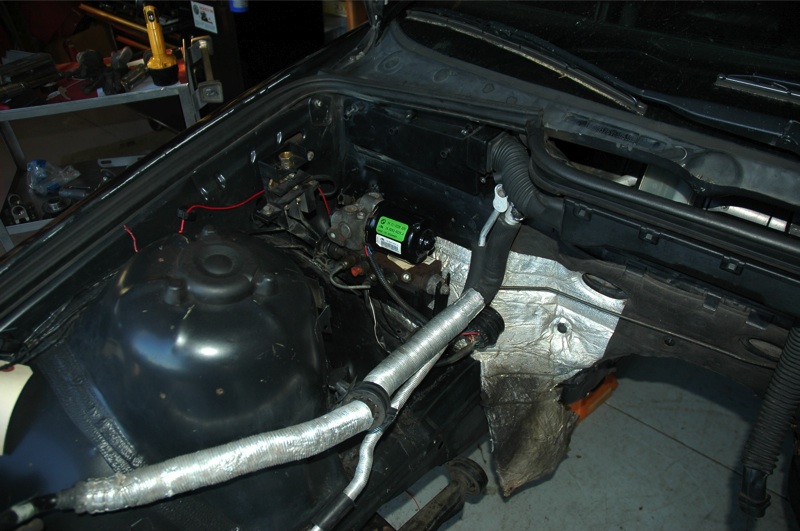
05-15-2010, 09:15 PM
#72
Spent today cutting, bending, and flaring some brake tubing. All four wheels are now hydraulically connected to the ABS module, just need to plumb the M/C to the ABS module and the return lines for the ABS module. Hoping to finish the brakes 100% this coming week, if possible. ;-)
Will tidy up the routing of the brake lines once the M/C lines are plumbed in.

Will tidy up the routing of the brake lines once the M/C lines are plumbed in.
05-21-2010, 08:13 PM
#73
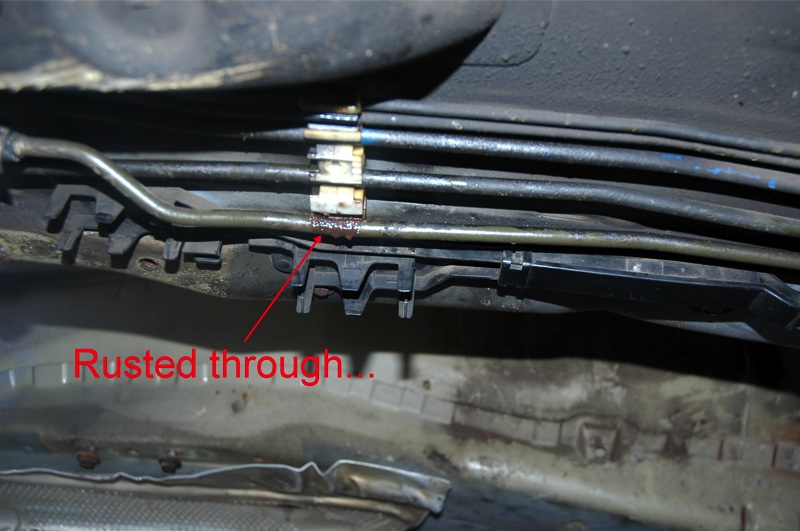
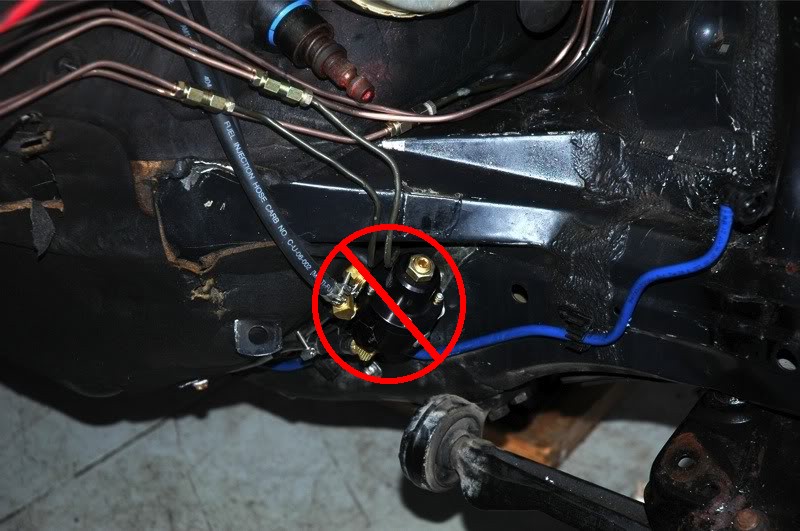
Finished up the fuel lines 100% today. Mallory Fuel Pressure regulator tucked nice and tidy under the little ledge where the driver frame rail meets the firewall. Connected the fuel lines to the intake manifold and energized the fuel pump checking for leaks. There was a leak, not from any of the new fuel lines but from the hard line that runs between the tank and the fuel filter was leaking where it passes through the forward most hanger! This car spent some time on the East Coast and its owner apparently drove this car around during the winter there. Some of that awesome rust accelerating agent used on the roads back east made its way between the rubber hanger and the fuel line itself where it went to work rusting through the fuel line! I happened to have some used 8mm fuel lines from a Datsun Z car that is in excellent condition, cut it to length, added appropriate bends, swaged a small flare on the ends, back in business.
Also finished up the Brake M/C lines a few days ago. All that is left with the brakes is to install the ABS travel sensor bracket when it arrives so I can install the pedal assy then bleed the brakes.
Also on the list is the heater valve and heater hose routing, I have a couple ideas in mind…
Also finished up the Brake M/C lines a few days ago. All that is left with the brakes is to install the ABS travel sensor bracket when it arrives so I can install the pedal assy then bleed the brakes.
Also on the list is the heater valve and heater hose routing, I have a couple ideas in mind…
08-01-2010, 11:33 PM
#75
Been a couple months, about time for an update�
I�m still alive, gaining a little weight, getting older, and still married. Oldest daughter graduated high school, she also got her drivers license and has commandeered my only mode of transportation. Summer weather has been real mild, actually sort of a weird summer weather wise. Our annual camp-in this year was fantastic, thank you to all that came out. The dusty hulk of steel that is close to being evicted, running or not, is still in the shop and on jack stands.
Water temp sendors AND sensors, BMW EFI, BMW Gauge and LSx, measured, (Senders and sensors tested were BMW BOSCH connection/square 2 prong; Black top, Green Top, Brown/Tan top, 4 prong prong round top, early Datsun EFI and GM LSx. Of interesting note is that all the BMW 2 prong EFI and Datsun EFI sensors were within 2% of each tother from 60-20 degrees F).
First the good news.
The resistance values-vs-temp values for the instrument gauges on ALL E36 cars, '92-'99 are the same! We all have been speculating they were different, come to find out they aren�t. BMW originally utilized two separate sensors/senders, (one for the EFI, other for the gauge), on the �92-�95 cars then in �96 combined them into one housing for the later cars, the 4 prong sensor/sender and retained the same exact values for both DME and gauge. :buttrock
Now the great news! :alright
What that means for anyone doing the 92-�99 E36, (318, 323, 325, 328, M3,) LSx conversion is the �96+ 4 prong sensor/sender works with their gauge and threads directly into the LSx head, no drilling, tapping, bushings, adapters etc to use the earlier 2 prong sensor, unless you want to. :confused Just deduce which 2 prongs for the gauge, (easy to do with the Bentley manual and an OHM meter), and you�re there.
As for the pig tail, many other BMW�s used this same connector, easy to find in wrecking yards on other cars.
The just ho-hum news.
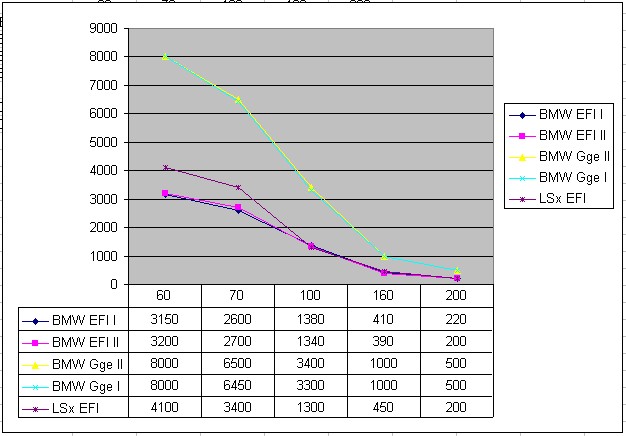
The LSx PCM sensor has a slightly different curve/slope compared the BMW EFI temps sensor, enough so that you wont want to use the BMW DME sensor for the LSx PCM, (see chart below). One could possibly adjust the CLT values using one of the tuning suites, I am pretty sure it�s just easier to install the GM temps sensor in the other head and be done with it. For what it�s worth, ALL GM temp sensors coolant and air temp have the same resistance to temp values, across the board, Pontiac, Olds, Chevrolet, etc, applicable to all GM Multi Port EFI vehicles.
LEGEND!
X axis= Degrees Fahrenheit.
Y axis = resistance in OHMS.
BMW EFI I = OBD-I DME temp sensor.
BMW EFI II = OBD-II DME temp sensor.
BMW Gge I = OBD-I gauge temp sender.
BMW Gge II = OBD-II gauge temp sender.
LSx EFI = PCM temp sensor.
There seems to be a down side to these BMW temp gauges. I spent a bit of time researching this and here is what I found.
BMW incorporated some form of buffer within the instrument cluster itself that holds the temp needle straight up, middle of the gauge when the engine is between 140-230ish degrees F. If the coolant temp breaches 230-ish then the gauge will swing from the middle up to HOT, not an incremental climb as one would expect or hope for as the engine gets warmer. The sender itself is analog like any other sender for a temp gauge, this buffering is done in the instrument cluster. Some feel the Euro cluster has less of a buffer but I was not able to find any evidence to support or deny that claim. There is a bit of speculation as to why BMW did this, turning a perfectly useful analog gauge into useless cold hot dial, beneficial no one. (theories such a people are getting so stupid that when they wee gauge move from center they panic and take their car to the dealer so this prevents unnecessary warranty claims, etc). Regardless, I see no point in trying to figure out why BMW did this, it is what it is, any discussion should really be centered around a possible solution to obtain a true analog temp gauge. Some have talked about trying to remove the buffer in the instrument itself, others have successfully replaced the internal guts of the temp gauge with VDO guts, stock needle and now have a gauge that indicates temperature on an analog scale. If someone finds a way to eliminate the buffer itself or other way so to get around this, please share, for now, here is what I found;
The issue, for those interested in reading;
http://forums.bimmerforums.com/forum....php?t=1208832
http://forums.bimmerforums.com/forum....php?t=1480682
http://m3forum.net/m3forum/showthread.php?t=324399
Fixes;
http://forums.bimmerforums.com/forum....php?t=1105631
http://forums.bimmerforums.com/forum...d.php?t=776813
I tried to verify this �buffer� thing in my car using a 0-10k potentiometer, (Variable resistor), no joy. I think I may to finish up more of the wiring before my instrument cluster will allow the temp gauge to function?!
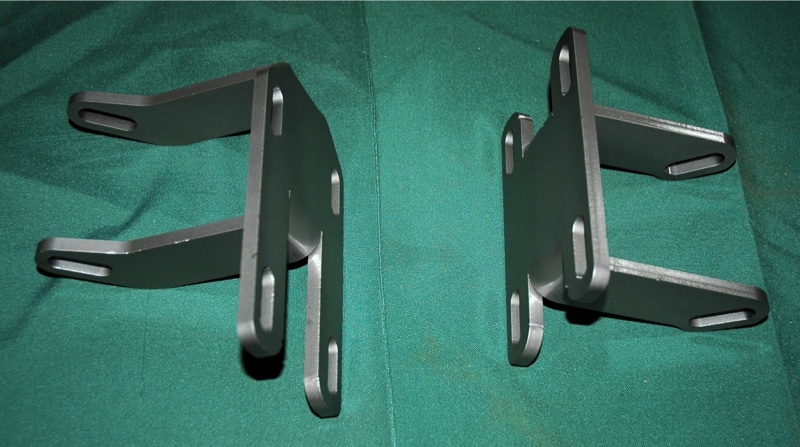
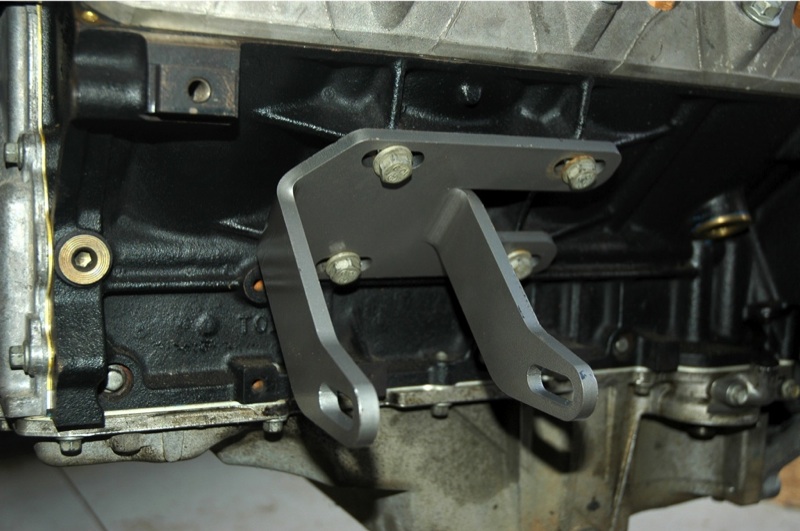
In other recent news, received a set of prototype headers to mock up in the car in hopes of finalizing placement of the engine mounts, headers need a bit of work still, we are still up in the air on actual mount design/placement. Though with these headers mocked up I did learn that my choice for location of the Mallory Fuel Pressure Regulator was a poor choice. Headers were within 1/8� to 1/4� of the FPR. Removed the FPR and installed the Corvette FPR/filter in place of the OE BMW filter and all is well now. Connected the battery, (it still has power, even after sitting for over a year!) pressurized the fuel system, fuel pressure is right at 59-60 PSI. Probably should consider ordering another pump to have on hand in case this one dies once I get it on the road. Car had 19x,xxx miles when I put up on jackstands over a year ago, no idea how many miles on this pump and probably shouldn�t trust it especially after sitting for so long and then ramping up the fuel pressure by 33%.
Another note for those of you using the Vette FPR, be aware that if your PCM came from a vehicle that had a FPR that utilized vacuum reference such as the trucks, (not sure about F-bodies), your fuel map will need the appropriate compensation to adjust for not having the Manifold pressure reference. If your PCM came from a vehicle that didn�t have the vacuum reference FPR, no worries.
I�m still alive, gaining a little weight, getting older, and still married. Oldest daughter graduated high school, she also got her drivers license and has commandeered my only mode of transportation. Summer weather has been real mild, actually sort of a weird summer weather wise. Our annual camp-in this year was fantastic, thank you to all that came out. The dusty hulk of steel that is close to being evicted, running or not, is still in the shop and on jack stands.
Water temp sendors AND sensors, BMW EFI, BMW Gauge and LSx, measured, (Senders and sensors tested were BMW BOSCH connection/square 2 prong; Black top, Green Top, Brown/Tan top, 4 prong prong round top, early Datsun EFI and GM LSx. Of interesting note is that all the BMW 2 prong EFI and Datsun EFI sensors were within 2% of each tother from 60-20 degrees F).
First the good news.
The resistance values-vs-temp values for the instrument gauges on ALL E36 cars, '92-'99 are the same! We all have been speculating they were different, come to find out they aren�t. BMW originally utilized two separate sensors/senders, (one for the EFI, other for the gauge), on the �92-�95 cars then in �96 combined them into one housing for the later cars, the 4 prong sensor/sender and retained the same exact values for both DME and gauge. :buttrock
Now the great news! :alright
What that means for anyone doing the 92-�99 E36, (318, 323, 325, 328, M3,) LSx conversion is the �96+ 4 prong sensor/sender works with their gauge and threads directly into the LSx head, no drilling, tapping, bushings, adapters etc to use the earlier 2 prong sensor, unless you want to. :confused Just deduce which 2 prongs for the gauge, (easy to do with the Bentley manual and an OHM meter), and you�re there.
As for the pig tail, many other BMW�s used this same connector, easy to find in wrecking yards on other cars.

The just ho-hum news.
The LSx PCM sensor has a slightly different curve/slope compared the BMW EFI temps sensor, enough so that you wont want to use the BMW DME sensor for the LSx PCM, (see chart below). One could possibly adjust the CLT values using one of the tuning suites, I am pretty sure it�s just easier to install the GM temps sensor in the other head and be done with it. For what it�s worth, ALL GM temp sensors coolant and air temp have the same resistance to temp values, across the board, Pontiac, Olds, Chevrolet, etc, applicable to all GM Multi Port EFI vehicles.
LEGEND!
X axis= Degrees Fahrenheit.
Y axis = resistance in OHMS.
BMW EFI I = OBD-I DME temp sensor.
BMW EFI II = OBD-II DME temp sensor.
BMW Gge I = OBD-I gauge temp sender.
BMW Gge II = OBD-II gauge temp sender.
LSx EFI = PCM temp sensor.
There seems to be a down side to these BMW temp gauges. I spent a bit of time researching this and here is what I found.
BMW incorporated some form of buffer within the instrument cluster itself that holds the temp needle straight up, middle of the gauge when the engine is between 140-230ish degrees F. If the coolant temp breaches 230-ish then the gauge will swing from the middle up to HOT, not an incremental climb as one would expect or hope for as the engine gets warmer. The sender itself is analog like any other sender for a temp gauge, this buffering is done in the instrument cluster. Some feel the Euro cluster has less of a buffer but I was not able to find any evidence to support or deny that claim. There is a bit of speculation as to why BMW did this, turning a perfectly useful analog gauge into useless cold hot dial, beneficial no one. (theories such a people are getting so stupid that when they wee gauge move from center they panic and take their car to the dealer so this prevents unnecessary warranty claims, etc). Regardless, I see no point in trying to figure out why BMW did this, it is what it is, any discussion should really be centered around a possible solution to obtain a true analog temp gauge. Some have talked about trying to remove the buffer in the instrument itself, others have successfully replaced the internal guts of the temp gauge with VDO guts, stock needle and now have a gauge that indicates temperature on an analog scale. If someone finds a way to eliminate the buffer itself or other way so to get around this, please share, for now, here is what I found;
The issue, for those interested in reading;
http://forums.bimmerforums.com/forum....php?t=1208832
http://forums.bimmerforums.com/forum....php?t=1480682
http://m3forum.net/m3forum/showthread.php?t=324399
Fixes;
http://forums.bimmerforums.com/forum....php?t=1105631
http://forums.bimmerforums.com/forum...d.php?t=776813
I tried to verify this �buffer� thing in my car using a 0-10k potentiometer, (Variable resistor), no joy. I think I may to finish up more of the wiring before my instrument cluster will allow the temp gauge to function?!
In other recent news, received a set of prototype headers to mock up in the car in hopes of finalizing placement of the engine mounts, headers need a bit of work still, we are still up in the air on actual mount design/placement. Though with these headers mocked up I did learn that my choice for location of the Mallory Fuel Pressure Regulator was a poor choice. Headers were within 1/8� to 1/4� of the FPR. Removed the FPR and installed the Corvette FPR/filter in place of the OE BMW filter and all is well now. Connected the battery, (it still has power, even after sitting for over a year!) pressurized the fuel system, fuel pressure is right at 59-60 PSI. Probably should consider ordering another pump to have on hand in case this one dies once I get it on the road. Car had 19x,xxx miles when I put up on jackstands over a year ago, no idea how many miles on this pump and probably shouldn�t trust it especially after sitting for so long and then ramping up the fuel pressure by 33%.
Another note for those of you using the Vette FPR, be aware that if your PCM came from a vehicle that had a FPR that utilized vacuum reference such as the trucks, (not sure about F-bodies), your fuel map will need the appropriate compensation to adjust for not having the Manifold pressure reference. If your PCM came from a vehicle that didn�t have the vacuum reference FPR, no worries.
08-07-2010, 09:30 AM
#77
Thank you for your support, I have been trying but that ball is not in my court. This project started over a year ago, was supposed to be on the road a couple months ago. Made some good progress towards getting it on the road but still haven't even mounted the engine to the car yet! So close, yet so far. In going about this in a particular manner I'm at the mercy of vendors. Yeah, I could ditch the vendors and finish this 100% myself, but the time period I needed to make that decision of vendors or order materials and start fabrication myself has since passed and I don't have the budget to buy another car and finish this, it's one or the other, I need transportation and now. If this isn't moving forward and real soon, it's for sale or trade for a comparable condition running BMW E36 M3 or BMW E39 5 series 6-cyl manual trans car.
Last edited by BRAAPZ; 08-07-2010 at 09:46 AM. Reason: Typo's.
08-07-2010, 12:51 PM
#78
Hey i understand your pain, times are really hard right now, its also been about a year and couple months for me and my project, i build everything and now the car starts and run, but i just don't have the money to get the rest of the parts i need like new clutch,water pump, radiator with fans, and finish running the exhaust pipes, plus interior. its taking some time, but hey its a project car. hand in there men, i think you will finish soon enough, stay positive and positive things happens my friend!!! thanks a lot for all your help with all of my questions in my build thanks
08-25-2010, 07:48 PM
#79
Watching all the other E36 V8 conversions come to life and drive down the road over the past few weeks on Bimmerforums is encouraging.
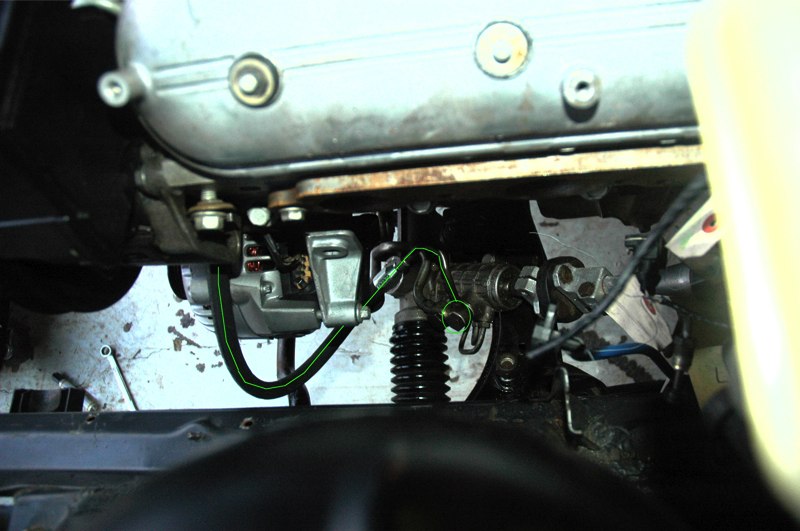
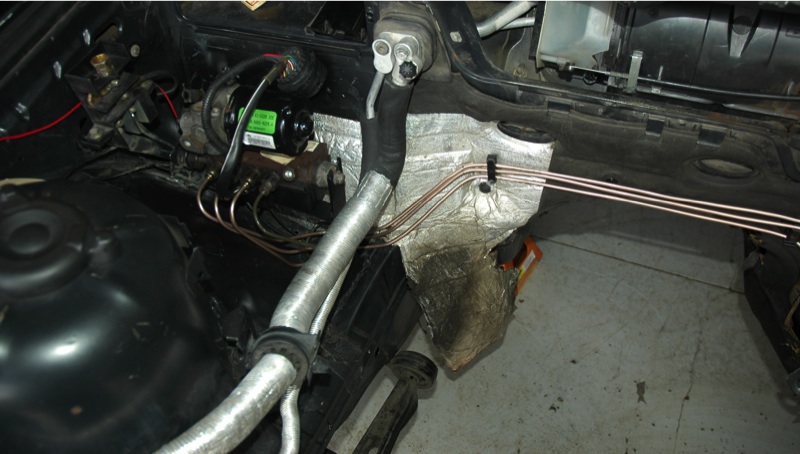
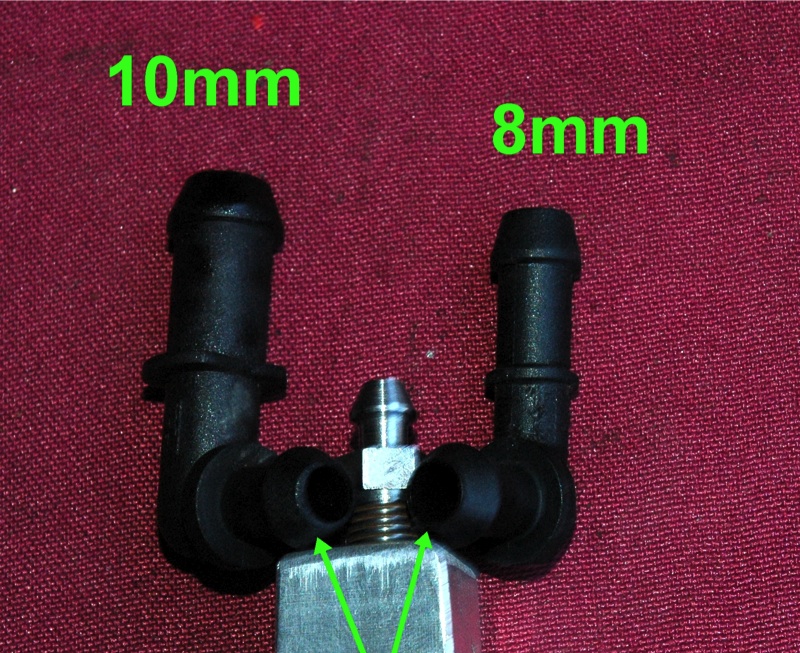
Engine is still sitting beside the car though I did get the low pressure brake line from the reservoir to the ABS module finished and connected. Ran a 3/8� hard line across the firewall with continual slope so any air in this large of line will naturally float up to the master cylinder reservoir or the bleeder block I fabbed and attached tot he ABS module. This bleeder block has two fittings that spaced out perfectly and directly plugs into the ABS module replacing those black plastic fittings. The Bleeder block is hollowed out with an open cavity at the top with a bleeder screw to seal it. Line out the bottom is 10mm with a small section of the 10mm BMW brake hose joining to the 3/8� line and the bleeder block.
Diagram showing the slope and relative elevations;
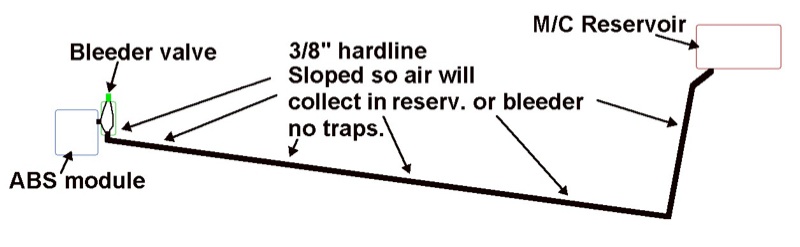
Low pressure line is lightly highlighted in GREEN;
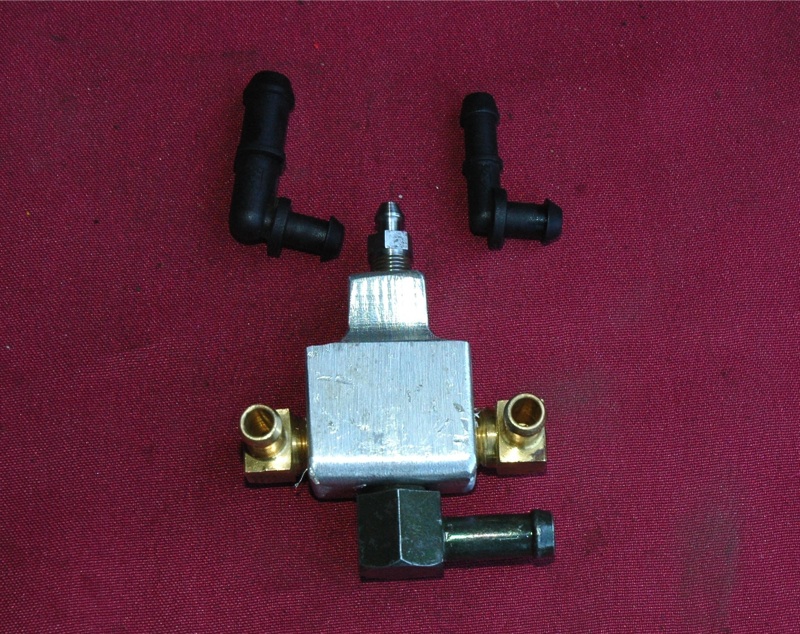
Bleeder block, (excuse the crude work and finish, losing ambition to take my time and make it nice, just want it done)!
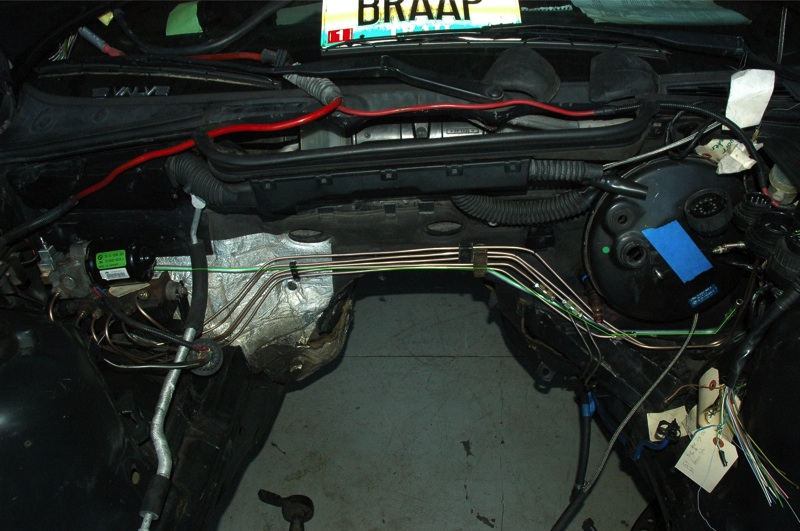
Bleeder block installed in the ABS module;

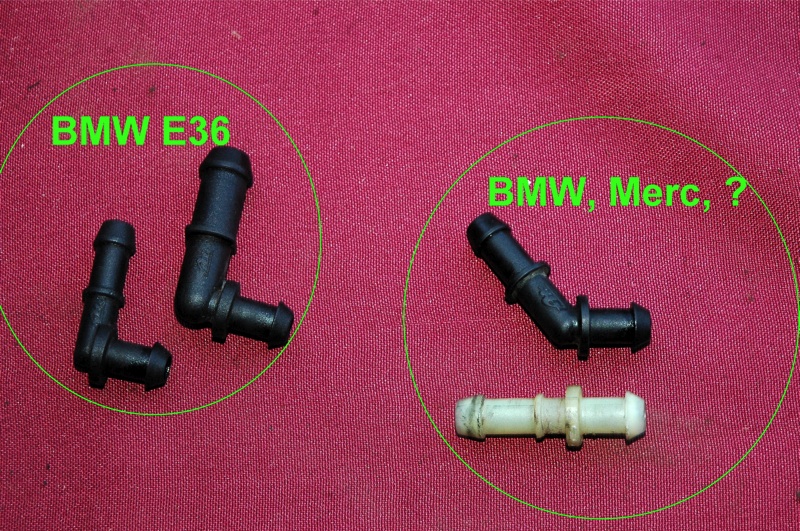
For those relocating their ABS modules, both of those black plastic fittings have the same size orifice opening even though they have two different size hoses, for some odd reason. As such, you are not confined to use 10mm for the larger one. Other European cars with ABS modules have similar fittings and at different angles, 45 degrees and straight show below, which may help in routing those low pressure lines.
Till the next update, hopefully before winter sets in, happy motoring...
Engine is still sitting beside the car though I did get the low pressure brake line from the reservoir to the ABS module finished and connected. Ran a 3/8� hard line across the firewall with continual slope so any air in this large of line will naturally float up to the master cylinder reservoir or the bleeder block I fabbed and attached tot he ABS module. This bleeder block has two fittings that spaced out perfectly and directly plugs into the ABS module replacing those black plastic fittings. The Bleeder block is hollowed out with an open cavity at the top with a bleeder screw to seal it. Line out the bottom is 10mm with a small section of the 10mm BMW brake hose joining to the 3/8� line and the bleeder block.
Diagram showing the slope and relative elevations;
Low pressure line is lightly highlighted in GREEN;
Bleeder block, (excuse the crude work and finish, losing ambition to take my time and make it nice, just want it done)!
Bleeder block installed in the ABS module;
For those relocating their ABS modules, both of those black plastic fittings have the same size orifice opening even though they have two different size hoses, for some odd reason. As such, you are not confined to use 10mm for the larger one. Other European cars with ABS modules have similar fittings and at different angles, 45 degrees and straight show below, which may help in routing those low pressure lines.
Till the next update, hopefully before winter sets in, happy motoring...
08-25-2010, 08:57 PM
#80

There seems to be a down side to these BMW temp gauges. I spent a bit of time researching this and here is what I found.
BMW incorporated some form of buffer within the instrument cluster itself that holds the temp needle straight up, middle of the gauge when the engine is between 140-230ish degrees F. If the coolant temp breaches 230-ish then the gauge will swing from the middle up to HOT, not an incremental climb as one would expect or hope for as the engine gets warmer. The sender itself is analog like any other sender for a temp gauge, this buffering is done in the instrument cluster. Some feel the Euro cluster has less of a buffer but I was not able to find any evidence to support or deny that claim. There is a bit of speculation as to why BMW did this, turning a perfectly useful analog gauge into useless cold hot dial, beneficial no one. (theories such a people are getting so stupid that when they wee gauge move from center they panic and take their car to the dealer so this prevents unnecessary warranty claims, etc). Regardless, I see no point in trying to figure out why BMW did this, it is what it is, any discussion should really be centered around a possible solution to obtain a true analog temp gauge. Some have talked about trying to remove the buffer in the instrument itself, others have successfully replaced the internal guts of the temp gauge with VDO guts, stock needle and now have a gauge that indicates temperature on an analog scale. If someone finds a way to eliminate the buffer itself or other way so to get around this, please share, for now.
Think all of us have been there. My swap is on the road, not yet my e36, but there's going to be some going back to making some things simply look better.